


126
Placing Originals on the Product
Follow the instructions here to place your original documents or photos on the product.
Caution:
Do not place anything on top of your product or use its cover as a writing surface to avoid
damaging it.
Placing Originals on the Scanner Glass
Placing Originals in the Automatic Document Feeder
Placing Originals on the Scanner Glass
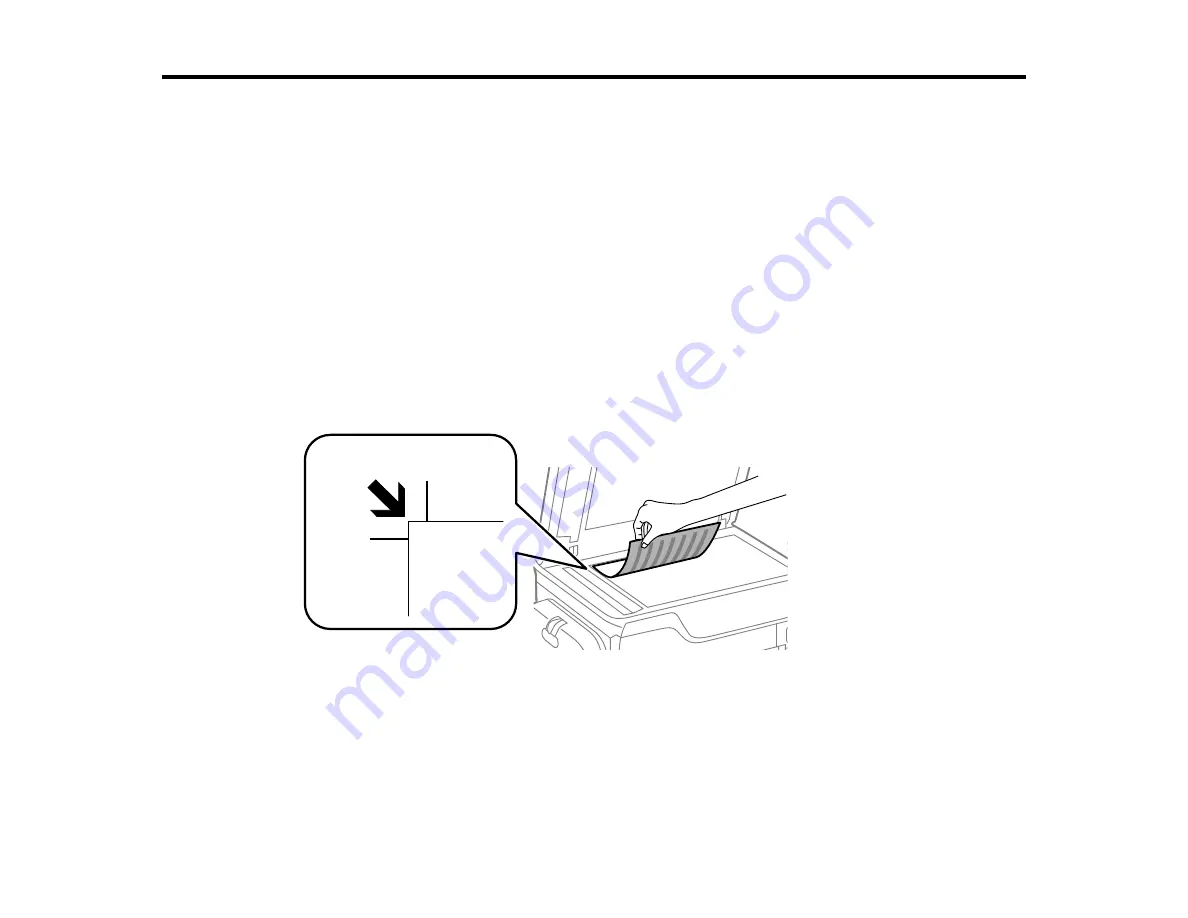
You can place originals up to this size on the scanner glass: A3 (11.7 × 16.5 inches [297 × 420 mm]).
1.
Open the document cover.
2.
Place your original facedown on the scanner glass with the top facing into the corner. Slide the
original to the edges of the indicated corner.
Note:
You can place multiple originals on the scanner glass. Just make sure they are at least
0.8 inch (20 mm) away from each other.
Note:
The edges of your original may be cropped by 0.06 inch (1.5 mm) from the edge of the
scanner glass.
Summary of Contents for WF-C869R
Page 1: ...WF C869R User s Guide ...
Page 2: ......
Page 20: ...20 8 Attach the front cover to the stands 9 Remove the output tray from the product ...
Page 25: ...25 5 Remove the output tray 6 Remove paper cassette 2 from the product ...
Page 56: ...56 8 Optional cabinet 1 Rear paper feed edge guides 2 Paper support and extension ...
Page 74: ...74 Parent topic Product Basics Related topics Wi Fi or Wired Networking ...
Page 223: ...223 You see an Epson Scan 2 window like this ...
Page 225: ...225 You see an Epson Scan 2 window like this ...
Page 230: ...230 You see this window ...
Page 246: ...246 DSL connection 1 Telephone wall jack 2 DSL filter 3 DSL modem ...
Page 247: ...247 ISDN connection 1 ISDN wall jack 2 Terminal adapter or ISDN router ...
Page 329: ...329 6 Pull out rear cover 2 D2 7 Remove the roller cover inside the printer ...
Page 334: ...334 5 Open the rear cover E that matches with the paper cassette you removed ...
Page 343: ...343 You see a window like this 4 Click Print ...
Page 354: ...354 Parent topic Adjusting Print Quality Related topics Loading Paper ...
Page 388: ...388 3 Carefully remove any jammed paper 4 Pull out rear cover 2 D2 ...
Page 390: ...390 2 Open rear cover E on the optional paper cassette unit with the jammed paper ...
Page 393: ...393 4 Carefully remove any jammed pages ...
Page 394: ...394 5 Close the ADF cover then raise the document cover ...
Page 395: ...395 6 Carefully remove any jammed pages 7 Lower the document cover ...


