background image

22

 TM-J9000/J9100 User’s Manual 

English

4.

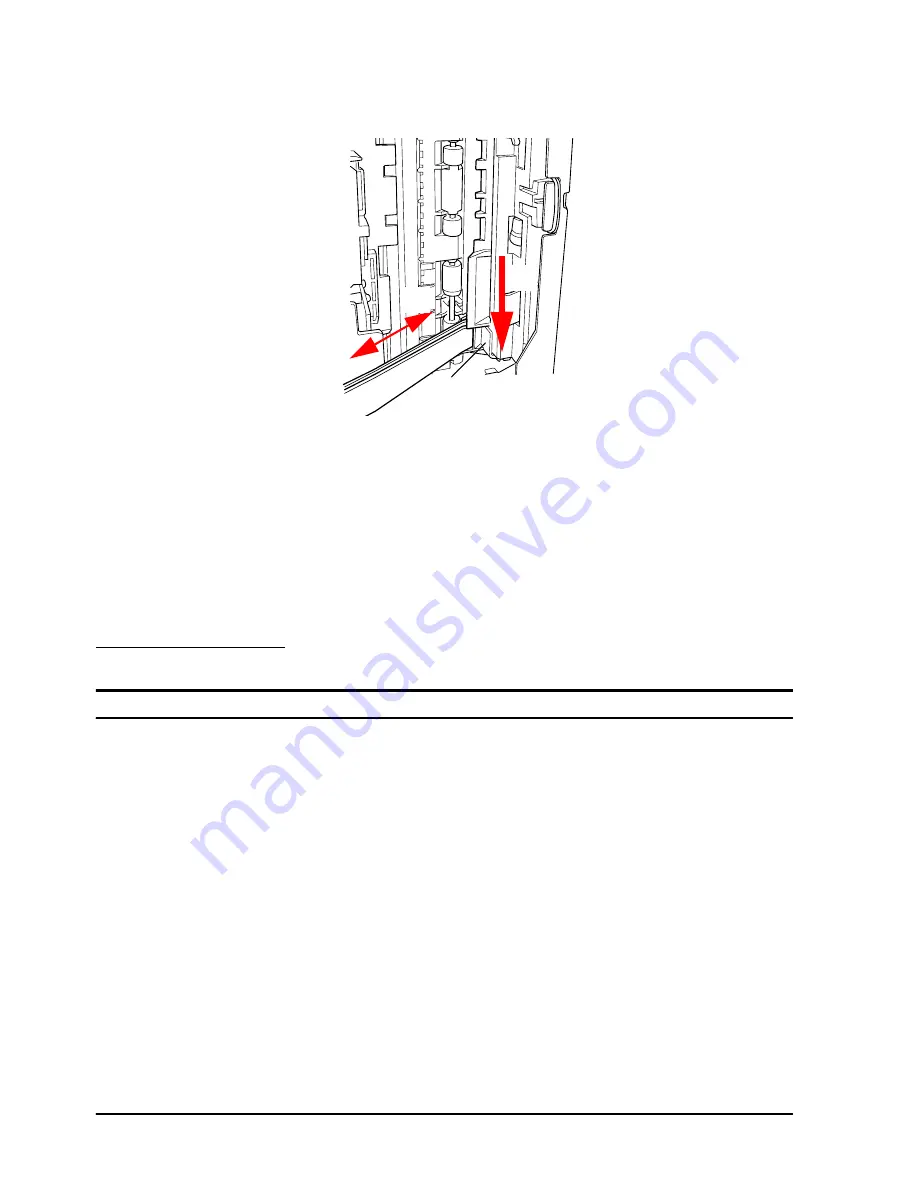
Slide the cleaning sheet down, and insert the edge into the TOF sensor 
while moving the sheet back and forth. 

5.

Clean the inside of the TOF sensor by moving the sheet back and forth 
4 or 5 times between the edge of the TOF sensor and the point where 
the cleaning sheet stops.

6.

Remove the cleaning sheet.

7.

Follow steps 4 and 5 in “Cleaning the Image Scanner” (page 20) to 
push in the scanner unit and attach the scanner cover.

Note:

Whenever you clean the TOF sensor, also clean the MICR mechanism. (See 
“Cleaning the MICR Unit” on page 18 for details.)

Troubleshooting 

ERROR

 LED is flashing or lit

The printer stops printing when the print head temperature goes up 
or down to an abnormal value. Printing restarts automatically when 
the print head temperature returns to normal.

Make sure that the printer covers are properly closed.

If a paper jam has occurred, remove the jammed paper, referring to 
the next section “Paper Jams.”

Turn off the printer, and then turn it on after a while. If the error 
persists, consult a qualified service person for repair.

When no ink cartridge is installed, the ERROR LED comes on. Install 
an ink cartridge.

When the roll paper is enabled but no paper roll is installed, the 

ERROR

 LED comes on. Install a paper roll.

TOF sensor

Summary of Contents for TM-J9000 Series

Page 1: ...User s Manual 405074707 ...

Page 2: ...third parties as a result of accident misuse or abuse of this product or unauthorized modifications repairs or alterations to this product or excluding the U S failure to strictly comply with Seiko Epson Corporation s operating and maintenance instructions Seiko Epson Corporation shall not be liable against any damages or problems arising from the use of any options or any consumable products othe...

Page 3: ...A EN 55024 IEC 61000 4 2 IEC 61000 4 3 IEC 61000 4 4 IEC 61000 4 5 IEC 61000 4 6 IEC 61000 4 8 IEC 61000 4 11 FCC Compliance Statement For American Users This equipment has been tested and found to comply with the limits for a Class A digital device pursuant to Part 15 of the FCC Rules These limits are designed to provide reasonable protection against harmful interference when the equipment is ope...

Page 4: ...to fire Immediately unplug the equipment and contact your dealer or a Seiko Epson service center for advice Never attempt to repair this product yourself Improper repair work can be dangerous Never disassemble or modify this product Tampering with this product may result in injury or fire Be sure to use the specified power source Connection to an improper power source may cause fire Do not allow f...

Page 5: ...oading replacing roll paper To ensure safety unplug this product before leaving it unused for an extended period Before moving the product unplug it and unplug all cables connected to it If ink leaks out of the printer wipe up the ink with a cloth or similar material immediately and contact your dealer or a Seiko Epson service center for advice Notes on Usage When using the printer do not open the...

Page 6: ...gn to maintain safety and total system reliability Because this product was not intended for use in applications requiring extremely high reliability safety such as aerospace equipment main communication equipment nuclear power control equipment or medical equipment related to direct medical care etc please make your own judgment on this product s suitability after a full evaluation Purpose of Thi...

Page 7: ...eder Guide Feeding paper using the included feeder guide allows you to insert a check straight Also the auto sheet feeder ASF model printers can feed up to 25 checks without manual feeding Follow these steps to attach the feeder guide 1 Hold the edge of the feeder guide carefully Validation section Power switch Card entrance Scanner Control panel Roll paper section Feeder Roll paper cover open but...

Page 8: ...auto sheet feeder ASF model printer Follow the steps shown below to attach the pocket 1 Push down the pocket cover on the left of the printer and remove it Note To attach the cover again insert the cover while pushing it up 2 Make sure that the ejection lever is open If it is closed open it Note Be careful not to hurt your fingers on the lever edge Dowel of the feeder guide The ejection lever is o...

Page 9: ...as shown in the following picture Note To remove the pocket place the printer vertically as shown in the picture below then while pushing up the lever on the bottom of the pocket slightly push the pocket backward and then pull it up Insert the hooks on the four corners of the pocket into the holes indicated with the circles and move the pocket into place Stopper Push up the lever ...

Page 10: ...hen no ink cartridge is installed or it is time to replace the ink cartridge The printer goes off line and the ERROR LED comes on Note The TM J9000 has an INK LED for BLACK only whereas the TM J9100 has LEDs for both BLACK and COLOR To insure print quality some ink remains in the cartridge after the INK LED comes on PAPER OUT LED Comes on when the roll paper is out or almost out VALIDATION FEEDER ...

Page 11: ...this button to feed the roll paper Power Switch and Power Switch Cover Press the power switch to turn on or off the printer Note Never open a cover or turn off the printer while the POWER LED is flashing WARNING If a machine failure has occurred while the included power switch cover is attached unplug the power cable immediately Continued use may result in a fire hazard The power switch cover is i...

Page 12: ...convex part of the bottom of the ink cartridge or remove the transparent film on the bottom of the ink cartridge otherwise ink may leak A used cartridge may have some ink on the convex part of the bottom of the cartridge Avoid touching that part to keep your hands clean Seiko Epson recommends using genuine EPSON cartridges for your printer Products of other manufacturers may cause damages that are...

Page 13: ...ttom right of the printer 2 Make sure the INK LED is lit or flashing When using both the black ink and colored ink check which of the ink cartridge INK LEDs is lit or flashing 3 Hold the tab and open the ink cartridge cover 4 Hold the knob at the top of the used ink cartridge and lift the cartridge out of the printer 5 Take a new ink cartridge out of its packaging and remove the yellow tape CAUTIO...

Page 14: ...alled for the first time the printer uses ink to prepare for printing Do not turn off the power or open any cover while the POWER LED is flashing This causes the printer to restart the ink charging which wastes ink When the POWER LED stops flashing and stays on the printer is ready for printing Handling Used Ink Cartridges Dispose of the used ink cartridges as industrial waste Also observe the law...

Page 15: ...ped to the core They may cause paper jams To prevent paper jams make sure that nothing obstructs the paper coming out of the paper outlet and do not pull the paper being ejected Do not open the roll paper cover during printing or paper feeding 1 Turn on the printer power 2 Press the roll paper cover open button and open the roll paper cover 3 If a roll paper core is inside the printer remove it 4 ...

Page 16: ... ply paper Make sure that the checks have no curl bending especially on the corners warpage or wrinkles Do not use checks with paper clips staples adhesive tape or other foreign materials attached Do not open the covers while printing and processing are in progress Notes on Using the Image Scanner The printer uses the image scanner to read checks Be sure to use a USB interface because the image sc...

Page 17: ... result Ejecting Checks When a check is ejected and the VALIDATION FEEDER LED flashes again remove the check Scanning ID Card Image Data Notes on ID Card Reading Make sure that the ID card is flat and does not have excessive bending cracks folds or embossing Do not touch the external terminal when using an IC card Do not insert anything other than cards Do not open any covers while an operation is...

Page 18: ...en the card is pulled into the printer release it immediately Note When the card is pulled into the printer a part of it comes out of the card carrier slit at the back of the printer Be sure not to block this slit Doing so may cause incorrect reading of data 4 When the card is ejected and ID LED flashes again pull the card straight out of the slit Note Do not touch the card when it is being ejecte...

Page 19: ...ER LED starts flashing 2 From above the validation section insert a validation paper straight into the slot keeping the right side of the paper at the marked point shown in the following note Note Keep the edge of the validation paper in the position shown on the label in the picture below 3 When the validation paper is ejected and the VALIDATION FEEDER LED starts flashing pull the paper straight ...

Page 20: ...ng sheets They may cause a paper jam or machine failure Be sure to dispose of used cleaning sheets It is recommended to clean the MICR unit once per week or once every 2 000 checks for good reading results Follow these steps to clean the MICR unit 1 Turn off the printer 2 Open the roll paper cover and turn on the printer while pressing the CLEANING button 3 Press the CLEANING button once and close...

Page 21: ...ery 6 months or every 100 000 passes Follow these steps to clean the glass 1 Put your fingers on the pocket on the right side of the printer unlock the scanner cover and remove it upward 2 Put your fingers on the tab marked Pull Open and pull down the scanner unit Note When pulling down the scanner unit avoid knocking it against the table or anything else to protect it from an excessive impact ...

Page 22: ... unremovable substance In such case wipe the glass with a cloth lightly dipped in alcohol and after that wipe off all remaining alcohol Be careful not to spill liquid into the scanner mechanism or electronic components This could permanently damage the mechanism and circuitry 4 Press the section marked Close indicated by the circle in the picture below then push in the scanner unit until it clicks...

Page 23: ... dispose of used cleaning sheets It is recommended to clean the TOF sensor once per week or once every 2 000 checks 1 Fold a cleaning sheet into four parts lengthwise as shown in the illustration on the left on page 21 2 Follow Steps 1 and 2 in Cleaning the Image Scanner page 19 to remove the scanner cover and to pull down the scanner unit Note When pulling down the scanner unit avoid knocking it ...

Page 24: ...leaning the MICR Unit on page 18 for details Troubleshooting ERROR LED is flashing or lit The printer stops printing when the print head temperature goes up or down to an abnormal value Printing restarts automatically when the print head temperature returns to normal Make sure that the printer covers are properly closed If a paper jam has occurred remove the jammed paper referring to the next sect...

Page 25: ...t upward 2 Put your fingers on the tab marked Pull Open and pull down the scanner unit Note When pulling down the scanner unit avoid knocking it against the table or any other object to protect it from an excessive impact 3 Remove the jammed paper or card 4 Reverse the steps above to return the scanner unit to its original position Note If the scanner unit is not pushed in properly a cover open er...

Page 26: ...r cannot be removed easily open the ink cartridge cover to remove the paper Obtaining the Printer Driver and Technical Reference Guide Download the driver from the following web site to control the universal serial bus USB The technical reference guide describing related information on TM J9000 J9100 development can also be downloaded from this web site Customers in North America http pos epson co...

Page 27: ... Validation Font A Economy mode 7 5 lps Validation Font B Economy mode 11 lps Roll paper Font A Economy mode 10 1 Ips Roll paper Font B Economy mode 14 3 Ips Paper Validation Feeder Type Normal Dimension H W 68 100 152 230 mm 2 68 3 94 5 98 9 06 in minimum 68 mm 152 mm 2 68 5 98 in Thickness only single ply paper can be used 0 09 0 13 mm 0 0035 to 0 0051 in Roll paper Type Normal Width 76 0 5 mm M...

Page 28: ...of pulses energized for the print head Consumables Ink cartridge 20 000 000 characters using font B with EPSON standard print pattern in economy mode Temperature Printing 10 35 C 50 to 95 F Operating 10 40 C 50 to 104 F Storage When packed ink not filled 20 60 C 4 to 140 F within 120 hours at 20 C 4 F or 60 C 140 F With ink filled 20 40 C 4 104 F Humidity Printing 20 80 non condensing Operating 20...

Page 29: ...54 in area cannot be set Scanning speed Check 300 mm s 11 81 in s Card 120 mm s 4 72 in s Paper Scanned media Check normal paper Card ISO IEC7810 compliant Size Check W L 68 100 152 230 mm min 68 152 mm 2 64 3 84 5 98 9 06 in min 2 64 5 98 in Card W L 53 92 54 18 85 47 85 90 mm 2 123 2 133 3 365 3 382 in Thickness Check single ply 0 09 0 13 mm 0 00354 0 00512 in Card 0 5 0 84 mm 0 020 0 033 in Cur...

Page 30: ... possíveis danos no ambiente ou na saúde pública por favor separe este produto de outros lixos desta forma terá a certeza de que pode ser reciclado através de métodos não prejudiciais ao ambiente Para obter mais informações sobre os locais de recolha de lixo disponíveis contacte a sua junta de freguesia câmara municipal ou localonde comprou este produto Nederlands Op uw product is een label van ee...

Page 31: ... kartu su įprastinėmis buitinėmis šiukšlėmis Siekiant išvengti galiamos žalos aplinkai bei žmonių sveikatai prašome atskirti šį produktą nuo kitų atliekų ir įsitikinti kad jis būtų perdirbtas aplinkai nepavojingu būdu Jei reikia išsamesnės informacijos apie atliekų surinkimo ypatumus prašome kreiptis į savo vietos valdžios įstaigas arba į mažmeninį pardavėją iš kurio jūs įsigijote šį produktą Latv...

Page 32: ...Printed in China ...

Reviews: