


EPSON Stylus Pro 4400/4450/4800/4880/4880C
Revision C
Adjustment
Basic Adjustment
395
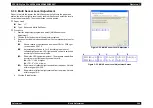
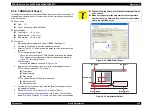
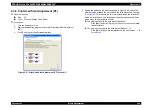
Figure 5-32. Adjustment pattern
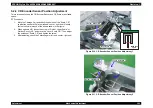
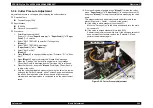
5.
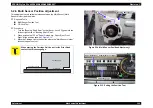
Open the top cover and move the "Carriage Unit" to the center of the
printer.
6.
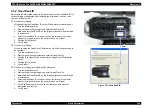
Loosen the four screws (A, B, C, and D) shown in
secure the head.
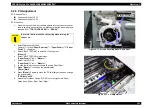
7.
Move the "Cam, Inclination, R" vertically and adjust the slant of the
print head.
z
If the upper side of the gap is wider (Pattern 1):
Lower the "Cam, Inclination, R".
z
If the bottom side of the gap is wider (Pattern 3):
Raise the "Cam, Inclination, R".
8.
Tighten the four screws that are loosened in
in the order
below.
A
→
B
→
C
→
D
Move the Carriage Unit to the home position and close the top cover.
9.
Click [Back] to go back to the previous screen, and perform
through
repeatedly until the adjustment is completed.
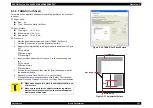
Figure 5-33. Print Head Slant Adjustment (PF) Screen (2)
Pattern 1
Pattern 2
Pattern 3
Paper Feed
Direction
Summary of Contents for Stylus Pro 4800 Portrait Edition
Page 9: ...C H A P T E R 1 PRODUCTDESCRIPTION ...
Page 113: ...C H A P T E R 2 OPERATINGPRINCIPLES ...
Page 156: ...C H A P T E R 3 TROUBLESHOOTING ...
Page 200: ...C H A P T E R 4 DISASSEMBLY ASSEMBLY ...
Page 366: ...C H A P T E R 5 ADJUSTMENT ...
Page 448: ...C H A P T E R 6 MAINTENANCE ...
Page 457: ...C H A P T E R 7 APPENDIX ...