Feature
This printer provides you with a variety of different printing options as
follows. For details, refer to the online
Reference Guide
.
Accessing the Online Reference
Guide
Follow these steps to access the online
Reference Guide
.
1. Insert the printer software CD in the CD-ROM drive.
2. For Windows, select
User Guides
in the Installer dialog box and click
. For Macintosh, double-click the
EPSON
icon. Then select
User
Guides
in the installer dialog box and click
.
Online Problem Solving
The EPSON’s Technical Support Web Site provide you with tips to help
solve problems. Access the Technical Support in the following ways:
For Windows users
You can also access them by clicking
Technical Support
in the Status
Monitor 3 dialog box or on the Main menu of the printer software.
For further information on the customer support services available in your
area, see the online
Reference Guide
.
For Macintosh users
1. Insert the CD in the CD-ROM drive.
2. Double-click the
EPSON
icon.
3. Select
Technical Support Web Site
, and click
.
For further information on the customer support services available in your
area, see the online
Reference Guide
.
Accessing the Printer Software
The printer software includes a printer driver and utilities. The printer driver
lets you choose from a wide variety of settings to get the best results from
your printer. The printer utilities help you check the printer and keep it in top
operating condition. Access the printer software as explained in this section.
For Windows users
From Windows applications
1. From the
File
menu of your application, click
. The Print dialog box
appears.
2. Select your printer, then click
Properties, Printer
,
Setup
, or
Options
to access the printer software. (Depending on your application, you may
need to click a combination of these buttons.)
Note:
When you access the printer software from a Windows application, the
settings that you make apply only to the application you are using.
From the Start menu
1. For Windows Me, 2000, NT 4.0, 98 and 95 users, click
Start
, point to
Settings
, then click
Printers
.
For Windows XP users, click
Start
, then click
Control Panel
, then click
Printers and other hardware
, then click
Printers and Faxes
.
2. For Windows Me, 98, and 95 users, select your printer, then click
Properties
on the File menu.
For Windows XP and 2000 users, select your printer, then click
Printing
Preferences
on the File menu.
For Windows NT 4.0 users, select your printer, then click
Document
Defaults
on the File menu.
For Macintosh users
You can access the various printer software dialog boxes as described
below.
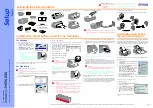
Replacing Ink Cartridges
You can replace an ink cartridge by using the Status Monitor utility installed
on your computer, or by using the printer's control panel. To replace an ink
cartridge or check ink levels using the Status Monitor utility, refer to “Using
the Status Monitor” in the online
Reference Guide
. To replace an ink
cartridge using the printer's control panel, follow the steps in this section.
Note:
❏
You cannot continue printing with one ink cartridge empty, even if the
other cartridge still contains ink. Before printing, replace the empty
cartridge.
❏
In addition to the ink used during document printing, ink is consumed
during the print head cleaning operation, during the self-cleaning cycle
which is performed when the printer is turned on, and during ink
charging when the ink cartridge is installed in the printer.
1. Make sure that the printer is on, but not printing. Then open the printer
cover.
2. Press the
H
ink button. The print head moves to the ink cartridge
replacement position.
c
Caution:
❏
Do not move the print head by hand, as this may damage the
printer. Always press the
H
ink button to move it.
❏
Whenever an ink cartridge is removed, be sure to protect the
ink supply area from dirt and dust. Do not touch the ink supply
port or its surrounding area.
3. Open the cartridge cover. Pinch the sides of the ink cartridge that you
want to replace.
4. Lift the cartridge out of the printer and dispose it properly. Do not take
the used cartridge apart or try to refill it.
5. Install the new ink cartridges as explained on the
Setup
in the “3. Install
the ink cartridges” section.
Note:
Dispose of the used cartridge properly. Do not take it apart or try to refill it.
Ink Change System
This printer uses 7 ink cartridges that are packaged with the printer. Instead
of the Photo Black ink cartridge, you can also use the Matte Black ink
cartridge (Option: T0348) that is suitable for printing on matte paper. It also
makes the printing blacker and sharper when you print on plain paper.
Change the ink cartridge depending on your purpose. To replace the ink
cartridge, refer to the “Replacing Ink Cartridges” section on this sheet.
Possible ink combination.
c
Caution:
❏
Only the first ink cartridge from the left side can be changed.
❏
Do not install the ink cartridges in combinations not listed above.
❏
Turn off the EPSON Photo Print Software before replacing an ink
cartridge.
After replacing the ink cartridge, make sure the driver setting for the ink
cartridge information is correct. To set the ink cartridge information, click
the
Printer and Option Information
button on the
Utility
tab (Windows).
Then select the appropriate black ink cartridge.
Choose
Chooser
from the Apple menu and click the icon for your printer
(Macintosh).
For details, refer to the online
Reference Guide
.
Panel Operation
See the online
Reference Guide
for details.
Error Indicators
You can identify many common problems using the lights on the printer’s
control panel. Use the following table of light patterns to diagnose the
problem, then follow the recommended corrective measures.
O
= on,
N
= off,
k
= flashing
#
= on,
"
= off,
$
= flashing
* EPSON Status Monitor 3 is for Windows; EPSON StatusMonitor is for Macintosh.
Safety Instructions
Read all of the instructions in this section when setting up and using your printer.
When choosing a place for the printer
❏
Avoid places subject to rapid changes in temperature and humidity.
Also, keep the printer away from direct sunlight, strong light, or heat
sources.
❏
Avoid places subject to dust, shocks, and vibrations.
❏
Leave enough room around the printer to allow for sufficient ventilation.
❏
Place the printer near a wall outlet where the plug can be easily
unplugged.
❏
Place the printer on a flat, stable surface that extends beyond the printer
base in all directions. If you place the printer by the wall, leave more
than 10 cm between the back of the printer and the wall. The printer will
not operate properly if it is tilted at an angle.
❏
When storing or transporting the printer, don’t tilt it or put it vertically or
turn it upside down. Otherwise ink may leak from the cartridge.
When choosing a power source
❏
Use only the type of power source indicated on the printer’s label.
❏
Do not use a damaged or frayed power cord.
❏
If you use an extension cord with the printer, make sure that the total
ampere rating of the devices plugged into the extension cord does not
exceed the cord’s ampere rating. Also, make sure that the total ampere
rating of all devices plugged into the wall outlet does not exceed the
wall outlet’s ampere rating.
❏
If you plan to use the printer in Germany, the building installation must
be protected by a 10 or 16 amp circuit breaker to provide adequate
short-circuit protection and over-current protection for this printer.
❏
Power cord
Be sure AC power code meets the relevant local safety standards.
When handling ink cartridges
❏
Do not open the ink cartridge packages until just before you install them.
❏
Before installing the new ink cartridge, shake it four or five times before
opening its package.
❏
Do not shake the ink cartridges after removing from the bag; this can
cause leakage.
❏
Be careful not to break the hooks that one on the side of the ink cartridge
when you remove it from the package.
❏
Keep ink cartridges out of the reach of children. Do not allow children
to drink from or otherwise handle the cartridges.
❏
Be careful when you handle used ink cartridges, as there may be some
ink remaining around the ink supply port. If ink gets on your skin, wash
the area thoroughly with soap and water. If ink gets into your eyes, flush
them immediately with water. If discomfort or vision problems remain
after a thorough flushing, see a doctor immediately.
❏
Do not touch or remove the green IC chip that is located on the side of
the cartridge.
❏
Do not remove or tear the label on the cartridge; this can cause leakage.
❏
Store each ink cartridge so that the bottom of its packaging faces down.
When using the printer
❏
Do not put your hand inside the printer or touch the ink cartridges during
printing.
❏
Do not block or cover the openings in the printer’s cabinet.
❏
Do not attempt to service the printer yourself.
❏
Unplug the printer and refer servicing to qualified service personnel
under the following conditions:
The power cord or plug is damaged; liquid has entered the printer; the
printer has been dropped or the cabinet damaged; the printer does not
operate normally or exhibits a distinct change in performance.
❏
Do not insert objects through the slots in the printer’s cabinet.
❏
Take care not to spill liquid on the printer.
❏
Leave the ink cartridge installed. Removing the cartridges can
dehydrate the print head and may prevent the printer from printing.
When using the Automatic Roll Paper Cutter
❏
Do not attach or remove this product while the power to the printer’s
main unit is on.
❏
Keep the cutter out of the reach of children.
❏
Do not touch the paper ejection part and cutter blade.
❏
Do not place the cutter on an unstable surface (such as on an unstable
table or a tilted surface).
❏
Do not disassemble or modify the cutter.
Information for United Kingdom
Users
Use of options
EPSON (UK) Limited shall not be liable against any damages or problems
arising from the use of any options or consumable products other than those
designated as Original EPSON Products or EPSON Approved Products by
EPSON (UK) Limited.
Safety information
w
Warning:
Refer to the rating plate for the voltage and check that the appliance
voltage corresponds to the supply voltage.
Important:
The wires in the mains lead fitted to this appliance are
coloured in accordance with the following code:
Blue — Neutral
Brown — Live
If you have to fit a plug:
As the colours of the mains lead of this appliance may not match the
coloured markings used to identify the terminals in a plug, please observe
the following:
❏
The blue wire must be connected to the terminal in the plug marked with
the letter N.
❏
The brown wire must be connected to the terminal in the plug marked
with the letter L.
❏
If the plug is damaged, replace the cord set or consult a qualified
electrician.
❏
Replace fuses only with fuses of the correct size and rating.
❏
Double-sided printing
❏
No margin printing
❏
Printing on roll paper
❏
Automatic roll paper cutter
❏
Printing on CD-R
❏
Photo Quicker
❏
Printing on matte board
❏
Ink change system
Dialog Box
How to Access
Click
on the File menu of your application or click
Options
in the Page
Setup dialog box.
Page Setup
Click
Page Setup
on the File menu of your application.
Layout
Click the
Layout icon button in the Print dialog box.
Utility
Click the
Utility icon button in the Print or Page Setup dialog box.
Ink Setting Position (from the left)
Recommended paper
1
2
3
4
5
6
7
1
All kinds of paper
Photo
Black
Light
Black
Cyan
Light
Cyan
Magenta
Light
Magenta
Yellow
2
Plain Paper/
Premium Ink Jet Plain
Paper/
Bright White Ink Jet
Paper/
Archival Matte Paper/
Watercolor
Paper-Radiant white/
CD-R
Matte
Black
Button
Function
P
power
Turns the printer on and off. To turn the printer off, press and hold the
P
power button until the light goes out.
Clears the memory of the printer if pressed twice while the power is on.
m
paper
Controls the paper-load and eject functions. Printing will resume if pressed
after a paper out error or double feed error.
H
ink
Moves the print head to enable replacement of the ink cartridge.
Enables print head cleaning if pressed for three seconds while the
H
ink out
light is off.
z
roll paper
(without the cutter)
Prints a cutting guideline and feeds roll paper to a position where it can be
easily removed from the sheet feeder if pressed after printing.
Feeds roll paper to the printing position if pressed after cutting the paper.
Feeds roll paper in reverse to a position where it can be easily removed
from the roll paper feeder, if pressed for 3 seconds.
z
roll paper
(with the cutter)
With driver setting
Single Cut or Double Cut
Cuts roll paper at the position that is selected and ejects it if pressed after
printing. Then feeds roll paper to the printing position automatically.
With driver setting
Not Cut
Cuts roll paper with a margin and ejects it if pressed after printing. Then
feeds roll paper to the printing position automatically.
Lights
Problem and Solution
O
m
Paper out
No media is loaded in the printer.
If printing on sheets of paper:
Load paper into the sheet feeder, then press the
m
paper button.
If printing on roll paper:
Remove any roll paper from the printer, then reload it into the roll paper feeder.
If printing on a CD-R:
Set the adjust lever to the
!
position and remove the CD-R tray. Then reinsert the
CD-R tray.
Paper gap
Loaded paper is too thick or the adjust lever is not in the
appropriate position.
Set the adjust lever to the appropriate position for the thickness of the paper, then
press the
m
paper button.
k
m
Pa
per jam
Paper is jammed in the printer.
If printing on sheets of paper:
Turn off the printer, set the adjust lever to the
!
position, then remove the paper.
Next, return the adjust lever to the
m
position.
If printing on roll paper:
Turn off the printer, set the adjust lever to the
!
position, then use a pair of scissors
to cut off the roll paper that has already been printed on. Next, use the roll paper knobs
to remove the paper. Return the adjust lever to the
m
position, then reload the paper
into the roll paper feeder.
Cutter error
The automatic roll paper cutter could not cut the roll paper
correctly.
Remove the roll paper, then reload it into the roll paper feeder.
k
m
Adjust lever position
error
(paper light flashes
quickly)
The adjust lever is set to the
!
position.
The adjust lever is set to the
%
position when printing on
paper, or is not set to the
%
position when printing on a
CD-R.
Set the adjust lever to the appropriate position for the loaded paper or CD-R.
$
H
Ink low
The ink cartridge is nearly empty.
Obtain a replacement ink cartridge. To determine the empty ink cartridge, check which
light is flashing, or check the ink level using EPSON Status Monitor 3* or EPSON
StatusMonitor*.
$
H
Ink color error
(ink lights flash
quickly)
During printing, the ink cartridge furthest to the left was
replaced with an ink cartridge of a different color.
Remove the ink cartridge and install an ink cartridge that matches the color of the one
originally installed. After doing so, the printer will automatically resume printing.
#
H
Ink out
The ink cartridge is empty or is not installed.
Replace the ink cartridge with a new one. To determine which cartridge is empty,
check the ink level using EPSON Status Monitor 3* or EPSON StatusMonitor*. If the
ink end error occurs after the print head moves to its home position, the ink cartridge
may not be installed properly. Reinstall the ink cartridge until it clicks into place.
Wrong cartridge
The currently installed ink cartridge is not compatible with
the printer.
Use the appropriate ink cartridge.
Incorrectly installed
ink cartridge
The ink cartridge is not installed correctly.
If the print head is at the home position, press the
H
ink button to move the print head
to the ink cartridge replacement position. Remove and reinsert the ink cartridge. Then
continue with ink cartridge installation.
If the print head is at the ink cartridge replacement position, remove and reinsert the
ink cartridge. Then continue with ink cartridge installation.
k
m
$
H
Cutter position error
The automatic roll paper cutter did not return to the
appropriate position.
Turn off the printer, then turn the printer back on.
If the error does not clear, contact your dealer.
k
m
$
H
Carriage error
(paper light and ink
lights flash alternately)
The print head carriage is obstructed by jammed paper or
other foreign material and cannot return to the home
position.
Turn off the printer. Open the printer cover and remove any paper from the paper path
by hand.Then, turn the printer back on. If the error does not clear, contact your dealer.
k
m
$
H
Unknown printer error
(paper light and ink
lights flash quickly)
An unknown printer error has occurred.
Turn off the printer and contact your dealer.
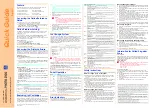
Quick Guide
K
e
e
p
t
h
is
s
h
ee
t h
a
n
d
y
fo
r
q
u
ic
k
re
fe
re
n
c
e
.
C
o
lo
r Ink Jet Pr
inter
English
All rights reserved. No part of this publication may be reproduced, stored in a retrieval system, or transmitted
in any form or by any means, electronic, mechanical, photocopying, recording, or otherwise, without the prior
written permission of SEIKO EPSON CORPORATION. The information contained herein is designed only for
use with this EPSON printer. EPSON is not responsible for any use of this information as applied to other
printers.
Neither SEIKO EPSON CORPORATION nor its affiliates shall be liable to the purchaser of this product or
third parties for damages, losses, costs, or expenses incurred by the purchaser or third parties as a result of
accident, misuse, or abuse of this product or unauthorized modifications, repairs, or alterations to this product,
or (excluding the U.S.) failure to strictly comply with SEIKO EPSON CORPORATION's operating and
maintenance instructions.
SEIKO EPSON CORPORATION shall not be liable for any damages or problems arising from the use of any
options or any consumable products other than those designated as Original EPSON Products or EPSON
Approved Products by SEIKO EPSON CORPORATION.
SEIKO EPSON CORPORATION shall not be held liable for any damage resulting from electromagnetic
interference that occurs from the use of any interface cables other than those designated as EPSON Approved
Products by SEIKO EPSON CORPORATION.
EPSON is a registered trademark and EPSON Stylus is a trademark of SEIKO EPSON CORPORATION.
PRINT Image Matching Version 2.0. Copyright 2002 SEIKO EPSON CORPORATION. All rights reserved.
PRINT Image Matching is a trademark of SEIKO EPSON CORPORATION. The PRINT Image Matching logo
is a trademark of SEIKO EPSON CORPORATION.
PRINT Image Matching is a term for the print command that is embedded in header file of the image created
by digital camera. It contains color setting and image parameter information.
Microsoft and Windows are registered trademarks of Microsoft Corporation.
Apple and Macintosh are registered trademarks of Aplle Computer, Inc.
General Notice: Other product names used herein are for identification purposes only and may be trademarks
of their respective owners. EPSON disclaims any and all rights in those marks.
Copyright© 2002 by SEIKO EPSON CORPORATION, Nagano, Japan.
Printed in XXXX


