background image

45

Replacing an Ink Cartridge

When the red   ink light flashes, one or more ink cartridges are low on ink.

When the red   ink light stays on, you need to replace the cartridge(s).

When you print, you’ll also see a message on your screen telling you which cartridge is 
low or empty. 

When a cartridge is more than six months old, you may need to replace it if printouts 
don’t look their best. If the quality doesn’t improve after cleaning and aligning the 
print head, you can replace the cartridge even if the red   ink light is off.

Checking the Ink Supply

To check your ink supply, do the following: 

Windows:

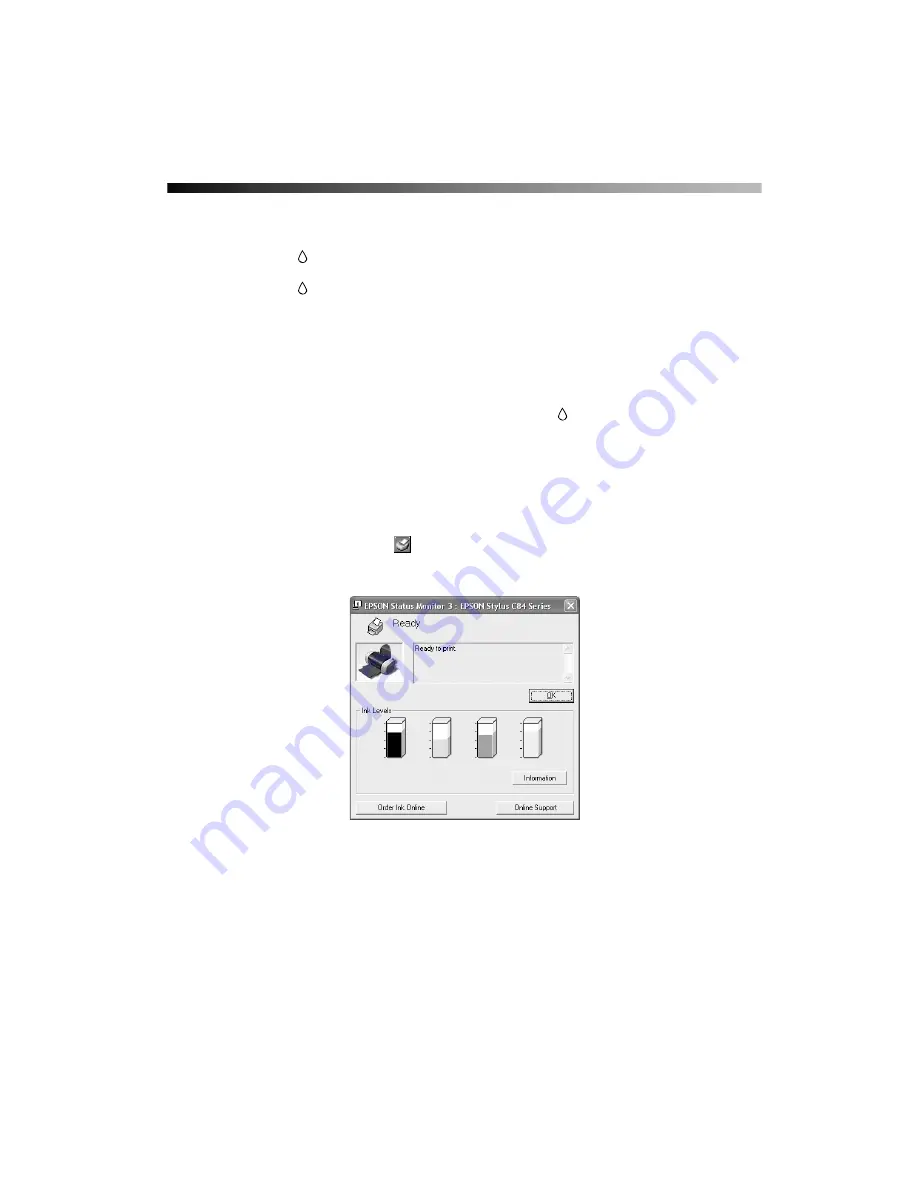
 Double-click the 

 icon on the Windows taskbar. You see a window 

like this:

Summary of Contents for Stylus C84

Page 1: ...EPSON Stylus C84 Printer Basics ...

Page 2: ...PSON Approved Products by SEIKO EPSON CORPORATION A Note Concerning Responsible Use of Copyrighted Materials Digital cameras scanners and ink jet printers like conventional photocopiers and cameras can be misused by improper copying or printing of copyrighted material While some countries laws permit limited copying of copyrighted material in certain circumstances those circumstances may not be as...

Page 3: ...R 11 Loading Single Sheets 11 Loading Envelopes 12 Loading Special Papers 13 PRINTING WITH WINDOWS 15 Printing From an Application 16 Selecting Default Settings 18 Customizing Windows Print Settings 19 Selecting the Correct Paper Type 21 Printing Borderless Photos 22 BorderFree Paper 22 Loading Paper 23 Printing Your Photos 24 PRINTING WITH A MACINTOSH 27 Printing With Macintosh OS X 28 Printing W...

Page 4: ... 43 Purchasing Ink Cartridges 44 Replacing an Ink Cartridge 45 Checking the Ink Supply 45 Ink Cartridge Precautions 46 Replacing an Empty or Low Ink Cartridge 47 Replacing a Cartridge When Print Quality Declines 50 Aligning the Print Head 54 Cleaning the Printer 57 Transporting the Printer 58 SOLVING PROBLEMS 61 Printer Parts 62 Diagnosing Printer Problems 63 Running a Printer Check 64 Problems an...

Page 5: ...et Help 76 REQUIREMENTS AND NOTICES 77 Windows System Requirements 77 Macintosh System Requirements 77 Important Safety Instructions 78 Ink Cartridge Safety Instructions 79 FCC Compliance Statement 80 Declaration of Conformity 81 Energy Star Compliance 81 Epson America Inc Limited Warranty 82 INDEX 85 ...

Page 6: ...6 ...

Page 7: ...rs under glass Actual print stability will vary according to media printed image display conditions light intensity humidity and other atmospheric conditions EPSON does not guarantee the longevity of prints For maximum print life display all prints under glass or lamination or properly store them True BorderFree frame ready prints on select 4 6 and letter size papers Resolution Performance Managem...

Page 8: ...orts PRINT Image Matching P I M II and Exif Print EPSON PhotoCenterSM is EPSON s free photo sharing website where you can store organize and share your photos print high resolution photos and create online postcards Add a link to EPSON PhotoCenter with your software installer About Your Documentation To set up your printer and install its software see the Start Here sheet This book contains system...

Page 9: ...et to install the EPSON Printer Information Center Note You need a browser such as Microsoft Internet Explorer 4 0 or later or Netscape Navigator 4 0 or later to view the manual If you are using a different browser the pages may not display correctly Launching the Animations 1 Double click the EPSON Printer Information Center icon on your desktop 2 Click Print Show 3 Click a title The movie starts...

Page 10: ...n 1 Turn on your computer Make sure your printer is still on 2 Put the EPSON CD ROM in your drive 3 Read the license agreement and click Agree to continue with the installation 4 When you see the Main Menu click Install Printer Driver Wait while the files are copied to your computer 5 Click OK when you see a message that setup is complete 6 Click Install Manual and Printer Movies and follow the on...

Page 11: ... Special Papers on page 13 Loading Single Sheets 1 Open the output tray and its extension 2 Fan the stack of paper and place it against the right edge guide Don t push the paper in 3 Press in the side of the left edge guide and slide it against the paper but not too tightly Press here then slide over Load paper under tab Output tray and extension ...

Page 12: ...p to 10 envelopes at a time flap edge left printable side up against the right edge of the sheet feeder 3 Slide the left edge guide against the envelopes but not too tightly Make sure the envelopes are under the tabs on the left and right edge guides Note For best results press each envelope flat before loading or load one envelope at a time Select the following settings when printing on envelopes...

Page 13: ... Letter 8 5 x 11 inches S041731 4 x 6 inches S041734 EPSON Photo Quality Ink Jet Paper Letter 8 5 x 11 inches S041062 A4 8 3 x 11 7 inches S041061 Legal 8 5 x 14 inches S041067 EPSON Glossy Photo Paper or EPSON Photo Paper Letter 8 5 x 11 inches S041141 S041649 S041271 S041272 A4 8 3 x 11 7 inches S041140 4 x 6 inches S041134 S041671 EPSON Matte Paper Heavyweight Letter 8 5 x 11 inches S041257 Dou...

Page 14: ...er type Loading capacity Premium Bright White Paper 120 Sheets Photo Quality Ink Jet Paper 80 sheets EPSON DuraBrite Ink Glossy Photo Paper 20 sheets Glossy Photo Paper or Photo Paper 20 sheets Matte Paper Heavyweight 20 sheets with a support sheet beneath the stack Double Sided Matte Paper 1 sheet Enhanced Matte Paper Archival Matte Paper 20 sheets Premium Semigloss Photo Paper 20 sheets Ink Jet ...

Page 15: ...do the following Use the right paper For the best looking photos most vivid colors and greatest detail always use genuine EPSON papers and EPSON inks Choose the right printer settings Your printer automatically adjusts itself for each type of paper That s why printer settings are important They tell your printer what kind of paper you re using and what type of print you want Make sure you check yo...

Page 16: ...s 1 From the file menu click Print You see a Print window like this one 2 Make sure EPSON Stylus C84 Series is selected 3 Click the Preferences or Properties button If you see a Setup Printer or Options button click it Then click Preferences or Properties on the next screen Select your printer name here Click here to open your printer software ...

Page 17: ... you the best combination of quality and speed for most prints For the highest quality Photo RPM on selected papers click the Advanced button on the Main tab Then see Customizing Windows Print Settings on page 19 for instructions on selecting Photo RPM 6 Select the paper Type for the paper you ve loaded See Selecting the Correct Paper Type on page 21 for more information about paper types 7 Select...

Page 18: ...fault Settings Your printer settings only apply to the program you re currently using If you want you can change the Windows default printer settings for all your programs 1 Right click the printer icon in the lower right corner of your screen taskbar 2 Select Printer Settings You see the window shown in Printing From an Application 3 Select the default settings you want for all your applications ...

Page 19: ...lity select Photo RPM Please note that printing will take longer in this mode For more information about advanced settings or instructions on saving them as a group so you can reuse them later click the or Help button If you want to use the Advanced screen each time you access your printer settings select the Show this screen first checkbox Select a color management method To choose No Color Adjus...

Page 20: ...tinue with step 5 to select layout options 5 Select the following page layout settings as necessary Note For more information on page layout settings click the or Help button 6 Click OK to save your settings then click OK or Print Select multi page document options here and here Select image resizing options here these affect only your printed image Select image position options here Add a waterma...

Page 21: ...t White Paper Plain Paper Bright White Paper EPSON Photo Quality Ink Jet Paper EPSON Photo Quality Ink Jet Cards EPSON Matte Paper Heavyweight EPSON Double Sided Matte Paper EPSON Enhanced Matte Paper Archival Matte Paper Matte Paper Heavyweight EPSON DuraBrite Ink Glossy Photo Paper DURABrite Ink Glossy Photo Paper EPSON Photo Paper EPSON Glossy Photo Paper EPSON Premium Semigloss Photo Paper Glo...

Page 22: ...nds proper care that will minimize color changes and lengthen display life Frame prints under glass or a protective plastic sleeve to protect them from atmospheric contaminants like humidity smoke and high levels of ozone As with all photographs keep your prints away from direct sunlight For proper storage keep your prints in a photo album or plastic photo storage box in acid free archival sleeves...

Page 23: ...r as shown then see the following section to print Always load the short edge first even for printing landscape oriented photos Load the printable side face up It s usually whiter or brighter than the other side Make sure the paper is under the tabs on the left and right edge guides Check the paper package for additional loading instructions Insert paper against the right edge Slide the left edge ...

Page 24: ...u see the following 3 Select Photo or Best Photo as the Quality Option setting 4 Select one of the following paper types Matte Paper Heavyweight Glossy Photo Paper DURABrite Ink Glossy Photo Paper 5 Click the Borderless checkbox Read the message and click OK 6 Select your paper Size setting 7 Select Portrait or Landscape as the orientation setting ...

Page 25: ...he in between setting Min retains the entire image in your print but there may be a small white edge on the borders of the print Max expands the image to ensure that there are no unprinted edges but the edges of the image may not appear in the print 10 Click OK then click OK or Print ...

Page 26: ...26 ...

Page 27: ... paper For the best looking photos most vivid colors and greatest detail always use genuine EPSON papers and EPSON inks Choose the right printer settings Your printer automatically adjusts itself for each type of paper That s why printer settings are important They tell your printer what kind of paper you re using and what type of print you want Make sure you check your printer settings every time...

Page 28: ...jobs using a custom page size make sure the selected size matches the paper you loaded and is within the printable area for your printer For example never choose a size wider than 9 inches or longer than 44 inches 3 Click OK to close the Page Setup window 4 From the File menu select Print You see a window like this one 5 Select your printer name from the Printer drop down list Note Make sure you c...

Page 29: ...y selecting these options in the pull down menu Copies Pages to select the number of copies or a page range Layout to select page layout options Output Options to save your print job as a PDF file Color Management to select ColorSync adjust the color controls change the gamma setting or turn off color adjustments in the printer software Summary to view a list of all your selections Save Custom Set...

Page 30: ...List window You see a screen like this 11 Monitor the progress of your print job or do one of the following Click the print job then click Delete to delete the job Click the print job then click Hold to pause printing Click a print job marked Hold and click Resume to resume printing Tip You can also cancel printing by pressing the paper button on your printer 12 When you re finished close Print Ce...

Page 31: ...e 4 Select the following settings Choose your paper from the Media Type list See page 35 for details Select Color to print a color document or black and white photograph To print a black text document click Black Choose Automatic to get good printing results for most projects Make sure you see C84 Series Select your paper size Select your paper source Select your document or image orientation Sele...

Page 32: ...multi page layouts or add a watermark Click to control background printing and schedule print jobs Click then click Preview to preview your printout Click to check your ink levels Tip For more information about printer settings click the button 6 Click Print 7 If you turned on background printing you can select EPSON Monitor IV from the Application menu in the upper right corner of your screen You...

Page 33: ...anced settings as necessary Note For the highest print quality select Photo RPM Please note that printing will take longer in this mode For more information on advanced settings or instructions on saving them as a group so you can reuse them later click Help 3 Click Print Click here to select Photo RPM for the best print quality on photo and glossy paper types Select various print options here For...

Page 34: ... printing will take longer in this mode For more information on advanced settings or instructions on saving them as a group so you can reuse them later click the button 3 Click OK to save your settings then click Print Click Custom then choose Advanced Select various print options here Select color management settings here Click here to select Photo RPM for the best print quality on photo and glos...

Page 35: ...t White Paper Plain Paper Bright White Paper EPSON Photo Quality Ink Jet Paper EPSON Photo Quality Ink Jet Cards EPSON Matte Paper Heavyweight EPSON Double Sided Matte Paper EPSON Enhanced Matte Paper Archival Matte Paper Matte Paper Heavyweight EPSON DuraBrite Ink Glossy Photo Paper DURABrite Ink Glossy Photo Paper EPSON Photo Paper EPSON Glossy Photo Paper EPSON Premium Semigloss Photo Paper Glo...

Page 36: ...ass or a protective plastic sleeve to protect them from atmospheric contaminants like humidity smoke and high levels of ozone As with all photographs keep your prints away from direct sunlight For proper storage keep your prints in a photo album or plastic photo storage box in acid free archival sleeves commonly available from most camera stores Always keep unused paper in the original package To ...

Page 37: ...e Make sure the paper is under the tabs on the left and right edge guides Check the paper package for additional loading instructions Macintosh OS X 1 Start your photo program and open your photo 2 Open the File menu and click Page Setup You see the following 3 Select Stylus C84 Sheet Feeder Borderless in the Format for drop down list Insert paper against the right edge Slide the left edge guide a...

Page 38: ...You see the following 8 Select Stylus C84 Sheet Feeder Borderless in the Printer drop down list Note Make sure you choose the same printer that you selected in step 3 or you may get unexpected results for your print 9 Select Print Settings from the pop up list 10 Select one of the following Media Types Matte Paper Heavyweight Glossy Photo Paper DURABrite Ink Glossy Photo Paper 11 Select Quality fo...

Page 39: ...e on the borders of the print Max expands the image to ensure that there are no unprinted edges but the edges of the image may not appear in the print 14 Click Print Macintosh OS 8 6 to 9 x 1 Start your photo program and open your photo 2 Open the File menu and click Page Setup You see the following 3 Select your Paper Size 4 Click the Borderless checkbox Read the message and click OK ...

Page 40: ...t there are no unprinted edges but the edges of the image may not appear in the print 7 Select Portrait or Landscape as the orientation setting 8 Click OK to close the Page Setup window 9 Open the File menu and click Print 10 Select one of the following Media Types Matte Paper Heavyweight Glossy Photo Paper DURABrite Ink Glossy Photo Paper 11 Select Quality for higher quality or Speed for faster p...

Page 41: ... the EPSON Printer Information Center icon on your desktop Cleaning the Print Head If your printouts are unexpectedly light or dots or lines are missing you may need to clean the print head This unclogs the nozzles so they can deliver ink properly Print head cleaning uses ink so clean it only if quality declines This section explains how to clean the print head using the Head Cleaning utility You ...

Page 42: ... Applications folder and double click EPSON Printer Utility Select Stylus C84 in the printer list click OK and select Head Cleaning Macintosh OS 8 6 to 9 x Open the File menu and choose Page Setup or Print Click the utility button then click the Head Cleaning button 3 Follow the instructions on the screen to clean the print head Cleaning takes several seconds The printer makes noise and the green ...

Page 43: ... lines click Clean to clean the print head again If you don t see any improvement after cleaning three or four times refer to Problems and Solutions on page 65 You can also turn the printer off and wait overnight this allows any dried ink to soften and then try cleaning the print head again Examining the Nozzle Check Pattern Examine the nozzle check pattern you printed Each staggered line should b...

Page 44: ...or this printer for users who print frequently Users that print infrequently may want to choose the standard capacity black ink cartridges Your printer includes the high capacity black ink cartridge When you need new ink cartridges contact your dealer or call the EPSON Store at 800 873 7766 or visit www epsonstore com U S sales only In Canada please call 800 463 7766 for dealer referral Ink cartri...

Page 45: ...lling you which cartridge is low or empty When a cartridge is more than six months old you may need to replace it if printouts don t look their best If the quality doesn t improve after cleaning and aligning the print head you can replace the cartridge even if the red ink light is off Checking the Ink Supply To check your ink supply do the following Windows Double click the icon on the Windows tas...

Page 46: ...ughly with water Caution Don t remove the cartridge label or ink will leak Don t remove the green IC chip from the cartridge Installing a cartridge without an IC chip can damage the printer Avoid touching the green IC chip as this can damage the ink cartridge If you remove an ink cartridge temporarily protect the ink supply port on the bottom of the cartridge from dirt and dust Place it in a small...

Page 47: ...wer the output tray and open the printer cover 3 Press the ink button for one second The print head moves to the left and the cartridge that needs to be replaced stops under the mark The power light also begins to flash Caution Don t press the ink button for more than 2 seconds or the printer will start to clean the print head To avoid damaging the printer never move the print head by hand 4 Press...

Page 48: ...een identified the print head moves to the ink cartridge replacement position 5 Open the cartridge cover 6 Pinch the back tab of the empty cartridge as you lift it out of the printer Don t take the used cartridge apart or try to refill it ...

Page 49: ...hem immediately with water 7 Before you remove the new cartridge from its package shake it four or five times 8 Remove the cartridge from its package and lower it into the cartridge holder Push down gently until the cartridge is firmly seated 9 Repeat steps 5 through 7 for each cartridge that you need to replace ...

Page 50: ... Declines Even if the ink out light isn t flashing or on you may need to replace an ink cartridge if it s been installed in your printer for more than six months and print quality declines Follow these steps to replace old ink cartridges 1 Print a nozzle check pattern to determine which cartridges need to be replaced Windows Right click the printer icon on the Windows taskbar and then click Nozzle...

Page 51: ...ve the new ink cartridges before you continue Once you start the ink cartridge replacement procedure you must complete all the steps in one session 4 Lower the output tray and open the printer cover 5 Press the ink button The print head moves to the ink cartridge replacement position and the power light begins to flash Note Don t press the ink button for more than 2 seconds or the printer will sta...

Page 52: ... of the printer Don t take the used cartridge apart or try to refill it Warning If ink gets on your hands wash them thoroughly with soap and water If ink gets in your eyes flush them immediately with water 8 Before you remove the new cartridge from its package shake it four or five times ...

Page 53: ...er 12 Close the printer cover and press the ink button for one second The printer moves the print head and begins charging the ink delivery system The green power light flashes and the printer makes noise Charging takes about one minute When it s finished the power light stops flashing and stays on Note Never turn off the printer while the power light is flashing unless the printer hasn t moved or...

Page 54: ...the printer icon on your taskbar in the lower right corner of your screen Select Print Head Alignment Macintosh OS X Open the Applications folder and double click the EPSON Printer Utility icon Select C84 Series in the printer list click OK and select Print Head Alignment Macintosh OS 8 6 to 9 x From the File menu select Page Setup or Print Click the Utility button then click the Print Head Alignm...

Page 55: ...st pattern and click Realignment Then repeat this step 6 Click Print to print the color vertical alignment sheet You see this screen 7 Look at the four sets of patterns in your printout For each set if you see a pattern with no visible vertical lines enter its number in the corresponding box on the screen and click Next If you can t find a pattern without any vertical lines select the best pattern...

Page 56: ... with no gap or line between the rectangles Enter its number in the box on the screen and click Next If you can t find an aligned pattern choose the best pattern and click Realignment Then repeat this step 10 Click Print to print a color horizontal alignment sheet You see this screen Windows Macintosh Windows Macintosh ...

Page 57: ... 2 Remove all the paper then use a soft brush to clean the sheet feeder 3 If the outer case or inside of the sheet feeder is dirty clean it with a soft cloth dampened with mild detergent Keep the printer cover closed to prevent water from getting inside 4 If ink accidentally gets inside the printer wipe off the rollers shown below with a damp cloth Warning Don t touch the gears or any other parts ...

Page 58: ...er 2 Remove any paper from the printer then remove the paper support 3 Open the printer cover 4 Press the ink button The print head moves to the ink cartridge replacement position and the power light begins to flash Note Don t press the ink button for more than 2 seconds or the printer will start to clean the print head Caution To avoid damaging the printer never move the print head by hand 5 Open...

Page 59: ... cartridge cover and press the ink button Wait until the print head locks in the far right position Don t worry if the ink light is on 8 Press the power button to turn off the printer Unplug the power cord from the electrical outlet Then disconnect the printer cable from the printer 9 Secure the ink cartridge holder to the case with tape Caution Be sure to remove the tape and reinstall the ink car...

Page 60: ...eep the printer level as you transport it After transporting the printer remove the tape securing the print head reinstall the ink cartridges and test your printer If you notice a decline in print quality clean the print head as described on page 41 if output is misaligned align the print head as described on page 54 ...

Page 61: ...on page 68 Paper Problems on page 71 Miscellaneous Problems on page 72 Uninstalling Printer Software on page 74 Where To Get Help on page 76 Tip It s a good idea to check EPSON s support web site periodically for possible updates to your printer driver Visit http support epson com and check the section for your product to see if there is a new driver available free of charge for downloading to you...

Page 62: ...62 Printer Parts Ink button Paper button Power button Paper support Sheet feeder Output tray Output tray extension Printer cover Parallel port USB port Left edge guide Right edge guide ...

Page 63: ...t installed a new cartridge it may be incompatible with the printer or incorrectly installed Reinstall it or replace it with the correct cartridge as described on Replacing an Empty or Low Ink Cartridge on page 47 Green power light and red ink light are on One or both of the ink cartridges is not installed correctly Reinstall cartridges as described in Replacing an Empty or Low Ink Cartridge on pa...

Page 64: ...ROM version number an ink counter code and a nozzle check pattern If the pattern has gaps you need to clean the print head as described on page 41 If the test page prints the problem probably lies in your software settings interface cable or computer or your software may not be installed correctly If the test page doesn t print you may have a problem with your printer Try the suggestions in Setup ...

Page 65: ...d make sure your system meets the requirements see Windows System Requirements or Macintosh System Requirements on page 77 Close other programs including screen savers and virus protectors and install again In Windows make sure your printer is selected as the default printer and that the correct port is shown in the printer properties In Mac OS 8 6 to 9 x if the C84 Series icon doesn t appear in t...

Page 66: ...System Requirements on page 77 Run a printer check as described in Running a Printer Check on page 64 If the test page prints make sure your software is installed correctly If you re printing on a network make sure you set up your printer for network printing as described in your on screen User s Guide The printer sounds as though it is printing but nothing prints The print head nozzles may need c...

Page 67: ... using Increase your system s memory RAM For the fastest printing try these tips Set the Quality Speed slider to Speed or select Draft as the Quality Option Windows In the Advanced window turn High Speed on Windows or MicroWeave off and High Speed on Macintosh If your printer is connected to a USB hub disconnect any unused USB devices If it still seems slow try connecting directly to your computer...

Page 68: ... Macintosh on page 27 Make sure the paper Type Windows or Media Type Macintosh setting matches your paper see page 35 for guidelines Make sure the printable side of the paper is face up It s usually whiter or shinier The ink cartridges may need replacing see Replacing an Ink Cartridge on page 45 Try using Automatic mode Macintosh only See Printing With a Macintosh on page 27 for instructions Align...

Page 69: ...andle it Prints made on glossy photo paper take longer to dry Follow the instructions included in your media pack If you are using double sided paper and printing heavily saturated or dark images on the front side of the paper you may notice that smudges or marks appear on the front when you print the second side If one side of the paper will contain a lighter image or text print that side first t...

Page 70: ...sults use genuine EPSON paper Your printout is grainy Use a higher quality paper or select a higher Quality Option or Print Quality setting see Printing With Windows on page 15 or Printing With a Macintosh on page 27 Align the print head as described on page 54 Increase the image resolution or print it in a smaller size see your software documentation You see wrong or missing colors Make sure Blac...

Page 71: ...ors produced by DuraBrite inks may look slightly different than those produced by dye based ink Due to the nature of pigment inks lighting conditions can affect the appearance of your printout For example a print viewed in daylight may appear to have a slightly different color balance when viewed under tungsten lighting Your printer software was designed to represent color accurately when prints a...

Page 72: ... new smooth high quality paper loaded printable side up Don t load paper above the arrow mark on the left edge guide If you re printing on both sides of the paper try loading fewer sheets Place the paper against the right edge and slide the left edge guide against it but not too tightly Miscellaneous Problems The image is inverted as if viewed in a mirror Turn off Mirror Image or Flip Horizontal i...

Page 73: ...e the correct margins for your paper size The margins must be within the printable area of the page see your electronic User s Guide If you re using Macintosh OS X make sure you choose the same printer in the Page Setup window and the Print window Place the paper against the right edge and slide the left edge guide against it but not too tightly Output is not what you expect when printing borderle...

Page 74: ...ndows 1 Click Start and select Programs or All Programs 2 Point to Epson or EPSON Printers then select EPSON Printer Software Uninstall 3 In the next window select EPSON Stylus C84 Series and click OK Then follow the on screen instructions 4 Restart your computer then see the Start Here sheet to reinstall software Macintosh OS X 1 Open the Applications folder then the Utilities folder 2 Select Pri...

Page 75: ...nue 4 On the Installer screen click the arrow in the Easy install list at the top and select Uninstall Then click the Uninstall button at the bottom and follow the on screen instructions 5 Restart your Macintosh then see the Start Here sheet to reinstall your software ...

Page 76: ... and operating system version Description of the problem You can purchase ink cartridges paper manuals and accessories from the EPSON Store at 800 873 7766 or visit www epsonstore com U S sales only In Canada please call 800 463 7766 for dealer referral Service Access World Wide Web From the Internet you can reach EPSON Support at http support epson com At this site you can download drivers and ot...

Page 77: ...ctor for your computer and a 36 pin Centronics compatible connector for the printer USB connection a computer with preinstalled Windows XP Me 2000 or 98 and a Windows compliant USB port and shielded USB AB cable Using an improperly shielded USB cable may cause the printer to malfunction Macintosh System Requirements To use your printer and its software your system should have An Apple iMac series ...

Page 78: ... does not exceed the outlet s ampere rating Keep your printer and computer system away from potential sources of electromagnetic interference such as loudspeakers or cordless telephone base units Avoid locations that are subject to rapid changes in heat or humidity shocks or vibrations or dust Leave enough room around the printer for sufficient ventilation leaving at least 3 9 inches between the b...

Page 79: ...k cartridge beyond the date printed on the cartridge carton For best results use up the ink cartridges within six months of first installing them Store ink cartridges in a cool dark place After bringing an ink cartridge inside from a cold storage site allow it to warm up at room temperature for at least three hours before using it Do not dismantle the ink cartridges or try to refill them This coul...

Page 80: ...measures Reorient or relocate the receiving antenna Increase the separation between the equipment and receiver Connect the equipment into an outlet on a circuit different from that to which the receiver is connected Consult the dealer or an experienced radio TV technician for help WARNING The connection of a non shielded equipment interface cable to this equipment will invalidate the FCC Certifica...

Page 81: ...to be within the variation accepted due to quantity production and testing on a statistical basis as required by 47CFR 2 909 Operation is subject to the following two conditions 1 this device may not cause harmful interference and 2 this device must accept any interference received including interference that may cause undesired operation Trade Name EPSON Type of Product Ink Jet Printer Model B251...

Page 82: ... your printer to Epson or its authorized service center where the printer will be fixed and sent back to you You are responsible for packing the printer and for all costs to and from the Epson authorized service center When warranty service involves the exchange of the printer or a part the item replaced becomes Epson property The replacement printer or part may be new or refurbished to the Epson ...

Page 83: ...N AMERICA INC NOR ITS AFFILIATES SHALL BE LIABLE FOR ANY LOSS INCONVENIENCE OR DAMAGE INCLUDING DIRECT SPECIAL INCIDENTAL OR CONSEQUENTIAL DAMAGES RESULTING FROM THE USE OR INABILITY TO USE THE EPSON PRODUCT WHETHER RESULTING FROM BREACH OF WARRANTY OR ANY OTHER LEGAL THEORY In Canada warranties include both warranties and conditions Some jurisdictions do not allow limitations on how long an impli...

Page 84: ...84 ...

Page 85: ...lignment 54 to 57 Cleaning print head 41 to 43 printer 57 Color management 19 29 Colors matching 70 to 71 missing 70 to 71 wrong 70 to 71 Control panel 63 Copies 73 Customizing print settings Macintosh 33 to 34 Windows 19 to 20 D Declaration of Conformity 81 Default printer settings 18 Documentation 8 to 10 DuraBrite inks 7 E Energy Star 81 Envelopes 12 EPSON Help 76 paper 13 to 14 PhotoCenter 8 P...

Page 86: ...ncorrect 73 Matching colors 70 to 71 Media type setting 21 35 to 36 Mirror image 72 Monitoring print status 18 30 32 Movies 9 to 10 Moving printer 58 to 60 N Noise 65 66 Nozzle check 43 64 P Page layout settings Macintosh 29 32 Windows 20 Paper borderless papers 22 to 23 37 envelopes 12 feeding problems 71 to 72 single sheets 11 to 12 special EPSON papers 13 to 14 storing prints 22 36 type setting...

Page 87: ... wrong colors 70 to 71 Q Quality setting 29 32 Quality type settings 17 R Replacing ink cartridges empty 45 to 50 old 44 50 to 53 RPM technology 7 S Safety instructions 46 78 to 79 Scratches on print 74 Sheet feeder cleaning 57 problems solving 72 Slow printing problem 67 Smeared print 69 Smudges 69 Software description 8 installation problems 65 to 66 uninstalling 74 to 75 Special EPSON papers 13...

Page 88: ...anty 82 Windows advanced print settings 19 to 20 default printer settings 18 installing printer software 10 printing 15 to 25 system requirements 77 uninstalling printer software 74 to 75 Wrinkled paper 71 to 72 ...

Page 89: ...put It s the ideal media when you need high quality double sided printing for brochures newsletters or flyers DuraBrite Ink Glossy Photo Paper 4 6 DuraBrite Ink Glossy Photo Paper is a high gloss heavyweight paper that is optimized for use with EPSON DuraBrite inks This paper is perfect for reprints snapshots and enlargements Also available in letter size Featuring EPSON s exclusive new DuraBrite ...

Page 90: ... check out the latest media Paper name Size Part number EPSON Premium Bright White Paper Letter 8 5 x 11 inches S041586 EPSON DURABrite Ink Glossy Photo Paper Letter 8 5 x 11 inches S041731 4 6 inches S041734 EPSON Photo Quality Ink Jet Paper Letter 8 5 x 11 inches S041062 Legal 8 5 x 14 inches S041067 A4 8 3 x 11 7 inches S041061 EPSON Double Sided Matte Paper Letter 8 5 x 11 inches S041568 EPSON...

Reviews: