background image

D

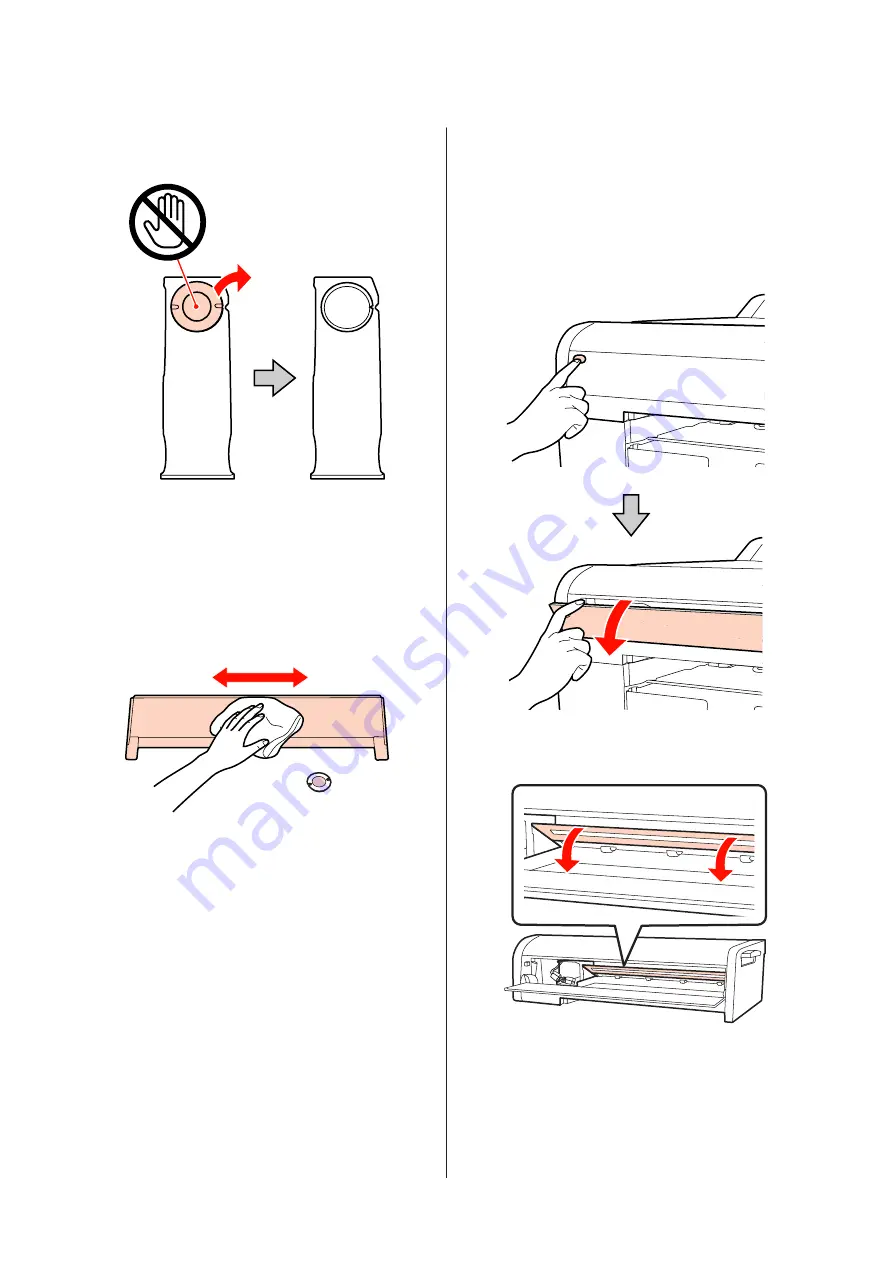
Remove the white calibration tile from the white
calibration tile holder.

E

Use a soft, dry cloth to carefully remove any dust
or dirt from the surface of the white calibration
tile or the surface of the backing.

If the dirt does not come off, soak a soft cloth in
water and wring it dry, and then rub away any
dirt from the surface. Then, wipe the surface
again with a soft, dry cloth.

F

See the 

SpectroProofer Mounter 17" Setup Guide

to setup the mounter.

U

 See the 

SpectroProofer Mounter 17" Setup

Guide

Cleaning the paper
presser

A

Turn off the printer, and then open the front
cover of the mounter.

B

Hold both ends of the paper presser and lower it
forward.

C

Soak a soft cloth in water with a small amount of
mild detergent, wring it dry, and then wipe away
dirt from the base (the surface that touches the
paper) of the paper presser.

Then, wipe it with a soft, dry cloth.

SpectroProofer Mounter 17"     User’s Guide

Maintenance

15

Summary of Contents for SpectroProofer Mounter 17"

Page 1: ...User s Guide NPD4282 00 EN ...

Page 2: ...tructions Seiko Epson Corporation shall not be liable for any damages or problems arising from the use of any options or any consumable products other than those designated as Original Epson Products or Epson Approved Products by Seiko Epson Corporation SeikoEpsonCorporationshallnotbeheldliableforanydamageresultingfromelectromagneticinterferencethatoccursfromtheuseofanyinterfacecables other than t...

Page 3: ...Cleaning the paper presser 15 Cleaning the paper guide unit 16 Troubleshooting When Error Message Appears 17 Troubleshooting 19 WhenInkGetson theFrontorBackSideof the Paper 19 When SpectroProofer Utilities Ends with an Error 19 Something Wrong with Color Measurement Data 19 Appendix Moving or Transporting 20 System Requirements 20 Specifications 20 Where To Get Help Technical Support Web Site 22 C...

Page 4: ...inter on which SpectroProofer Mounterisinstalled andreferservicingtoqualified service personnel under the following conditions liquidhasenteredtheproduct theproducthasbeen dropped or the cabinet damaged the product does not operate normally or exhibits a distinct change in performance Meaning of Marks wWarnings must be followed carefully to avoid bodily injury cCautions must be observed to avoid d...

Page 5: ...EP ILS20EPUV F Color Measurement Device carriage Install ILS20EP ILS20EPUV here Rear A Air vent Takes in air to dry the color measurement chart printed by the printer Do not block or clog the air vent Otherwise air cannot be taken in and prints will not be dried sufficiently Clean the vent if it is dusty B Side Cover Open the cover when connecting or removing the printer connection cable C Printer...

Page 6: ...n measuring colors B DC connector Attach theDC connectortothe ILS DC cable located on the Color Measurement Device carriage placed at the front of the mounter C Communication connecter Attach this connecter to the ILS communication cable located on the color measurement device carriage on the base of the mounter D White calibration tile The white based tile for color measurement data Use this tile...

Page 7: ... not break or lose the white calibration tile You cannot buy the white calibration tile by itself You need to purchase ILS20EP ILS20EPUV set Backing Take care to prevent a scratch or dirt getting on the surface of the backing If a scratch dirt or other matter gets on the backing it may affect the color measuring result cCaution Donotdroporknockitagainsthardobjectsbecause the backing is a fragile p...

Page 8: ... ready state B Color calibration U See Color calibration on page 11 Calibrate your printer using Printer Linearization in the SpectroProofer Utilities C Color measurement U See Preparing and executing a color measurement job on page 12 Select a job by starting Preparing and executing a color measurement job in the SpectroProofer Utilities When you start Job status confirmation on the SpectroProofe...

Page 9: ...types Paper Size for roll paper cut sheets Automated color measurement Paper width 203 mm 8 inches 432 mm 17 inches Paper length 254 mm 10 inches 594 mm A2 vertical length Manual color measurement Paper width 203 mm 8 inches 432 mm 17 inches Paper length 323 mm 594 mm A2 vertical length SpectroProofer Mounter 17 User s Guide How To Use 9 ...

Page 10: ...ut sheet Premium Glossy Photo Paper Premium Photo Paper Glossy Premium Semigloss Photo Paper Premium Photo Paper Semi gloss Premium Luster Photo Paper Ultra Premium Photo Paper Luster Enhanced Matte Paper Archival Matte Paper Ultra Premium Presentation Paper Matte Watercolor Paper Radiant White Epson Proofing Paper White Semimatte Ultra Smooth Fine Art Paper Velvet Fine Art Paper Although there is...

Page 11: ... is the operation tool for this product See the online help of the SpectroProofer Utilities for detailed information Starting SpectroProofer Utilities Follow the instructions below to start SpectroProofer Utilities Windows Click Start point to All Programs point to SpectroProofer Utilities and then click SpectroProofer Utilities Mac OS X Double click the hard disk icon the Applications folder Epso...

Page 12: ...e the printer manual when loading the paper U See Supported Media on page 9 B Start the SpectroProofer Utilities U See Starting SpectroProofer Utilities on page 11 C Click Preparing and executing a color measurement job D Select the job you want to perform Follow the on screen instructions to complete the settings Click the Help button to see the online help for detailed information Note The ICC p...

Page 13: ...ter and then open the front cover of the mounter B Unplug the two interface cables connected with ILS20EP ILS20EPUV C Hold the front of ILS20EP ILS20EPUV and lift the rear a little and then remove it cCaution Donotdroporknockitagainsthardobjects The lens may be scratched or ILS20EP ILS20EPUV may be damaged SpectroProofer Mounter 17 User s Guide Maintenance 13 ...

Page 14: ...ose the front cover of the mounter U See the SpectroProofer Mounter 17 Setup Guide Cleaning the surface of the backing white calibration tile A Open the side cover and then unplug the printer connection cable B Remove the mounter C Turn the mounter around and then remove the backing or the white calibration tile holder cCaution Becausethebackingisfragile donotdropor knock it against hard objects S...

Page 15: ...n with a soft dry cloth F See the SpectroProofer Mounter 17 Setup Guide to setup the mounter U See the SpectroProofer Mounter 17 Setup Guide Cleaning the paper presser A Turn off the printer and then open the front cover of the mounter B Hold both ends of the paper presser and lower it forward C Soak a soft cloth in water with a small amount of mild detergent wring it dry and then wipe away dirt f...

Page 16: ...periodically cleanup the powdery paper about once a month A Open the side cover and then unplug the printer connection cable B Remove the mounter C Remove the paper guide unit and then wipe away the powdery paper D Replacethepaperguideunit installthemounter and then connect the printer connection cable U See the SpectroProofer Mounter 17 Setup Guide SpectroProofer Mounter 17 User s Guide Maintenan...

Page 17: ...e printer remove the mounter and then install the paper guide unit correctly Install the mounter correctly and then turn the printer back on U See the SpectroProofer Mounter 17 Setup Guide For error number 13 or 15 Turnofftheprinter andthenremovethemounter Removeanypackingmaterialsor foreignobjectsaroundthebackingifany andthenresetthebackingcorrectly Install the mounter correctly and then turn the...

Page 18: ...ofer then restart printer Turnofftheprinter andthenconnectthemounter sprinterconnectioncable Checkthat the cable is connected correctly and then turn the printer back on U See the SpectroProofer Mounter 17 Setup Guide SpectroProofer Mounter 17 User s Guide Troubleshooting 18 ...

Page 19: ... message using Job status confirmation if the status of the job becomes Error completion You can check the error messages as described below A In the work screen select Job and then select Property B Click the Log tab C Confirm the message displayed in the Error log Something Wrong with Color Measurement Data If the color measurement data is something wrong confirm the status of SpectroProofer and...

Page 20: ...5 C 50 to 95 F Storage 20 to 40 C 4 to 104 F Specifications Environmental conditions Humidity Operation 30 to 80 Storage 5 to 85 without condensation Dimensions W D H 725 266 193 mm Weight mounter only Approx 8 7 Kg Power supply voltage Input DC42V DC output 5 5v 1 0A the power for ILS20EP ILS20EPUV Accessories White calibration tile holder Backing white black Paper guide unit for SpectroProofer M...

Page 21: ... When transporting repack the devices using protective materials and packing materials When sending for recertification make sure that the white calibration tile and ILS20EP ILS20EPUV are included in the set cCaution ILS20EP ILS20EPUVandthewhitecalibrationtile are adjusted to be a set and given the same number in the factory Make sure that you send the white calibration tile as a set with the colo...

Page 22: ...properly andyou cannot solve the problem using the troubleshooting information in your product documentation contact Epson support services for assistance If Epson support foryourareaisnotlistedbelow contactthedealerwhere you purchased your product Epson support will be able to help you much more quickly if you give them the following information Product serial number Theserialnumberlabelisusually...

Page 23: ...t Epson support Help for Users in Australia Epson Australia wishes to provide you with a high level of customer service In addition to your product documentation we provide the following sources for obtaining information Your Dealer Don t forget that your dealer can often help identify and resolve problems The dealer should always be the first call for advise on problems they can often solve probl...

Page 24: ...r Hotline team can help you with the following over the phone Sales enquiries and product information Product usage questions or problems Enquiries on repair service and warranty Help for Users in Vietnam Contacts for information support and services are Epson Hotline Phone 84 8 823 9239 Service Center 80 Truong Dinh Street District 1 Hochiminh City Vietnam Help for Users in Indonesia Contacts for...

Page 25: ...can access our World Wide Web home page at http www epson com hk Technical Support Hotline You can also contact our technical staff at the following telephone and fax numbers Phone 852 2827 8911 Fax 852 2827 4383 Help for Users in Malaysia Contacts for information support and services are World Wide Web http www epson com my Information on product specifications drivers for download Frequently Ask...

Page 26: ...0 9AM 6PM Prefix local STD code Help for Users in the Philippines To obtain technical support as well as other after sales services users are welcome to contact the Epson Philippines Corporation at the telephone and fax numbers and e mail address below Trunk Line 63 2 706 2609 Fax 63 2 706 2665 Helpdesk Direct Line 63 2 706 2625 E mail epchelpdesk epc epson com ph World Wide Web http www epson com...

Reviews: