background image

29

Printing From Your Computer

When you print from your computer, you can edit and enhance photos, create custom CDs 
or DVDs with your text or photos, or create greeting cards and calendars. Before you start, 
make sure your printer software is installed as described on the 

Start Here

 sheet. 

Follow the instructions in these sections to print your photos:

“Basic Printing in Windows” below

“Basic Printing in Mac OS X” on page 31

“Selecting the Correct Paper Type” on page 34

“Printing Borderless Photos” on page 35

“Printing on CDs or DVDs” on page 38

Basic Printing in Windows

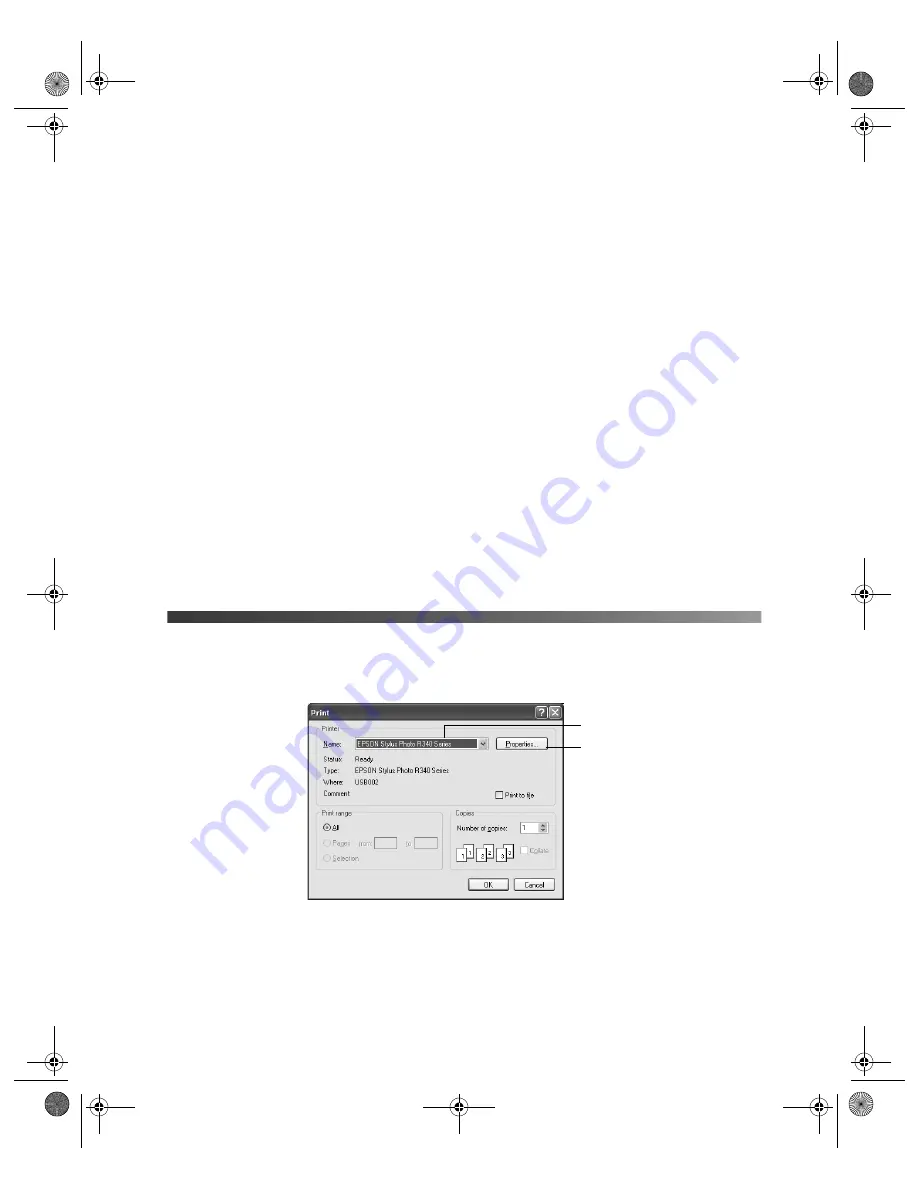
1. From the File menu, click 

Print

. You see a Print window like this one:

2. Make sure 

EPSON Stylus Photo R340 Series

 is selected.

3. Click the 

Preferences

 or 

Properties

 button. (If you see a 

Setup

Printer

, or 

Options


button, click it. Then click 

Preferences

 or 

Properties

 on the next screen.)

Select your printer name here

Click here to open 
your printer software

Pbasics.book  Page 29  Monday, August 1, 2005  12:31 PM

Summary of Contents for R340 - Stylus Photo Color Inkjet Printer

Page 1: ...Epson Stylus Photo R340 Printer Basics Pbasics book Page 1 Monday August 1 2005 12 31 PM ...

Page 2: ...untries laws permit limited copying of copyrighted material in certain circumstances those circumstances may not be as broad as some people assume Epson encourages each user to be responsible and respectful of the copyright laws when using digital cameras scanners and ink jet printers Trademarks Epson Epson Stylus Epson Photo Stickers MicroWeave PRINT Image Matching and the PRINT Image Matching lo...

Page 3: ... an External Device 14 Viewing a Slide Show of Your Photos 15 Copying Photos to Your Computer 15 Removing a Memory Card 16 Printing Without a Computer 17 Printing Photos 17 Viewing and Printing Photos 18 Printing All the Photos on a Memory Card 18 Printing a Range of Photos 18 Printing Photos from a Specific Date 19 Printing a Proof Sheet 19 Choosing Print Settings 20 Touching Up Your Photos 21 Au...

Page 4: ...gs 31 Basic Printing in Mac OS X 31 Selecting the Correct Paper Type 34 Printing Borderless Photos 35 Windows 36 Mac OS X 37 Printing on CDs or DVDs 38 Cleaning the Roller 38 Inserting a CD or DVD 39 Printing Your Design 41 Adjusting the Print Position 41 Adjusting the Print Density 43 Maintaining Your Printer 45 Cleaning the Print Head 45 Replacing an Ink Cartridge 47 Removing and Installing Ink ...

Page 5: ...oblems 62 Miscellaneous Printout Problems 62 Uninstalling Printer Software 64 Windows 64 Mac OS X 64 Where To Get Help 65 Notices 67 Windows System Requirements 67 Macintosh System Requirements 67 Important Safety Instructions 68 Ink Cartridge Safety Instructions 69 Energy Star Compliance 70 FCC Compliance Statement 70 Declaration of Conformity 71 Epson America Inc Limited Warranty 72 Index 75 Pba...

Page 6: ...6 Contents Pbasics book Page 6 Monday August 1 2005 12 31 PM ...

Page 7: ... Performance Management RPM technology optimizes the number and placement of ink droplets on a variety of papers for superior photo quality and performance with manageable print file sizes Three built in memory card slots support CompactFlash Type I and II Secure Digital MultiMediaCard xD Picture Card SmartMedia Sony Memory Stick Memory Stick PRO Memory Stick Duo Memory Stick PRO Duo adapter sold ...

Page 8: ...out Warnings must be followed carefully to avoid bodily injury Cautions must be observed to avoid damage to your equipment Notes contain important information about your printer Tips contain additional hints for better printing Viewing Your On Screen User s Guide Your printer CD ROM includes an on screen User s Guide You need a browser such as Microsoft Internet Explorer 4 0 or later Netscape Navi...

Page 9: ... the feeder under the tab with the printable whiter or glossier side up If you are loading multiple sheets fan the stack of paper before loading it to prevent paper jams Note Don t load paper above the arrow mark inside the left edge guide Some special papers can be loaded only one sheet at a time See your on screen User s Guide for details 3 Slide the left edge guide against the paper Make sure i...

Page 10: ...designed for your printer are formulated to achieve improved lightfastness when used with Epson papers for prints that are properly displayed or stored As with traditional photos proper care will minimize color changes and lengthen display life For display Epson recommends that prints be framed under glass or a protective plastic sleeve to protect them from atmospheric contaminants like humidity c...

Page 11: ...oto R340 2 Open the memory card door 3 Insert the memory card into one of the three slots as shown below Note Insert just one card at a time See your on screen User s Guide for supported photo file formats 4 Push the card in carefully until it stops it doesn t go in all the way When it is in the card light comes on 5 Close the memory card door CompactFlash or Microdrive left Memory Stick SD Secure...

Page 12: ...ter using a USB cable Digital camera with PictBridge or USB DP USB Direct Print support USB thumb drives see http support epson com for a list of compatible drives USB CD DVD burners and drives see http support epson com for a list of compatible drives 100 or 250MB Iomega Zip drive AC or USB powered Memory cards with a commercially available USB adapter such as the MicroTech ZiO Note Epson cannot ...

Page 13: ...vice to the EXT I F USB port on the front of the printer Some digital cameras require a special USB cable if so be sure to use the one that came with the camera 3 Turn on the printer and your camera or storage device After a moment the printer reads and counts the number of images When it s done your images are available for printing see page 17 Note If you used the Stylus Photo R340 to back up yo...

Page 14: ...hat connects the printer to your computer otherwise files on the memory card may be copied to your computer 3 If necessary make sure your drive is plugged in and turned on Then connect a USB cable from your drive to the EXT I F USB port on the front of the printer see page 12 4 Press the Setup button on the printer 5 Press the d button to choose Backup and press OK 6 Press OK When you see the Star...

Page 15: ... To pause the slide show while it is playing press OK To stop the slide show press Back Copying Photos to Your Computer If you ve taken digital photos with your camera you can insert the memory card into your printer s memory card slot and copy the photos to your computer You can access the contents of the card just like any drive on your computer 1 Make sure your computer and printer are connecte...

Page 16: ...be able to read the files on the card Always format cards and delete pictures using your camera and do not copy files to the card from your computer Removing a Memory Card Once you re finished copying photos from your memory card follow the steps below to remove it Be sure to remove any cards before unplugging the USB cable from your printer Caution Do not eject a card while the card light is flas...

Page 17: ...Copying Photos to Your Computer 17 Pbasics book Page 17 Monday August 1 2005 12 31 PM ...

Page 18: ...ngs on page 20 Touching Up Your Photos on page 21 Cropping and Sizing Your Photos on page 23 Printing on CDs and DVDs on page 24 Resetting Default Settings on page 28 Printing Photos Before you begin make sure the printer is in Memory Card mode If the printer is in CD DVD mode press the Memory Card button Before you print make sure you load paper see page 9 and insert your camera s memory card in ...

Page 19: ...s option lets you print all the photos on your memory card at once 1 Press l or r to choose Print All Photos then press OK 2 Press u or d to select the number of copies 3 Press the Print Settings button and choose your print settings see page 20 4 Press the x Start button to print your photos Note To cancel printing press the y Stop button Printing a Range of Photos Choose and print a sequence of ...

Page 20: ...r print settings see page 20 6 Press the x Start button to print your photo Note To cancel printing press the y Stop button Printing a Proof Sheet Print a proof sheet showing thumbnail images and photo numbers for all the photos on your card 1 Press l or r to choose Print Proof Sheet then press OK 2 Press the Print Settings button and choose your print settings see page 20 Depending on your paper ...

Page 21: ...r paper size and press OK 6 After selecting the paper size press d to select Layout and press OK For this paper Select this Paper Type setting Epson Ultra Premium Glossy Photo Paper Ultra Premium Epson Premium Glossy Photo Paper Premium Glossy Epson Premium Semigloss Photo Paper Epson Semigloss Scrapbook Photo Paper Semigloss Epson Premium Luster Photo Paper Premium Luster Epson Photo Paper Epson ...

Page 22: ...o all your photos By default the automatic adjustments are enabled 1 Press the Print Settings button 2 Press the d button to choose Auto Correct then press OK Prints one photo per sheet borderless fits the photo lengthwise on the paper Prints one photo per sheet with borders around the edges Prints a photo on the top half of the sheet Prints two photos per sheet Prints four photos per sheet Prints...

Page 23: ...elect this if you don t want to use P I M Exif or PhotoEnhance Note These settings remain in effect until you change them To reset all settings to the defaults see page 28 To make manual adjustments in addition to the automatic ones follow the steps in the next section Manually Adjusting Your Photos 1 Press the Print Setting button 2 Press d or u to choose one of these options then press the r but...

Page 24: ...n adjust the frame as follows Press the and buttons to change the frame size Press the r l u and d buttons to move the frame position Press the Print Settings button to rotate the frame 5 When you are done press OK Note This setting remains in effect until you print or press the y Stop Clear button Borderless Expansion If you are printing borderless photos you can change the expansion setting to e...

Page 25: ...et printable CDs and DVDs without even turning on your computer You can order ink jet printable CDs and DVDs from your local retailer or several websites including www epsonstore com www pcmall com www cdw com www zones com www warehouse com www macconnection com and www pcconnection com Caution Use only ink jet printable CDs or DVDs for printing Thermal printable and regular CDs and DVDs should n...

Page 26: ... music or video is burned on your ink jet printable CDs or DVDs before you print Otherwise dirt or scratches on the surface may cause errors when you burn the data If you plan to print large numbers of CDs or DVDs it s a good idea to print a small sample then wait a day and check the quality to make sure it is satisfactory Before you insert a CD or DVD make sure the printer is turned on Otherwise ...

Page 27: ...b and the two rollers Push it in until the arrows on the tray and guide are aligned Don t push the tray in too far line up the arrows exactly 4 Follow the instructions below to print your CD or DVD Printing Your CD or DVD After you have loaded a CD or DVD you re ready to print 1 Press the Print CD DVD button to select CD DVD print mode if it is not already selected Line up arrows Keep tray level L...

Page 28: ...nt Settings button and choose additional print settings see page 21 5 Press the x Start button to print your photos Note To cancel printing press the y Stop button Adjusting the Printing Position If your photo is not centered on the CD or DVD you may need to adjust the print position 1 Press the Setup button 2 Select CD DVD Position Up Down or CD DVD Position Left Right then press the r button 1 u...

Page 29: ... return to the Setup menu Note The printer remembers this setting even after it has been turned off so you don t need to adjust the position each time you use the CD DVD function Resetting Default Settings You can reset the printer s settings such as the layout color effects or crop settings to the default settings before printing other photos 1 Press the Setup button 2 Press u to choose Restore F...

Page 30: ...Basic Printing in Mac OS X on page 31 Selecting the Correct Paper Type on page 34 Printing Borderless Photos on page 35 Printing on CDs or DVDs on page 38 Basic Printing in Windows 1 From the File menu click Print You see a Print window like this one 2 Make sure EPSON Stylus Photo R340 Series is selected 3 Click the Preferences or Properties button If you see a Setup Printer or Options button clic...

Page 31: ...uality Photo RPM on selected papers see your on screen User s Guide You can select page layout settings by clicking the Page Layout tab in the Printing Preferences or Properties window 5 Select the paper Type and Size for the paper you ve loaded See Selecting the Correct Paper Type on page 34 for more information about paper types 6 Select your document or image Orientation Tip For more informatio...

Page 32: ...e printer icon in the lower right corner of your screen taskbar 2 Select Printer Settings You see the window shown on page 30 3 Select the default settings you want for all your applications then click OK You can still change the printer settings in your program if necessary Basic Printing in Mac OS X Follow the steps below to print a document 1 From the File menu select Page Setup You see a scree...

Page 33: ...ou see a screen like this 7 Open the Printer menu and select Stylus Photo R340 8 Select Print Settings from the pop up menu 9 Select the following Print Settings as necessary Note The Quality setting on this screen gives you the best combination of quality and speed for most prints Select Stylus Photo R340 Select Print Settings Select Quality or Speed for faster printing Select your media type see...

Page 34: ...he Print Center icon when it appears in the dock Then double click your printer name Stylus Photo R340 In Mac OS X 10 3 x or 10 4 x click the Stylus Photo R340 icon when it appears in the dock You see a screen that shows the progress of your print job 13 You can do one of the following Click the print job then click Delete to delete the job Click the print job then click Hold to pause printing Cli...

Page 35: ...hoto Quality Ink Jet Cards Epson Photo Quality Self Adhesive Sheets Epson Ink Jet Transparencies Photo Quality Ink Jet Paper Epson Matte Paper Heavyweight Epson Double Sided Matte Paper PremierArt Matte Scrapbook Photo Paper for Epson Matte Paper Heavyweight Epson Photo Paper Photo Paper Epson Glossy Photo Paper Epson Photo Quality Glossy Paper Epson Glossy Photo Greeting Cards Glossy Photo Paper ...

Page 36: ... Sizes Paper Type Windows or Media Type setting Macintosh Epson Matte Paper Heavyweight Letter 8 5 11 inches 8 10 inches Matte Paper Heavyweight Epson Photo Paper Letter 8 5 11 inches Photo Paper Epson Glossy Photo Paper Letter 8 5 11 inches 4 6 inches Glossy Photo Paper Epson Ultra Premium Glossy Photo Paper Letter 8 5 11 inches 4 6 inches Ultra Premium Glossy Photo Paper Epson Premium Glossy Pho...

Page 37: ...Ultra Premium Glossy Photo Paper Premium Glossy Photo Paper Premium Semigloss Photo Paper Premium Luster Photo Paper 6 Click the Borderless checkbox Read the message and click OK 7 Select the paper Size for the paper you ve loaded 8 Select your document or image Orientation 9 Click OK to close the Printing Preferences or Properties window 10 Click OK or Print to start printing Select Photo or Best...

Page 38: ...rint 6 Select Stylus Photo R340 in the Format for menu 7 Choose Print Settings from the pop up menu 8 Select one of the following media types Matte Paper Heavyweight Photo Paper Glossy Photo Paper Ultra Premium Glossy Photo Paper Premium Glossy Photo Paper Premium Semigloss Photo Paper Premium Luster Photo Paper 9 Select other print settings as necessary then click Print to start printing Select S...

Page 39: ... DVDs see the on screen help in EPSON Print CD Cleaning the Roller below Inserting a CD or DVD on page 39 Printing Your Design on page 41 Adjusting the Print Position on page 41 Adjusting the Print Density on page 43 Cleaning the Roller Before you print on CDs or DVDs it s a good idea to clean the roller inside the printer You can do this by feeding and ejecting several sheets of plain paper 1 Mak...

Page 40: ...isfactory If you want to check the print position or color see the instructions for Adjusting the Print Position on page 41 and Adjusting the Print Density on page 43 Before you insert a CD or DVD make sure the printer is turned on Otherwise the disc may not be positioned correctly Follow these steps to load CDs and DVDs into your printer Caution If you don t insert the tray correctly you may dama...

Page 41: ...nd ring lie flat on the tray otherwise the printer may be damaged 3 Insert the tray into the printer carefully making sure it is level not tilted up or down Slide the tray under the tab and the two rollers Push it in until the arrows on the tray and guide are aligned Don t push the tray in too far line up the arrows exactly 4 Follow the instructions in Printing Your Design on page 41 to print your...

Page 42: ...t sunlight If you want to check the print position or color see the instructions for Adjusting the Print Position below and Adjusting the Print Density on page 43 Adjusting the Print Position If your printed images and text are not centered the way you want you may need to adjust the printing position Use the blank cardboard position check disk included with your printer or an extra CD You can als...

Page 43: ...h 5 Click Print The confirmation pattern is printed on the position check disk or CD 6 Remove the position check disk or CD and measure the distance from the edge of the hole to the small cross marks distances labeled A and B as shown You ll need a metric ruler with millimeters for these measurements Macintosh Windows Pbasics book Page 42 Monday August 1 2005 12 31 PM ...

Page 44: ...rs may absorb ink differently so you may need to adjust the density for each type of disc Follow these instructions to print a color saturation check pattern and make adjustments as necessary 1 Insert a test CD or DVD for printing as described on page 39 2 Start EPSON Print CD 3 Select Print from the File menu 4 Make sure Stylus Photo R340 is selected then click Print Density Confirmation Pattern ...

Page 45: ...ed in a different location 8 If you want to try a third Color Correction setting you can repeat steps 3 through 6 again and select Third or Third Time 9 Remove the CD or DVD and let it dry for at least 24 hours Then check the saturation levels again You can also use the Brightness and Contrast settings in EPSON Print CD to adjust color saturation See the EPSON Print CD on screen help for instructi...

Page 46: ...r dots or lines are missing from the image you may need to clean the print head This unclogs the nozzles so they can deliver ink properly Print head cleaning uses ink so clean it only if quality declines You can clean the print head either from the printer s control panel or using your printer software To clean it using the printer software the printer must be connected directly to your computer n...

Page 47: ...k pattern prints 6 Examine the nozzle check pattern you printed Each staggered horizontal and straight vertical line should be complete with no gaps in the pattern as shown below If your printout looks okay you re done Press Back to finish If there are any gaps as shown below press OK and then Print to clean the print head again If you don t see any improvement after cleaning three or four times c...

Page 48: ...t head nozzles may dry out To ensure good results use genuine Epson ink cartridges and do not refill them Other products may cause damage to your printer not covered by Epson s warranty When an installed cartridge is more than six months old you may need to replace it if printouts don t look their best If the quality doesn t improve after cleaning and aligning the print head you can replace the ca...

Page 49: ...ee a message press the Setup button then Press d to choose Ink Cartridge Replacement then press OK Press OK again The print head moves to the replacement position 3 Open the cartridge cover 4 Press in the tab on the back of the cartridge and lift the cartridge out of the printer Dispose of it carefully Warning Keep ink cartridges out of the reach of children and do not drink the ink If ink gets on...

Page 50: ... gently push the cartridge down until it clicks into place 7 If you need to replace another ink cartridge repeat steps 4 through 6 before continuing with step 8 8 Close the ink cartridge cover 9 Press OK and close the printer cover The printer begins charging the ink delivery system 10 When you see a message that charging is complete after about a minute press OK Pbasics book Page 49 Monday August...

Page 51: ... paper is loaded 2 Press the Setup button 3 Press d to choose Head Alignment then press OK 4 Press the x Start button to print the alignment pattern 5 Once the pattern is done printing examine the first row or set of boxes marked 1 Select the box 1 9 which is most evenly printed with no noticeable streaks or lines You may need to use a magnifying glass 6 Press r press u or d to choose the box numb...

Page 52: ...r oils inside the printer Don t use any cleaning sheets included with special paper they may jam inside the printer Transporting the Printer If you move your printer some distance you need to prepare it for transportation in its original box or one of a similar size Caution To avoid damage always leave the ink cartridges installed when transporting the printer 1 Turn on the printer wait until the ...

Page 53: ...orting the printer remove the tape securing the print head and test your printer If you notice a decline in print quality clean the print head see page 45 if output is misaligned align the print head see page 50 Adjusting the LCD Brightness You can adjust the LCD brightness for the best view depending on the lighting conditions in the room where your printer is located 1 Press the Setup button 2 P...

Page 54: ...sing Problems Your Epson Stylus Photo R340 includes a number of ways to help you diagnose problems To identify the most common problems check for messages on the control panel display and follow the instructions provided Some of the most common messages are explained in the next section If you re not sure whether the problem is coming from your printer or the computer run a printer check as descri...

Page 55: ...the Start button Load paper in the sheet feeder see page 9 and press the x Start button The printer resumes printing Ink cartridges cannot be recognized Black T048120 Cyan T048220 Magenta T048320 Yellow T048420 Light Cyan T048520 Light Magenta T048620 The genuine Epson ink cartridges listed above are recommended for replacement Reinstall the cartridge shown see page 47 Service required Parts insid...

Page 56: ... The printer prints the nozzle check pattern Make sure the memory card or storage disk has been inserted correctly If so check to see if there is a problem with the card or disk and try again Use a compatible formatted memory card see page 11 or a compatible storage device see page 12 Cannot recognize the device Make sure the memory card has been inserted correctly see page 11 If you connected a U...

Page 57: ...ging finishes before you turn off the printer or it may charge improperly and use excess ink the next time you turn it on Make sure the ink cartridge cover is closed completely and no packing material remains in the printer Turn off the printer wait a moment then turn it back on to clear the error You re having problems installing the printer software Carefully follow the installation instructions...

Page 58: ...ing from your computer run a printer check as described on page 55 If the check page prints make sure your software is installed correctly If you re printing on a network you need to set up your printer for network printing as described in your on screen User s Guide The printer sounds as though it is printing but nothing prints Make sure the print head nozzles are not clogged To clean the print h...

Page 59: ...sing Note Borderless printing takes longer than normal especially near the edges of the paper Printing without a computer is also a bit slower If you are printing a landscape photo without a computer it takes longer for the printer to rotate and process the image Your memory card does not work correctly If you re using different kinds of memory cards make sure only one card is inserted at a time M...

Page 60: ...ine Epson inks Make sure you load paper with the printable side face up The printable side is usually the whiter or brighter side of the paper Make sure your paper isn t damp or curled or loaded face down the printable side should be face up If it s damp or curled reload a new stack of paper When printing on special paper check the instructions in the paper package You may need to use an included ...

Page 61: ...Type or Media Type setting matches the paper you loaded see page 34 for guidelines Make sure your paper isn t damaged old dirty or loaded face down If it is reload a new stack of paper with the printable side up it is usually whiter or shinier You see wrong or missing colors Make sure the Ink setting is set to Color for color images or black and white photos Also make sure your software is set for...

Page 62: ...ake sure the paper support extension is pulled up If paper doesn t feed remove it from the sheet feeder reload it against the right edge then slide the left edge guide against the paper If multiple pages feed at once remove the paper from the sheet feeder fan the edges to separate the sheets and carefully reload it If paper jams press the x Start button to clear the jam If that doesn t clear the p...

Page 63: ...r DVD won t feed into the printer Make sure you hold the CD DVD tray level as you load it into the tray guide not tilting it up or down Don t push in the tray too far but line up the arrows exactly as described on page 40 Miscellaneous Printout Problems The image is reversed Turn off the Flip Horizontal setting in the Page Layout screen Windows Print Settings window under the Advanced settings Mac...

Page 64: ...uctions Image size or position is incorrect Make sure paper and layout options are set correctly Your images may not match the width height proportions aspect ratio of the paper size or layout you re using Images may be cropped to fit the paper and layout You see incorrect characters Make sure the USB cable is securely connected and meets the system requirements on page 67 Then try printing again ...

Page 65: ... sure your EPSON Stylus Photo R340 icon is selected and click OK Then follow the on screen instructions 6 In Windows 98SE or Me click EPSON USB Printer Devices in the program list and click the Add Remove button When you see the prompt asking if you want to reboot click No 7 Restart your computer when you re done When you are ready to reinstall the printer software follow the instructions for your...

Page 66: ... You can purchase genuine Epson ink and paper from an authorized Epson reseller To find the nearest reseller please call 800 GO EPSON 800 463 7766 To purchase online visit www epsonstore com U S sales only In Canada please call 800 463 7766 for reseller referral Service Access World Wide Web From the Internet you can reach Epson Support at http support epson com At this site you can download drive...

Page 67: ...66 Problem Solving Pbasics book Page 66 Monday August 1 2005 12 31 PM ...

Page 68: ... an improperly shielded USB cable especially a cable more than 6 5 feet 2 meters long may cause the printer to malfunction Macintosh System Requirements An Apple iMac series Power Macintosh G3 G4 or G5 PowerBook iBook or eMac Mac OS X 10 2 4 or later 512MB of available RAM 200MB or more available hard disk space recommended VGA display or better CD ROM or DVD drive for installing the printer softw...

Page 69: ... shocks or vibrations or dust Leave enough room around the printer for sufficient ventilation Do not place the printer near a radiator or heating vent or in direct sunlight Place the printer on a flat stable surface that extends beyond the printer base in all directions The printer will not operate properly if it is tilted or at an angle When storing or transporting the printer do not tilt it stan...

Page 70: ...t move the print head by hand You may damage the printer Install the ink cartridge immediately after you remove it from its package Leaving the cartridge unpacked for a long time before use can result in reduced print quality Do not use an ink cartridge beyond the date printed on the package For best results use up the ink cartridges within six months of first installing them Store ink cartridges ...

Page 71: ...interference to radio and television reception which can be determined by turning the equipment off and on the user is encouraged to try to correct the interference by one or more of the following measures Reorient or relocate the receiving antenna Increase the separation between the equipment and receiver Connect the equipment into an outlet on a circuit different from that to which the receiver ...

Page 72: ...al device Each product marketed is identical to the representative unit tested and found to be compliant with the standards Records maintained continue to reflect the equipment being produced can be expected to be within the variation accepted due to quantity production and testing on a statistical basis as required by 47CFR 2 909 Operation is subject to the following two conditions 1 this device ...

Page 73: ...arranty service involves the exchange of the printer or a part the item replaced becomes Epson property The replacement printer or part may be new or refurbished to the Epson standard of quality and at Epson s option may be another model of like kind and quality Epson s liability for replacement of the covered printer will not exceed the original retail selling price of the covered printer Exchang...

Page 74: ...PECIAL INCIDENTAL OR CONSEQUENTIAL DAMAGES RESULTING FROM THE USE OR INABILITY TO USE THE EPSON PRODUCT WHETHER RESULTING FROM BREACH OF WARRANTY OR ANY OTHER LEGAL THEORY In Canada warranties include both warranties and conditions Some jurisdictions do not allow limitations on how long an implied warranty lasts and some jurisdictions do not allow the exclusion or limitation of incidental or conse...

Page 75: ...74 Notices Pbasics book Page 74 Monday August 1 2005 12 31 PM ...

Page 76: ...ensity 22 43 to 44 adjusting print position 27 to 28 41 to 43 cleaning roller 25 38 inserting in printer 25 to 26 39 to 40 ordering 24 printing on 24 to 28 38 to 44 printing without computer 24 to 28 problems 62 Characters incorrect 63 Checking printer 55 Cleaning print head 45 to 46 printer 50 roller 25 38 sheets 51 Color Management settings Macintosh 33 Color problems 60 ColorLife Photo Paper 34...

Page 77: ... Horizontal setting 62 Full bleed printing 35 to 37 G Glossy papers 20 34 35 36 37 Grainy prints 60 H Head Cleaning utility 45 to 46 Help Epson 65 High Speed setting 58 I Incorrect characters 63 colors 60 margins 63 Index 19 Ink cartridge level of ink in 31 47 ordering 47 replacing 47 to 49 safety instructions 48 69 Ink Jet Transparencies 34 Ink level checking Windows 31 without computer 47 Insert...

Page 78: ...10 P Page Setup Mac OS X 31 Paper Epson 10 20 34 35 feeding problems 61 jams 61 loading 9 to 10 orientation 9 to 10 32 Paper Size setting Macintosh 32 37 Windows 30 36 Paper Source setting Windows 36 Paper support 9 to 10 Paper Type setting control panel 20 Windows 30 Photo viewer adjustment 52 PhotoEnhance 22 Photographs accessing 11 to 16 adjusting quality 21 to 22 backing up 14 copying to compu...

Page 79: ...21 selecting photos 18 to 19 touching up photos 21 to 22 Printing slow 58 Problems CD DVD 62 diagnosing 53 to 56 error messages 54 to 55 ink 54 to 55 installing software 56 to 57 LCD panel 57 memory card 58 miscellaneous 62 to 63 paper feeding 61 print quality 59 to 61 printer 53 to 63 setup 56 to 57 Proof sheet 19 Protecting photos 10 Q Quality problems 59 to 61 Quality setting 22 Quality Type se...

Page 80: ...setting Windows 30 U Uninstalling software 64 Unplugging memory cards 16 USB 57 64 67 USB DP 12 to 14 USB drive 12 to 14 User s Guide 8 Utilities Head Cleaning 45 to 46 Nozzle Check 46 Print Head Alignment 50 V View and print 18 Viewing photos 18 Viewing slide show 15 W Warranty 72 to 73 Windows basic printing 29 to 30 cancelling printing 30 default print settings 31 system requirements 67 uninsta...

Page 81: ...80 Index Pbasics book Page 80 Monday August 1 2005 12 31 PM ...

Reviews: