background image

EPSON PowerLite 503c/713c Projector

9/01

EPSON PowerLite 503c/713c Projector 

3

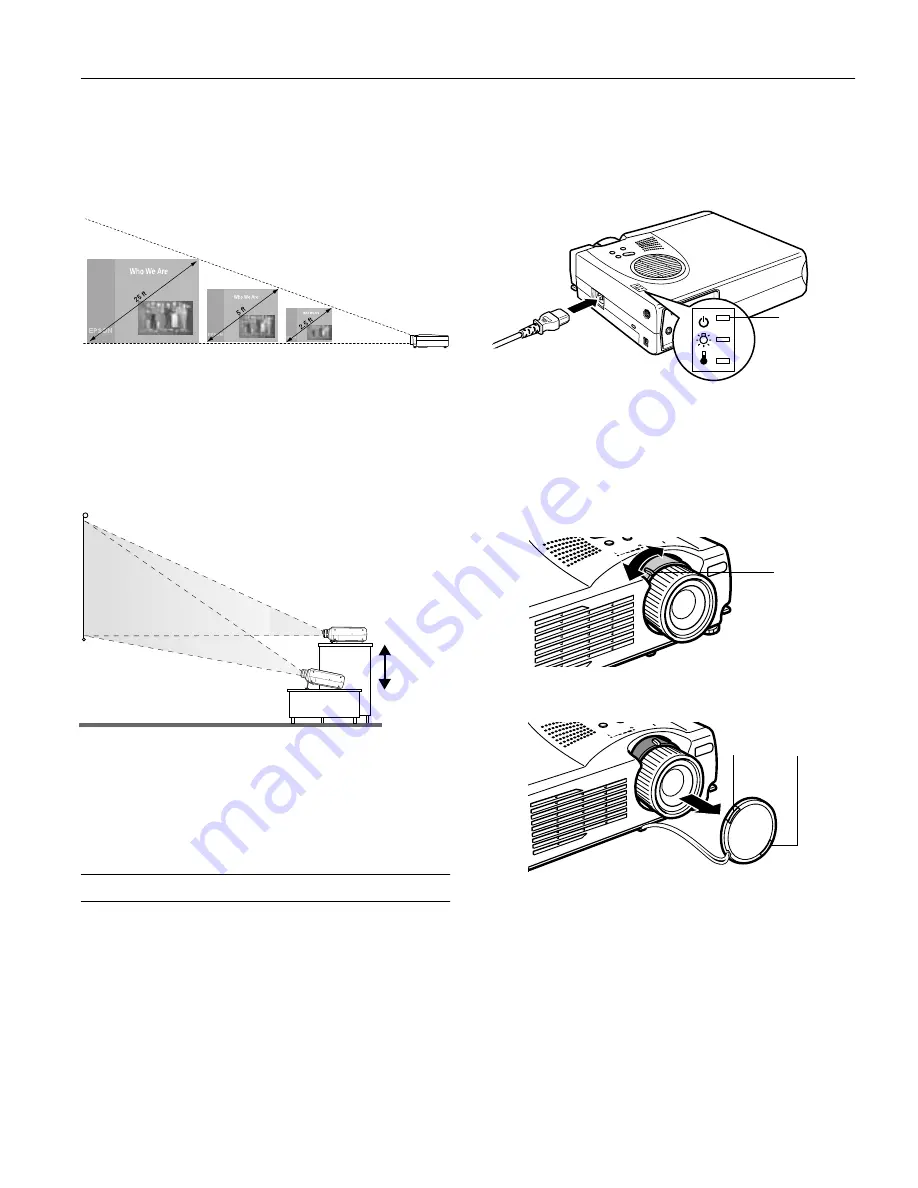
Use the figure below as a guideline to help you determine how 
far from the screen to place the projector. Image size generally 
increases with distance, but may vary depending on how you 
position the lens ring and whether you have adjusted the 
image size with other settings. 

If you place the projector below the level of the screen, you’ll 
have to tilt it up by extending the feet as shown. Tilting the 
projector upward causes the image to lose its square shape, but 
you can correct the distortion by pressing the 

Keystone


button as described on page 5. 

If you place the projector level with the bottom of the screen, 
the image will be square and you won’t have to adjust it. If 
you place the projector higher than the bottom of the screen, 
the image will still be square, but you won’t be able to fill the 
whole screen with the image.

Starting Up the Projector

Make sure your projector and other equipment are set up and 
connected correctly. Then turn on your projector, as described 
below, followed by any equipment you’ve connected to it. You 
can turn on your computer and video equipment in any order, 
but if you have both a computer and video source connected, 
you may have to switch to the desired source as described on 
page 4. 

Turning On the Projector

Follow these steps to plug in and turn on the projector:

1. Connect one end of the power cord to the projector’s power 

inlet. 

2. Connect the other end to a grounded electrical outlet. 

The power light on top of the projector turns orange, 
indicating that the projector is receiving power but not yet 
turned on. 

3. Use the tab on the lens ring to rotate the ring and extend the 

lens.

4. Squeeze the lens cap tabs and remove the lens cap.

Caution

: Do not use the projector with the lens cap in place. 

The heat generated by the lens can damage the cap.

3.6 to 4.3 ft

7 to 9 ft

38 to 45 ft

distance from 
screen

ideal 
height

power light

tab

squeeze here

Summary of Contents for PowerLite 713c

Page 1: ...0 W Lamp life About 1000 hours Part number ELPLP14 Remote Control Range 32 8 feet 10 meters Batteries Alkaline AA 2 Mouse Compatibility Supports PS 2 USB ADB Dimensions Height 2 8 to 3 4 inches 72 to 87 mm Width 8 4 inches 213 mm Depth 10 5 inches 267 mm Weight 5 8 lb 2 6 kg Electrical Rated frequency 50 to 60 Hz Power supply 100 to 120 VAC 1 9 A 200 to 240 VAC 1 0 A Power consumption Operating 23...

Page 2: ... under the projector Make sure the projector is within 6 feet of a grounded electrical outlet or extension cord and within 5 feet of your computer and or video source Place the projector directly in front of the center of the screen facing it toward the screen squarely Otherwise your image will not be square Mode Refresh Rate Hz Resolution VGAEGA 70 640 x 350 VGA60 VGA72 VGA75 VGA85 VGA Text VGA T...

Page 3: ...whole screen with the image Starting Up the Projector Make sure your projector and other equipment are set up and connected correctly Then turn on your projector as described below followed by any equipment you ve connected to it You can turn on your computer and video equipment in any order but if you have both a computer and video source connected you may have to switch to the desired source as ...

Page 4: ... to select the correct source Allow a few seconds for the projector to sync up after pressing the button If you re using a Macintosh laptop You may need to set up your system to display on the projector screen as well as the LCD screen Follow these steps 1 From the Apple menu select Control Panels then click Monitors and Sound 2 Click the Arrange icon 3 Drag one monitor icon on top of the other If...

Page 5: ...ghtly smaller You can also perform electronic keystone correction using the projector s Setting menu Shutting Down the Projector When you ve finished using the projector follow the recommended procedure to shut it down This extends the life of the lamp and protects the projector from possible overheating Note When the projector has not received any input signals for 30 minutes it automatically tur...

Page 6: ...s is a good time to replace it following the instructions on page 8 red The lamp is burned out Replace it as described on page 8 flashing red There is a problem with the lamp power supply fuse or circuit If necessary replace the lamp as described on page 8 flashing orange The projector is too hot Make sure the temperature surrounding the projector does not exceed 104 F and there is plenty of space...

Page 7: ...l bar Button 4 Draws a freehand line Button 5 Erases highlighting effects Enter pointer button Use the Enter button to navigate in menus or to use the remote as a mouse pointer when the projector is connected to a computer with the mouse cable The Enter button acts as a mouse left click Light Illuminates all buttons on the remote control Esc Stops the current function Pressing Esc while viewing a ...

Page 8: ...ord 2 Stand the projector on end to keep dust from falling inside 3 To clean the filter EPSON recommends using a small vacuum cleaner designed for computers and other office equipment If you don t have one gently clean the filter using a very soft brush such as an artist s camel hair brush If the dirt is difficult to remove or if the filter is torn replace it Contact your dealer or EPSON to obtain...

Page 9: ...d tighten its screw securely The projector won t come on if the lamp cover is loose Optional Accessories Related Documentation CPD 12796 EPSON PowerLite 503c 713c User s Guide CPD 12797 EPSON PowerLite 503c 713c Quick Setup sheet CPD 12798 CD ROM containing projector software and software User s Guide and projector User s Guide Service Manual TM EMP503 Parts Price List PL EMP503 PL EMP713 handle P...

Page 10: ...EPSON PowerLite 503c 713c Projector 10 EPSON PowerLite 503c 713c Projector 9 01 ...

Reviews: