background image

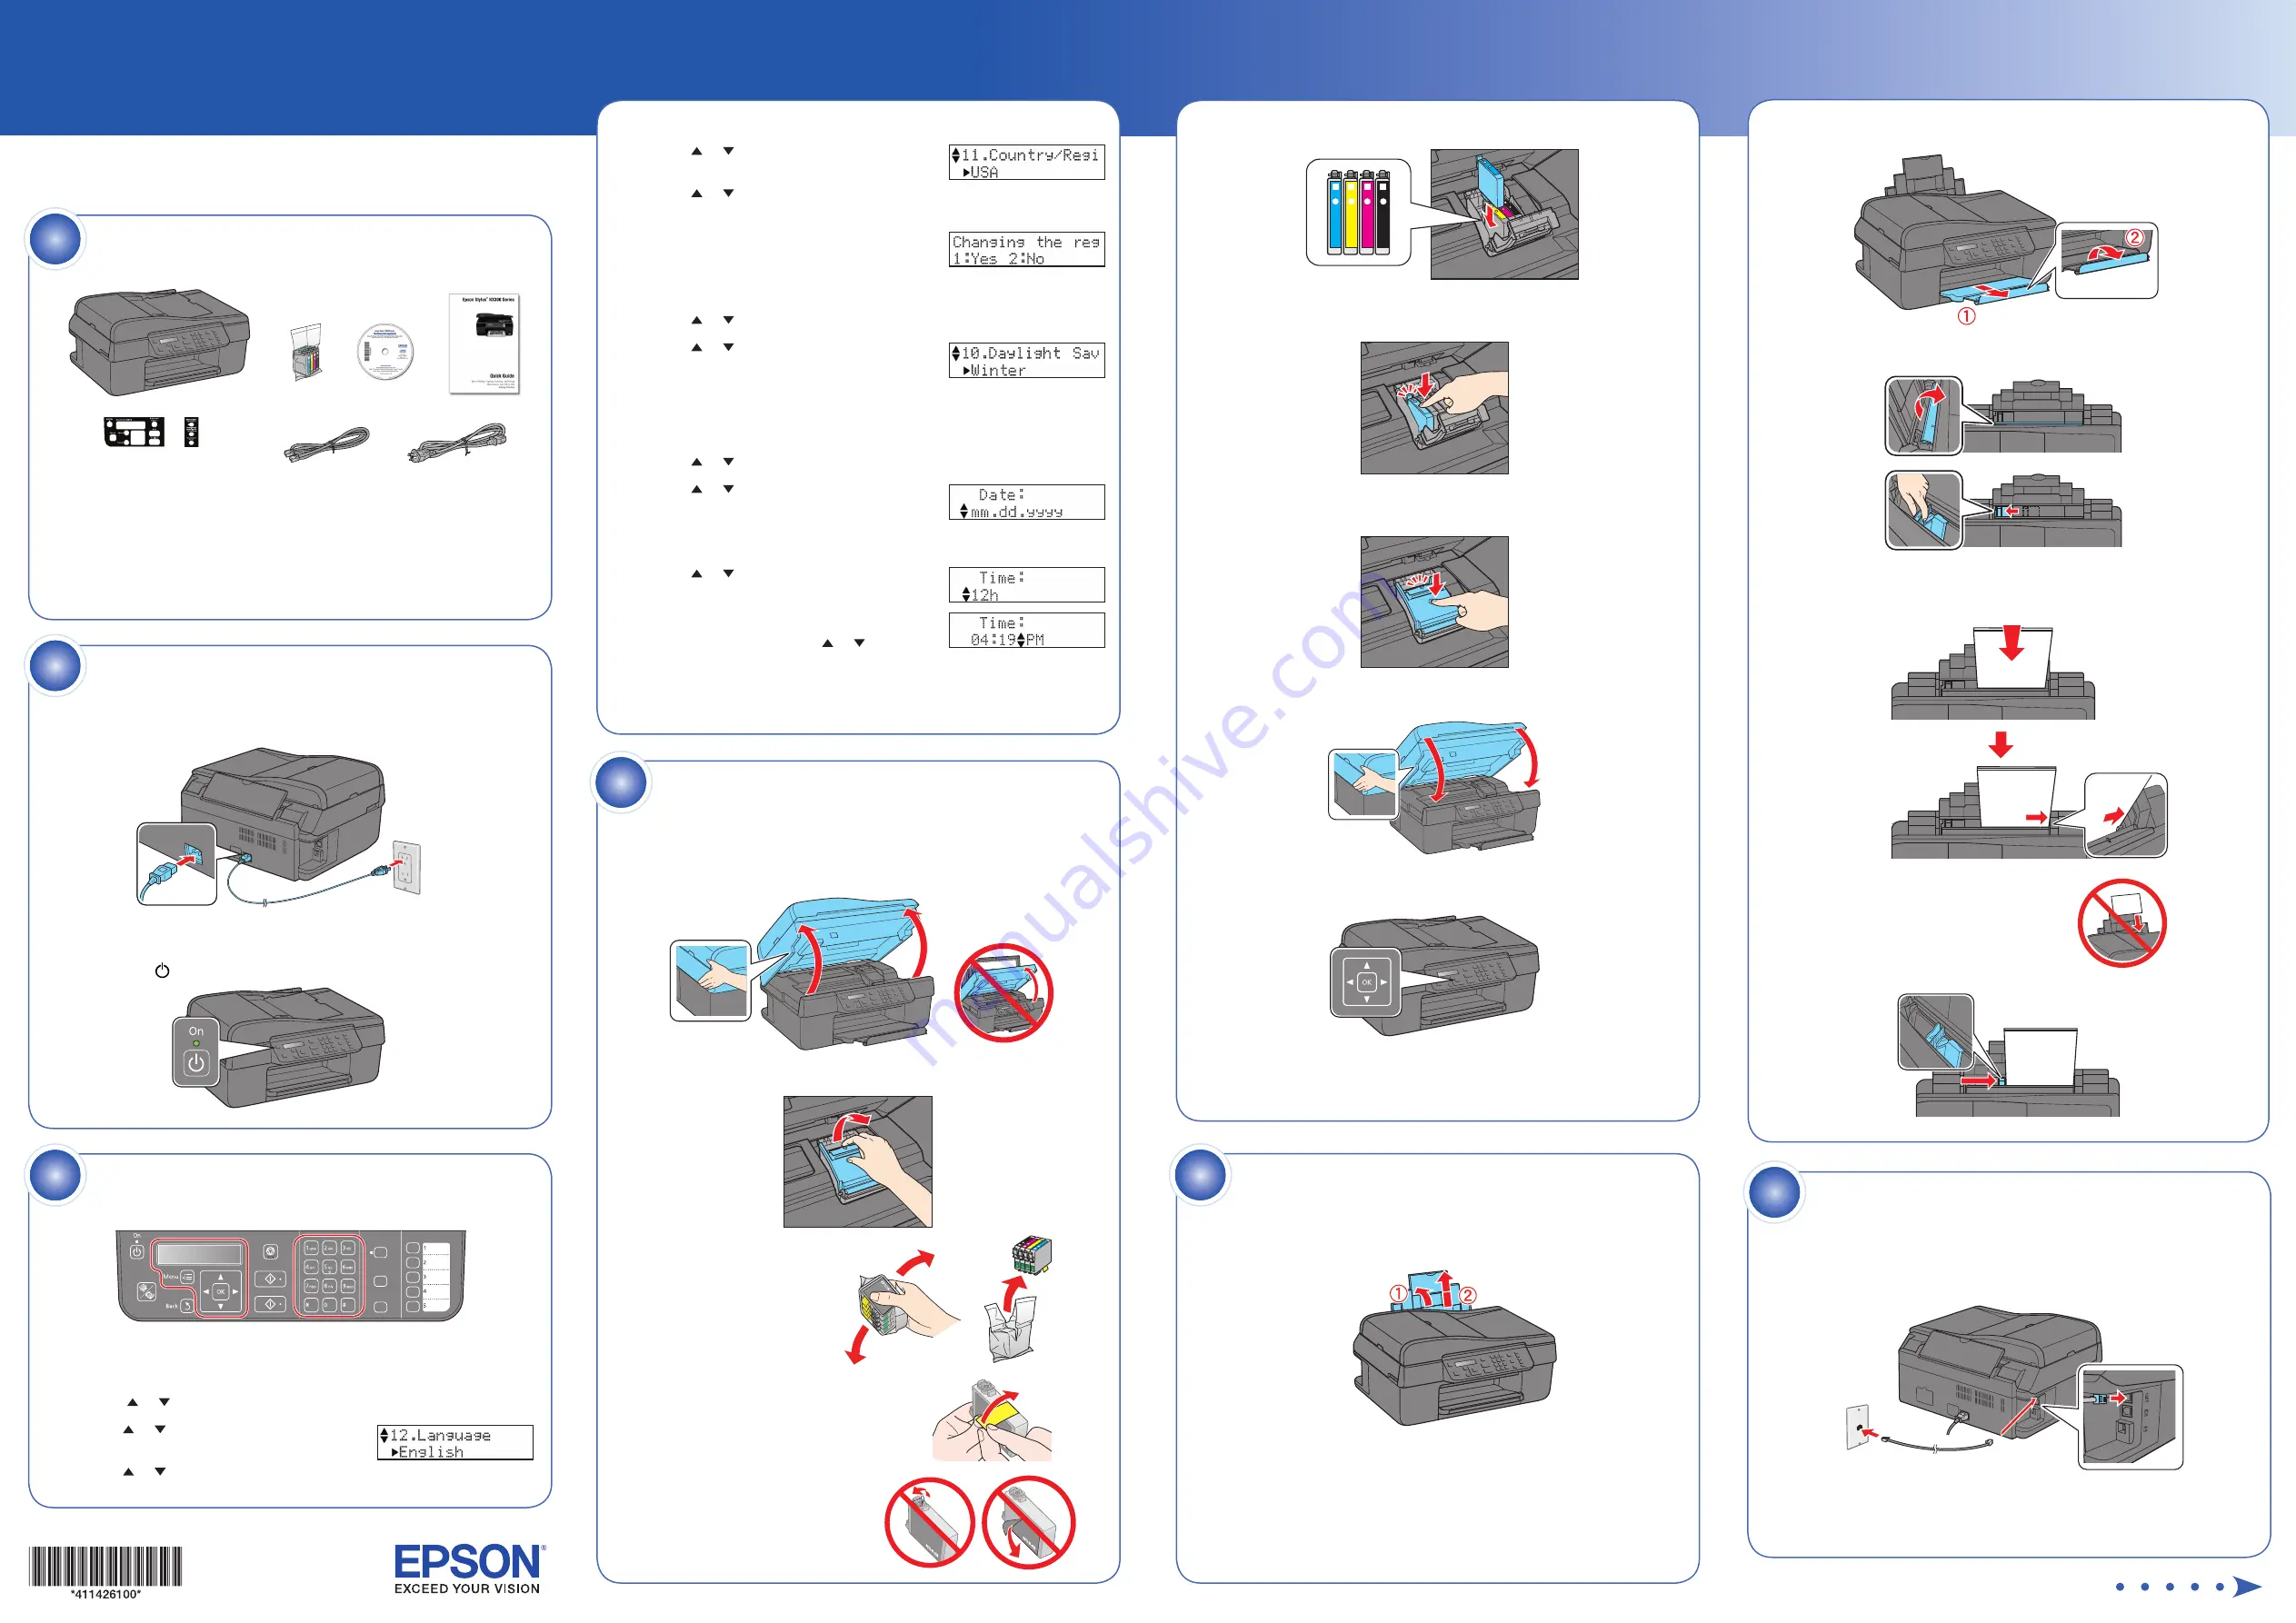
Choose your settings

Select your language:

  1 

Press 

Menu

 to enter the setup mode.

  2

  Press 

or

to select 

Maintenance

, then press 

OK

.

  3

  Press

or

to select your 

Language

then press 

OK

.

  4

  Press

or

to select your laguage, 

then press 

OK

.

If anything is missing, contact Epson as described on the back 
in “Any questions?”.

Caution:

 Do not open the ink cartridge package until you are ready to 

install the ink. Cartridges are vacuum packed to maintain reliability.

Canada only:

 For French speakers, remove sticker(s) from the backing 

sheet and place over corresponding text on the control panel.

Unpack

1

Start Here

2


Open the output tray, pull out the extension, and raise the paper 
stopper.

3


Slide the edge guide to the left while holding the feeder guard forward.

4


Load paper against the right edge guide and behind the tab, with the 
printable side face up.


Note

: Don’t load the paper sideways; 

always load it short edge first.

5


Slide the edge guide over.

5


 Insert the cartridges in the holder for each color.

6


 Press each cartridge down until it clicks.

7


Close the ink cartridge cover and press it down until it clicks.

8


Close the scanner.

9


Press the 

OK

 button to charge the ink. Charging takes about 2 minutes.


Caution:

 Don’t turn off the NX300 Series while it is charging or you’ll 

waste ink

(Included for Canada only)

Epson Stylus

®

 NX300 Series

1


Connect the power cable.


 Caution:

 Do not connect to your computer yet.

2


Press the

On

 button.

Turn on the NX300 Series

2

Install ink cartridges

Note:

 Don’t load paper before installing the ink cartridges.

1


Open the scanner.

2


 Open the cartridge cover.

3


 Shake the ink cartridges, 
then unpack them.

4


Remove only the yellow tape from each 
cartridge.


 Caution:

 Don’t remove any other 

seals from the cartridges.

3

Load paper

5

1


Open the paper support and pull up the extension.

To use the NX300 Series for faxing, connect the included phone cord from 
a telephone wall jack to the 

LINE

 port on the NX300 Series. To connect a 

telephone or answering machine, see the 

Quick Guide

 for instructions.

Note:

 If you’re connecting to a DSL phone line, you must use a DSL filter or 

you won’t be able to fax. Contact your DSL provider for the necessary filter.

Connect the phone cord

6

Select your country:

  1 

Press

or

to select 

Country/Region

then press 

OK

.


2

  Press

or

to select your 

Region

then press 

OK

.


3

  If you change the region, confirm your 

selection at next screen by pressing the 

1

 key (for yes) on the numeric keypad. 

Enter the date and time:


1

  Press

or

to select 

Daylight Saving Time

, then press 

OK

.


2

  Press

or

to select 

Summer

, if your 

region uses Daylight Saving Time and 

it’s currently in effect. (DST is effective 

from spring to summer.) Otherwise select 

Winter

 to turn off the setting.


3

  Press 

OK

.


4

  Press

or

to select 

Date/Time

, then press 

OK

.


5

  Press

or

to select the type of 

date display, then press 

OK

.


6

  Use the numeric keypad to change 

the date, then press 

OK

.


7

  Press

or

to select a 12-hour or 24-hour 

display, then press 

OK

.


8

  Use the numeric keypad to set the time.


9

  If you selected 

12h

, Press

or

to 

select 

AM

 or 

PM

.


10

  Press 

OK

.


When you’re finished choosing your settings, press 

Menu

 to exit.

Auto Answer/

Space

Redial/Pause

Stop/

Clear Settings

B

&

W

Color

Copy/Fax

Speed Dial

Group Dial/

Backspace

4

Summary of Contents for NX300 - Stylus Color Inkjet

Page 1: ...talling the ink cartridges 1 Open the scanner 2 Open the cartridge cover 3 Shake the ink cartridges then unpack them 4 Remove only the yellow tape from each cartridge Caution Don t remove any other seals from the cartridges 3 Load paper 5 1 Open the paper support and pull up the extension To use the NX300 Series for faxing connect the included phone cord from a telephone wall jack to the LINE port...

Page 2: ...talling the ink cartridges 1 Open the scanner 2 Open the cartridge cover 3 Shake the ink cartridges then unpack them 4 Remove only the yellow tape from each cartridge Caution Don t remove any other seals from the cartridges 3 Load paper 5 1 Open the paper support and pull up the extension To use the NX300 Series for faxing connect the included phone cord from a telephone wall jack to the LINE port...

Page 3: ...talling the ink cartridges 1 Open the scanner 2 Open the cartridge cover 3 Shake the ink cartridges then unpack them 4 Remove only the yellow tape from each cartridge Caution Don t remove any other seals from the cartridges 3 Load paper 5 1 Open the paper support and pull up the extension To use the NX300 Series for faxing connect the included phone cord from a telephone wall jack to the LINE port...

Page 4: ...talling the ink cartridges 1 Open the scanner 2 Open the cartridge cover 3 Shake the ink cartridges then unpack them 4 Remove only the yellow tape from each cartridge Caution Don t remove any other seals from the cartridges 3 Load paper 5 1 Open the paper support and pull up the extension To use the NX300 Series for faxing connect the included phone cord from a telephone wall jack to the LINE port...

Page 5: ...r local reseller Need paper and ink Your software works with Windows 2000 XP XP Professional x64 Edition Windows Vista and Mac OS X 10 3 9 10 4 x or 10 5 x Windows 1 Make sure the NX300 Series is NOT CONNECTED to your computer Note If you see a Found New Hardware screen click Cancel and disconnect the USB cable You can t install your software that way 2 Insert the NX300 Series software CD With Win...

Page 6: ...r local reseller Need paper and ink Your software works with Windows 2000 XP XP Professional x64 Edition Windows Vista and Mac OS X 10 3 9 10 4 x or 10 5 x Windows 1 Make sure the NX300 Series is NOT CONNECTED to your computer Note If you see a Found New Hardware screen click Cancel and disconnect the USB cable You can t install your software that way 2 Insert the NX300 Series software CD With Win...

Page 7: ...r local reseller Need paper and ink Your software works with Windows 2000 XP XP Professional x64 Edition Windows Vista and Mac OS X 10 3 9 10 4 x or 10 5 x Windows 1 Make sure the NX300 Series is NOT CONNECTED to your computer Note If you see a Found New Hardware screen click Cancel and disconnect the USB cable You can t install your software that way 2 Insert the NX300 Series software CD With Win...

Page 8: ...r local reseller Need paper and ink Your software works with Windows 2000 XP XP Professional x64 Edition Windows Vista and Mac OS X 10 3 9 10 4 x or 10 5 x Windows 1 Make sure the NX300 Series is NOT CONNECTED to your computer Note If you see a Found New Hardware screen click Cancel and disconnect the USB cable You can t install your software that way 2 Insert the NX300 Series software CD With Win...

Reviews: