background image

58

5.

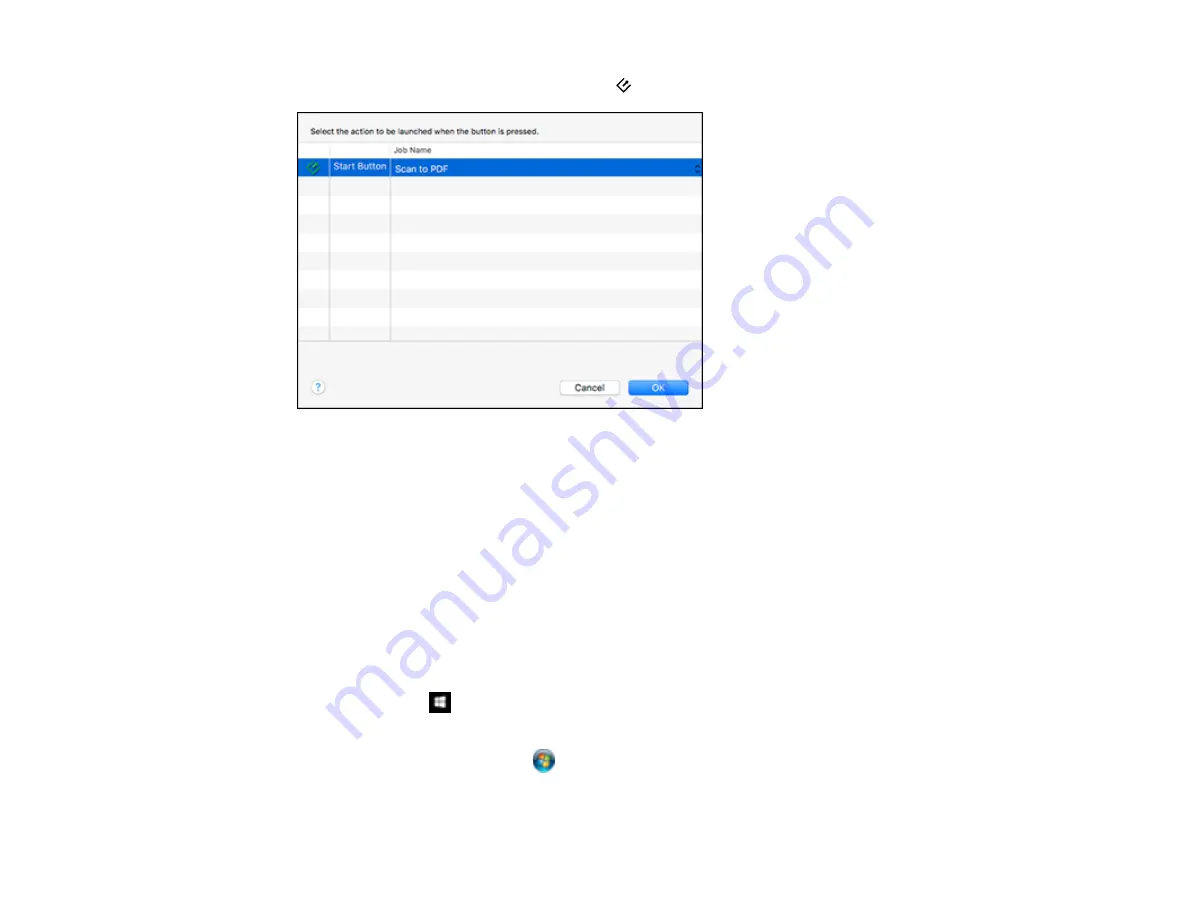
Select the job that you want to assign to the

start button.

6.

Click

OK

.

Parent topic:

Starting a Scan from a Scanner Button

Starting a Scan Using the Epson Scan 2 Icon

You can start the Epson Scan 2 program to select scan settings, scan, and save the scanned image to a
file.

Note:

If you are using your Epson product with the Windows 10 S operating system, you cannot use the

software described in this section. You also cannot download and install any Epson product software
from the Epson website for use with Windows 10 S; you must obtain software only from the Windows
Store.

Windows 10:

Click

and select

EPSON

>

Epson Scan 2

.

Windows 8.x

: Navigate to the

Apps

screen and select

Epson Scan 2

.

Windows (other versions)

: Click

or

Start

, and select

All Programs

or

Programs

. Select

EPSON

>

Epson Scan 2

>

Epson Scan 2

.

Mac:

Open the

Applications

folder, open the

Epson Software

folder, and select

Epson Scan 2

.

Summary of Contents for ES-400

Page 1: ...ES 400 ES 500W ES 500WR User s Guide ...

Page 2: ......

Page 3: ...ated Card Specifications 34 Loading Special Originals 34 Special Original Specifications 40 Wi Fi Networking 42 Network Security Recommendations 42 Connecting to an Existing Wi Fi Network 43 Manually Connecting to a Wi Fi Network 44 Wi Fi Protected Setup WPS 44 Using WPS to Connect to a Network 45 Using WPS PIN Mode to Connect to a Network 46 Setting Up Network Scanning 46 Determining the Scanner ...

Page 4: ...ormat Options 79 Scan Resolution Guidelines 80 Scanning with NFC from Your Android Device 81 Scanning Special Projects 83 Scanning Two Originals onto One Sheet Stitching Images 83 Scanning Multi Page Originals as Separate Files Windows 86 Saving Scanned Documents as a Searchable PDF Using Epson Scan 2 90 Saving Scanned Documents as a Searchable PDF with Document Capture Mac 91 Saving a Scan as an ...

Page 5: ...138 Original Jams in Scanner 139 Scanning is Slow 141 Solving Network Scanning Problems 142 Cannot Scan Over a Network 142 Scanner Cannot Connect to a Wireless Router 143 Solving Scanned Image Quality Problems 144 Back of Original Image Appears in Scanned Image 144 Scanned Characters are Blurry 144 Characters are not Recognized During Conversion to Editable Text OCR 145 Ripple Patterns Appear in a...

Page 6: ...ecifications 156 Network Interface Specifications ES 500W ES 500WR 157 Flatbed Scanner Dock Specifications ES 400 158 Safety and Approvals Specifications 159 Notices 161 Important Safety Instructions 161 Restrictions on Copying 163 Default Delay Times for Power Management for Epson Products 164 Binding Arbitration and Class Waiver 164 Trademarks 167 Copyright Notice 168 libTIFF Software Acknowledg...

Page 7: ...u can download the Epson ScanSmart software for use with your scanner Visit epson com support U S epson ca support Canada or epson com jm support Caribbean and select your product Then select the software on the Downloads tab For instructions on scanning with Epson ScanSmart see the help information in Epson ScanSmart or click here to access the Epson ScanSmart User s Guide ...

Page 8: ...Scanner Parts Locations Changing the Power Off and Sleep Timer Settings Scanner Parts Locations See these sections to identify the parts on your scanner Scanner Parts Scanner Buttons and Lights User Replaceable Epson Scanner Parts and Accessories Parent topic Scanner Basics Scanner Parts ...

Page 9: ...the ES 500W ES 500WR but the parts are the same for the ES 400 1 ADF Automatic Document Feeder 2 Edge guides 3 Input tray 4 Input tray extension 5 Output tray 6 Output tray extensions 7 Stopper 1 Kensington security slot 2 USB port ...

Page 10: ...10 3 Power inlet 1 Cover open lever 2 Scanner cover 3 Pickup rollers 4 Separation rollers 1 AC adapter ...

Page 11: ... 2 Power cord 3 USB cable Parent topic Scanner Parts Locations Scanner Buttons and Lights Buttons ES 400 1 power button 2 double feed detection skip button 3 slow mode button 4 stop button 5 start button ...

Page 12: ...12 ES 500W ES 500WR 1 power button 2 Wi Fi connect button 3 Wi Fi button 4 double feed detection skip button 5 slow mode button 6 stop button 7 start button 8 NFC tag ...

Page 13: ...13 Lights ES 400 1 error light 2 automatic feeding mode light 3 ready light 4 double feed detection skip light 5 slow mode light ...

Page 14: ...r Replaceable Epson Scanner Parts and Accessories You can purchase genuine Epson accessories at epson com U S sales epson ca Canadian sales or epson com jm Caribbean sales You can also purchase accessories from an Epson authorized reseller To find the nearest one call 800 GO EPSON 800 463 7766 in the U S or 800 807 7766 in Canada Part Part number Carrier sheet B12B819051 Roller assembly kit B12B81...

Page 15: ...can use the Epson Scan 2 Utility to change the time period before the scanner enters sleep mode and turns off automatically 1 Do one of the following to access the Epson Scan 2 Utility Windows 10 Click and select EPSON Epson Scan 2 Utility Windows 8 x Navigate to the Apps screen and select Epson Scan 2 Utility Windows other versions Click or Start and select All Programs or Programs Select EPSON E...

Page 16: ...the scanner to go to sleep as the Sleep Timer setting 4 Select the length of time after which you want the scanner to automatically turn off when not in use as the Power Off Timer setting 5 Click Set to save the settings 6 Close the Epson Scan 2 Utility Parent topic Scanner Basics ...

Page 17: ... Loading Originals in the Input Tray You can load originals that meet the document specifications in the input tray Caution Do not load photos or valuable original documents or artwork directly into the input tray This may wrinkle or damage the original Load these originals using an optional carrier sheet The steps below describe loading originals of the same size To load originals of multiple siz...

Page 18: ...s extension and open the stopper Note If you are loading an original that is 15 5 inches 393 8 mm or longer do not pull out the input or output tray extensions and do not open the stopper 3 Slide the input tray edge guides all the way out ...

Page 19: ...n your stack of originals Note If you are loading an original that is 15 5 inches 393 8 mm or longer load only one sheet at a time 5 Stack the originals with the printed side facing down and slide the stack so the leading edge is at an angle as shown ...

Page 20: ...nted side down and top edge first and guide them in until they meet resistance If you are loading paper business cards load up to 15 cards printed side down and long edge first into the input tray horizontally and slide them in until they meet resistance ...

Page 21: ...21 ...

Page 22: ...ading hole punched originals load them with the holes facing down or to the side as shown The holes must be within 1 2 inches 30 mm of the edge of the originals 7 Slide the edge guides against the edges of the original ...

Page 23: ...e stopper on the output tray extension to fit the ejected originals Note If thicker paper does not eject properly or falls from the output tray push in the output tray and allow the originals to eject freely onto the surface below the scanner If the scanned images are affected by the originals ejecting below the scanner try placing the scanner on the edge of a table where the ejected originals can...

Page 24: ...s Original Document Specifications Related topics Scanning Loading Multiple Sizes of Originals in the Input Tray You can load originals of different sizes paper types and thicknesses at one time in the input tray Just make sure they meet the original document specifications Caution Do not load photos or valuable original documents or artwork directly into the input tray This may wrinkle or damage ...

Page 25: ...s extension and open the stopper Note If you are loading originals that are 15 5 inches 393 8 mm or longer do not pull out the input or output tray extensions and do not open the stopper 3 Slide the input tray edge guides all the way out ...

Page 26: ...st the edges of the widest original 6 If necessary during scanning adjust the position of the stopper on the output tray extension to fit the ejected originals Note If thicker paper does not eject properly or falls from the output tray push in the output tray and allow the originals to eject freely onto the surface below the scanner If the scanned images are affected by the originals ejecting belo...

Page 27: ...low mode button once before scanning to slow down the feeding speed press it again to return to normal speed Parent topic Loading Originals in the Input Tray Original Document Specifications You can load original documents that meet these specifications in your scanner ...

Page 28: ... inches 210 297 mm A5 5 8 8 2 inches 148 210 mm A6 4 1 5 8 inches 105 148 mm B5 7 2 10 1 inches 182 257 mm Width 2 0 to 8 5 inches 50 8 to 215 9 mm Height 15 5 to 240 inches 393 7 to 6096 mm 13 to 35 lb 50 to 130 g m 1 sheet Receipts With Epson ScanSmart ES 500WR Receipts scanned at 301 dpi or more up to 8 5 15 5 inches 215 9 393 8 mm Receipts scanned at 300 dpi or less up to 3 14 26 inches 79 660...

Page 29: ... wet ink Ripped curled or wrinkled originals Originals containing staples or paper clips Originals with holes other than standard hole punched originals Originals that are bound Originals with carbon paper backing Transparencies Glossy originals Carbon less paper Perforated originals Originals with labels or stickers Fabric or other non paper originals Parent topic Loading Originals in the Input T...

Page 30: ...30 1 Open the input tray pull out the output tray and open the stopper Do not pull out the extensions 2 Slide the input tray edge guides all the way out ...

Page 31: ...31 3 Load plastic or laminated cards printed side down and long edge first into the input tray horizontally and slide them in until they meet resistance ...

Page 32: ...32 Note Do not load plastic cards vertically ...

Page 33: ...Settings tab in Epson Scan 2 when scanning the cards Note If you do not disable the Detect Double Feed setting and a double feed error occurs remove the plastic or laminated card from the input tray and reload it Press the double feed detection skip button to disable the Detect Double Feed feature and scan again ...

Page 34: ... 1 24 mm maximum 1 card horizontal Plastic cards standard ISO781A ID 1 compliant 0 03 inch 0 76 mm maximum 5 cards horizontal Laminated cards 4 7 5 9 inches 120 150 mm or smaller 0 03 inch 0 8 mm maximum 1 card Note Plastic cards with glossy surfaces may not scan properly Parent topic Loading Plastic and Laminated Cards in the Input Tray Loading Special Originals You can load a photo or large thic...

Page 35: ...s extension and open the stopper Note If you are loading originals that are 15 5 inches 393 8 mm or longer do not pull out the input or output tray extensions and do not open the stopper 3 Slide the input tray edge guides all the way out ...

Page 36: ...36 4 Load envelopes vertically in the input tray with the printable side down and the flap facing as shown Slide in the envelopes until they meet resistance ...

Page 37: ...wn and place it in the center of an optional carrier sheet Make sure the illustration on the front edge of the carrier sheet is facing up For a photo or an irregularly shaped original load it in the center of an optional carrier sheet with the printed side face down Make sure the illustration on the front edge of the carrier sheet is facing up ...

Page 38: ...38 6 Load the carrier sheet in the input tray as shown until it meets resistance Folded original ...

Page 39: ...regularly shaped original 7 Slide the edge guides against the edges of the original or carrier sheet 8 Turn off the Detect Double Feed setting on the Main Settings tab in Epson Scan 2 when scanning special originals ...

Page 40: ...es Special Original Specifications Related topics Scanning Special Original Specifications You can load photos envelopes or large thick or folded originals that meet these specifications in your scanner Paper type Paper size Paper thickness Loading capacity Large originals plain paper fine paper or recycled paper load only in a carrier sheet Up to this size A3 11 7 16 5 inches 297 420 mm 0 012 inc...

Page 41: ...ading capacity Irregularly shaped originals load only in a carrier sheet Up to this size A4 8 3 11 7 inches 210 297 mm 0 012 inch 0 3 mm maximum excluding the thickness of the carrier sheet 5 carrier sheets Parent topic Loading Special Originals ...

Page 42: ...ines and other intrusions Enable security on your wireless LAN Enable the appropriate security on the wireless LAN you plan to use with your product Network security such as a network password can deter interception of traffic over the wireless LAN Your router may already have a default password enabled by your Internet service provider ISP See your ISP and router documentation for instructions on...

Page 43: ...tact lists Parent topic Wi Fi Networking Connecting to an Existing Wi Fi Network You can set up your scanner to communicate with your computer using a wireless router The wireless router can be connected to your computer over a wireless or wired network 1 Epson scanner 2 Wireless router 3 Computer with a wireless interface 4 Computer 5 Internet 6 Ethernet cable used only for wired connection to th...

Page 44: ...r 2 Turn on the scanner 3 Press the Wi Fi button on the scanner s control panel 4 From your computer or device open the list of wireless networks and select the SSID shown on the scanner label Then select the connect option 5 Enter the password shown on the scanner label The AP mode light comes on in blue indicating an AP mode connection 6 Connect your computer or device to the wireless network Wa...

Page 45: ...y pressing and holding the WPS button on your wireless router until the security light flashes or by enabling the WPS setting in your router firmware The router enters WPS discovery mode for 2 minutes Note If you cannot locate the WPS button or there are no buttons on the router or access point see the documentation provided with your router for details 3 Press and hold the Wi Fi connect button on...

Page 46: ...de lights flash alternately while establishing the connection When the Wi Fi light on the scanner stays on the scanner is connected to the network Note If the error light turns on the connection failed Press the stop button to clear the error restart the router and repeat these steps 4 Select the link below to set up network scanning You must set up network scanning to connect your computer and wi...

Page 47: ... enter it in these steps 1 Do one of the following to start the Epson Scan 2 Utility Windows 10 Click EPSON Epson Scan 2 Utility Windows 8 x Navigate to the Apps screen and select Epson Scan 2 Utility Windows other versions Click or Start All Programs or Programs EPSON Epson Scan 2 Epson Scan 2 Utility Mac Open the Applications folder click Epson Software and click Epson Scan 2 Utility 2 Select Se...

Page 48: ...ss setting type in the IP address or host name of your Epson Network Interface Unit or scanner and click Add 5 Click OK to check the connection You see a confirmation message 6 Click OK to save your settings and close the Epson Scan 2 Utility 7 If you are setting up network scanning using the optional Network Interface Unit see the link below to scan Determining the Scanner s IP Address ...

Page 49: ...ig EpsonNet Config 2 Locate your scanner in the list and write down the IP address Parent topic Setting Up Network Scanning Epson DocumentScan App for iOS Android You can use the Epson DocumentScan app to scan from a network scanner to an iOS or Android device over a direct Wi Fi connection For more information about Epson DocumentScan search for the app on the App Store iOS or Google Play Android...

Page 50: ...ning 6 OK button and arrows use the arrows to highlight an option and the OK button to select it 7 start button starts scanning when networking is enabled Parent topic Using the Network Interface Unit Connecting the Network Interface Unit See the documentation that came with the optional Epson Network Interface Unit for instructions on connecting it to your scanner After connecting the Epson Netwo...

Page 51: ...twork Interface Unit 2 On the LCD screen of the Epson Network Interface Unit select the computer you want to send the scanned file to and press the OK button Note If your scanner is part of a network group make sure to set the computer to the same network group or it will not appear on the LCD screen 3 If you set up a password in Document Capture Pro enter the password at the prompt 4 Select a sca...

Page 52: ...ettings If you need to solve a problem with your network connection you can restore all network settings to their defaults ES 500W ES 500WR 1 Turn off your scanner 2 Press and hold the Wi Fi button and the power button until the Wi Fi and AP mode lights turn on Then release the buttons 3 Wait until the Wi Fi and AP mode lights flash alternately and then turn off The default network settings are re...

Page 53: ...hese methods Note For instructions on scanning with Epson ScanSmart see the help information in Epson ScanSmart or click here to access the Epson ScanSmart User s Guide Starting a Scan from a Scanner Button Starting a Scan Using the Epson Scan 2 Icon Starting a Scan from a Scanning Program Parent topic Scanning Starting a Scan from a Scanner Button You can scan using the start button on your scann...

Page 54: ... Note If your scanner is connected to one computer via USB and another computer via wireless pressing the start button on the scanner will save the scanned images to the wirelessly connected computer ES 500W ES 500WR Adding and Assigning Scan Jobs with Document Capture Pro Windows Assigning Start Button Settings or Scan Jobs Mac Parent topic Starting a Scan Related topics Loading Originals Adding ...

Page 55: ...n Software Document Capture Pro You see the Document Capture Pro window 2 If you see a Switch to Simple View button in the upper right corner of the window click it You see a window like this 3 Click the Job Settings button Note If you do not see the button click the symbol in the Job bar ...

Page 56: ... button click the Button Assignment icon 6 Select the job that you want to assign to the start button from the drop down list 7 Click OK then click OK again You can now use the assigned scan job when you scan with the start button on your product Parent topic Starting a Scan from a Scanner Button Assigning Start Button Settings or Scan Jobs Mac You can view or change the default scan settings when...

Page 57: ... ES 500WR Launch Epson Scan 2 before scanning from the start button on your scanner 1 Start Document Capture on a computer connected to the product 2 Click the Manage Job icon from the toolbar at the top of the window You see a window showing the current scan job list 3 If you want to add a scan job click Add or the icon enter a name for the new job select settings as necessary and click OK You ca...

Page 58: ...ating system you cannot use the software described in this section You also cannot download and install any Epson product software from the Epson website for use with Windows 10 S you must obtain software only from the Windows Store Windows 10 Click and select EPSON Epson Scan 2 Windows 8 x Navigate to the Apps screen and select Epson Scan 2 Windows other versions Click or Start and select All Pro...

Page 59: ...59 You see an Epson Scan 2 window like this ...

Page 60: ... section You also cannot download and install any Epson product software from the Epson website for use with Windows 10 S you must obtain software only from the Windows Store 1 Open your scanning program and select its scanning option See your scanning program help for instructions 2 Select your product Note In certain programs you may need to select your product as the source first If you see a S...

Page 61: ...61 You see an Epson Scan 2 window like this ...

Page 62: ...the product 2 Do one of the following to start Document Capture Pro Windows 10 Click and select Epson Software Document Capture Pro Windows 8 x Navigate to the Apps screen and select Document Capture Pro Windows other versions Click or Start and select All Programs or Programs Select Epson Software Document Capture Pro You see the Document Capture Pro window You may see a screen asking you to sele...

Page 63: ...Scan Setting Name list or select Scan Scan Settings from the menu bar You see a window like this 5 Select any displayed settings you want to use and click OK Note See the help information in Document Capture Pro for details 6 Click Scan ...

Page 64: ...red images click the Add Page s icon and follow the instructions on the screen 8 Check the scanned images and edit them as necessary Note See the help information in Document Capture Pro for details 9 Click one of the Destination icons to choose where to send your scanned files If you cannot see all of the icons below click the arrows next to the icons 10 Depending on the destination you chose cli...

Page 65: ... original in the product 2 Do one of the following to start Document Capture Pro Windows 10 Click and select Epson Software Document Capture Pro Windows 8 x Navigate to the Apps screen and select Document Capture Pro Windows other versions Click or Start and select All Programs or Programs Select Epson Software Document Capture Pro You see the Document Capture Pro window You may see a screen askin...

Page 66: ...ur scanner from the scanner list if necessary 5 If you want to use a scan job click one of the job icons in the Job section of the window to complete and send your scan with one click Note If you do not see any icons click the V symbol next to the Job Settings button ...

Page 67: ...o for details If you do not see the Scan Settings button click the symbol in the Scan and bar 7 Click one of the destination icons in the Scan and section of the window Your product starts scanning and you see the settings window 8 Select any destination settings as necessary and click OK Note See the help information in Document Capture Pro for details 9 Confirm your settings and click OK Parent ...

Page 68: ...an select settings preview and change the scanned file settings as necessary Note The settings may vary depending on the software version you are using See the Help information in Document Capture for details 1 Load your original in the product 2 Open the Applications folder open the Epson Software folder and select Document Capture You see a window like this Note You may need to select your scann...

Page 69: ...s 4 Select any displayed scan settings you want to use Note See the Help information in Document Capture for details 5 If you want to select detailed scan settings close the Scan Settings window open the Scan menu at the top of the Mac desktop and select Displays the EPSON Scan Setup Screen 6 Click the Scan icon and select any detailed scan settings you want to use from the Epson Scan 2 window 7 C...

Page 70: ...captured images click the icon select Acquire from Scanner and repeat the previous steps 9 Check the scanned images and edit them as necessary 10 Click one of the Destination icons to choose where to send your scanned files If you cannot see all of the icons below click the arrow next to the icons 11 Depending on the destination you chose click OK or Send to complete the operation Parent topic Sca...

Page 71: ...s your document and saves the scanned file in JPEG format in your operating system s Documents or My Documents folder or opens it in your scanning program You can select settings preview and change the scanned file settings as necessary 1 Load your original in the product 2 Start Epson Scan 2 ...

Page 72: ...72 You see this window ...

Page 73: ...setting that matches the size of your original or select Auto Detect to have Epson Scan 2 automatically detect the size You can select Customize to enter a custom size if necessary 6 Select your original image type and how you want it scanned as the Image Type setting 7 Select the Resolution setting you want to use for your scan 8 Select any of the additional settings that you want to use on the M...

Page 74: ...t or other special original see the link below for other setting requirements for special documents 13 Select the format in which you want to save your scanned file as the Image Format setting If necessary select Options and select any desired format options 14 Enter the file name for your scanned file in the File Name field Select Settings to modify the file name settings ...

Page 75: ...ab You can select these additional scanning settings on the Epson Scan 2 Main Settings tab Stitch Images When scanning double sided originals lets you lay out images from both sides of the original onto one scanned page Rotate Rotates the original image clockwise to the desired angle before scanning it Select Auto to allow your product to automatically rotate the image based on the orientation of ...

Page 76: ...side of a blank page and adds the marks to the scanned image adjust this setting to prevent this Detect Double Feed Detects a double feed paper error in the ADF If you are scanning an original envelope or plastic card select Off Parent topic Scanning in Epson Scan 2 ...

Page 77: ...anning Settings Advanced Settings Tab You can select these additional scanning settings on the Epson Scan 2 Advanced Settings tab Not all adjustment settings may be available depending on other settings you have chosen ...

Page 78: ...image Gamma Adjusts the midtone density of the scanned image Threshold Adjusts the level at which black areas in text and line art are delineated improving text recognition in OCR Optical Character Recognition programs Unsharp Mask Makes the edges of certain image areas clearer Turn off this option to leave softer edges Descreening Removes the ripple pattern that might appear in subtly shaded imag...

Page 79: ...se only contents skew is corrected when you select the Paper and Contents Skew setting Large originals If the Document Size list does not contain the document size you want to scan select Customize to create a custom size Long paper If the Document Size list does not contain the document size you want to scan select Auto Detect Long Paper or select Customize to create a custom document size Lamina...

Page 80: ... using Adobe Reader Acrobat or other programs You can save multi page documents in one PDF file Recognized text in the scanned document can be searched Parent topic Scanning in Epson Scan 2 Scan Resolution Guidelines The resolution setting in your scanning software measured in dpi dots per inch controls the amount of detail captured in your scans Increasing the resolution raises the amount of deta...

Page 81: ...ng with a resolution of 300 dpi or less and over 215 inches 5461 mm and up to 240 inches 6096 mm long with a resolution of 200 dpi or less Parent topic Scanning Scanning with NFC from Your Android Device You can easily connect your Android 4 0 or later device to your product using NFC Near Field Communication ES 500W ES 500WR Once connected you can scan using Epson DocumentScan Note If the scanner...

Page 82: ...he scanner automatically Note If you do not have Epson DocumentScan installed the app store page for the Epson DocumentScan app opens on your device Install Epson DocumentScan and repeat this step 4 Follow the Epson DocumentScan on screen instructions to scan your document Note If the Android device and product disconnect try to scan a document The device and scanner should reconnect automatically...

Page 83: ...erver or Cloud Service Windows Parent topic Scanning Scanning Two Originals onto One Sheet Stitching Images You can scan both sides of a double sided or folded original and combine them into a single image with the Epson Scan 2 Stitch Images settings not available for all products Note The settings may vary depending on the software version you are using See the help information in Document Captur...

Page 84: ...84 You see a window like this 4 Click the Scan Settings button then click Detailed Settings Note If you do not see any icons click the V symbol next to the Job Settings button ...

Page 85: ...85 You see an Epson Scan 2 window like this ...

Page 86: ...ning Special Projects Scanning Multi Page Originals as Separate Files Windows You can use Document Capture Pro Windows to scan multi page originals as separate scanned files You indicate how the separate files are created by defining a maximum page count per file or by inserting blank pages barcodes or characters that can be detected by the software as separation markers Note The settings may vary...

Page 87: ...dow 3 If you see a Switch to Simple View button in the upper right corner of the window click it You see a window like this 4 Click the Scan Settings button Note If you do not see any icons click the V symbol next to the Job Settings button ...

Page 88: ... OK Note See the help information in Document Capture Pro for details 6 Click one of the destination icons except Print in the Scan and section of the window Your product starts scanning and you see the settings window 7 Select the Apply job separation checkbox 8 Click Separation Settings ...

Page 89: ...See the help information in Document Capture Pro for details 10 If necessary select Create Folder and select a folder name 11 Select any other folder naming settings you want and click OK then click OK again Your originals are saved into separate files and folders as specified Parent topic Scanning Special Projects ...

Page 90: ...scan using OCR with Epson Scan 2 Select Epson Software Updater in the Windows Start menu or Mac Epson Software folder and select the component and PDF extension files to download and install them 1 Load your original in the product for scanning 2 Start Epson Scan 2 3 Select your scan settings 4 Click Preview and adjust the area you want to scan if necessary 5 If you are using the ADF reload the ej...

Page 91: ...ics Loading Originals Saving Scanned Documents as a Searchable PDF with Document Capture Mac You can scan a document with Document Capture and save the text in a searchable PDF In a searchable PDF test is recognized using Optical Character Recognition OCR and then embedded in the scanned original Note The settings may vary depending on the software version you are using See the Help information in...

Page 92: ...92 You see a window like this Note You may need to select your scanner from the scanner list 3 Click the Scan icon ...

Page 93: ...s 4 Select any displayed scan settings you want to use Note See the Help information in Document Capture for details 5 If you want to select detailed scan settings close the Scan Settings window open the Scan menu at the top of the Mac desktop and select Displays the EPSON Scan Setup Screen 6 Click the Scan icon and select any detailed scan settings you want to use from the Epson Scan 2 window 7 C...

Page 94: ...t the previous steps 9 Check the scanned images and edit them as necessary 10 Open the File menu at the top of the Mac desktop and select Save As 11 Select PDF as the File Type setting and click the Options button 12 Select the Create Searchable PDF checkbox and click OK 13 Click one of the Destination icons to choose where to send your scanned file If you cannot see all of the icons below click t...

Page 95: ...ftware version you are using See the help information in Document Capture Pro for details 1 Load your original in the product 2 Do one of the following to start Document Capture Pro Windows 10 Click and select Epson Software Document Capture Pro Windows 8 x Navigate to the Apps screen and select Document Capture Pro Windows other versions Click or Start and select All Programs or Programs Select E...

Page 96: ... Document Capture Pro for details 6 Click one of the destination icons except Print to choose where to send your scanned files Your product starts scanning and you see the settings window 7 Select the Office format file you want to use from the File Type drop down list Note The first time you select an Office format file you are prompted to download a plug in update for Microsoft Office files Sele...

Page 97: ...cial Projects Related topics Loading Originals Saving a Scan as an Office Format File Mac You can use Document Capture Mac to save your scans in one of these Microsoft Office file fomats Microsoft Word docx and Microsoft Excel xlsx Note The settings may vary depending on the software version you are using See the Help information in Document Capture for details 1 Load your original in the product ...

Page 98: ...98 You see a window like this Note You may need to select your scanner from the scanner list 3 Click the Scan icon ...

Page 99: ...s 4 Select any displayed scan settings you want to use Note See the Help information in Document Capture for details 5 If you want to select detailed scan settings close the Scan Settings window open the Scan menu at the top of the Mac desktop and select Displays the EPSON Scan Setup Screen 6 Click the Scan icon and select any detailed scan settings you want to use from the Epson Scan 2 window 7 C...

Page 100: ...steps 9 Check the scanned images and edit them as necessary 10 Open the File menu at the top of the Mac desktop and select Save As 11 Select DOCX Word or XLSX Excel as the File Type setting Note The first time you select an Office file type setting in Document Capture you see a prompt to download a necessary plug in for Microsoft Office files Select Yes and follow the on screen instructions to dow...

Page 101: ...d images to a SharePoint server or a cloud service Note The settings may vary depending on the software version you are using See the help information in Document Capture Pro for details 1 Load your original in the product 2 Do one of the following to start Document Capture Pro Windows 10 Click and select Epson Software Document Capture Pro Windows 8 x Navigate to the Apps screen and select Docume...

Page 102: ...102 You see a window like this 4 Click the Scan Settings button Note If you do not see any icons click the V symbol next to the Job Settings button ...

Page 103: ...rts scanning and you see the settings window Note If you cannot see all of the icons the service software may not be installed or the service may not be available on your platform 7 Enter any required information to set up the destination You may need to log in to your cloud service to authenticate the connection and allow Document Capture Pro to access the cloud service If you have previously cre...

Page 104: ...ngs and click OK Note See the help information in Document Capture Pro for details Your originals are uploaded to the indicated server or cloud service Parent topic Scanning Special Projects Related topics Loading Originals ...

Page 105: ...n Perfection V19 V39 to use the optional flatbed scanner dock To attach the flatbed scanner and dock to your document scanner follow the installation instructions that came with your flatbed scanner dock Note You cannot use the flatbed scanner dock and Epson Network Interface Unit options at the same time See these sections to learn about the flatbed scanner dock option Flatbed Scanner Dock Parts ...

Page 106: ...k Windows Scanning from the Flatbed Scanner Dock See these sections to scan when using the optional flatbed scanner dock Scanning from the Docked Flatbed Scanner Scanning from the ADF with the Flatbed Scanner Dock Attached Parent topic Using the Optional Flatbed Scanner Dock Windows Scanning from the Docked Flatbed Scanner You can place originals directly on the scanner glass of the flatbed scanne...

Page 107: ...Do not place heavy objects on the scanner glass and do not press on the glass with too much force or it may damage the scanner Do not leave photos on the scanner glass for an extended period or they may stick to the glass 1 Close the document scanner s output tray ...

Page 108: ...108 2 Open the flatbed scanner cover ...

Page 109: ...109 3 Place your original facedown on the scanner glass with the top edge facing as shown Slide the original to the edges of the indicated corner ...

Page 110: ...ource setting 7 Select other scan settings as necessary 8 Click Scan Parent topic Scanning from the Flatbed Scanner Dock Related tasks Scanning from the ADF with the Flatbed Scanner Dock Attached Scanning in Epson Scan 2 Scanning from the ADF with the Flatbed Scanner Dock Attached Depending on the length of your originals you may need to adjust the position of the input tray output tray and stoppe...

Page 111: ...111 Extend the output tray a little longer than the length of the original and move the stopper forward or backward as necessary ...

Page 112: ...mm to 297 mm long Open and extend the document scanner s input tray open the flatbed scanner s stopper and slide the stopper forward or backward so that it is a little longer than the length of the original Do not open the output tray on the document scanner ...

Page 113: ...Scanner Dock Related tasks Scanning from the Docked Flatbed Scanner Scanning in Epson Scan 2 Cleaning the Flatbed Scanner Dock To keep your product working at its best you should clean it several times a year Caution Do not use a hard brush alcohol or paint thinner to clean the product or you may damage it Do not use oil or other lubricants inside the product or let water get inside it Do not open...

Page 114: ...ass is dirty clean it with a soft dry cloth If the glass surface is stained with grease or some other hard to remove material use a small amount of glass cleaner on a soft cloth to remove it Wipe off all remaining liquid Caution Do not spray glass cleaner directly on the scanner glass Do not press the surface of the scanner glass with any force and be careful not to scratch or damage the scanner g...

Page 115: ...he flatbed scanner dock without the document scanner follow the installation instructions that came with the flatbed scanner dock in reverse to remove the flatbed scanner and dock from the document scanner 1 Turn off the document scanner using the power button Note There is no power button on the flatbed scanner 2 Unplug the AC power cord and disconnect the USB cable that connects the flatbed scan...

Page 116: ...4 Place the scanner unit in its original packing materials if possible or use equivalent materials with cushioning around the scanner Caution Avoid turning the scanner upside down when transporting it or you may damage the scanner Parent topic Using the Optional Flatbed Scanner Dock Windows ...

Page 117: ...2 Disconnect any connected cables 3 Clean the outer case with a soft dry cloth Do not use liquid or chemical cleansers Note If the outer case still requires additional cleaning use a slightly damp cloth to wipe the outer case Then wipe the case with a soft dry cloth Parent topic Cleaning and Transporting Your Scanner Cleaning Inside Your Scanner Clean your scanner regularly to make sure that no du...

Page 118: ... cover 4 Use a genuine Epson cleaning kit or a soft moist cloth to wipe off any dust or dirt on the glass scanning surfaces and the rollers inside the scanner cover If the glass surface is stained with grease or some other hard to remove material use a genuine Epson cleaning kit to remove stains ...

Page 119: ... Wipe off all remaining liquid Caution Do not spray glass cleaner directly on the scanning surfaces Be careful not to place too much force on the glass 5 Use a cotton swab to wipe off any dust or dirt on the sensors Caution Do not use liquid or glass cleaner on the cotton swab ...

Page 120: ... dirt on the separation roller using a genuine Epson cleaning kit or a soft moist cloth Caution Use only a genuine Epson cleaning kit or soft moist cloth to clean the roller using a dry cloth may damage the surface of the roller ...

Page 121: ...dry cloth may damage the surface of the roller 8 Plug in the AC adapter and press the power button to turn on the scanner 9 Hold down the start button for at least two seconds while opening the scanner cover The rollers on the bottom move momentarily and then the scanner enters cleaning mode Press the start button several times to rotate the rollers shown here Use a genuine Epson cleaning kit or a...

Page 122: ...er roller counter to determine when your rollers need to be replaced When you replace the scanner rollers reset the scanner roller counter so you know when you may need to replace the rollers again 1 Make sure the scanner is turned on and connected to your computer 2 Do one of the following to open the Epson Scan 2 Utility Windows 10 Click and select EPSON Epson Scan 2 Utility Windows 8 x Navigate...

Page 123: ... like this 4 If the number in the Number of Scans field exceeds the number displayed as the Life Cycle of the rollers it is time to replace the rollers 5 Close the Epson Scan 2 Utility Parent topic Cleaning and Transporting Your Scanner Replacing the Scanner Rollers Replace the scanner rollers when the number of scans exceeds the life cycle of the rollers Check the scanner roller counter to see wh...

Page 124: ...ions show the ES 500W ES 500WR but the instructions are the same for the ES 400 1 Turn off the scanner 2 Unplug the AC adapter 3 Disconnect any connected cables 4 Pull down on the cover open lever and open the scanner cover ...

Page 125: ...125 5 Press down on the pickup roller cover latch and pull up the cover to remove it ...

Page 126: ...he tab on the pickup rollers and slide the rollers to the right to remove them 7 To install the new pickup rollers align the notches on the roller unit and slide it to the left Press up on the tab to secure the rollers ...

Page 127: ...ller cover into the notches as shown and press it down until it clicks into place Note If you are not able to close the cover the pickup rollers are not installed correctly Remove the roller unit and reinstall it then try to close the cover again ...

Page 128: ... Squeeze the tabs on the sides of the separation roller cover and open the cover Caution Be careful not to apply too much force when opening the cover 10 Slide the separation roller to the left and remove it ...

Page 129: ...s not installed correctly Remove the roller and reinstall it then try to close the cover again 13 Close the scanner cover 14 Connect any disconnected cables 15 Plug in the AC adapter and turn on the scanner 16 Reset the roller counter Resetting the Scanner Roller Counter Parent topic Cleaning and Transporting Your Scanner Related references User Replaceable Epson Scanner Parts and Accessories Rela...

Page 130: ...omputer 2 Do one of the following to open the Epson Scan 2 Utility Windows 10 Click and select EPSON Epson Scan 2 Utility Windows 8 x Navigate to the Apps screen and select Epson Scan 2 Utility Windows other versions Click or Start All Programs or Programs EPSON Epson Scan 2 Epson Scan 2 Utility Mac Open the Applications folder click Epson Software and click Epson Scan 2 Utility 3 Click the Counte...

Page 131: ...re it for an extended period prepare it for transportation as described here 1 Turn off the scanner and unplug the AC adapter 2 Disconnect any connected cables 3 Close the input tray and the output tray Note Make sure the output tray is securely closed 4 Place the scanner in its original packing materials if possible or use equivalent materials with cushioning around the product Parent topic Clean...

Page 132: ...ving Network Scanning Problems Solving Scanned Image Quality Problems Solving Flatbed Scanner Dock Problems Uninstall Your Scanner Software Where to Get Help Scanner Light Status You can often diagnose problems with your scanner by checking its lights ES 400 1 error light 2 automatic feeding mode light 3 ready light 4 double feed detection skip light ...

Page 133: ...olution The error light is flashing slowly A paper jam or a double feed has occurred Remove any paper loaded in the input tray If the light continues to flash a scanner error may have occurred Turn the scanner off and then back on again If the error continues contact Epson for support The error light is on The scanner cover is open Make sure the scanner cover is closed and there is no jammed paper...

Page 134: ...e Try updating the firmware again The Wi Fi and error lights are flashing slowly ES 500W ES 500WR An access point settings error security error has occurred Press the stop button to clear the error restart the devices you want to connect to the network then reconnect to the network The Wi Fi light is flashing slowly and error light is on ES 500W ES 500WR The Wi Fi white and error lights are flashi...

Page 135: ...y Cannot Start Epson Scan 2 Original Feeds Incorrectly in Scanner Original Jams in Scanner Scanning is Slow Parent topic Solving Problems Scanner Does Not Turn On or Turns Off Unexpectedly If the scanner does not turn on or if it turns off unexpectedly try these solutions Make sure the AC adapter is securely connected to the scanner and to a working electrical outlet If the scanner turns off unexp...

Page 136: ...ke sure Document Capture Pro Windows or Document Capture Mac is installed correctly If necessary uninstall and reinstall it Make sure you have assigned the correct job to the scanner button and change it if necessary Check the status of the lights and make sure the scanner is ready to scan When using a wireless connection start Epson Scan 2 on your computer before scanning from the product ES 500W...

Page 137: ...ve the scanned images to the wirelessly connected computer ES 500W ES 500WR Parent topic Solving Scanning Problems Related concepts Uninstall Your Scanner Software Related references Windows System Requirements Mac System Requirements Cannot Start Epson Scan 2 If you cannot start Epson Scan 2 try these solutions Make sure your scanner is turned on and any interface cables are securely connected at...

Page 138: ...e sheets if necessary and reload them Load fewer originals at a time Load only originals that meet the specifications for your scanner Clean inside the scanner and replace the roller assembly kit if necessary Scan the originals one by one using the Automatic Feeding Mode setting in Epson Scan 2 Press the slow mode button to slow down the scanning speed If you see a double feed error in the Epson S...

Page 139: ...ide the scanner follow these steps Note The illustrations show the ES 500W ES 500WR but the instructions are the same for the ES 400 1 Turn off your scanner 2 Remove all originals from the input tray 3 Pull down the cover open lever and open the scanner cover ...

Page 140: ...140 4 Gently pull out any jammed originals from inside the scanner 5 Gently pull out any jammed originals from the output tray ...

Page 141: ...inal at a lower resolution if possible Make sure your system meets the requirements for your operating system If you are scanning a high resolution image you may need more than the minimum requirements If necessary increase your system s memory or reduce the resolution Make sure slow mode is turned off If you are running virus protection or other security software exclude the TWAIN log files from ...

Page 142: ...h Epson ScanSmart see the help information in Epson ScanSmart or click here to access the Epson ScanSmart User s Guide If you are scanning a large original at a high resolution a network communication error may occur Try scanning again at a lower resolution If network communication was interrupted while starting Epson Scan 2 exit Epson Scan 2 wait a few seconds and restart it If Epson Scan 2 canno...

Page 143: ...ou may need to temporarily disable your firewall and any anti virus software on your wireless router Then try scanning again You can also unblock your scanner driver or network address in your firewall or anti virus software Check to see if access restrictions such as MAC address filtering are set on the router If access restrictions are set add your scanner s MAC address to your router s address ...

Page 144: ...c Solving Problems Back of Original Image Appears in Scanned Image If an image from the back of a thin original appears in your scanned image make sure you selected the correct Image Type setting for your original and select the Text Enhancement setting in Epson Scan 2 You can also select the Remove Background setting in Epson Scan 2 Note If you select Color as the Image Type setting you can chang...

Page 145: ...rs in your scanned images are not recognized during OCR conversion try these solutions Make sure your original is loaded straight on your product Use an original with clear text Adjust these Epson Scan 2 settings if available and try scanning again Select the correct Image Type setting Select or adjust the Text Enhancement setting If the Image Type is set to Black White adjust the Threshold settin...

Page 146: ...ines appear in all your scanned images clean the rollers and glass scanning surfaces inside your scanner using a genuine Epson cleaning kit or a soft moist cloth Parent topic Solving Scanned Image Quality Problems Related tasks Cleaning Inside Your Scanner Scanned Image is Cropped If the edges of a scanned image are cropped try the following solutions Select Auto Detect or Auto Detect Long Paper a...

Page 147: ... may need to reset the Epson Scan 2 settings using the Epson Scan 2 Utility 1 Do one of the following to start the Epson Scan 2 Utility Windows 10 Click EPSON Epson Scan 2 Utility Windows 8 x Navigate to the Apps screen and select Epson Scan 2 Utility Windows other versions Click or Start and select All Programs or Programs Select EPSON Epson Scan 2 Epson Scan 2 Utility Mac Open the Applications f...

Page 148: ... are not recommended Caution Do not spray glass cleaner directly on the scanner glass Parent topic Solving Flatbed Scanner Dock Problems Back of Original Image Appears in Scanned Document If an image from the back of a thin original appears in your scanned image try the following solutions Place a piece of black paper on the back of the original and scan it again Make sure you selected the correct...

Page 149: ...program Select the scanner software program and click Uninstall Change 4 Restart your computer then see the Start Here sheet to re install your software Note If you find that re installing your scanner software does not solve a problem contact Epson Parent topic Uninstall Your Scanner Software Uninstalling Scanner Software Mac In most cases you do not need to uninstall your scanner software before...

Page 150: ...oad utilities and documentation get FAQs and troubleshooting advice or e mail Epson with your questions Speak to a Support Representative Before you call Epson for support please have the following information ready Product name Product serial number located on a label on the product Proof of purchase such as a store receipt and date of purchase Computer configuration Description of the problem Th...

Page 151: ...sories at epson com U S sales epson ca Canadian sales or epson com jm Caribbean sales You can also purchase accessories from an Epson authorized reseller To find the nearest one call 800 GO EPSON 800 463 7766 in the U S or 800 807 7766 in Canada Parent topic Solving Problems ...

Page 152: ...cifications ES 500W ES 500WR Flatbed Scanner Dock Specifications ES 400 Safety and Approvals Specifications Windows System Requirements To use your product and its software your computer should use one of these Microsoft operating systems Windows 10 Windows 8 x Windows 7 Note For the latest product software available for your operating system visit the Epson support site at epson com support U S e...

Page 153: ...er Switching on OS X is not supported Note For the latest product software available for your operating system visit the Epson support site at epson com support U S epson ca support Canada or epson com jm support Caribbean select your product and select Downloads Parent topic Technical Specifications General Specifications Scanner type Sheet feed one pass duplex color Photoelectric device CIS Effe...

Page 154: ...ut Facedown loading Paper output Facedown ejection Paper capacity 50 sheets of paper at 21 lb 80 g m2 weight Scanning resolution 600 dpi main scan 600 dpi sub scan Output resolution 75 to 1200 dpi in 1 dpi increments 75 to 300 dpi if length is 15 5 inches 393 7 mm to 215 inches 5461 0 mm 75 to 200 dpi if length is 215 inches 5461 1 mm to 240 inches 6096 0 mm Color Depth Color 30 bits per pixel int...

Page 155: ...n at the same time Parent topic Technical Specifications Dimension Specifications Height 6 9 inches 176 mm Width 11 7 inches 296 mm Depth 6 7 inches 169 mm Weight 8 2 lb 3 7 kg Note Dimensions do not include projecting parts Parent topic Technical Specifications Electrical Specifications Scanner Note Check the label on the scanner and the AC adapter for voltage information Power consumption varies...

Page 156: ...o 60 Hz Rated output power supply voltage DC 24 V Rated output current 2 A Parent topic Technical Specifications Environmental Specifications Temperature Operating 41 to 95 F 5 to 35 C Storage 13 to 140 F 25 to 60 C Humidity non condensing Operating 15 to 80 RH Storage 15 to 85 RH Operating conditions Ordinary office or home conditions Note Avoid operating the scanner in direct sunlight near a str...

Page 157: ...PA WPA2 Personal WPA2 Enterprise WPA2 compliant with support for WPA WPA2 Enterprise WEP 64 128 bit Frequency range 2 4 GHz Communication mode Infrastructure mode Ad hoc mode not supported for IEEE802 11n AP mode not supported for IEEE802 11b Radio frequency power transmitted Maximum 17 dBm EIRP Note AP mode and Wi Fi connection can be used at the same time ...

Page 158: ...Authentication for email sending POP before SMTP APOP SMTP Authentication MIB accessing Authentication Encryption SNMPv3 Parent topic Technical Specifications Flatbed Scanner Dock Specifications ES 400 Interface Hi Speed USB Rated DC input power supply voltage DC 24 V Dimensions when assembled with a sheet feed scanner and a flatbed scanner Width 11 8 inches 300 mm Depth 18 9 inches 481 mm Height ...

Page 159: ...d modification of the product Operation is subject to the following two conditions 1 this device may not cause harmful interference and 2 this device must accept any interference received including interference that may cause undesired operation of the device To prevent radio interference to the licensed service this device is intended to be operated indoors and away from windows to provide maximu...

Page 160: ...160 Parent topic Technical Specifications ...

Page 161: ...o a computer or other device with a cable ensure the correct orientation of the connectors Each connector has only one correct orientation Inserting a connector in the wrong orientation may damage both devices connected by the cable Do not insert objects into any opening as they may touch dangerous voltage points or short out parts Beware of electrical shock hazards Place the product on a flat sta...

Page 162: ... top of the AC power cord and do not allow the AC adapter or the power cord to be stepped on or run over Be particularly careful to keep the AC power cord straight at the end and the point where it enters the AC adapter Use only the AC adapter that comes with your scanner Using any other adapter could cause fire electrical shock or injury Use only the power cord that comes with your scanner Use of...

Page 163: ...d be placed to avoid abrasions cuts fraying crimping and kinking Do not place objects on top of the USB cable and do not allow the cable to be stepped on or run over Be particularly careful to keep the USB cable straight at the end Unplug the scanner and the USB cable and refer servicing to qualified service personnel under the following conditions Liquid has entered the scanner the scanner has be...

Page 164: ...d software or other transaction involving you and Epson whether in contract warranty misrepresentation fraud tort intentional tort statute regulation ordinance or any other legal or equitable basis DISPUTE DOES NOT INCLUDE IP CLAIMS or more specifically a claim or cause of action for a trademark infringement or dilution b patent infringement c copyright infringement or misuse or d trade secret mis...

Page 165: ...IMITATION FEDERAL OR STATE CLASS ACTIONS OR CLASS ARBITRATIONS CLASS ACTION LAWSUITS CLASS WIDE ARBITRATIONS PRIVATE ATTORNEY GENERAL ACTIONS AND ANY OTHER PROCEEDING WHERE SOMEONE ACTS IN A REPRESENTATIVE CAPACITY ARE NOT ALLOWED ACCORDINGLY UNDER THE ARBITRATION PROCEDURES OUTLINED IN THIS SECTION AN ARBITRATOR SHALL NOT COMBINE OR CONSOLIDATE MORE THAN ONE PARTY S CLAIMS WITHOUT THE WRITTEN CON...

Page 166: ...er made shall not be disclosed to the arbitrator until after the arbitrator determines the amount if any to which you or Epson is entitled The discovery or exchange of non privileged information relevant to the Dispute may be allowed during the arbitration c Arbitration Fees Epson shall pay or if applicable reimburse you for all JAMS filings and arbitrator fees for any arbitration commenced by you...

Page 167: ...licable amendment If you do not affirmatively assent to the applicable amendment you are agreeing that you will arbitrate any Dispute between the parties in accordance with the language of this Section 1 or resolve disputes as provided for in Section 1 7 if you timely elected to opt out when you first assented to this Agreement 1 9 Severability If any provision in this Section 1 is found to be une...

Page 168: ...s arising from the use of any options or any consumable products other than those designated as Original Epson Products or Epson Approved Products by Seiko Epson Corporation Seiko Epson Corporation shall not be held liable for any damage resulting from electromagnetic interference that occurs from the use of any interface cables other than those designated as Epson approved Products by Seiko Epson...

Page 169: ...Y THEORY OF LIABILITY ARISING OUT OF OR IN CONNECTION WITH THE USE OR PERFORMANCE OF THIS SOFTWARE Parent topic Copyright Notice A Note Concerning Responsible Use of Copyrighted Materials Epson encourages each user to be responsible and respectful of the copyright laws when using any Epson product While some countries laws permit limited copying or reuse of copyrighted material in certain circumst...

Reviews: