

ROM Module
The Adobe
®
PostScript
®
3™ Kit ROM module (C12C832461 (EPL-5900) /
C12C832521 (EPL-6100)) is a useful option that generates crisp PostScript output.
c
Caution:
❏
Before you install a ROM module, be sure to discharge any static electricity by
touching a grounded piece of metal. Otherwise, you may damage static-sensitive
components.
❏
Make sure that the printer is turned off.
❏
Remove only the two screws attaching the right side cover.
w
Warning:
❏
Removing other screws and covers will expose high voltage areas.
❏
Be careful when working inside the printer as some components are sharp and may
cause injury.
c
Caution:
❏
Do not force the ROM module into the slot.
❏
Be sure to insert the ROM module facing the correct way.
❏
Do not remove any modules from the circuit board. Otherwise, the printer will
not work.
To confirm that the ROM module is installed correctly, print a status sheet.
See “4 Testing and Connecting the Printer.”
Interface Cards
Your printer comes with a Type B interface slot. You can install an optional interface
card into this slot to expand the flexibility of your printer. For example, installing
an optional Ethernet card turns your printer into a network printer.
c
Caution:
❏
Before you install the interface card, be sure to discharge any static electricity by
touching a grounded piece of metal; otherwise, you may damage static-sensitive
components.
❏
Make sure that the printer is turned off.
❏
Remove only two screws attaching the right side cover.
w
Warning:
❏
Removing other screws and covers will expose high voltage areas.
❏
Be careful when working inside the printer as some components are sharp and may
cause injury.
1.
2.
3.
4.
5.
A slot (black)
To confirm that the optional interface card is installed correctly, print a status sheet.
See “4 Testing and Connecting the Printer.“
Testing and Connecting the Printer
Plugging in the Printer
Make sure that the printer is turned
off. Insert the power cord into the back
of the printer. Then plug the other end
into a properly grounded electrical
outlet.
Connecting the Printer to a Computer
To connect your computer to the printer’s built-in parallel interface, you need a
shielded, twisted-pair parallel interface cable that is IEEE-1284 compatible.
When your computer has a USB interface connector, the USB Revision 1.1 compliant
cable is available.
System requirements for USB connection are as follows:
❏
Apple
®
Macintosh
®
system that has a USB interface guaranteed by Apple
Computer, Inc.
❏
Microsoft
®
Windows
®
system that has a USB interface guaranteed by each
manufacturer, and the preinstalled Windows Me, 98, XP, and 2000 or the
upgraded Windows Me, XP, and 2000 from the preinstalled Windows 98.
Note:
❏
Be sure to connect a computer that supports bidirectional communication.
❏
When using an inappropriate cable or connecting peripheral devices between the printer
and the computer, the connection may be unstable.
❏
You can not connect Macintosh computers to the parallel interface of the printer.
1. Make sure that both the printer and the computer are off.
2. Attach the parallel or USB interface cable to the printer as shown.
Note:
❏
Use a shielded, twisted-pair parallel cable, or a USB Revision 1.1 compliant cable.
❏
When the cable has a grounding wire, secure the wire with the screw below the
connector.
3. Plug the other end of the cable into the computer’s parallel or USB interface
connector. See your computer’s instruction manual for more information.
1.
2.
3.
<Parallel>
<USB>
4
Loading Paper
Load the A4 size paper into the MP tray as shown below. About the available paper
types, see “Available paper types” in the
Reference Guide
.
Testing the Printer
To confirm the current status of the printer, print a status sheet. The status sheet
contains information about the printer, the consumables, the current settings, and
the installed options, if any.
Installing the Printer Driver
When you install the printer driver, the following software are installed.
❏
Printer driver
The printer driver gives you complete control settings over your printer with the
Microsoft
®
Windows
®
Me, 98, 95, XP, 2000, NT
®
4.0, and Mac OS 8.1 to 9.x. With
it, you can make various settings such as print quality and paper size.
❏
EPSON Status Monitor 3
The EPSON Status Monitor 3 allows you to view printer status information such
as the amount of toner remaining and check for any printer errors.
Note:
❏
Make sure that your printer is turned off.
❏
To install other software, please see the Reference Guide.
❏
The screenshots on this sheet are from the EPL-6100’s printer driver.
For Windows Users
Insert the CD-ROM that comes with your printer in your CD-ROM drive.
Then follow the on-screen instructions.
Note:
If the EPSON Installation Program screen does not appear automatically, double-click the
My Computer
icon, right-click the
CD-ROM
icon, and click
Open
in the menu that
appears. Then double-click
Setup.exe
.
About an Additional Driver
When the printer is shared with some computers (clients) in a network and the print
server’s OS is Windows 2000 or NT 4.0, you can install the printer driver for the
client’s OS in the server as an additional driver. This allows the clients to download
the appropriate printer driver from the printer server if necessary.
See “Using an Additional Driver” in the
Reference Guide
for details.
1.
2.
1.
2.
Lift the paper
guide slightly to
move it
5
For Macintosh Users
Your Macintosh must meet the following requirements to use the driver included
with the printer:
Mac OS 8.1 to 9.x*
* To turn off QuickDraw GX, first make sure that the Caps Lock key is unlocked. Then, while holding
down the spacebar, restart your Macintosh. The Extensions Manager will open. Clear the
QuickDraw GX check box, then close the Extensions Manager.
c
Caution:
Turn off any anti-virus software before installing the printer driver.
1. Insert the printer software CD-ROM.
2. Double-click the
Install Printer Driver/Utility
folder (EPL-5900) or
Install
Software
folder (EPL-6100).
3. Double-click the
Installer
icon.
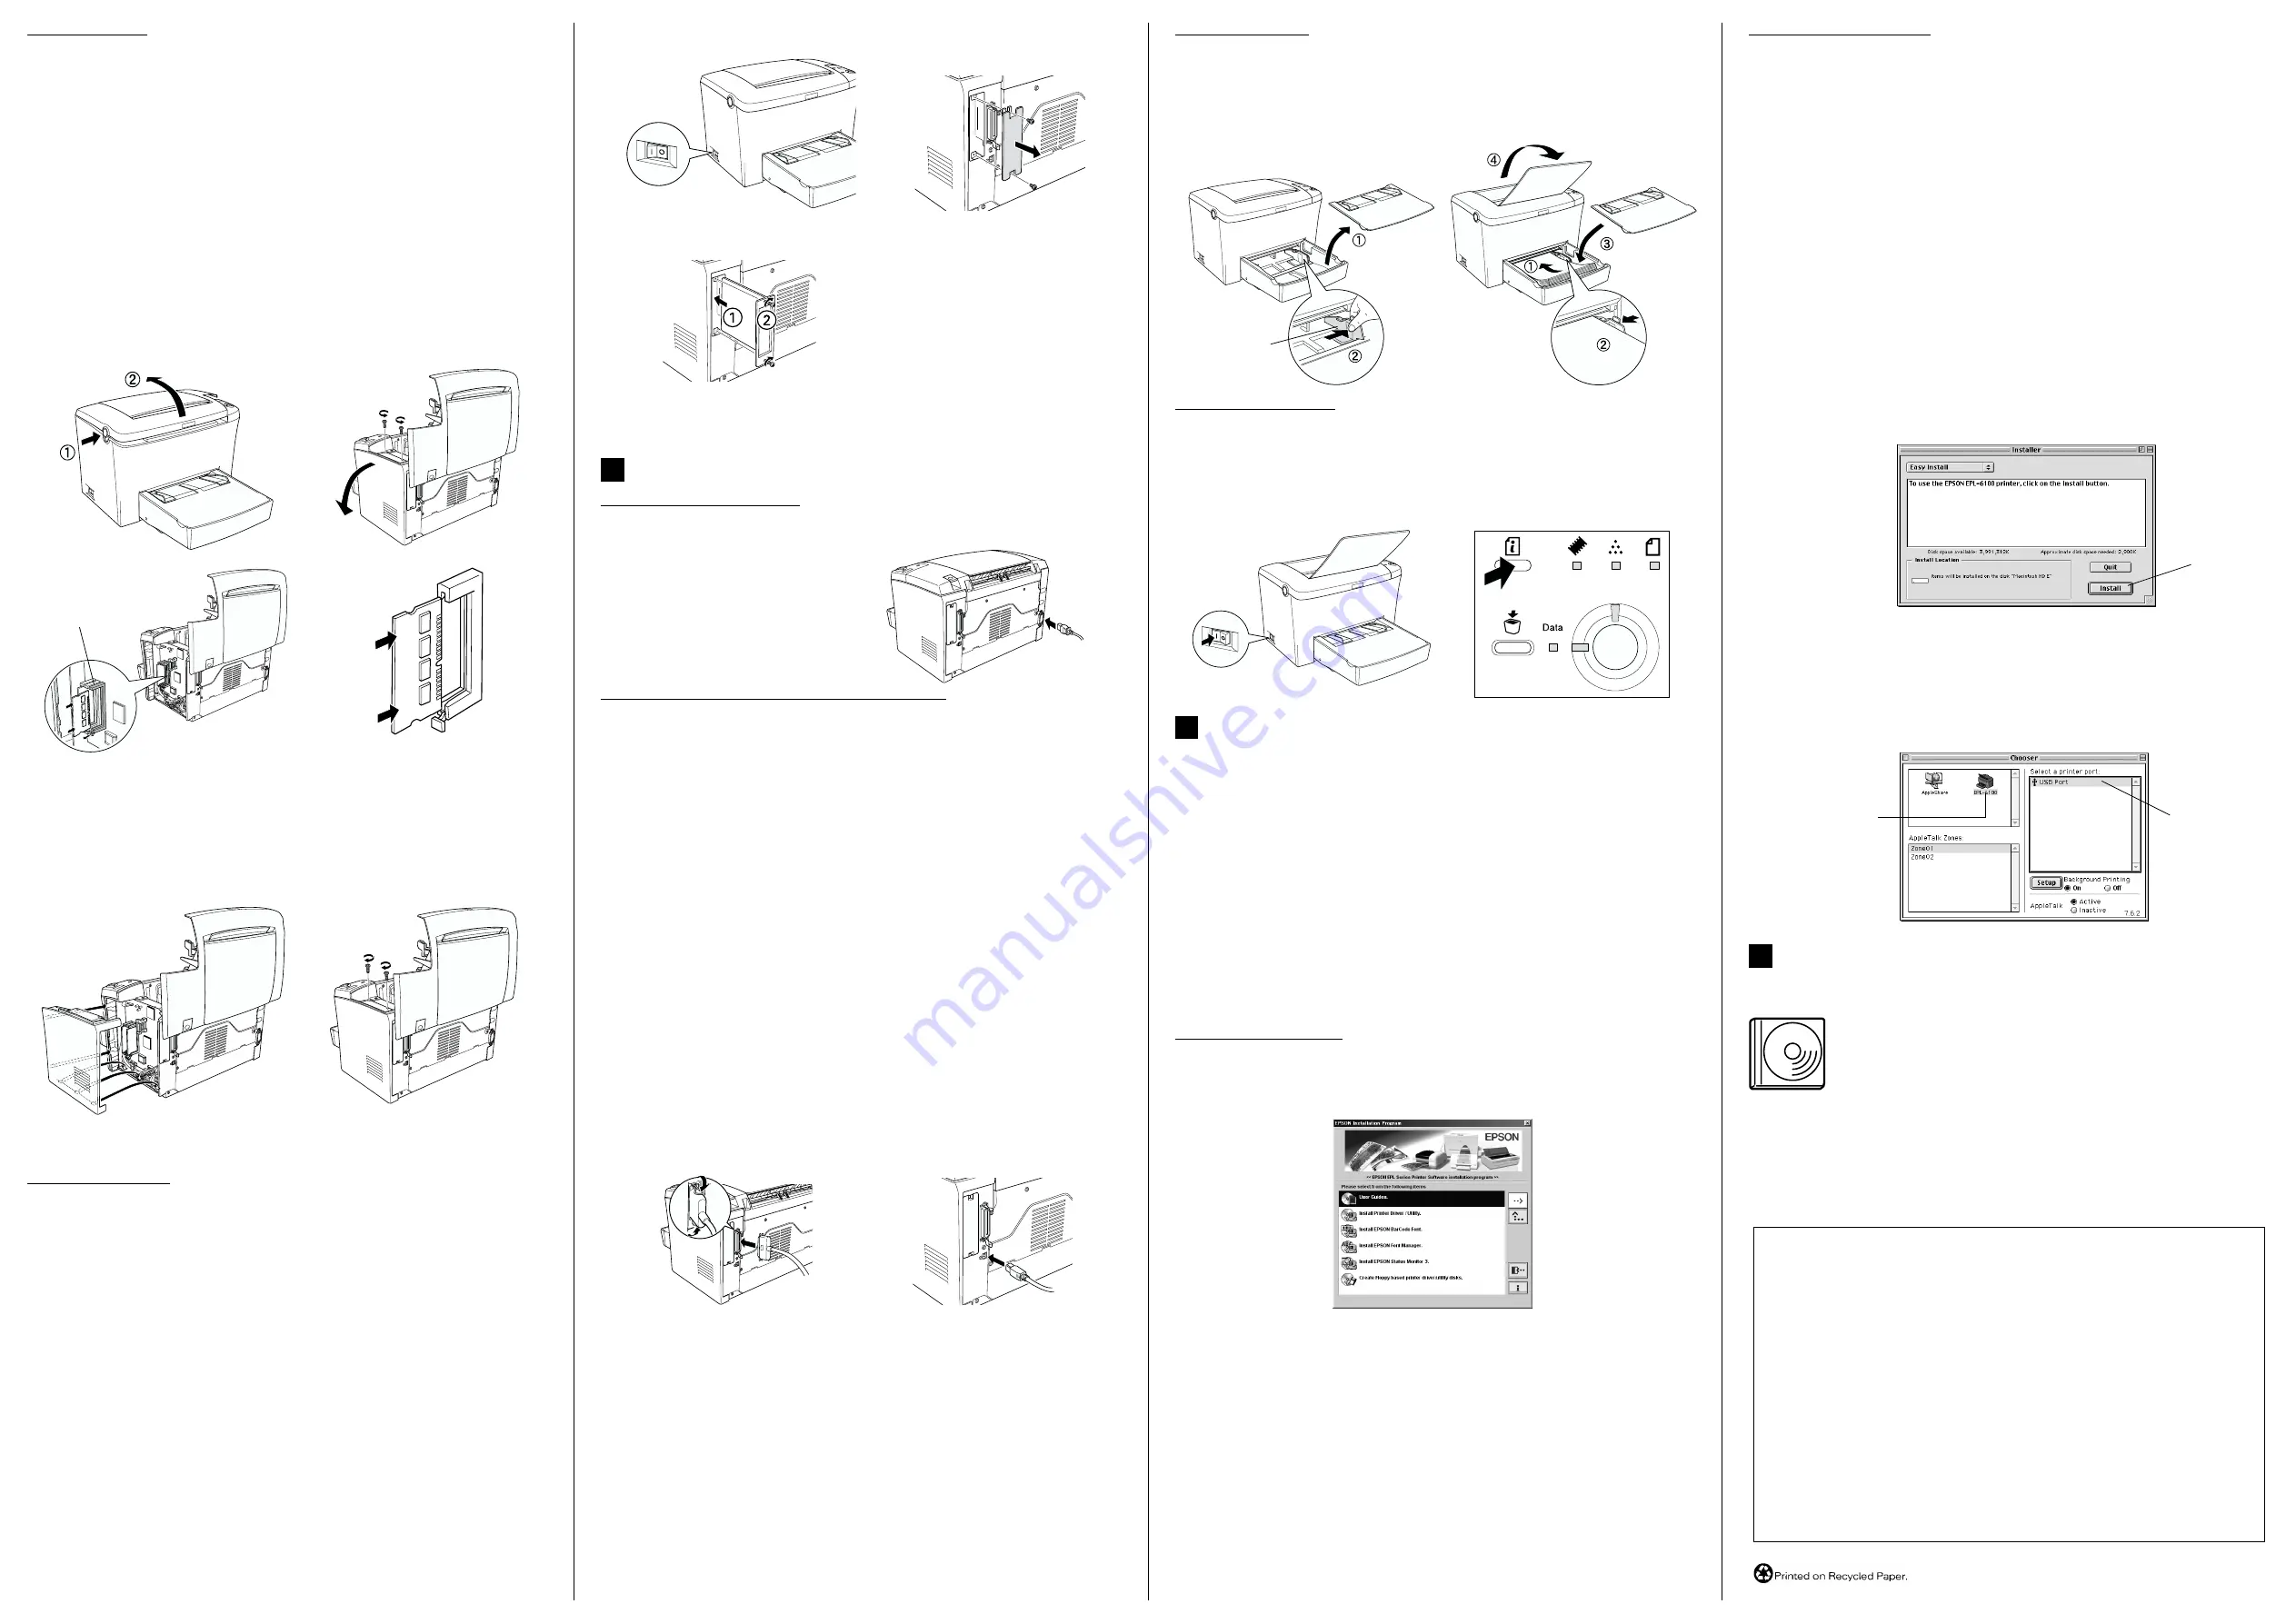
4. After accepting the license agreement, Installer appears.
5. Click
Install
and follow the on-screen instructions.
Selecting your printer in the Chooser
After you have installed the printer driver, you need to open
Chooser
to select your
printer. This procedure is necessary the first time you use a printer and when you
want to switch to another printer. Your Macintosh will always print using the last
printer selected.
To Know More About Your Printer
Reference Guide
The CD-ROM shipped with your printer includes the Reference
Guide as well as the printer driver.
Microsoft Internet Explorer 4.0 or later, or Netscape Navigator 4.0 or
later must be installed in your computer to read the Reference Guide.
❏
How to use the printer
❏
How to solve problems
❏
How to keep your printer in good condition
❏
Safety information and technical specifications
Click here
Click the EPL-6100
(EPL-5900) icon
Select USB Port
6
All rights reserved. No part of this publication may be reproduced, stored in a retrieval system, or
transmitted in any form or by any means, mechanical, photocopying, recording, or otherwise, without
the prior written permission of SEIKO EPSON CORPORATION.
No patent liability is assumed with respect to the use of the information contained herein. Neither is any
liability assumed for damages resulting from the use of the information contained herein.
Neither SEIKO EPSON CORPORATION nor its affiliates shall be liable to the purchaser of this product
or third parties for damages, losses, costs, or expenses incurred by purchaser or third parties as a result
of: accident, misuse, or abuse of this product or unauthorized modifications, repairs, or alterations to
this product, or (excluding the U.S.) failure to strictly comply with SEIKO EPSON CORPORATION’s
operating and maintenance instructions.
SEIKO EPSON CORPORATION shall not be liable against any damages or problems arising from the
use of any options or any consumable products other than those designated as Original EPSON Products
or EPSON Approved Products by SEIKO EPSON CORPORATION.
EPSON and EPSON ESC/P are registered trademarks and EPSON ESC/P2 is a trademark of SEIKO
EPSON CORPORATION.
The PCL6 compatible interpreter is a customized version of IPS-PRINT SIX © developed by Xionics
Document Technologies, Inc., a subsidiary of Oak Technology, Inc.
General Notice: Other product names used herein are for identification purposes only and may be trademarks of
their respective owners. EPSON disclaims any and all rights in those marks.
Copyright © 2002 by SEIKO EPSON CORPORATION, Nagano, Japan
Printed in Japan 02.XX-XX


