background image

Fine-tuning the Projector

43

Changing Menu Settings

You can use the buttons on the control panel or remote control to 
access the menus and change settings. Follow these steps:

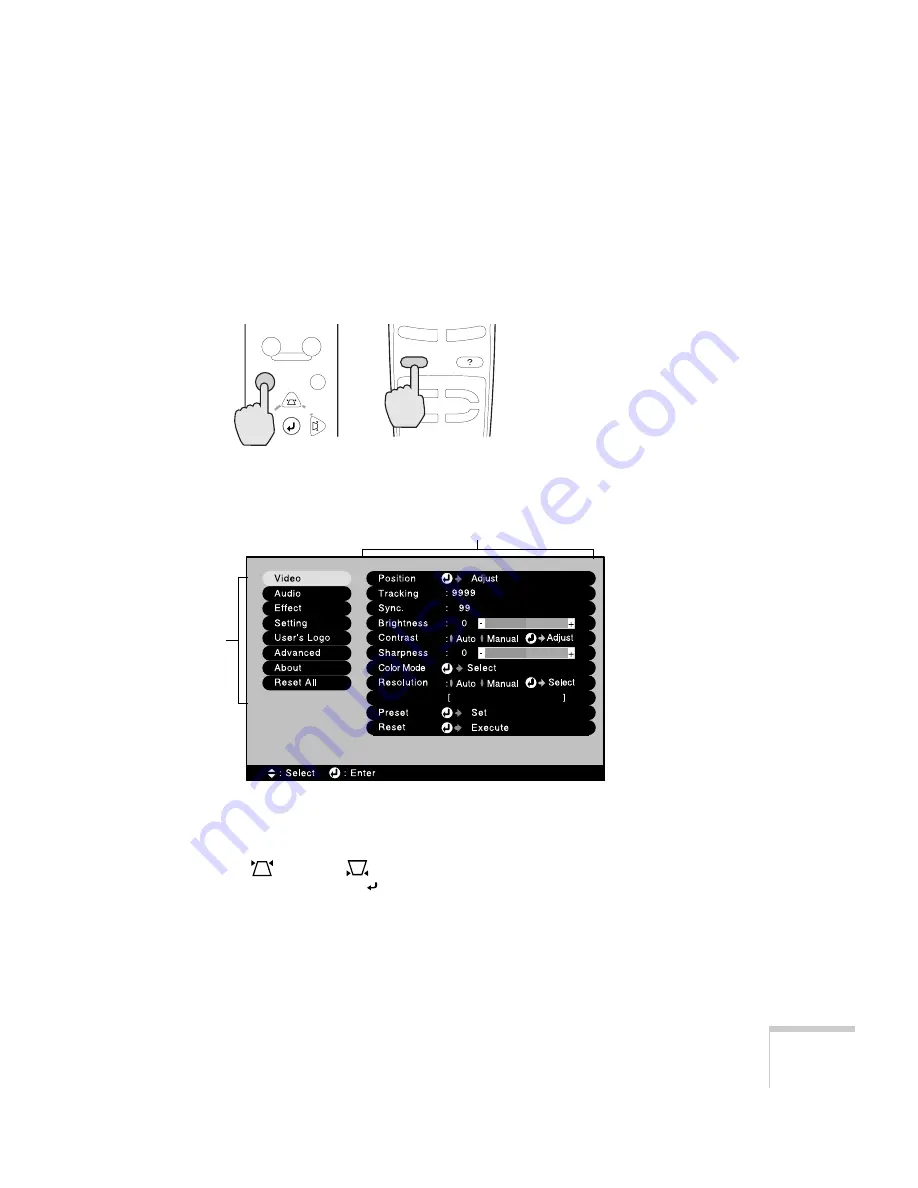
1. To display the menu screen, press the 

Menu

 button on the 

control panel or the remote control. 

You see the menu screen:

The eight menus are listed on the left, and the options available 
for the highlighted menu are shown on the right.

2. Press the 


Sync+ 

or  

Sync– 

button on the control panel, 

or press up or down on the   button on the remote control, to 
scroll through the menu list. 

Esc

Menu

Comp1

Source

Video

S-Video

Comp2/YCbCr

Help

Sync+

Tracking -

Tr

Menu

Esc

Computer/YCbCr

Video

Auto

Source

control panel

remote control

menus

 menu options

Summary of Contents for EMP 810

Page 1: ...EPSON PowerLite 600p 800p 810p Multimedia Projector User sGuide ...

Page 2: ... contained herein is designed only for use with this EPSON product EPSON is not responsible for any use of this information as applied to other products Neither SEIKO EPSON CORPORATION nor its affiliates shall be liable to the purchaser of this product or third parties for damages losses costs or expenses incurred by purchaser or third parties as a result of accident misuse or abuse of this produc...

Page 3: ...ojector 6 Additional Components 7 Optional Accessories 8 1 Setting Up the Projector 9 Positioning the Projector 10 Connecting to a Laptop Computer 12 Connecting the Computer Cable 12 Connecting the Cable for Remote Mouse Control 13 Amplifying Computer Audio 14 Connecting to Video Sources 15 Connecting the RCA A V Cable 16 Connecting an S Video Cable 17 Connecting a Component Video Cable 18 ...

Page 4: ...he Picture and Sound 28 Shutting Down the Projector 29 3 Using the Remote Control 31 Turning On and Using the Remote Control 32 Installing Batteries 32 Turning On the Remote Control 32 Using the Remote Control 33 Controlling the Picture and Sound 33 Switching Between Picture Sources 33 Adjusting the Volume 34 Turning Off the Picture and Sound 34 Stopping Action 34 Zooming Your Image 35 Resizing th...

Page 5: ...stomizing Projector Features 53 Setting Advanced Features 55 Viewing Lamp Usage and Other Information 56 Restoring the Default Settings 57 5 Maintaining and Transporting the Projector 59 Cleaning the Lens 60 Cleaning the Projector Case 60 Cleaning and Replacing the Air Filter 61 Replacing the Lamp 62 Resetting the Lamp Timer 65 Transporting the Projector 66 6 Solving Problems 67 Using On Screen He...

Page 6: ...necting the Audio Cable 91 Connecting to a Second Computer 92 Connecting to a High End Workstation 93 Connecting to a DVI Video Source 93 B Appendix B Notices 95 Important Safety Instructions 95 Remote Control Information 97 Declaration of Conformity 98 FCC Compliance Statement 99 Warranty 100 C Appendix C Technical Specifications 103 General 103 Projection Lamp 104 Remote Control 104 Mouse Compat...

Page 7: ...ality video With EPSON s patented SizeWise chip the projector supports computer displays ranging from VGA through UXGA or SXGA on the PowerLite 600p The projector also supports the new Digital Visual Interface DVI format You can connect the projector to a wide range of computers including IBM compatible PCs and laptops Apple Macintosh Power Macintosh series including G3 and G4 systems PowerBook co...

Page 8: ...al camera or any other video source to your projector You can connect up to three video sources at the same time with or without a computer and easily switch between them See page 15 for instructions Using the remote control The remote control lets you switch from one computer or video source to another with access to picture in picture pointer zoom and many other projector features For details se...

Page 9: ...t be observed to avoid damage to your equipment Notes contain important information about your projector Reading This Manual Online Your PowerLite CD ROM includes an electronic copy of this manual You may find it convenient to copy it onto your laptop s hard drive so it s always with you for example when taking your presentation on the road To view your electronic manual you need to use Adobe Acro...

Page 10: ...t s free Quick Setup sheet Gives you all the instructions you need to get your projector set up and connected to a laptop or PowerBook computer Owner s Kit folder Includes your Quick Setup sheet warranty brochures CD ROM and EPSON PrivateLine Support card Store this User s Guide in the folder and keep the folder with your projector at all times Built in help system Provides assistance for common p...

Page 11: ...warranty brochure included in your Owner s Kit In addition for customers who register their projector EPSON offers free Extra CareSM Road Service In the unlikely event of an equipment failure you won t have to wait for your unit to be repaired Instead EPSON will ship you a replacement unit anywhere in the United States or Canada usually via overnight delivery See the brochure in your Owner s Kit f...

Page 12: ... original packaging or the equivalent when you need to send the projector to another location If you are moving the projector by hand use a carrying case such as the optional cases available from EPSON See page 8 for more information about cases projector remote control batteries CD ROM not needed to use the projector power cord computer cable A V cable USB cable PS 2 mouse cable ...

Page 13: ...er set shown on page 89 available from EPSON see page 8 Older iMac systems may need a special adapter to provide a VGA output port see your computer dealer Some systems may need an additional cable to use the remote control as a wireless mouse If your Macintosh doesn t have a USB port you ll need a Macintosh mouse cable If your PC doesn t have a USB or PS 2 port you ll need a PC serial mouse cable...

Page 14: ...eiling mount ELPMB36 Kensington security lock ELPSL01 Projection screens 50 inch portable screen 60 inch Insta Theatre screen 80 inch Insta Theatre screen ELPSC06 ELPSC07 ELPSC08 Wireless microphone and two satellite speakers ELPCVS1 Auxiliary audio system ELPPAS1 Remote control receiver plugs into projector to extend range of remote control ELPST02 Remote control receiver kit includes standard re...

Page 15: ...laptop computer or video presentation If you need to set up the projector for a permanent installation or connect it to a desktop or workstation computer see Appendix A You ll find instructions for the following in this chapter Positioning the projector Connecting to a laptop computer Connecting to video sources ...

Page 16: ...onvenient to place the projector in front of the audience leaving as much space as possible between the projector and the screen to get a good sized image This lets the presenter stand in the front of the room face the audience and remain close enough to the equipment to be able to control it Use the figure below as a guideline to help you determine how far from the screen to place the projector I...

Page 17: ...ter If you place the projector level with the bottom of the screen the image will be square and you won t have to adjust it If you place the projector higher than the bottom of the screen the image will still be square but you won t be able to fill the whole screen with the image ideal height note After positioning the projector you may want to connect a Kensington MicroSaver anti theft device to ...

Page 18: ... laptop s video out or monitor port If you re using a PowerBook and you can t connect the cable you may need to use the Macintosh desktop adapter as shown on page 89 available from EPSON see page 8 3 Tighten the screws on the connectors If you don t need to make any other connections you can plug in your projector and turn it on See page 20 for instructions note To connect to desktops and other co...

Page 19: ...USB cable 1 Locate the cable you need depending on whether your laptop has a round PS 2 mouse port or a flat USB mouse port 2 Connect one end of the cable to the projector s USB or Mouse port 3 Connect the other end of the cable to the external mouse port or USB port on your laptop 4 If necessary configure your laptop to work with an external mouse If you don t need to make any other connections y...

Page 20: ...he audio cable to the Audio1 jack on the projector 2 Connect the other end of the audio cable to your laptop s headphone jack or audio out jack Jack locations vary see your computer manual if you re not sure which jack to use If you don t need to make any other connections you can plug in your projector and turn it on See page 20 for instructions note If you connected the USB cable you may not nee...

Page 21: ...ou have composite video S Video or component video For composite video use the RCA A V cable included with the projector For S Video use the S Video cable supplied with your video device or obtain one from your electronics dealer For component video you ll need a VGA to component video cable You can purchase this from EPSON see page 8 Component video connectors are usually colored green blue and r...

Page 22: ...ug to the video out jack on your video source 3 Connect the red and white plugs on the A V cable to the projector s Audio L white and R red jacks 4 Connect the red and white plugs on the other end of the cable to the corresponding audio output jacks on your video source If your video source has a stereo mini jack instead of RCA jacks you can use a stereo mini jack cable not included Connect it to ...

Page 23: ...player or other video source are turned off 1 Insert one end of an S Video cable into the projector s S Video connector 2 Insert the other end into the S Video output port of your video source 3 If your video source has RCA audio you can use the A V cable to connect to the projector s Audio L white and R red jacks If your video source has a stereo mini jack instead of RCA jacks you can use a stere...

Page 24: ...r 2 Component Video port 2 Connect the red green and blue leads at the opposite end of the cable to the corresponding connectors on your video source 3 If your video source has RCA audio you can use the A V cable to connect to the projector s Audio L white and R red jacks If your video source has a stereo mini jack instead of RCA jacks you can use a stereo mini jack cable not included Connect it t...

Page 25: ...o turn on the projector adjust the image and give your presentation Although you can operate the projector without it the remote control lets you use additional features See Chapter 3 for instructions on using the remote This chapter covers the following Turning on the projector and other equipment Adjusting the image Controlling the projector Shutting down the projector ...

Page 26: ...cted you may have to switch to the desired source as described on page 28 Turning On the Projector Follow these steps to plug in and turn on the projector 1 If you re projecting video first plug in and turn on your VCR DVD player or other video source If you re projecting from a computer go to step 2 2 Connect one end of the power cord to the power inlet on the back of the projector 3 Connect the ...

Page 27: ...nitor click Cancel If you see a New Hardware Wizard message about USB audio click Next and follow the instructions on the screen Windows only If you re projecting a video press the Play button on your video source If a projected image fails to appear see the next section for help Once you see your image turn to page 24 for instructions on focusing and making other image adjustments When you re don...

Page 28: ...mputer If you ve connected more than one computer and or video source you may need to press the Computer YCbCr or Video button on the projector s control panel to select the correct source Allow a few seconds for the projector to sync up after pressing the button If you re using a PowerBook You may need to set up your system to display on the projector screen as well as the LCD screen Follow these...

Page 29: ...t it may also be labelled CRT LCD You may have to hold down the Fn key while pressing it Check your laptop s manual or online help for details On most systems the key lets you toggle between the LCD screen and the projector or display on both at the same time Allow a few seconds for the projector to sync up after pressing it Depending on your computer s video card you might need to use the Display...

Page 30: ... reposition it See page 25 If the image isn t square see page 26 If only part of a computer image is displayed you may need to press the Resize button See page 27 for more information If the projected image is flickering or noisy see page 27 Focusing and Zooming Your Image Rotate the focus ring to sharpen the image Rotate the zoom ring to reduce or enlarge the image focus ring zoom ring ...

Page 31: ...mage is too low you can raise it by extending the projector s foot 1 Stand behind the projector Press the foot release button and lift the front of the projector This unlocks the foot 2 Once the image is positioned where you want it release the button to lock the foot in position 3 If you need to straighten the image rotate the round adjustable foot at the back of the projector If the image is no ...

Page 32: ...ge press the left or right Keystone button on the projector s control panel If your image looks like or press the top or bottom Keystone button to correct the shape of the image After correction your image will be slightly smaller You can also perform electronic keystone correction using the projector s Setting menu See page 53 Sync Tracking Tracking Sync Menu Esc Keystone Shift Auto Sync Tracking...

Page 33: ...n your image using the E Zoom button on the remote you can press the Resize button to return it to the original display size Adjusting the Tracking and Synchronization If you re projecting from a computer and displaying an image that contains a lot of detail such as the text of a letter you may notice one or more vertical stripes or bands or some of the characters may look heavy or blurred You can...

Page 34: ...on to switch between standard composite video and S Video After you select a source the screen goes dark for a moment before the image appears Adjusting the Volume If your presentation includes sound you can adjust the volume from the projector s control panel Press the left or right side of the Volume button Turning Off the Picture and Sound You can use the A V Mute button on the control panel to...

Page 35: ...en the projector has cooled the orange light stays on and the exhaust fan shuts off If you want to turn the projector on again wait until the orange light stops flashing Then press the Power button 4 If you extended the front foot press the foot adjust button to retract it 5 Replace the lens cap and unplug the power cord 6 If you re using a VCR or other video source turn it off after you turn off ...

Page 36: ...30 Using the Projector ...

Page 37: ...m in on a portion of your image and highlight your presentation If you re using a computer and you ve connected the mouse cable as described in Chapter 1 or Appendix A you can use the remote control as a wireless mouse This chapter covers the following information Turning on and using the remote control Controlling the picture and sound Highlighting your presentation Using the remote control as a ...

Page 38: ...ed Then push up the on off switch on the side of the remote control to turn it on Turn off the remote control before transporting it or storing it in a projector case This prevents the batteries from discharging if something presses against one of the buttons caution When replacing batteries take the following precautions Don t mix old and new batteries Replace batteries as soon as they run out If...

Page 39: ...off the picture and sound freeze the action zoom in on the picture or display a picture in picture video image Make sure you have set up your projector and connected any equipment as described in Chapter 1 or Appendix A Switching Between Picture Sources If you ve connected your projector to a computer and or video sources you can use the buttons on the remote control to switch between the differen...

Page 40: ...ou want to temporarily re direct your audience s attention without the distraction of a bright screen To turn off the picture press the A V Mute button The screen goes dark To turn the image back on press the button again You can also have an image such as a company logo display on the screen whenever you press the A V Mute button See page 51 for instructions Stopping Action You can use the remote...

Page 41: ...m out You can also press the Resize or Esc button to return to the original size Resizing the Image Some computer images need to be resized to display in the projector s native format 1024 768 pixels If only part of your computer image is displayed you can correct it with the Resize button Press the Resize button on the remote control or on the projector s control panel The screen image is automat...

Page 42: ...tion as described on page 53 1 Press the P in P button on the remote control The screen may go dark for a moment and then your video image appears in a small window on the screen A menu appears in the lower left corner of the screen describing how to move and resize the image 2 Use the button to reposition the video window on the screen You can use the E Zoom button to enlarge or reduce the video ...

Page 43: ...place them anywhere on your screen 1 To activate the pointer tool press button 1 on the remote control A pointing hand appears in the center of the screen To change it to an arrow press 1 again Press 1 a third time to see a different arrow 2 Press the side of the button or grasp it between your thumb and finger to move the arrow wherever you want it 3 To paste the pointer on the screen press down ...

Page 44: ...ee page 50 Using Horizontal and Vertical Highlights With the bar tool you can draw bold horizontal or vertical lines on the screen to underline or highlight your presentation points You can choose from three types of bars 1 To activate the bar tool press button 3 on the remote control A horizontal bar appears across the screen If you want a vertical bar press 3 again If you want to try another hor...

Page 45: ... the button with your thumb or grasp it between your thumb and finger and tilt it in the direction you want to move This button works like the mouse button on many laptop keyboards To click or left click press the left mouse button below the button Or press down on the center of the button This changes slides in a PowerPoint presentation in Slide Show mode To right click press the Esc button Power...

Page 46: ...button in the direction you want to drag You can use the up and down arrow buttons on the remote control to move the cursor or move through a PowerPoint presentation Press the down arrow to move forward through a presentation or display the next slide Press the up arrow to move backward or display the previous slide Power A V Mute Freeze E Zoom Previous Next ...

Page 47: ...startup screen customize the highlighting tools and find out how long your lamp has been in use This chapter covers the following information Using the menu system Adjusting the image Adjusting the sound Customizing the highlighting controls Creating your own startup screen Customizing projector features Viewing lamp usage and other information Restoring the default settings ...

Page 48: ...fy the highlighting tools available on the remote control The Setting menu allows you to set or adjust features such as the Picture in Picture P in P video source blank screen color A V Mute display option and sleep mode The User s Logo menu lets you capture and store a custom image or logo which you can then use as a startup screen or with the A V Mute option The Advanced menu lets you specify ad...

Page 49: ...mote control You see the menu screen The eight menus are listed on the left and the options available for the highlighted menu are shown on the right 2 Press the Sync or Sync button on the control panel or press up or down on the button on the remote control to scroll through the menu list Esc Menu Comp1 Source Video S Video Comp2 YCbCr Help Sync Tracking Tracking Menu Esc Computer YCbCr Video Aut...

Page 50: ...video source isn t connected certain options may be unavailable 5 Use the Tracking or Tracking button control panel or the button remote control to change the setting for the selected option Enabled settings are indicated by a green light while disabled ones are blank 6 Press the Esc button to return to the main menu Your changes are saved automatically 7 Press Esc again or the Menu button to exit...

Page 51: ... source is connected to the projector standard computer video analog RGB DVI computer video digital RGB composite or S Video component video or RGB video standard TV Video menu for standard computer display Analog RGB Video menu for DVI computer display Digital RGB Video menu for composite video or S Video Video menu for component video Video menu for RGB Video ...

Page 52: ...e Tracking and Sync buttons control panel or the button remote control to set the following options Tracking analog computer images only Removes unwanted vertical lines from a computer image by matching the projector s internal clock to the computer display signal Sync analog computer images only Corrects fuzziness by synchronizing the projector with the tracking signal sent from the computer Brig...

Page 53: ...on For presentations in dark rooms Theater For optimizing movie images with natural color the default for video or S video display Amusement For optimizing games Resolution analog computer images only Leave this setting at Auto to allow the projector to detect the video signal automatically If the projector is unable to sync up with the computer select Manual and choose one of the settings Video S...

Page 54: ...Video menu 3 Use the Sync button control panel or the button remote control to move down to the Preset option 4 Press You see the Preset Selection menu with the current resolution setting displayed 5 Use the Sync button control panel or the button remote control to select the number to which you want to assign the current settings 6 Press If you see an Overwrite prompt select Yes and press 7 Press...

Page 55: ...on remote control to highlight Audio You see the following 3 Press to select the Audio menu 4 Use the Tracking and Sync buttons control panel or the button remote control to set the following options Audio Input Audio 1 is automatically selected for computer sound and Audio2 for video Select USB to amplify computer sound through a USB cable connected to the projector Volume Treble Bass 5 When you ...

Page 56: ...You see the main menu 2 Use the Sync button control panel or the button remote control to highlight Effect You see the Effect menu 3 Press to select the Effect menu 4 Use the Tracking and Sync buttons control panel or the button remote control to customize the following Pointer Stamp Lets you define the shape and size for three different pointers Spotlight Lets you choose a large medium or small s...

Page 57: ...ther image you want to use Capturing the Image Start by displaying the image you want to use It can be an image from either a computer or video source such as a DVD player or digital camera Then follow these steps to capture the image and transfer it to the projector 1 Press the Menu button on the control panel or remote control You see the menu screen 2 Use the Sync button control panel or the bu...

Page 58: ...nu screen Choosing When to Display the Image After your image is saved you can set it up as the no signal message and or the screen that s displayed when you press A V Mute 1 Press the Menu button to display the menu screen if not already displayed 2 Use the Sync button control panel or the button remote control to highlight the Setting menu 3 Press the button to select the Setting menu 4 Use the ...

Page 59: ...Setting menu 4 Use the Tracking and Sync buttons control panel or the button remote control to set the following options V Keystone or H Keystone Correct the shape of the image Keystone correction makes the image smaller especially if you use both vertical V Keystone and horizontal H Keystone correction If you need to adjust the shape in both directions adjust the vertical first If the image looks...

Page 60: ...an image that you have transferred to the projector see page 51 Comp1 Input Specifies the format for input to the Computer1 port Select Digital RGB Analog RGB Analog RGB or RGB Video Comp2 YCbCr Input Specifies the format for input to the Computer 2 Component Video port If the source is a computer select Analog RGB If the source is a video device select YCbCr for DVD images or YPbPr for progressiv...

Page 61: ... panel or the button remote control to set the following options Language Select from 9 languages to be used for the projector menus Startup Screen Turn on to display your captured image or logo whenever the projector starts See page 51 for more information Color Adjustment Adjusts the color temperature of the projected image Select Color Temp to set a temperature between 5000 and 10000 K Select R...

Page 62: ...sed 1 Press the Menu button You see the main menu 2 Use the Sync button control panel or the button remote control to highlight About You see the lamp usage hours and computer display settings on the right The life span of the lamp is about 1500 hours If the number shown is close to 1500 make sure you have a spare lamp handy After you change the lamp you need to reset the lamp timer note If you ac...

Page 63: ...to confirm the reset 4 When you re finished press Esc or Menu Restoring the Default Settings The Reset All option lets you return all the projector settings to their default values Select Reset All and press the button on the control panel or remote control to display the confirmation screen Select Yes to reset all the default settings or No to cancel ...

Page 64: ...58 Fine tuning the Projector ...

Page 65: ...eplace are the lamp and air filter If any other part needs replacing contact your dealer or a qualified servicer This chapter covers the following Cleaning the lens Cleaning the projector case Cleaning and replacing the air filter Replacing the lamp Transporting the projector warning Before you clean any part of the projector turn it off and unplug the power cord Never open any cover on the projec...

Page 66: ... cloth with lens cleaner and gently wipe the lens surface Cleaning the Projector Case Before you clean the case first turn off the projector and unplug the power cord To remove dirt or dust wipe the case with a soft dry lint free cloth To remove stubborn dirt or stains moisten a soft cloth with water and a neutral detergent Then wipe the case Do not use wax alcohol benzene thinner or other chemica...

Page 67: ...Stand the projector on end with the handle on top to keep dust and dirt from falling inside 3 To clean the filter EPSON recommends using a small vacuum cleaner designed for computers and other office equipment If you don t have one gently clean the filter using a very soft brush such as an artist s camel hair brush If the dirt is difficult to remove or if the filter is broken replace it Contact yo...

Page 68: ...he lamp comes on after about 1400 hours of use To maintain projector brightness and image quality replace the lamp as soon as possible Contact your dealer or call EPSON at 800 873 7766 in the United States and Canada for a replacement lamp Request part number ELPLP15 Press the arrow tab warning Be extremely careful when removing the lamp module In the unlikely event that the bulb has ruptured smal...

Page 69: ...cord 2 Allow the projector to cool for at least half an hour if it has been on 3 Use a screwdriver to slide the latch and pop open the lamp cover Then lift up and remove it 4 Use a screwdriver to loosen the two silver screws holding the lamp in place You can t remove these screws warning Let the lamp cool before replacing it If the lamp breaks handle the shards carefully to avoid injury ...

Page 70: ...he new lamp 7 Once the lamp is fully inserted tighten its screws 8 To replace the lamp cover insert the tabs and then snap the cover into place The projector won t come on if the lamp cover is loose caution Do not touch the glass portion of the lamp assembly Touching the glass could result in premature lamp failure ...

Page 71: ...enu 1 Press the Menu button on the control panel or the remote control You see the main menu 2 Use the Sync button control panel or the button remote control to highlight About You see the lamp usage hours and other settings 3 Press to select Reset Lamp Timer Press again You see this prompt 4 Select Yes then press 5 When you re finished press Esc or Menu ...

Page 72: ...nty of cushioning around the projector When transporting the projector a long distance first put it in a carrying case such as an optional EPSON case then pack it in a firm box using cushioning around the case If you want to store the remote control inside the projector s carrying case be sure to turn it off using the switch on its side This prevents the batteries from discharging if something pre...

Page 73: ...how to contact technical support for problems you can t solve yourself This chapter explains the following Using the projector s on screen help system What to do when the projector s status lights flash Solving problems with the image or sound Solving problems with the remote control Contacting technical support ...

Page 74: ...lue Help button on the projector or the remote control You see the Help menu 2 Press the Sync or Sync button on the projector or use the button on the remote control to highlight one of the options Then press the button to select it 3 Press the Tracking or Tracking button on the projector or use the button on the remote control to highlight the problem you want to solve Then press the button to vi...

Page 75: ...n If none of the suggestions solves your problem see additional solutions to problems in the following sections What To Do When the Lights Flash The lights on top of the projector indicate the projector s status and let you know when a problem occurs If the projector is not working correctly first turn it off let it cool and unplug it Then plug the power cord back in and turn on the projector If t...

Page 76: ...re light is flashing orange The projector is too hot and is in a high speed cooling cycle Make sure the room temperature does not exceed 95 F 35 C and there is plenty of space around and under the projector for ventilation The air filter may be clogged Clean or replace it as described on page 61 The temperature light is red The projector is overheating which turns the lamp off automatically Wait u...

Page 77: ...ct EPSON for help red The lamp is burned out Replace it as described on page 62 flashing orange The lamp is almost burned out Make sure you have a replacement lamp ready flashing red There is a problem with the lamp power supply fan or circuit If necessary replace the lamp as described on page 62 flashing orange The projector is too hot Make sure the temperature surrounding the projector does not ...

Page 78: ...page 46 for more information Try selecting the Reset All setting to return all setup menus to their default values Press the A V Mute button to make sure the picture has not been turned off temporarily The attached computer may be in sleep mode or displaying a black screen saver Try pressing a key on the computer You see a blue screen with the message No Signal displayed Make sure the cables are c...

Page 79: ...computer s documentation or online help for details If you re using a PowerBook 1 From the Apple menu select Control Panels then click Monitors and Sound 2 Click the Arrange icon 3 Drag one monitor icon on top of the other This lets you display on the projector screen as well as the LCD screen 4 If this option isn t available click the Monitor icon 5 Select one of the listed Simulscan resolutions ...

Page 80: ...ngs tab and select a different resolution Macintosh On the Apple menu choose Control Panels then click Monitors and Sound Select a different resolution You also may need to modify existing presentation files if you created them for a different resolution See your software documentation for specific information The image isn t square but trapezoid shaped If the projector isn t directly in front of ...

Page 81: ...ur laptop computer and the projector turn off the laptop s LCD display The image is blurry There may be dirt or smears on the lens Clean the lens as described on page 60 Adjust the focus using the focus ring Make sure the lens is not fogged by condensation You may need to wait before using the projector after moving it from a cold environment to a warm environment Adjust the Sharpness setting on t...

Page 82: ...ntrol panel or using the Video menu as described on page 46 1 Fill the screen with an image containing fine detail when making these adjustments For example in Windows you can select a pattern to appear as your desktop background If this option isn t available try projecting black text on a white background 2 Hold down the Shift button and press the Tracking or Tracking buttons to eliminate vertic...

Page 83: ...olume control on your computer is not turned all the way down or muted Make sure the USB cable is securely connected to the projector and your computer and the drivers are installed If you re using the audio cable make sure it is securely connected to both the projector and your computer s headphone jack or audio out jack See page 14 for laptops or Appendix A for other systems Make sure the Window...

Page 84: ...ay be low on power To change the batteries see page 32 Dim the room lights and turn off any fluorescents Make sure the projector is not in direct sunlight Strong lighting especially fluorescent lights may affect the projector s infrared receivers Turn off any nearby equipment that emits infrared energy such as a radiant room heater You can t control the mouse pointer with the remote control Make s...

Page 85: ...or the duration of your warranty period You may also speak with a projector support specialist by dialing one of these numbers U S 562 276 4394 6 AM to 6 PM Pacific Time Monday through Friday Canada 905 709 3839 6 AM to 6 PM Pacific Time Monday through Friday Toll or long distance charges may apply Electronic support services Service Access World Wide Web From the Internet you can reach EPSON s pr...

Page 86: ...10p Product serial number located on the bottom of the projector Computer configuration Description of the problem You can purchase screens carrying cases or other accessories from EPSON at 800 873 7766 or by visiting the EPSON Store at www epsonstore com U S sales only In Canada please call 800 873 7766 for dealer referral ...

Page 87: ...igh end workstation more than one computer or a DVI video source It also provides guidance on setting up the projector in a permanent installation The following information is covered Installing the projector Connecting to a PC desktop computer Connecting to a desktop Macintosh Connecting to a second computer Connecting to a high end workstation Connecting to a DVI video source ...

Page 88: ...o tilt it down to position the image on screen This causes the image to lose its square shape You can then correct the distortion by using the V Keystone function in the projector s menu system see Customizing Projector Features on page 53 or by using the Keystone buttons on the projector s control panel If you place the projector s lens so it s level with the top of the screen the image will be s...

Page 89: ...tomatically switch the audio along with the video source whenever you choose a different video source See Switching Between Picture Sources on page 28 or page 33 To connect the projector to an external sound system you will need an RCA to 3 5 mm stereo audio cable which may be included with your sound system or may be purchased from an electronics store Before you start make sure the projector and...

Page 90: ...audio cable if you ll be projecting with audio Follow the steps in each section for the cables you need to connect Before beginning make sure the projector and computer are turned off If you need help with positioning the projector see page 10 Connecting the Computer Cable 1 Disconnect the monitor cable from the video port on the back of the computer 2 If you ll be viewing the display on your comp...

Page 91: ...ment 85 3 Connect one end of the computer cable to the projector s Computer2 Component Video port as shown 4 Connect the other end of the cable to the computer s video port 5 Tighten the screws on the connectors Computer2 Component Video Port ...

Page 92: ...esentation includes sound you can play it through the projector s speakers by connecting the USB cable 1 Connect the square end of the USB cable to the projector s USB port as shown 2 Disconnect your mouse from the port on the back of your computer and replace it with the other end of the cable Your computer s mouse will be disabled while you are using the remote control as a mouse note If you hav...

Page 93: ... in speakers you ll need to connect a stereo mini jack audio cable not included If you connected the USB cable you may not need a separate audio cable 1 Connect one end of the audio cable to the Audio 1 jack on the projector 2 Connect the other end of the audio cable to the speaker or audio out port on the computer s sound card audio cable Audio 1 jack ...

Page 94: ...nnect Before beginning make sure the projector and computer are turned off If you need help with positioning the projector see page 10 Connecting the Computer Cable 1 Disconnect the monitor cable from the video port on the back of the Macintosh 2 If you ll be viewing the display on your computer monitor as well as the projector screen connect the monitor cable to the projector s Monitor Out port a...

Page 95: ...er which you can buy from EPSON see page 8 To use the adapter remove its cover as shown and set its DIP switches according to the resolution you want to use such as 16 inch mode See your Macintosh documentation for instructions Replace the cover and connect the adapter to the free end of the computer video cable Then plug the cable with the adapter into the video port on your Macintosh 5 Tighten t...

Page 96: ...h mouse cable see your projector dealer for help in obtaining the correct cable The USB cable also provides audio suport If your Macintosh supports USB and your presentation includes sound you can play it through the projector s speakers by connecting the USB cable 1 Connect the square end of the USB cable to the projector s USB port 2 Disconnect your Macintosh s mouse cable Connect the other end ...

Page 97: ...s built in speakers you ll need to connect a stereo mini jack audio cable not included If you connected the USB cable you may not need a separate audio cable 1 Connect one end of the audio cable to the Audio 1 jack on the projector 2 Connect the other end of the audio cable to the speaker or audio out port on the Macintosh Audio1 jack audio cable ...

Page 98: ...port as shown 3 To display images properly make sure the Comp1 Input option in the projector s Setting menu is set correctly See page 54 for instructions 4 If you want to hear the computer s audio through the projector you ll need to connect the USB cable or purchase an RCA to 3 5 mm stereo cable available from your electronics store or video dealer Insert the cable s 3 5 mm plug into your compute...

Page 99: ... Source The projector s DVI Digital Visual Interface port receives pictures directly from your computer in digital format This lets the projector display images of greater clarity than can be achieved using a standard analog VGA connection To project images in digital video format follow these steps 1 Connect the computer s DVI cable to the projector s Computer1 port 2 To display images properly m...

Page 100: ...94 Appendix A Connecting to Additional Equipment ...

Page 101: ...perly grounded outlet If you have a two prong outlet contact an electrician to replace it Do not hold the plug with wet hands Take the following precautions for the plug Failure to comply with these precautions could result in sparks or fire Do not insert the plug into an outlet with dust present Insert the plug firmly into the outlet Do not overload wall outlets extension cords or integral conven...

Page 102: ...tions When the power cord or plug is damaged or frayed If liquid has been spilled into the projector or if it has been exposed to rain or water If it does not operate normally when you follow the operating instructions or if it exhibits a distinct change in performance indicating a need for service If it has been dropped or the housing has been damaged If you use the projector in a country other t...

Page 103: ...quipment that emits infrared energy such as a radiant room heater is in the room These conditions commonly cause problems for most infrared controlled equipment Try the following Make sure the remote control is turned on The remote control unit s batteries may be low on power replace them Dim the ambient lighting and or turn off any fluorescent lights Close any window coverings and or move the pro...

Page 104: ...Class B digital device Each product marketed is identical to the representative unit tested and found to be compliant with the standards Records maintained continue to reflect the equipment being produced can be expected to be within the variation accepted due to quantity production and testing on a statistical basis as required by 47CFR 2 909 Operation is subject to the following two conditions 1...

Page 105: ...eceiving antenna Increase the separation between the equipment and receiver Connect the equipment into an outlet on a circuit different from that to which the receiver is connected Consult the dealer or an experienced radio TV technician for help WARNING The connection of a non shielded equipment interface cable to this equipment will invalidate the FCC Certification of this device and may cause i...

Page 106: ...placement products or parts assume the remaining warranty period of the product covered by this limited warranty However each replacement lamp carries the limited 90 day warranty stated above What This Warranty Does Not Cover This warranty covers only normal consumer use in the United States and Canada For lamps 24 hour per day use causes unusual strain and is not considered normal use This warran...

Page 107: ...Y OTHER LEGAL THEORY IF THE REMEDY ABOVE FAILS EPSON S ENTIRE LIABILITY SHALL BE LIMITED TO A REFUND OF THE PRICE PAID FOR THE EPSON PRODUCTS COVERED BY THIS LIMITED WARRANTY In Canada warranties include both warranties and conditions Some jurisdictions do not allow limitations on how long an implied warranty lasts and some jurisdictions do not allow the exclusion or limitation of incidental or co...

Page 108: ...102 Appendix B Notices ...

Page 109: ...800 600 pixels SVGA Color reproduction 24 bit 16 7 million colors Brightness 810p 2000 lumens ANSI 800p 1500 lumens ANSI 600p 1700 lumens ANSI Contrast ratio 400 1 Image size 30 to 300 inches Projection distance 2 85 to 40 7 feet 0 87 to 12 4 meters Projection methods Front rear upside down ceiling mount Internal sound system 5 W monaural Optical aspect ratio 4 3 horizontal vertical Zoom ratio 1 1...

Page 110: ...15 Remote Control Range 32 8 feet 10 meters Batteries Alkaline AA 2 Mouse Compatibility Supports PS 2 and USB Dimensions Height 4 1 inches 104 mm Width 13 7 inches 348 mm Depth 10 8 inches 274 mm Weight 9 3 lb 4 2 kg Electrical Rated frequency 50 60 Hz AC Power supply 100 to 120 VAC 3 1A 200 to 240 VAC 1 5 A Power consumption Operating 280 W Standby 5 5 W ...

Page 111: ...C Storage 14 to 140 F 10 to 60 C Humidity Operating 20 to 80 RH non condensing Storage 10 to 90 RH non condensing Safety United States FCC Part 15J Class B UL1950 Rev 3 Canada DOC SOR 88 475 CSA C22 2 No 950 Rev 3 cUL CE Marking Directive 73 23 EEC EN 60950 Directive 89 336 EEC EN 55022 EN 55024 ...

Page 112: ...ition the frequencies of some computers may not allow images to display correctly see your computer s documentation for details Mode Refresh Rate Hz Resolution PC98 57 640 400 VGAEGA 70 640 350 VGA60 60 640 480 VESA72 72 640 480 VESA75 75 640 480 VESA85 85 640 480 VGA120 120 640 480 SVGA56 56 800 600 SVGA60 60 800 600 SVGA72 72 800 600 SVGA75 75 800 600 SVGA85 85 800 600 SVGA120 120 800 600 XGA43i...

Page 113: ...400 10502 SXGA 75 75 1400 10502 SXGA 85 85 1400 10502 UXGA48i 48 1600 12002 3 UXGA60 60 1600 12002 3 UXGA65 65 1600 12002 3 UXGA70 70 1600 12002 3 UXGA75 75 1600 12002 3 UXGA80 80 1600 12002 3 UXGA85 85 1600 12002 3 iMAC VGA 117 640 480 iMAC SVGA 95 800 600 iMAC XGA 75 1024 7681 MAC II 13 67 640 480 MAC16 75 832 624 MAC19 75 1024 7681 MAC21 75 1152 8702 TV525i 60 2 TV625i 50 2 SDTV525p 60 2 HDTV75...

Page 114: ... Video port is a female video RGB 15 pin micro D style connector Here are its pin assignments Pin no Computer port 1 Red video 2 Green video 3 Blue video 4 GND 5 GND 6 Red GND 7 Green GND 8 Blue GND 9 Reserved 10 Synchronous GND 11 GND 12 SDA 13 Horizontal sync composite sync 14 Vertical sync 15 SCL ...

Page 115: ...htness setting 46 C Cables A V 6 to 8 15 to 18 audio 6 to 8 14 83 87 91 computer 6 to 8 12 84 to 85 88 to 89 Cables continued mouse 6 to 8 13 86 90 purchasing 8 USB 6 to 8 13 86 90 video 6 to 8 15 to 18 Capturing image 51 to 52 Carrying case 8 66 Ceiling mount 8 82 Cleaning air filter 61 to 62 lens 60 projector case 60 Color problems 77 settings 46 to 47 55 Color Mode setting 47 Comp1 button 33 54...

Page 116: ...justing 25 Help 4 to 5 79 to 80 Help button 68 Help system using 68 to 69 Highlighting tools 37 to 38 50 to 51 H Keystone setting 53 I iBook connecting to 12 iMac connecting to 7 Image adjusting 24 to 27 45 to 47 capturing and saving in projector 51 to 52 correcting shape 26 53 74 focusing 24 height adjusting 25 positioning 25 46 problems with troubleshooting 72 to 77 raising 25 resizing 27 35 sha...

Page 117: ...ters Online 4 79 Preset button 48 PrivateLine Support 5 79 Problems color 77 image 72 to 77 remote control 78 sound 77 Projection lamp See Lamp Projector carrying case 8 66 cleaning 60 to 62 connections see Connecting projector distance from screen 10 103 feet adjusting height with 25 installing 82 to 83 lamp specifications 104 options 8 positioning 10 to 11 resolution 1 103 specifications 103 to ...

Page 118: ...able 7 15 Switching picture source 28 33 Sync buttons 26 76 Synchronization adjusting 27 46 T Technical support 4 to 5 79 to 80 Temperature requirements 105 status light 69 Tone setting 49 Tracking buttons 26 76 Tracking adjusting 27 46 Transporting projector 66 Treble adjusting 49 Troubleshooting blank screen 22 to 23 image and sound problems 72 to 77 projector problems 67 to 77 remote control pr...

Page 119: ...Index 113 Volume adjusting 28 34 49 button 28 34 setting 49 W Warning lights 69 to 72 Warranty 5 100 to 101 Workstations connecting projector to 93 Z Zoom ratio 103 Zooming image 24 to 25 35 ...

Page 120: ...114 Index ...

Reviews: