background image

66

Adjusting the Menu Settings

Follow the instructions in these sections to access the projector menu system and change projector
settings.

Using the Projector's Menus
Image Quality Settings - Image Menu
Projector Feature Settings - Settings Menu
Projector Information Display - Info Menu
Projector Reset Options - Reset Menu

Using the Projector's Menus

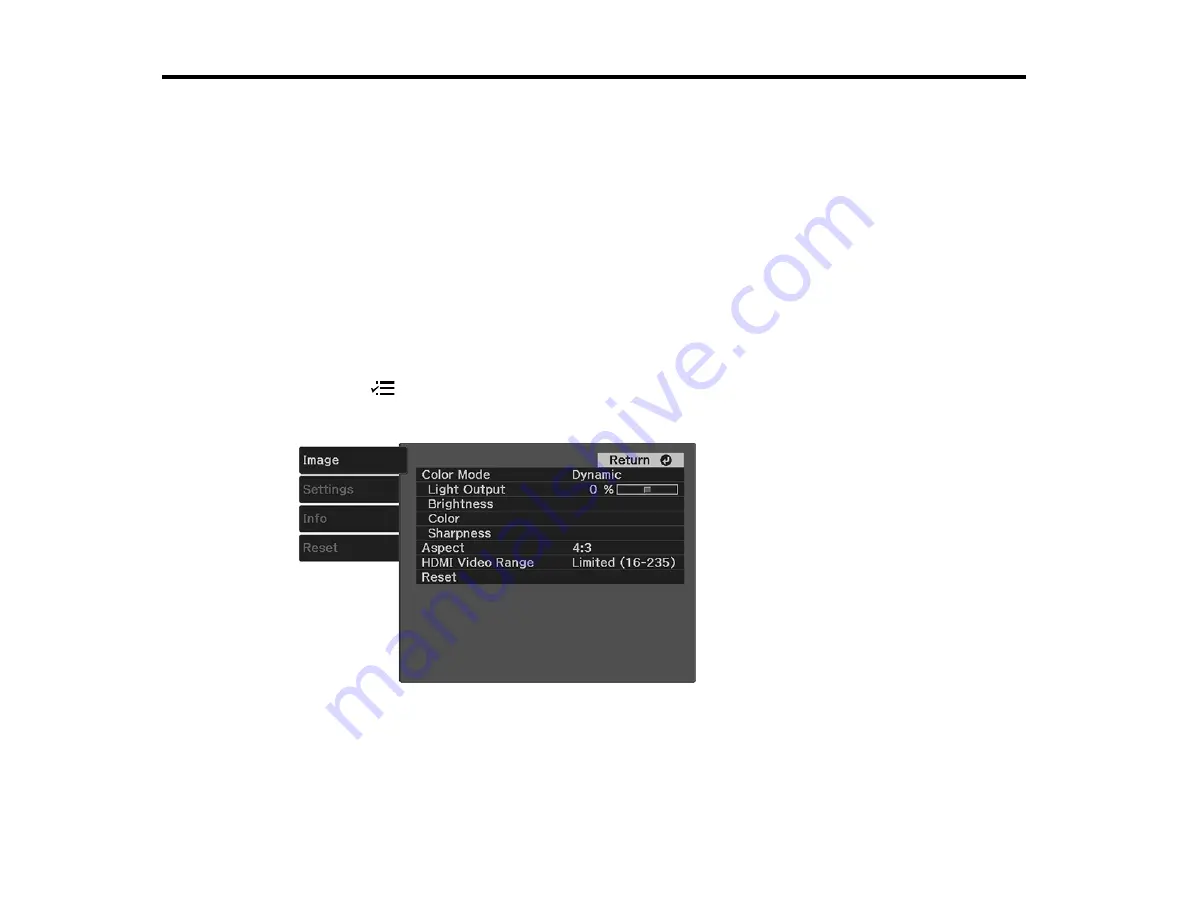
You can use the projector's menus to adjust the settings that control how your projector works. The
projector displays the menus on the screen.

1.

Press the

menu button on the projector remote control.

You see a screen like this:

2.

Press the up or down arrow button to move through the menus listed on the left. The settings for
each menu are displayed on the right.

Note:

The available settings depend on the current input source.

Summary of Contents for EF-100 Series

Page 1: ...EF 100WATV EF 100BATV User s Guide ...

Page 2: ......

Page 3: ...ocations 12 Projector Parts Front Top 13 Projector Parts Rear 15 Projector Parts Base 16 Projector Parts Control Panel 17 Projector Parts Remote Control 18 Setting Up the Projector 22 Projector Placement 22 Projector Setup and Installation Options 22 Projection Distance 24 Projector Connections 28 Connecting the Streaming Device 29 Connecting to an HDMI Video Source 32 Connecting Headphones 34 Con...

Page 4: ...lable Color Modes 55 Turning On Automatic Luminance Adjustment 55 Adjusting Light Output Brightness 56 Saving Settings to Memory and Using Saved Settings 57 Controlling the Volume with the Volume Buttons 59 Adjusting Projector Features 60 Operating Connected Devices Using the HDMI Link Features 60 Shutting Off the Picture and Sound Temporarily 62 Projector Security Features 62 Locking the Projecto...

Page 5: ...0 Displaying From a Mac Laptop 90 Solutions When the Image is Not Rectangular 91 Solutions When Only a Partial Image Appears 91 Solutions When the Image Contains Noise or Static 92 Solutions When the Image is Fuzzy or Blurry 92 Solutions When the Image Brightness or Colors are Incorrect 93 Solutions to Sound Problems 93 Solutions to Bluetooth Audio Problems 94 Solving Projector or Remote Control O...

Page 6: ...cations 107 Projector Safety and Approvals Specifications 108 Supported Video Display Formats 108 Notices 110 Recycling 110 Important Safety Information 110 Laser Safety Information 110 Important Safety Instructions 113 Restriction of Use 116 List of Safety Symbols 116 FCC Compliance Statement 121 Binding Arbitration and Class Waiver 122 Trademarks 125 Copyright Notice 125 A Note Concerning Respon...

Page 7: ...7 EF 100WATV EF 100BATV User s Guide Welcome to the EF 100WATV EF 100BATV User s Guide For a printable PDF copy of this guide click here ...

Page 8: ...ightness white light output will vary depending on usage conditions Color light output measured in accordance with IDMS 15 4 white light output measured in accordance with ISO 21118 High definition mini cinema lens Advanced 3LCD technology Epson microlaser array projection technology Up to 150 inches 12 5 ft diagonal projected image size no screen required Flexible connectivity HDMI port for strea...

Page 9: ...and Canada Warranty and Registration Information Latin America Parent topic Introduction to Your Projector Product Box Contents Save all the packaging in case you need to ship the projector Always use the original packaging or equivalent when shipping Make sure your projector box included all of these parts 1 Projector 2 Streaming device 3 Projector remote control 4 Remote control for Android TV 5...

Page 10: ...ion Signal or connection type Additional component necessary HDMI Compatible HDMI cable Available for purchase from Epson or an authorized Epson reseller Note Older Mac computers 2009 and earlier may not support HDMI audio Audio out Commercially available 3 5 mm mini jack stereo cable Parent topic Projector Features Related tasks Connecting to an HDMI Video Source Optional Equipment and Replacemen...

Page 11: ... that lets you project with confidence For details see the warranty that came with your projector In addition Epson offers free Extra Care Road Service In the unlikely event of an equipment failure you won t have to wait for your unit to be repaired Instead Epson will ship you a replacement unit anywhere in the United States Canada or Puerto Rico See the Extra Care Road Service brochure for detail...

Page 12: ...r Additional Information Need quick help on using your projector Here s where to look for help epson com support U S epson ca support Canada or epson com jm support Caribbean View FAQs frequently asked questions and e mail your questions to Epson technical support 24 hours a day If you still need help after checking this manual and any other sources listed here you can use the Epson PrivateLine Su...

Page 13: ...rts Remote Control Parent topic Introduction to Your Projector Projector Parts Front Top 1 Audio out port cover 2 HDMI cable path 3 AC inlet 4 Air exhaust vents 5 Air intake vent 6 Projection window 7 Remote receiver ...

Page 14: ... may become warped or damaged by heat near the vents Hot air from the air exhaust vents could cause burns or other injuries or warping of projector parts Parent topic Projector Part Locations Related references Projector Light Status Related tasks Connecting to an HDMI Video Source Connecting Headphones Focusing the Image Using the Focus Lever Installing a Security Cable Cleaning the Air Filter an...

Page 15: ...ir exhaust vent 3 Speaker 4 USB power cable 5 Cable clamp 6 Rear cover slots 7 Cable hook 8 HDMI extension cable 9 Service port Parent topic Projector Part Locations Related tasks Connecting the Streaming Device Connecting to an HDMI Video Source ...

Page 16: ...oot release lever 2 Optional ceiling lighting track mount hole 3 Rear feet removable for mounting 4 Front adjustable foot 5 Air filter cover Note Use M4 9mm screws for mounting the projector Parent topic Projector Part Locations ...

Page 17: ... light 2 Focus lever 3 Status laser and temperature lights 4 Volume buttons 5 Horizontal keystone buttons Parent topic Projector Part Locations Related references Projector Light Status Related tasks Focusing the Image Using the Focus Lever Controlling the Volume with the Volume Buttons Correcting Image Shape with H V Keystone Turning On the Projector ...

Page 18: ...18 Projector Parts Remote Control Projector remote control 1 power button ...

Page 19: ...eaming device 8 keystone button corrects image distortion 9 mic button operates Android TV using voice commands 10 Not applicable 11 Enter button selects options 12 home button displays Android TV home screen 13 A V mute button turns off picture and sound 14 Command light 15 Microphone 16 Remote control emitter Note This remote control is used to control the projector and the connected streaming d...

Page 20: ...20 Remote control for Android TV 1 power button 2 Directional pad ...

Page 21: ...remote control is used to control the streaming device only if it is connected to a different device or projector You do not need to use this remote control in addition to the projector remote control Parent topic Projector Part Locations Related tasks Using the Projector s Menus Controlling the Volume with the Volume Buttons Correcting Image Shape with H V Keystone Changing the Color Mode Pairing...

Page 22: ...jector can be installed Keep these considerations in mind as you select a projector location Place the projector on a sturdy level surface or install it using a compatible mount Leave plenty of space around and under the projector for ventilation and do not place it on top of or next to anything that could block the vents Place the projector parallel to the screen Position the projector within rea...

Page 23: ...23 Front Rear Front ceiling ...

Page 24: ...opic Projector Placement Projection Distance The distance at which you place the projector from the screen determines the approximate size of the image The image size increases the farther the projector is from the screen but can vary depending on the zoom factor aspect ratio and other settings ...

Page 25: ...jection Distance Calculator here U S here Canada or here Caribbean 1 Projection distance 2 Distance from the center of the lens to the base of the screen 3 Center of lens 16 9 Aspect Ratio Image or Screen Screen or image size Projection distance 1 Wide to Tele Distance from center of lens to base of screen 2 30 inches 26 to 36 inches 67 to 91 cm 0 79 inch 2 cm 40 inches 36 to 48 inches 91 to 123 c...

Page 26: ...8 inches 185 to 250 cm 1 97 inches 5 cm 90 inches 82 to 111 inches 209 to 282 cm 1 97 inches 5 cm 100 inches 92 to 124 inches 233 to 314 cm 2 36 inches 6 cm 110 inches 101 to 136 inches 256 to 346 cm 2 36 inches 6 cm 120 inches 110 to 149 inches 280 to 378 cm 2 76 inches 7 cm 130 inches 120 to 161 inches 304 to 410 cm 2 76 inches 7 cm 16 10 Aspect Ratio Image or Screen Screen or image size Project...

Page 27: ...inches 180 to 243 cm 3 94 inches 10 cm 90 inches 80 to 108 inches 203 to 274 cm 4 33 inches 11 cm 100 inches 89 to 120 inches 226 to 305 cm 4 72 inches 12 cm 120 inches 107 to 145 inches 272 to 368 cm 5 91 inches 15 cm 130 inches 116 to 157 inches 295 to 399 cm 6 30 inches 16 cm 150 inches 134 to 181 inches 341 to 461 cm 7 09 inches 18 cm 4 3 Aspect Ratio Image or Screen Screen or image size Proje...

Page 28: ...81 to 109 inches 205 to 276 cm 4 33 inches 11 cm 90 inches 91 to 122 inches 231 to 311 cm 4 72 inches 12 cm 100 inches 101 to 137 inches 257 to 347 cm 5 51 inches 14 cm 110 inches 111 to 150 inches 283 to 382 cm 5 91 inches 15 cm 120 inches 122 to 164 inches 309 to 417 cm 6 69 inches 17 cm 130 inches 132 to 178 inches 335 to 452 cm 7 09 inches 18 cm Epson cannot guarantee optimal focus performance...

Page 29: ...arent topic Setting Up the Projector Related references Additional Components Projector Feature Settings Settings Menu Connecting the Streaming Device You can connect the streaming device included with your projector to the projector s HDMI port Connecting the USB power cable provides power to the streaming device Note To use video on demand or Android TV features through the streaming device you ...

Page 30: ...30 2 Open the USB power cable clamp 3 Connect the streaming device to the projector s HDMI extension cable ...

Page 31: ...ice securely inside the projector Caution Do not force the streaming device into the projector you may damage the projector and or the device 5 Make sure the device is securely connected as shown Pass the USB power cable through the cable clamp then close the cable clamp to secure the cable ...

Page 32: ...o Source If your video source has an HDMI port you can connect it to the projector using an HDMI cable The video source s sound is output to the projector s speaker Note You can also connect a computer or laptop to the projector using an HDMI cable Caution Do not turn on the video source before connecting it to the projector otherwise you may damage the projector ...

Page 33: ...er from the projector 2 Connect one end of an HDMI cable to your video source s HDMI port 3 Connect the other end of the HDMI cable to the projector s HDMI extension cable 4 Pass the HDMI cable through the cable path as shown ...

Page 34: ...lume with the Volume Buttons Connecting Headphones You can connect headphones to the projector s audio out port You can control the volume using the projector remote control Note The projector s audio out port only supports 3 5mm stereo headphones If you use any other type of headphones audio may not be output normally ...

Page 35: ...35 1 Open the audio out port cover 2 Insert the headphone jack into the audio out port ...

Page 36: ...or 2 Press and hold the menu button on the projector remote control for about three seconds to display the Bluetooth menu 3 Press the arrow buttons on the projector remote control to select the Bluetooth Audio setting and press Enter 4 Select On and press Enter 5 Make sure the Bluetooth audio device you want to connect to is in pairing or discovery mode see your Bluetooth audio device manual for d...

Page 37: ...wo AAA batteries that came with the projector Caution Use only the type of batteries specified in this manual Do not install batteries of different types or mix new and old batteries 1 Remove the battery cover 2 Insert the batteries with the and ends facing as shown Warning Make sure the batteries are inserted in the correct positions If the batteries are not inserted correctly they could explode ...

Page 38: ...cks into place Warning Dispose of used batteries according to local regulations Do not expose batteries to heat or flame Keep batteries out of the reach of children they are choking hazards and are very dangerous if swallowed Parent topic Setting Up the Projector ...

Page 39: ...e Height Image Shape Focusing the Image Using the Focus Lever Resizing the Image Using Zoom Image Aspect Ratio Color Mode Turning On Automatic Luminance Adjustment Adjusting Light Output Brightness Saving Settings to Memory and Using Saved Settings Controlling the Volume with the Volume Buttons Turning On the Projector Turn on the projector before you turn on the video source you want to use Cauti...

Page 40: ...r look into the projector lens when the laser is on This can damage your eyes and is especially dangerous for children and pets Caution Make sure no objects are blocking the light from the projector lens Objects blocking the lens for an extended time can melt and light that is reflected back into the lens can cause the projector to malfunction The Welcome Guide is displayed the first time you turn...

Page 41: ...ote control The projector displays a shutdown confirmation screen 2 Press the power button again To leave it on press any other button The laser turns off and the status light turns off Caution Do not turn the projector on immediately after turning it off Turning the projector on and off frequently may shorten the life of the laser 3 To transport or store the projector make sure the power light is...

Page 42: ...ds If you will not use the remote control for a long time remove the batteries Parent topic Using Basic Projector Features Pairing the Projector Remote Control To use Android TV and video on demand features you must pair the projector remote control with the projector Note When you first turn on the projector instructions for pairing the projector remote control are displayed on the screen 1 Turn ...

Page 43: ... and messages in another language you can change the Language setting 1 Turn on the projector 2 Press the menu button on the projector remote control 3 Press the arrow buttons to select the Settings menu and press Enter 4 Select the Language setting and press Enter 5 Select the language you want to use and press Enter 6 Press the menu button to exit the menu or the return button to return to the p...

Page 44: ...n Rear Upside Down flips the image over top to bottom and horizontally to project from the ceiling and behind a translucent screen Changing the Projection Mode Using the Menus Parent topic Using Basic Projector Features Changing the Projection Mode Using the Menus You can change the projection mode to flip the image over top to bottom and or left to right using the projector menus Note You can als...

Page 45: ...n mode you want to use and press Enter 7 Press the menu button to exit the menu or the return button to return to the previous screen Parent topic Projection Modes Adjusting the Image Height If you are projecting from a table or other flat surface and the image is too high or low you can adjust the image height using the projector s adjustable foot 1 Turn on the projector and display an image ...

Page 46: ...ectangular image by placing the projector directly in front of the center of the screen and keeping it level If you place the projector at an angle to the screen or tilted up or down or off to the side you may need to correct the image shape for the best display quality Correcting Image Shape with H V Keystone Correcting Image Shape with Quick Corner Parent topic Using Basic Projector Features Cor...

Page 47: ...other image shape correction methods 1 Turn on the projector and display an image 2 Press the keystone button on the projector remote control 3 Use the arrow buttons on the projector remote control to select between vertical and horizontal keystone correction and to adjust the image shape as necessary V Keystone H Keystone ...

Page 48: ...ick Corner You can use the projector s Quick Corner setting to correct the shape and size of an image that is unevenly rectangular on all sides Note To provide the best possible image quality adjust the projector s position to correct the image shape If this isn t possible use the Quick Corner setting to correct the image shape Note You cannot combine Quick Corner correction with other image shape...

Page 49: ...tor remote control to display the Keystone adjustment screen 4 Select the Installation setting and press Enter 5 Select the Keystone setting and press Enter 6 Select the Quick Corner setting and press Enter twice Note When the Keystone option is set to Quick Corner the horizontal keystone buttons on the control panel are disabled ...

Page 50: ... area selection screen Note To reset your adjustments press and hold the return button for at least 2 seconds to display a reset screen then select Reset Quick Corner and Yes 9 Press the menu button to exit the menu or the return button to return to the previous screen Parent topic Image Shape Focusing the Image Using the Focus Lever You can adjust the sharpness of the projected image using the fo...

Page 51: ...ht to adjust the focus Parent topic Using Basic Projector Features Resizing the Image Using Zoom You can resize the displayed image 1 Turn on the projector and display an image 2 Press the menu button on the projector remote control ...

Page 52: ... The projector can display images in different width to height ratios called aspect ratios Normally the input signal from your video source determines the image s aspect ratio However for certain images you can change the aspect ratio to fit your screen If you always want to use a particular aspect ratio for a certain video input source you can select it using the projector s menus Changing the Im...

Page 53: ...previous screen Parent topic Image Aspect Ratio Available Image Aspect Ratios You can select the following image aspect ratios depending on the input signal from your image source Aspect ratio setting Description Auto Automatically sets the aspect ratio according to the input signal 16 9 Converts the aspect ratio of the image to 16 9 Full Displays images using the full width of the projection area...

Page 54: ...e Color Modes Parent topic Using Basic Projector Features Changing the Color Mode If you want to view the projector s menus and messages in another language you can change the Language setting 1 Turn on the projector and display an image 2 Press the menu button on the projector remote control 3 Select the Image menu and press Enter 4 Select the Color Mode setting and press Enter 5 Select the color...

Page 55: ...jecting vivid images Natural Best for projecting the image as is choose this mode when making color adjustments Cinema Best for projecting movies Parent topic Color Mode Turning On Automatic Luminance Adjustment You can turn on the Dynamic Contrast setting to automatically optimize the image luminance This improves the image contrast based on the brightness of the content you project 1 Turn on the...

Page 56: ...al adjusts brightness at the standard speed High Speed adjusts brightness as soon as a scene changes 7 Press the menu button to exit the menu or the return button to return to the previous screen Parent topic Using Basic Projector Features Adjusting Light Output Brightness You can adjust the brightness of the projector s light output 1 Turn on the projector and display an image 2 Press the menu bu...

Page 57: ...button to exit the menu or the return button to return to the previous screen Parent topic Using Basic Projector Features Saving Settings to Memory and Using Saved Settings You can save the customized Image menu settings for your video input and then select the saved settings whenever you want to use them 1 Turn on the projector and display an image 2 Press the menu button on the projector remote ...

Page 58: ...h different names are available Note A memory name that has already been used is indicated by a blue mark Saving over a previously saved memory overwrites the settings with your current settings Erase Memory erases the selected memory settings Rename Memory renames a saved memory Note To delete all saved memories select the Reset Memory setting in the Reset menu 6 Press the menu button to exit the...

Page 59: ...or or any Bluetooth audio device paired to the projector Note You must adjust the volume separately for each connected input source 1 Turn on the projector and start a video that includes audio 2 To raise or lower the volume press the volume up or volume down button on the control panel or the projector remote control A volume gauge appears on the screen Parent topic Using Basic Projector Features...

Page 60: ...mote control to control certain features of devices connected to the projector s HDMI port Note The connected device and HDMI cable must meet the HDMI CEC standard The device must also be configured see the documentation that came with the device All devices or functions may not operate properly 1 Press the menu button on the projector remote control 2 Press the arrow buttons to select the Setting...

Page 61: ...elect On and press the return button 6 Select the Device Connections setting and press Enter You see this screen Note Linked devices are indicated by a blue mark You cannot select grayed out devices 7 Select the device you want to control and project images from and press Enter ...

Page 62: ... that you stopped it 1 Press the A V mute button on the projector remote control to temporarily stop projection and mute any sound 2 To turn the picture and sound back on press the A V mute button again Parent topic Adjusting Projector Features Projector Security Features You can secure your projector to deter theft or prevent unintended use by setting up the following security features Button loc...

Page 63: ...63 2 Press the arrow buttons to select the Settings menu and press Enter You see this screen 3 Select the Operation setting and press Enter You see this screen ...

Page 64: ...es at the confirmation screen 5 Press the menu button to exit the menu or the return button to return to the previous screen Unlocking the Projector s Buttons Parent topic Projector Security Features Unlocking the Projector s Buttons If the projector s buttons have been locked do one of the following To disable the child lock setting press the menu button on the projector remote control and select...

Page 65: ...ty Cable You can use the security slot on the side of the projector to attach a Kensington lock See your local computer or electronics dealer for purchase information 1 Security slot Parent topic Projector Security Features ...

Page 66: ...rojector Reset Options Reset Menu Using the Projector s Menus You can use the projector s menus to adjust the settings that control how your projector works The projector displays the menus on the screen 1 Press the menu button on the projector remote control You see a screen like this 2 Press the up or down arrow button to move through the menus listed on the left The settings for each menu are d...

Page 67: ...e menu button to exit the menu or the return button to return to the previous screen Parent topic Adjusting the Menu Settings Image Quality Settings Image Menu Settings on the Image menu let you adjust the quality of your image for the input source you are currently using The available settings depend on the currently selected input source Setting Options Description Color Mode See the list of ava...

Page 68: ... Mode Select Off Normal or High Speed EPSON Super White Reduces overexposure of white in the image Color Color Saturation Adjusts the color intensity of the image Tint Adjusts the balance of green to magenta tones in the image White Balance Color Temp sets the color temperature according to the selected color mode lower values tint the image red and higher values tint the image blue Customized adj...

Page 69: ...or the input source HDMI Video Range Auto Limited 16 235 Full 0 255 Sets the video range to match the setting of the device connected to the HDMI port Reset Resets all Image menu settings to their defaults Note The Brightness setting does not affect laser brightness To change the laser brightness adjust the Light Output setting Parent topic Adjusting the Menu Settings Related references Available ...

Page 70: ...70 Projector Feature Settings Settings Menu Options on the Settings menu let you customize various projector features ...

Page 71: ... etc Standard best for normal sound quality Vocal best for voices and dialogue Music best for music Movie best for video or movie audio This setting is disabled for Bluetooth audio devices Bluetooth Selects Bluetooth features Search Bluetooth Device searches for available Bluetooth devices Bluetooth Audio turns Bluetooth audio on or off Connected Device displays information for the Bluetooth audio...

Page 72: ...orrect horizontal and vertical sides Quick Corner select to correct image shape and alignment using an on screen display Zoom Adjusts the image size Projection Selects the way the projector faces the screen OSD Rotation Rotates the menu display 90 High Altitude Mode Regulates the projector s operating temperature at altitudes above 4921 feet 1500 m ...

Page 73: ...on the projector remote control Picture Demo Mode Select On to display pre installed images when there is no input signal When enabled the projector does not enter Sleep Mode Operation Various options see table below Various options see table below Memory Various options Sets up or saves customized settings to memory Language Various languages Sets the language for the projector menus and messages...

Page 74: ... Turns the projector on when it is plugged in instead of using the power button Illumination Turns off the indicators on the projector Child Lock Locks the power button on the control panel Control Panel Lock Controls projector button locking to secure the projector Full Lock locks all buttons on the control panel Partial Lock locks all buttons on the control panel except the power button USB Powe...

Page 75: ...ion Operation Hours Displays the number of hours H the projector has been used since it was turned on Source Displays the name of the port to which the current input source is connected Input Signal Displays the input signal setting of the current input source Resolution Displays the resolution of the current input source Refresh Rate Displays the refresh rate of the current input source Sync Info...

Page 76: ...r Reset Options Reset Menu You can reset most of the projector settings to their default values using the Reset menu Setting Description Reset Memory Deletes all saved memories Reset All Config Resets most of the projector settings to their defaults except the Zoom Memory and Language settings Parent topic Adjusting the Menu Settings ...

Page 77: ...on or an authorized Epson servicer This projector uses a sealed laser light source which does not need servicing and cannot be replaced Warning Before cleaning any part of the projector turn it off and unplug the power cord Never open any cover on the projector except as specifically explained in this manual Dangerous electrical voltages in the projector can injure you severely Warning Do not try ...

Page 78: ...not use wax alcohol benzine paint thinner or other chemicals to clean the projector case These can damage the case Do not use canned air or the gases may leave a flammable residue Parent topic Projector Maintenance Related tasks Turning Off the Projector Air Filter and Vent Maintenance Regular filter maintenance is important to maintaining your projector Your Epson projector is designed with an ea...

Page 79: ... the power cord 2 Gently remove the dust using a small vacuum designed for computers or a very soft brush such as a paintbrush Note You can remove the air filter to clean both sides Do not use water or any other solvent to clean the air filter Caution Do not use canned air The gases may leave a flammable residue or push dust and debris into the projector s optics or other sensitive areas Parent to...

Page 80: ...ling you to clean or replace it The air filter is torn or damaged You can replace the air filter while the projector is mounted to the ceiling or placed upside down on a table 1 Turn off the projector and unplug the power cord 2 Place the projector upside down on a table 3 Remove the air filter cover 4 Pull the air filter out of the projector ...

Page 81: ...Replace the air filter cover Parent topic Air Filter and Vent Maintenance Related references Optional Equipment and Replacement Parts Replacing the Remote Control Batteries The remote control uses two AAA manganese or alkaline batteries Replace the batteries as soon as they run out Caution Use only the type of batteries specified in this manual Do not install batteries of different types or mix ne...

Page 82: ...void getting the fluid on your hands If it gets on your hands wash them immediately to avoid injury 3 Insert the batteries with the and ends facing as shown Warning Make sure the batteries are inserted in the correct positions If the batteries are not inserted correctly they could explode or leak causing a fire injury or damage to the product ...

Page 83: ...store the projector safely 1 Turn off the projector 2 Make sure the power light is blue but not flashing and the status light is off then unplug the power cord 3 Do one of the following When transporting the projector a long distance or as checked luggage pack it in a firm box with cushioning around it and mark the box Fragile When shipping the projector for repairs place it in its original packin...

Page 84: ...ica Projection Problem Tips If the projector is not working properly try turning it off and unplugging it Then plug it back in and turn it on If this does not solve the problem check the following The lights on the projector may indicate what the problem is The solutions in this manual can help you solve many problems If none of these solutions help you can contact Epson for technical support Pare...

Page 85: ... look for a solution in the tables here 1 Power light 2 Status light 3 Laser light 4 Temp temperature light Note If no lights turn on when the projector is on make sure the Illumination setting is turned on in the Settings menu Power light Status light Laser light Temp light Status and solution Blue Blue Off Off Normal operation Blue Off Off Off Standby or sleep mode ...

Page 86: ... Turn the projector off unplug it and contact Epson for help Off Flashing blue Off Flashing orange A fan or sensor has a problem Turn the projector off unplug it and contact Epson for help Off Flashing blue Off Orange Projector has overheated and turned off Leave it turned off to cool down After about five minutes do the following Make sure that the vents are not clogged with dust or obstructed by...

Page 87: ... the air filter Make sure the environmental temperature is not too hot If the problem persists unplug the projector and contact Epson for help Flashing blue Varies Flashing orange Varies Laser warning Turn the projector off unplug it and contact Epson for help Note If the lights display a pattern not listed in the tables above turn the projector off unplug it and contact Epson for help Parent topi...

Page 88: ...ily turned off Check the status lights to confirm the projector is operating normally Make sure all necessary cables are securely connected and the power is on for the projector and connected video sources Try using a shorter HDMI cable Press the projector s power button to wake it from standby or sleep mode Also see if your connected computer is in sleep mode or displaying a blank screen saver If...

Page 89: ...l of the projector settings using the options on the Reset menu Parent topic Solving Image or Sound Problems Related references Projector Light Status Projector Reset Options Reset Menu Related tasks Connecting the Streaming Device Connecting to an HDMI Video Source Turning On the Projector Turning Off the Projector Solutions When No Signal Message Appears If the No Signal message appears try the ...

Page 90: ...the Windows key and press P at the same time then click Duplicate 2 If the same image is not displayed by the laptop and projector check the Windows Display utility to make sure the external monitor port is enabled and extended desktop mode is disabled See your computer or Windows manual for instructions 3 If necessary check your video card settings and set the multiple display option to Clone Mir...

Page 91: ... Solutions When Only a Partial Image Appears If only a partial computer image appears try the following solutions If you zoomed into or out of the image using the Zoom setting press the return button on the projector remote control until the projector returns to a full display Check the cables connecting the computer or video source to the projector Try connecting different cables Check your compu...

Page 92: ...uction setting in the Image menu Select a computer video resolution and refresh rate that are compatible with the projector Parent topic Solving Image or Sound Problems Related references Image Quality Settings Image Menu Related tasks Connecting to an HDMI Video Source Solutions When the Image is Fuzzy or Blurry If the projected image is fuzzy or blurry try the following solutions Adjust the imag...

Page 93: ...on the Image menu such as Brightness Contrast Tint and or Color Saturation Make sure you selected the correct HDMI Video Range setting in the Image menu Make sure the HDMI cable is securely connected to the projector and your video device If you connected a long cable try connecting a shorter cable Position the projector close enough to the screen Parent topic Solving Image or Sound Problems Relat...

Page 94: ...e sure the Bluetooth Audio setting is turned on in the Settings menu If you are using the projector s speaker or headphones turn this setting off Select Search Bluetooth Device in the Settings menu when you pair a Bluetooth audio device for the first time or change to another Bluetooth audio device Make sure the Bluetooth audio device is paired to the projector and not to another device Make sure ...

Page 95: ...l to turn on the projector If the projector s laser shuts off unexpectedly it may have entered standby mode after a period of inactivity Press the power button to wake the projector and adjust the Sleep Mode setting to change the sleep interval If the projector is installed on a lighting track disconnect it from the lighting track and plug it into a power outlet to make sure it is working If the p...

Page 96: ...ng the Projector Remote Control Solutions to Remote Control Problems If the projector does not respond to remote control commands try the following solutions Check that the remote control batteries are installed correctly and have power If necessary replace the batteries Make sure you are operating the remote control within the reception angle and range of the projector Make sure the projector is ...

Page 97: ...ation Make sure the HDMI Link setting is set to On Check if the device is available in the Device Connections list in the Settings menu If the device does not appear it does not meet the HDMI CEC standards Connect a different device Make sure the connected devices are turned on and in standby status See the documentation supplied with the device for more information If you connected a new device o...

Page 98: ...ect to change without notice Toll or long distance charges may apply Before you call have the following information ready Product name Product serial number located on the bottom or rear of the projector or in the menu system Proof of purchase such as a store receipt and date of purchase Computer or video configuration Description of the problem Purchase Supplies and Accessories You can purchase s...

Page 99: ...erial number located on the bottom or rear of the projector or in menu system Proof of purchase such as a store receipt and date of purchase Computer or video configuration Description of the problem Then call Country Telephone Argentina 54 11 5167 0300 0800 288 37766 Bolivia 800 100 116 Brazil 0800 007 5000 Chile 56 2 2484 3400 Colombia Bogota 57 1 592 2200 Other cities 018000 915235 Costa Rica 8...

Page 100: ...oll free number from a mobile phone Note Toll or long distance charges may apply If your country does not appear on the list contact the sales office in the nearest country Purchase Supplies and Accessories You can purchase optional accessories and replacement parts from an Epson authorized reseller To find the nearest reseller go to Or you can contact your nearest sales office as described in Whe...

Page 101: ...General Projector Specifications Type of display Poly silicon TFT active matrix Resolution 1280 800 pixels WXGA Lens F 1 58 Focal length 13 53 mm Color reproduction Up to 16 77 million colors Brightness with Dynamic Color Mode and Wide Zoom Normal Light Output mode White light output 2000 lumens ISO 21118 standard Color light output 2000 lumens ECO Light Output mode White light output 1000 lumens ...

Page 102: ...ocus adjustment Manual Zoom adjustment Digital Zoom ratio Tele to Wide 1 0 to 1 35 Internal sound system 5 W monaural Noise level 29 dB Normal Light Output mode 26 dB ECO Light Output mode Keystone correction angle Vertical 45 Horizontal 40 USB Type B port compatibility mini USB USB 1 1 and 2 0 compliant for copying menu settings and firmware updating USB Type A port compatibility One USB 1 1 and ...

Page 103: ...ding upon mode selected environmental conditions and usage Brightness decreases over time Parent topic Technical Specifications Projector Remote Control Specifications Reception range 16 4 feet 5 m Batteries Two alkaline or manganese AAA Parent topic Technical Specifications Projector Dimension Specifications Height excluding foot 3 46 inches 88 mm Width 8 27 inches 210 mm Depth 8 94 inches 227 mm...

Page 104: ...104 For mounting 1 Center of lens 2 17 inches 55 mm 2 3 62 inches 92 mm 3 2 31 inches 58 8 mm 4 0 12 inch 3 mm ...

Page 105: ...105 5 3 46 inches 88 mm 1 4 39 inches 111 4 mm 2 2 22 inches 56 4 mm 3 Center of lens 4 3 29 inches 83 6 mm 5 4 33 inches 110 mm 6 Rear foot 7 4 69 inches 119 mm 8 3 86 inches 98 mm 9 2 52 inches 64 mm ...

Page 106: ...ption 100 to 120 V Operating 178 W at 100 Light Output 118 W at 50 Light Output Standby 0 4 W Power consumption 220 to 240 V Operating 172 W at 100 Light Output 115 W at 50 Light Output Standby 0 4 W Parent topic Technical Specifications Projector Environmental Specifications Temperature Operating At 0 to 7500 ft 2286 m altitude 41 to 95 F 5 to 35 C At 7500 ft 2286 m to 9842 ft 3000 m altitude 41 ...

Page 107: ... Communication distance Approximately 32 8 ft 10 m Supported profiles A2DP Content protection SCMS T Frequency used 2 4 GHz band 2 402 to 2 480 GHz Supported codecs SBC Qualcomm aptX audio Parent topic Technical Specifications Streaming Device Specifications Power supply 5V 2A Dimensions Length 3 7 inches 94 1 mm Width 1 19 inches 30 1 mm Depth 0 47 inch 12 mm Weight 1 ounce 28 g Temperature no co...

Page 108: ...rmats For best results your computer s monitor port or video card resolution should be set to display in the projector s native resolution However your projector includes Epson s SizeWise chip that supports other computer display resolutions so your image will be resized to fit automatically Your computer s monitor port or video card refresh rate vertical frequency must be compatible with the proj...

Page 109: ... Refresh rate in Hz Resolution in pixels SDTV 576i 576p 50 720 576 HDTV 720p 50 59 94 60 1280 720 HDTV 1080i 50 59 94 60 1920 1080 HDTV 1080p 23 98 24 29 97 30 50 59 94 60 1920 1080 Parent topic Technical Specifications ...

Page 110: ...ned on the bright light can damage your eyes Never let children look into the lens when it is on Never open any cover on the projector except the filter covers Dangerous electrical voltages inside the projector can severely injure you Except as specifically explained in this User s Guide do not attempt to service this product yourself Refer all servicing to qualified service personnel Warning The ...

Page 111: ...he lens Do not allow small children to operate the projector Children must be accompanied by an adult Do not apply optical devices such as a magnifying glass or reflector to the projected image Using the projector may result in physical harm fire or an accident Do not block the light from the lens during projection The high temperature in this area could cause burns fire or other damage The lens m...

Page 112: ...112 Side As with any bright source do not stare into the beam RG2 IEC EN 62471 5 2015 ...

Page 113: ...could rise and cause a fire Do not place the projector on an unstable cart stand or table or on a surface that is unable to support its weight Otherwise it could fall or topple causing an accident and injury If the projector is mounted on a ceiling or wall it should be installed by qualified technicians using mounting hardware designed for use with this projector When installing or adjusting a cei...

Page 114: ...wer strips Failure to comply with these precautions could result in fire or electric shock Do not place the projector where the cord can be walked on This may result in fraying or damage to the plug Unplug the projector from the wall outlet and allow to cool before cleaning Use a dry cloth or for stubborn dirt or stains a moist cloth that has been wrung dry for cleaning Do not use liquid or aeroso...

Page 115: ...rain water or excessive humidity Do not use or store the projector where it may be exposed to smoke steam corrosive gases excessive dust vibration or shock Do not use the projector where flammable or explosive gases may be present Do not use or store the projector or remote control in a hot location such as near a heater in direct sunlight or in a closed vehicle If you use the projector in a count...

Page 116: ...ning the Air Filter and Vents Turning Off the Projector Restriction of Use When this product is used for applications requiring high reliability safety such as transportation devices related to aviation rail marine automotive disaster prevention devices various safety devices or functional precision devices you should use this product only after giving consideration to including fail safes and red...

Page 117: ...n when using the product 5 IEC60417 No 5041 Caution hot surface To indicate that the marked item can be hot and should not be touched without taking care 6 IEC60417 No 6042 ISO3864 B3 6 Caution risk of electric shock To identify equipment that has risk of electric shock 7 IEC60417 No 5957 For indoor use only To identify electrical equipment designed primarily for indoor use 8 IEC60417 No 5926 Pola...

Page 118: ...f the cell s inside the battery holder 12 Positioning of cell To identify the battery holder itself and to identify the positioning of the cell s inside the battery holder 13 IEC60417 No 5019 Protective earth To identify any terminal which is intended for connection to an external conductor for protection against electric shock in case of a fault or the terminal of a protective earth electrode 14 ...

Page 119: ...ISO 3864 General prohibition To identify actions or operations that are prohibited 19 ISO 3864 Contact prohibition To indicate injury that could occur due to touching a specific part of the equipment 20 Never look into the optical lens while the projector is on 21 To indicate that the marked item don t place anything on projector 22 ISO3864 IEC60825 1 Caution laser radiation To indicate the equipm...

Page 120: ... you must keep away from moving fan blades 27 IEC60417 No 6043 Caution sharp corners To indicate that you must not touch sharp corners 28 To indicate that looking into the lens while projecting is prohibited 29 ISO7010 No W027 ISO3864 Warning optical radiation UV visible light IR etc To indicate that you must be careful not to injure your eyes or skin when in the vicinity of optical radiation 30 I...

Page 121: ...nt and receiver Connect the equipment into an outlet on a circuit different from that to which the receiver is connected Consult the dealer or an experienced radio TV technician for help This device complies with part 15 of the FCC Rules Operation is subject to the following two conditions 1 This device may not cause harmful interference and 2 this device must accept any interference received incl...

Page 122: ...es then in effect for consumer related disputes but excluding any rules that permit joinder or class actions in arbitration for more detail on procedure see Section 1 6 below You and Epson understand and agree that a the Federal Arbitration Act 9 U S C 1 et seq governs the interpretation and enforcement of this Section 1 b this Agreement memorializes a transaction in interstate commerce and c this...

Page 123: ...thority to resolve all disputes arising out of or relating to the interpretation applicability enforceability or formation of this Agreement including any claim that all or any part of this Agreement is void or voidable Notwithstanding this broad delegation of authority to the arbitrator a court may determine the limited question of whether a claim or cause of action is for an IP Claim which is ex...

Page 124: ...rsuant to this Section 1 6d e Attorney s Fees Epson will not seek its attorney s fees and expenses for any arbitration commenced involving a Dispute under this Agreement Your right to attorney s fees and expenses under Section 1 6d above does not limit your rights to attorney s fees and expenses under applicable law notwithstanding the foregoing the arbitrator may not award duplicative awards of a...

Page 125: ...ered trademark of Microsoft Corporation in the United States and or other countries Apple and Mac are trademarks of Apple Inc registered in the U S and other countries Google and Android TV are trademarks of Google LLC Qualcomm aptX is a product of Qualcomm Technologies Inc and or its subsidiaries Qualcomm is a trademark of Qualcomm Incorporated registered in the United States and other countries ...

Page 126: ...tle and interest whatsoever in and to Bluetopia and your use is subject to such ownership and to the license agreement Stonestreet One LLC reserves all rights related to Bluetopia not expressly granted under the license agreement and no other rights or licenses are granted either directly or by implication estoppel or otherwise or under any patents copyrights mask works trade secrets or other inte...

Reviews: