Epson C11C658011 Manual Download Page 7

Epson Stylus Photo R380

10/06

Epson Stylus Photo R380

 - 7

Caution: 

Be sure to insert the CD/DVD tray while the printer is 

turned on; this ensures that the print position will be adjusted 
automatically. 

Do not insert the CD/DVD tray while the printer is printing; 
otherwise, your printer may be damaged or the surface of the CD 
or DVD may become dirty or scratched.

Designing CDs and DVDs

You can use the Epson Print CD program (included on the 
Printer Software CD-ROM) to create and print a design with 
images, graphics, and text. See your 

Printer Basics

 manual or 

on-screen 

User’s Guide

 for instructions.

Printing Your Design

After you have created your design and loaded a CD or DVD, 
follow these steps to print:

1. Open the File menu and select 

Print

.

2. Make sure 

EPSON Stylus Photo R380 Series

 (Windows) 

or 

Stylus Photo R380

 (Macintosh) is selected.

3. Select 

CD/DVD

 or 

CD/DVD Premium Surface

 as the 

Media Type setting.

4. Select 

None

 as the Print Confirmation Pattern setting 

(Windows) or Test Print Pattern setting (Macintosh).

5. Click 

Print

.

Note: 

You can print on only one CD or DVD at a time. When the 

Copies setting is set to 2 or more, remove each disc from the 
tray after it has been printed, and then place the next CD or DVD 
on the tray. Then press the 


Start

 button to resume printing.

After you print, handle the CD or DVD carefully and allow the ink 
to dry for at least 24 hours before playing the disc or inserting it in 
a drive. Keep printed discs away from moisture and direct 
sunlight.

After you finish printing on a CD/DVD, remove the CD/DVD tray 
and set the front tray to the paper position by pushing up the tray 
lever.

If you need to adjust the print position or color, see your 
on-screen 

User’s Guide

 or 

Printer Basics

 book.

Replacing an Ink Cartridge

When you print with low or expended ink cartridges, you see 
a message on the LCD screen telling you which cartridges are 
low or expended.

You’ll also see a message on your computer screen when you 
print telling you which cartridge is low or expended.

When a cartridge is installed in the printer for more than six 
months, you may need to replace it if printouts don’t look 
their best. If the quality doesn’t improve after cleaning and 
aligning the print head, you can replace the cartridge even if 
the cartridge is not expended.

Checking the Ink Cartridge Status

Follow the steps below to check how much ink is left in your 
cartridges. 

Note: 

You can also check the ink cartridges using your computer; 

see your 

Printer Basics

 manual or on-screen 

User’s Guide

 for 

instructions.

1. Press 

Setup

 to enter the Setup menu.

2. Press 

l

 or 

r

 to select 

Ink Cartridge Status

, then press 

OK

.

3. You see a screen showing the status of the ink cartridges:

The cartridges are identified as follows: 

Y

 (yellow), 

B


(black), 

LC

 (light cyan), 

LM

 (light magenta), 

M

 (magenta), 

C

 (cyan).

4. When you’re done checking the ink cartridge status, press 

OK

. Press 

l

 or 

r

 to select 

OK

, then press 

OK

.

Removing and Installing Ink Cartridges

Be sure you have a new ink cartridge before you begin. Once 
you start replacing a cartridge, you must complete all the steps 
in one session.

Caution: 

Leave the expended cartridge installed until you have 

obtained a replacement, or the ink remaining in the print head 
nozzles may dry out. To ensure good results, use genuine Epson 
ink cartridges and do not refill them. Other products may cause 
damage to your printer not covered by Epson’s warranty.

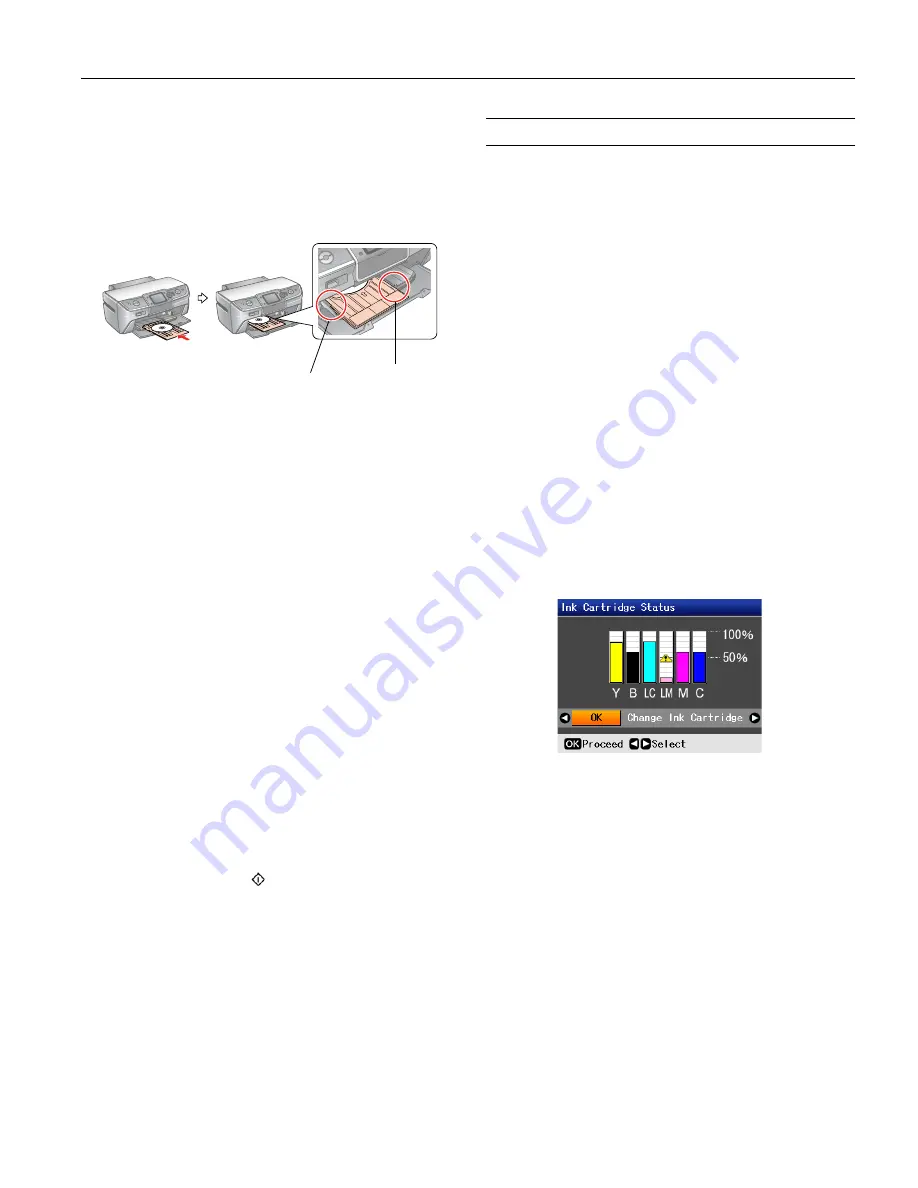
Make sure the CD/DVD 
tray slides under the tab 
(on both sides)

Make sure the 
arrow marks 
are aligned

Summary of Contents for C11C658011

Page 1: ...Don t use an ink cartridge beyond the expiration date on the package Sheet feeder Edge guide Paper support Control panel Printer cover External interface PictBridge port Front tray Front cover Front tray extensions Tray lever Infrared port Memory card slots under cover USB port AC inlet Ink cartridge holder Cartridge Part number Black 78 T078120 Cyan 78 T078220 Magenta 78 T078320 Yellow 78 T078420...

Page 2: ...tra Premium Glossy Photo Paper Borderless 4 6 inches S041934 Letter 8 5 11 inches S041935 Epson Premium Photo Paper Glossy Epson Premium Glossy Photo Paper Borderless 4 6 inches S041808 S041727 Borderless 5 7 inches S041464 Borderless 8 10 inches S041465 Letter 8 5 11 inches S041286 S041667 Epson Premium Photo Paper Semi gloss Epson Premium Semigloss Photo Paper Borderless 4 6 inches S041982 Lette...

Page 3: ... class B CAN CSA CEI IEC CISPR 22 Class B Slot Type of card Top slot xD Picture Card xD Picture Card Type M xD Picture Card Type H MagicGate Memory Stick MagicGate Memory Stick Duo Memory Stick Memory Stick Duo Memory Stick PRO Memory Stick PRO Duo MultiMediaCard SD Card SDHC Card miniSD Card miniSDHC Card microSD Card microSDHC Card Bottom slot CompactFlash Microdrive Media format DCF version 1 0...

Page 4: ...The minimum bottom margin is 0 12 inches 3 0 mm D L The minimum left margin is 0 20 inches 5 0 mm D R The minimum right margin is 0 20 inches 5 0 mm E The minimum bottom margin is 0 78 inches 20 0 mm Normal Borderless Envelopes Inner hub area 18 to 42 mm Outer periphery area 117 to 120 mm for a 12 cm CD DVD 77 to 80 mm for a 8 cm CD DVD For this paper Select this paper Type or Media Type setting P...

Page 5: ...ansfer paper Epson Photo Quality Self Adhesive Sheets 1 sheet Error message Solution A printer error has occurred See your documentation Paper may be blocking movement of the print head Turn off the printer then lift up the printer cover and remove any jammed paper or other foreign objects Also make sure you ve removed all of the packing material Then turn the printer back on If you still see this...

Page 6: ...e surface may cause errors when you burn the data 1 Turn on the printer and open the front cover 2 Set the front tray to the CD DVD position by pulling the tray lever down Caution Before you move the tray lever make sure no paper or other objects are on the front tray and the front tray is not extended Do not touch the front tray when you move the tray lever Do not move the tray lever while the pr...

Page 7: ...t the print position or color see your on screen User s Guide or Printer Basics book Replacing an Ink Cartridge When you print with low or expended ink cartridges you see a message on the LCD screen telling you which cartridges are low or expended You ll also see a message on your computer screen when you print telling you which cartridge is low or expended When a cartridge is installed in the pri...

Page 8: ... in your eyes flush them immediately with water If discomfort or vision problems continue after a thorough flushing see a doctor immediately Note If an ink cartridge is low you may continue to use it until it is expended 5 Remove the new cartridge from the package Caution Do not touch the green IC chip on the side of the cartridge This can damage the ink cartridge Always install an ink cartridge i...

Page 9: ...ad nozzles or clean the print head make sure the CD DVD tray is not inserted in the printer and make sure the front tray is in the paper lower position Checking the Print Head Nozzles Follow the steps below to check the print head nozzles using the printer s control panel Note You can also check the print head nozzles using your computer See your Printer Basics manual or on screen User s Guide for...

Page 10: ... see light or dark lines you may need to align the print head Note You may also see lines in your printouts if your cartridges are low on ink or you need to clean the print head Caution Do not press the Stop Clear Settings button while printing an alignment sheet The steps below explain how to align the print head using the printer s control panel You can also do this using your computer See your ...

Page 11: ...ts and don t spray or apply lubricants oils or grease inside the printer Don t use any cleaning sheets included with special paper they may jam inside the printer Transporting the Printer If you need to ship your printer you must prepare it for transportation by packing the printer in its original box or one of a similar size Caution When storing or transporting the printer do not tilt it stand it...

Page 12: ...cord and USB cable from the printer Keep the printer level as you transport it After transporting the printer plug it in turn it on and test it If you notice a decline in print quality clean the print head if output is grainy or blurry align the print head Related Documentation CPD 22276 Epson Stylus Photo R380 Start Here CPD 22278 Epson Stylus Photo R380 Printer Basics CPD 22277 Epson Stylus Phot...

Reviews: