


Related Information
&
“Application for Configuring Printer Operations (Web Config)” on page 221
Connecting to the Network from the Control Panel (When Using an Additional
Network)
Connect the printer to the network by using the printer's control panel.
Assigning the IP Address (When Using an Additional Network)
Set up the basic items such as Host Address, Subnet Mask, Default Gateway.
Make settings for the standard and the additional network.
This section explains the procedure for setting a static IP address.
1.
Turn on the printer.
2.
Select
Settings
on the home screen on the printer's control panel.
3.
Select
General Settings
>
Network Settings
.
4.
Select
Standard
or
Additional
for the network that you want to set up.
5.
Select
Advanced
>
TCP/IP
.
Note:
When you select
Advanced
, you need to enter the administrator password for the additional network.
6.
Select
Manual
for
Obtain IP Address
.
When you set the IP address automatically by using the DHCP function of router, select
Auto
. In that case, the
IP Address
,
Subnet Mask
, and
Default Gateway
on step 7 to 8 are also set automatically, so go to step 9.
7.
Enter the IP address.
Focus moves to the forward segment or the back segment separated by a period if you select
l
and
r
.
Confirm the value reflected on the previous screen.
8.
Set up the
Subnet Mask
and
Default Gateway
.
Confirm the value reflected on the previous screen.
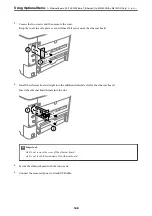
c
Important:
If the combination of the IP Address, Subnet Mask and Default Gateway is incorrect,
Start Setup
is inactive
and cannot proceed with the settings. Confirm that there is no error in the entry.
9.
Enter the IP address for the primary DNS server.
Confirm the value reflected on the previous screen.
>
Ethernet Board (10/100/1000 Base-T, Ethernet) (AL-M8250DN/AL-M8150DN Only)
>
170