background image

EPSON AcuLaser CX11/CX11F

Revision B

DISASSEMBLY AND ASSEMBLY

Printer

311

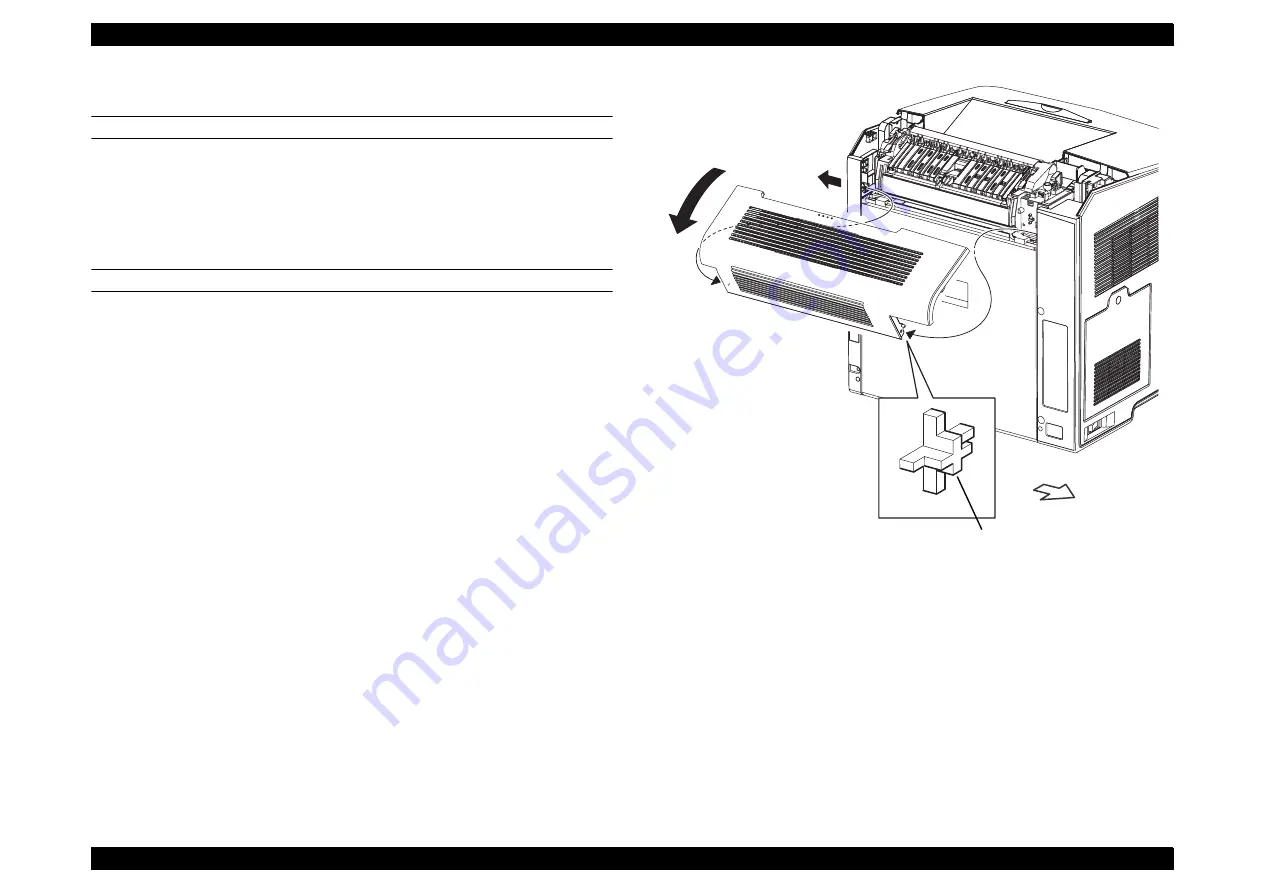
4.2.2.3  COVER FUSER

REMOVAL

1.

Open COVER FUSER.

2.

Bow COVER FUSER to pull out its right and left convex potions, and remove the 
COVER FUSER.

REINSTALLATION

1.

Insert the right and left convex potions of the COVER FUSER.

2.

Close COVER FUSER.

Figure 4-6.  Removal of COVER FUSER

Leg_Sec03_005EB

2)-1

2)-2

1)

LEFT

Protrusion

Summary of Contents for AcuLaser CX11 Series

Page 1: ...EPSON AcuLaserCX11 CX11F Color Multi Function Page Printer SERVICE MANUAL SEOT04007 ...

Page 2: ... SO WHEN THE POWER SUPPLY CABLE MUST BE CONNECTED USE EXTREME CAUTION IN WORKING ON POWER SUPPLY AND OTHER ELECTRONIC COMPONENTS 4 ALWAYS WEAR GLOVES FOR DISASSEMBLY AND REASSEMBLY TO AVOID INJURY FROM SHARP METAL EDGES WARNING 1 REPAIRS ON EPSON PRODUCT SHOULD BE PERFORMED ONLY BY AN EPSON CERTIFIED REPAIR TECHNICIAN 2 MAKE CERTAIN THAT THE SOURCE VOLTAGES IS THE SAME AS THE RATED VOLTAGE LISTED ...

Page 3: ...mation for reference System Connection Diagram and Printer System Electrical Connection Packaging Specification Exploded diagram Parts List Electrical circuit boards schematics System Parameter List of Error List Symbols Used in this Manual Various symbols are used throughout this manual either to provide additional information on a specific topic or to warn of possible danger present during a pro...

Page 4: ... L Left L H Left Hand LD Laser diode LDD Lightly Doped Drain LED Light emitting diode LEF Long Edge Feed LH Left Hand LV Low Voltage LVPS Low Voltage Power Supply M Magenta MAG Mag Roll MCU Machine Control Unit MOB Marks On Belt MOT Motor MSI Multi Sheet Inserter N P No Paper NVM Non Volatile Memory OEM Original Equipment Manufacturing OHP Overhead Project In this manual OHP means a transparent sh...

Page 5: ...ting any service procedure turn the printer off and unplug the power cord from the wall outlet If you need to work on the printer with power applied such as voltage measurement strictly follow the instructions in this manual and use extreme caution to avoid an electric shock W A R N I N G If you need to work on the printer with power applied never touch any electronic components other than the tar...

Page 6: ...er cable and leave the printer until it cools down sufficiently to work on it to prevent burn injury W A R N I N G Do not touch the driving part e g gears while the assembly printer is operating W A R N I N G As the inside of the printer is high temperature state immediately after the operation leave it more than 30 minutes before working Leg_001_022RA FUSER Unit Caution Label Refer to Caution Lab...

Page 7: ...to avoid injury of yourself and anyone around you C H E C K P O I N T The laser beam has a narrower frequency band and more coherent phases than any other light sunlight electric light The beam has excellent monochromaticity and convergence thus it reaches long distances Because of these characteristics the laser beam converges into one point causing high density and high temperature And that is w...

Page 8: ...he user to avoid burn injury Refer to High Temperature Assembly Warning label for Laser Beam The label is attached on the top of the laser beam emitting unit ROS ASSY to alert the service personnel the danger of laser beam Refer to Laser Beam C H E C K P O I N T In maintenance work check that the labels are free from peeling and soiling Leg_Sec001_018EA Leg_Sec001_019EA Leg_Sec001_020EA Leg_Sec001...

Page 9: ...fire by sparks in the vacuum cleaner Cautions relating to Storage of Paper To achieve the appropriate printing results unused paper that is stored outside of the unit should be sealed up by packing material or put into a plastic bag to prevent it from becoming moist W A R N I N G Do not pick up dropped toner with a general vacuum cleaner To do so may cause ignition Leg_Sec001_014EA ...

Page 10: ... INLK FUSER When any one of the above interlock switches turns off 24VDC supply to the motors and solenoid is cut off The SWITCH ASSY TOP turns off when the COVER ASSY TOP is opened The SWITCH INLK FRONT does when the COVER FRONT ASSY U is opened and the SWITCH INLK FUSER does when the COVER FUSER is opened FUSER LOCK SWITCH The FUSER LOCK SWITCH turns off when the latch lever of the FUSER ASSY is...

Page 11: ...Schematic Diagram of Safety System ...

Page 12: ... 2005 First release B 13 July 2005 Modification Chapter 1 Reception setup items p 68 New information is added Chapter 4 4 2 3 7 HOLDER ASSY RETARD MSI p 338 A caution box is added 4 2 4 4 FRAME ASSY PH p 352 New information is added manuals4you com manuals4you com ...

Page 13: ...ion Path 96 2 2 4 Paper Feed 102 2 2 5 Xerographic 108 2 2 6 Electrical 120 2 2 7 Operating Modes 122 2 2 8 Flying start printing 123 2 3 Scanner Operating Principles 124 2 3 1 Scanner Mechanism Overview 124 2 3 2 ADF Mechanism Overview 126 Chapter 3 TROUBLESHOOTING 3 1 Overview 129 3 1 1 Procedure for troubleshooting 129 3 1 2 Checking Installation Status 129 3 1 3 Precautions in Performing Troub...

Page 14: ...D 532 5 2 2 Firmware Update 534 5 3 Fax Function 541 5 3 1 Fax unit Firmware Update 541 5 3 2 Retrieving Writing User Data 541 Chapter 6 MAINTENANCE 6 1 Overview 546 6 2 On site Service 547 6 2 1 Details of On site Servicing 548 6 3 Lubrication and Glueing 551 6 3 1 Printer Section 551 6 3 2 Scanner ADF Section 551 6 4 Printer Maintenance Function 553 6 4 1 Maintenance Menu 553 6 4 2 Maintenance I...

Page 15: ...C H A P T E R 1 PRODUCTDESCRIPTION ...

Page 16: ...g m2 Paper Eject Capacity Face down 250 sheets NOTE Conditions for the capacity 22 degrees C 55 RH standard paper simplex duplex printing The print ratio is 5 for both B W and color printing With color printing 5 for each color Consumables Toner Cartridge with CSIC chip C M Y K Photoconductor Unit with CSIC chip Transfer Belt and Waste Toner Box are included 1 1 2 Scanner Section Color CCD A4 comp...

Page 17: ...with a large LCD with backlight Built in Interfaces USB2 0HS Ethernet 10Base 100Base T standard or option Fax modular The AcuLaser CX11F only 1 1 5 Software ESC PageS03 installed A wide variety of copy modes Copy Mode Text Photos Text Photos and High resolution 2 in 1 copy is available Push type scan Enables to send scanned data to another PC via network Support both Local TWAIN and Network TWAIN ...

Page 18: ... For thick papers that exceed 163 g m2 43 lb including transparency envelope Feeds papers at low speed to maintain toner fixation 4 Low speed 1 mode For thick papers that exceed 105g m2 28 lb including envelope label Feeds papers at low speed to maintain toner fixation 5 Low speed 2 mode Feeds papers at low speed to maintain toner fixation when printing on transparencies 6 Note that the time given...

Page 19: ...all engine options and controller options installed Base model Fax model Note As for the base model the values are measured when performing printing Scanner consumption current Table 1 3 Sound Pressure Model During printing Standby mode Sleep mode Base model 54dB Background noise Background noise FAX model 57dB Background noise Background noise Table 1 4 Sound Power Model During printing Standby m...

Page 20: ...damaged part INSTANTANEOUS OUTAGES No effect on printing quality DIP 1 cycle 100 rated voltage 10 RESISTANCE TO STATIC ELECTRICITY Ensure the following conditions using evaluation methods compliant with IEC61000 4 2 CISPR 24 Contact electric discharge 5 kV No error on any device after applying Aerial electric discharge 10 kV No error on any device after applying INSULATION RESISTANCE 10 MΩ or more...

Page 21: ... unit ADF installed 460 mm 500 sheet cassette option 760 mm AIR PRESSURE ALTITUDE Note Withstands altitude of 0 to 15 000 m while transported by air However this assumes that the cargo compartment is maintained at 70 9275 kPa or higher LEVELNESS Difference between front and back 5 mm or less 445 mm Difference between left and right 10 mm or less 445 mm ILLUMINATION 3 000 lx or less do not expose t...

Page 22: ...Section 1010 1040 200V series IEC60825 Class 1 Laser Product CE Directive Nordic Agency Approvals Model Type Applicable Standards 120V FCC Part15 Subpart B Class B AnSI C63 4 11 4D 230V EN55022 CIRSPR Publication22 Class B EN61000 3 2 Harmonics ClassA EN61000 3 3 Flicker EN55024 GB4943 GB9254 Class B GB17625 1 KN22 Class B KN61000 4 2 3 4 5 6 11 AS NZSCISPR22 Class B Model Type Applicable Standard...

Page 23: ...o BAM Styrene Concentration 0 02 mg m3 or less Dust concentration 0 075 mg m3 or less measurement method conforms to BAM TVOC 0 2 mg m3 or less MISCELLANEOUS Toner should have no affect on the human body OSHA TSCA and EINECS compliant OPC should have no affect on the human body OSHA compliant Ozone evolution UL 478 5th edition compliant Materials should not contain any materials prohibited in each...

Page 24: ...first Note Calculated as Color Monochrome 2 1 Color only 150 000 pages Monochrome only 200 000 pages Durability Number of printable pages Ave 3 000 pages month Max 45 000 pages month Monochrome Color 3 1 SCANNER SECTION TBD Carriage MCBF 100 000 cycles or more Opening Closing of the document cover 30 000 times Opening Closing of the scanner module 2 000 times Light source MTTF 10 000 hours ADF SEC...

Page 25: ...included ADF Width becomes 494 mm when the LGL extension paper tray is opened Figure 1 2 Dimensional Outline Drawing main unit 500 sheet cassette Table 1 10 Dimensions and Weight Product Width mm Depth mm Height mm Weight kg Base model 460 467 593 30 9 FAX model 460 467 667 33 1 500 sheet cassette 440 446 130 8 467mm 593mm 460mm 667mm Base model FAX model Table 1 11 Dimensions and Weight with Opti...

Page 26: ...r cartridges close the cover A lift up the scanner section 2 and open the cover B 8 Turn up the photoconductor insert lever 9 Insert the photoconductor unit 10 Close the cover B 11 Fully extend the paper output extension on the cover B Be sure to extend the folded part of the paper output when printing on LGL sized papers 12 Before scanning LGL sized papers using the ADF extend the folded part of ...

Page 27: ...xing Heat roller and fuser belt system 1 2 2 2 Printer Basic Specifications RESOLUTION 600dpi FIRST PRINT TIME The time from receiving the Start command to when trailing edge of the paper leaves the paper eject roller Note that the time given in the tables below does not apply when the printer is in the conditions described in 1 2 2 7 Printer Engine Restrictions p39 Table 1 12 Monochrome mode Unit...

Page 28: ... paper 2 reverse side For printing on reverse side of the Thick paper 2 Low speed 1 Low speed OHP Transparency color monochrome Low speed 2 Low speed Label 2 Labels Low speed 1 Standard Envelopes 75 to 105g m2Envelops for each country Low speed 1 Low speed Coated paper 3 105 to 210 g m2 Low speed 1 Low speed Coated paper 3 reverse side For printing on reverse side of the Coated paper 3 Low speed 1...

Page 29: ... be added to the printer to feed papers as follows Note 1 RX 80 64 g m2 2 EPSON high quality plain paper 82 g m2 Table 1 16 Combination with Optional Cassette Combination 1 2 Standard MP tray 200 sheets 1 180 sheets 2 use use 500 sheet cassette 500 sheets 1 2 use Total Number of Sheets 200 1 180 2 700 1 680 2 ...

Page 30: ...d Paper Size Type and Orientation Paper Paper size unit mm inch MP tray 500 sheet cassette Paper orientaion Manual duplex Vertical length Horizontal width Standard A4 297 00 210 00 SEF Available A5 148 00 210 00 SEF Available Letter 279 40 11 00 215 90 8 50 SEF Available HALF Letter 215 90 8 50 139 70 5 50 3 SEF Legal 355 60 14 00 215 90 8 50 SEF Available GLG 330 20 13 00 215 90 8 50 SEF GLT 266 ...

Page 31: ...0 sheets Face down only NOTE Conditions for the capacity 22 degrees C 55 RH standard paper simplex duplex printing The print ratio is 5 for both B W and color printing With color printing 5 for each color CONSUMABLES AND PERIODIC REPLACEMENT UNIT Note For detailed specifications refer to 1 2 2 5 Consumables Periodic Replacement Unit p37 Paper feed direcction Envelopestype Yokei 0 Yokei 4 Yokei 6 4...

Page 32: ...rent between the front side and the back side Paper with punch holes or perforations Creased curled or torn paper Irregularly shaped paper or paper with non perpendicular corners Labels that peel off easily Paper with glue staples or paper clips attached to it Special paper for ink jet applications super fine glossy glossy film etc Paper previously used in a thermal or ink jet printer Transparenci...

Page 33: ...th x 355 60 mm length NOTE Continuous printing beyond the guaranteed printing area border 4mm causes soiling inside the mechanism Printable area The minimum left right top and bottom margins are 4 mm for any type of paper For envelop however left and right margins should be 6 mm Figure 1 4 Printable Area Table 1 19 Available Paper by Feeder Paper Feeder Standar d paper Plain paper Special paper OH...

Page 34: ...of the curl of the bottommost paper similarly measure the other three corners and define the largest value of four corners as the curl value Table 1 20 Printing start position accuracy A4 Simplex printing Main scanning direction Reference point c 2 5mm Sub scanning direction Reference point a 2 0mm c a b f e d Feed direction Printable area Table 1 21 Skew A4 Simplex printing Main scanning directio...

Page 35: ... corner 3 edges and 6 sides of the listed in the table below by drop of 91 cm Table 1 24 Consumables and Components needing Periodic Replacement Program Configurations Lifetime pages External dimensions mm Weight kg Toner Cartridge Y M C K Toner Cartridge 1500 1 52 7 W 285 6 D 58 4 H 0 2 4000 1 0 27 Photoconductor Unit Transfer belt Photoconductor with waste toner box 14000 2 B W continuous 42 000...

Page 36: ...position Photoconductor Unit This unit can be replaced regardless of whether or not the main unit is turned on OPTIONAL PRODUCTS 500 sheet cassette Turn off the main unit before installing If the main unit is on when the cassette is installed it is not detected Secure the cassette to the main unit with the coupling part on the top surface inside the unit Adding Controller Option Parts Turn off the...

Page 37: ...ondition and control Time required sec 1 During printing To keep the image density at target level 1 When printing more than 51 copies pages continuously 1 Every time the printer makes 50 copies pages it stops the job temporarily to perform the ADC 2 control 2 If the printer detect a near end of Toner Cartridge it changes the timing of the ADC control to every 25 copies pages 45 seconds 2 Admix 3 ...

Page 38: ...printer performs the ADC Temperature 4 degrees Humidity 10 RH 45 1 3 Photoconductor Unit Parameter control according to the piece to piece variations of Photoconductor The printer performs the ADC when replacing the Photoconductor unit with a new one or used one 74 2 4 New Toner Cartridge Filling toner Recovering from an Empty error The printer performs the ADC when replacing the Toner Cartridge w...

Page 39: ...se Light Source White cold cathode fluorescent lamp CCFL Gradations 16 bit input 1 8 bit output for each pixel of each color Scan Speed Monochrome 2 sec A4 300 dpi Full color 11 sec A4 300 dpi Warmup Time Within 45 sec at 25 degrees C Light intensity output reaches 95 within 90 sec at 25 degrees C Document Size Detection Not available ADF Detection Available Scan Pause and Resume Available Lock Me...

Page 40: ...ning Order 1 to N Document Stack Face down Document Positioning Center Scan Speed Monochrome 2 sec A4 300 dpi Full color 11sec A4 300dpi Detection of Paper Presence on the ADF Available Document Size Detection Available for A4 LT and B5 Cover Open Detection Available Lock Mechanism ADF cannot be opened when the scanner unit is open Weight 2 65kg Size 448 x 323 x 90 Registration Accuracy Leading ed...

Page 41: ...counterclockwise so that the jammed document is ejected to the document tray The knob cannot be turned clockwise 1 2 5 Copy Performance 1 2 5 1 Paper Size and Print Area Figure 1 6 Guaranteed Printing Area NOTE The scanned area of the original is determined based on the paper size matching the home position of the original origin on the document table with that of the paper When the size of the or...

Page 42: ...277mm Copy using document table Main scanning 100 2 0 190mm Sub scanning 100 1 0 277mm PRINTING START POSITION ACCURACY Figure 1 7 Printing Start Position Accuracy SKEW T B D Table 1 30 Printing Start Position Accuracy A4 Document table ADF Main scanning direction Reference point c 3 5mm 4 5mm Sub scanning direction Reference point a 3 0mm 4 5mm Table 1 31 Skew A4 Document table ADF Main scanning ...

Page 43: ... Public Switched Telephone Network PBX Private Branch Exchange Earth start Flash start compatible For German models only TRANSMISSION SPEED The communication speed is determined automatically by negotiating with the other party according to the fax protocol Transmission speed 33600 31200 28800 26400 24000 21600 19200 16800 14400 12000 9600 7200 4800 2400 bps PROTOCOL Protocol G3 G3ECM Supported Co...

Page 44: ...ons FAX model Interface Host I F USB 2 0 HS Network Cobalt FAX I F External board compatible manufactured by NJRC Laser FAX Scanner I F CCD I F Moter I F ADF I F Engine I F UART same as AcuLaser C1100 1 2 7 2 Host interface specifications The printer provides the following host interfaces USB Rev 2 0 HS interface Network interface Fax interface Fax model only Phone line Attached telephone The loca...

Page 45: ...e Print LED green Error LED Red One Touch button A B C Asterisk button Hash button Ten key Reset button FAX button Advanced Menu button Right button Left button Up button Down button B W Start button Color Start button Cancel button Speed dial button Redial button Scan button Scan LED green Copy button Setup button Copy LED green Setup LED green FAX LED green Buzzer FAX model Base model ...

Page 46: ... the fax mode and receiving fax also becomes unavailable System errors are indicated as Cxxxx Service Req service call error and disables the whole operation However when the engine related service call error Exxxx has occurred functions except printer operation can be used Table 1 33 LCD and LEDs Name Function Liquid Crystal Display LCD LCD 132 x 65 dot matrix allows max 22 characters x 5 lines d...

Page 47: ...n parameter Resets the fax transmission parameter Returns the menu screen on the LCD to the previous level Up Down buttons Used when proceeding through menu items or selecting the parameters Left Right buttons Speed dial button Entering numbers after pressing this button immediately send the fax data to the registered fax number Redial button Inserts a pause into the number or dials the number tha...

Page 48: ... Print mode initial screen Display Description Top line Left status guidance Displays mode and status Right Toner remaining amount icon Displays 11 levels to indicate 0 to 100 by 10 in the order of K C M and Y Fax reception data accumulation icon Only displayed when there are received fax jobs remaining unprinted in the memory It is not displayed for accumulated sending jobs Four lines from the bo...

Page 49: ...d Figure 1 11 Alert Screen If the job cancel alert occurs press the Cancel button again to cancel the job Press the Start button to void the cancel Error Screen If an error has occurred error screen appears Guidance is displayed as long as the error can be cleared and the job is continuable Figure 1 12 Error Screen To clear the error press the Start button Press the Cancel button to cancel the job...

Page 50: ...e touch speed dial C Moves to fax mode and dials the registered number Moves to fax mode and dials the registered number Invalid Moves to fax mode and dials the registered number Moves to fax mode and dials the registered number Advanced Menu button Invalid Invalid Invalid Invalid Invalid Reset button Invalid Invalid Invalid Multiple warnings detected Invalid Up button Down button Multiple warning...

Page 51: ... Image optimum Check paper type Color mismatch CMYK toner low Worn photoconductor Worn fixer Worn CMYK developer soon Non genuine toner Display Descriptions Reset Please wait Warming up Calibrating printer Cancel the job Remote job cancellation Standby Ready Printing Including processing the job Printing test sheet Scanning locked Scanning Reset all Cancel all jobs Cancel the job Writing to ROM mo...

Page 52: ... wait Scanning Please wait Manual Duplex Manual duplex printing Check paper Manual feed Using networked TWAIN Please wait TWAIN is being used Cancel printing Cancel to stop Start to continue Cancellation of print job Cancel all print jobs Cancel to stop Start to continue Cancellation of all print jobs Cancel scanning Cancel to stop Start to continue Cancellation of scan job Scanner Trouble Unable ...

Page 53: ...n three seconds Prompts the user to register new numbers Invalid Does not shift to fax mode and dial Advanced Menu button When verifying speed dial numbers Displays details on speed dial numbers Invalid Invalid Reset button 1 Short press Performs initialization 2 Long press hold for more than three seconds Perform initialization for all the settings 3 Cursor function Deletes one character 4 Select...

Page 54: ...lays the amount of the memory used for the fax module Fax Transmssn Job Fax transmission jobs currently transmitted job and stored jobs are listed Fax Reception Job Fax reception jobs currently received job and stored jobs are listed Item Setup menu item Remarks Memory Info Display Used Memory xxx xxx is 0 to 100 Fax Transmssn Job TT MM Start time Waiting Transmission Status of job Dial Number Spe...

Page 55: ...eed Dial List Activity Report Fax Setting List Memory Job Info Fax Menu Advanced Fax Menu Display Remarks Check paper size Image optimum Check paper type Color mismatch CMKY toner low Worn photoconductor Worn fixer Worn developer Non genuine toner Display Remarks Reset Please wait Warming up Calibrating printer Cancel the job Remote job cancellation Standby Fax scanning Transmitting Fax Only Color...

Page 56: ... Invalid Scrolls up down in the setting items Left Right Selects and changes the setting Invalid Selects and changes the setting Speed dial Invalid Invalid Invalid Redial Invalid Invalid Invalid Stop Invalid Cancels the Job Cancels the Job Asterisk Hash buttons Invalid Invalid Invalid Ten key Enters number of pages magnification Invalid Enters number of pages magnification Start Start Invalid Star...

Page 57: ...tailed drawings that consist of a lot of fine lines Performs black text enhancement process reducing the background noise Scan resolution is set to 600 dpi the maximum image quality mode for emphasis reproducibility of the technical drawing fine lines Yes 600dpi 600dpi Adjustment Item Set contents Description Setup value coverage side side Density Adjust the density of whole area of the image Incr...

Page 58: ...splay Remarks Could not print Check paper size Image oputimum Check paper type Color mismatch CMYK toner low Worn photoconductor Worn fixer Worn developer Non genuine toner Display Remarks Please wait Warming printer Calibrating printer Cancel the job Remote job cancellation Standby Copying Scanning 1st page Scanning 2nd page Display Remarks Press Cancel to stop Display Remarks Insufficient memory...

Page 59: ...h to print mode One touch speed dial A One touch speed dial B One touch speed dial C Moves to fax mode and dials the registered number Invalid Does not shift to fax mode and dial Advanced Menu button Shifts from scan mode initial screen to advanced scan menu screen Invalid Invalid Reset button 1 Short press Performs initialization 2 Long press hold for more than three seconds Perform initializatio...

Page 60: ...played are replaced with blanks spaces Setup menu Setup items Remarks File format PDF TIFF JPG Display Remarks Standard scan Manual scan Not for Auto scan Setup menu Setup items Remarks Paper size A4 B5 LT LGL LGL sized papers can be used when the ADF is installed Display Remarks Scan To PC Press Start scan Using local PC Select Network PC Scan menu Advanced scan menu Display Remarks Could not pri...

Page 61: ...Calibrating printer Cancel the job Remote job cancellation Standby Scanning Waiting to Connect PC Display Remarks Press Cancel to stop Display Remarks Canceling Scanning Please wait Cancel Scan Job Press Cancel to Canc or Start to Continue Cancellation of scan job PC Connection failed Net Connection failed Not concluded normally because of the cable breakage or other reasons ...

Page 62: ...Invalid Ten key Invalid Start Invalid Setup menu Remarks Printer settings Information Menu p65 Tray menu p65 Setup Menu p65 Reset Menu p66 Support Menu When started in support mode p66 Printer Adjust Menu When started in support mode p66 Maintenance Menu When started in maintenance mode p69 Host I F settings USB Menu p66 Network Menu p67 Fax settings Basic Settings p67 Transmssn Settings p67 Recep...

Page 63: ...9 Setup menu Setup items MP Tray size LT HLT LGL GLT GLG EXE F4 MON C10 DL C5 C6 ISO B5 Cassette paper size A4 LT MP Tray Plain Semithk Letterhead Recycled Colored LC Type Plain paper semi thick paper letterhead recycled paper colored paper Setup menu Setup items Remarks Lang Lang English Lang Français Sprache Deutsch Lingua Italiano IDIOMA ESPAÑOL SPRÅK SVENSKA Sprog Dansk Taal Neder lands Kieli ...

Page 64: ...o the setting value of the Panel or PING is memorized and it is restored and displayed on the panel when the setting is changed back to Panel or PING The printer displays 192 168 192 168 if the settings are not made from the panel Setup menu Remarks Clear warning Clear all warning Reset Restart Unit Reboot Factory Settings Change Toner C Change Toner M Change Toner Y Change Toner K Reset Fuser Cou...

Page 65: ...tup menu Setup items Remarks Network I F 1 On Off Network Config 2 ÇµÇ Ç ÅAÇ ÇÈ Get IPAddress 3 Panel Auto Ping Default values vary according to the destination IP 3 4 5 0 0 0 0 255 255 255 255 SM 3 0 0 0 0 255 255 255 255 GW 3 0 0 0 0 255 255 255 255 AppleTalk 3 On Off MS Network 3 On Off Rendezvous 3 On Off Link Speed 3 Auto 100 Full 100 Half 10 Full 10 Half Default values vary according to the ...

Page 66: ...ngs cannot be changed as long as there are jobs stored in the memory FAX COMMUNICATION MANAGEMENT SETUP ITEMS Note Fax communication management setting cannot be changed as long as there are jobs stored in the memory FAX FACTORY DEFAULT SETUP ITEMS Note 1 This function returns all fax settings stored on the fax board and reboots the product 2 And deletes all unfinished fax jobs stored on the memor...

Page 67: ...erating procedure Support mode Hold Down and turn the printer ON Initialization of EEPROM Hold Color Reset and Left and turn the power ON Check for all of the RAM area is performed Initialization of panel settings Hold Reset and turn the printer ON Update program ROM Hold Color Reset and Down and turn the printer ON Maintenance mode Hold Left Up Down and Right and turn the printer ON Update engine...

Page 68: ...RCounter The printer reboots Reset C DvlpCounter The printer reboots Reset M DvlpCounter The printer reboots Reset Y DvlpCounter The printer reboots Reset K DvlpCounter The printer reboots Reset Fuser Counter The printer reboots Clear Error Log MCU DATA Backup MCU DATA Restore Table 1 36 Self diagnosis Setup menu Reference Printer 3 3 1 1 Printer Self Diagnosis p134 Scanner 3 3 1 2 Scanner Self Di...

Page 69: ...capacity cartridge for K toner is included with shipment and is not available separately The last line printed on the status sheet contains the following information 1 Firmware version in DDYM format that starts with IA 2 Type of the device of code ROM F lash Space Mask 3 4 digit CMTD Color Matching Table Data version that starts with A 4 Mechanical controller version expressed by 10 digit numbers...

Page 70: ...with 3 figures for each When options are installed the following information on them are added 1 RAM DIMM Total amount of memory including the standard RAM is indicated as Installed Memory 2 Network IF Board Settings in Network Menu Host I F Settings are listed Network is added in the Interface LAN HW Address LAN HW Revision and LAN FW Revision are added in the Hardware Configuration NOTE LAN HW A...

Page 71: ...EPSON AcuLaser CX11 CX11F Revision B 73 Figure 1 14 Simplified Status Sheet 1 Figure 1 15 Simplified Status Sheet 2 ...

Page 72: ...on B 74 ENGINE STATUS SHEET It can be output from the Maintenance Menu Refer to Chapter 6 MAINTENANCE for the details on the Engine Status Sheet C A U T I O N 7 Do not disclose this information to users manuals4you com manuals4you com ...

Page 73: ...des a chronological history of the fax jobs stored in the product fax unit The history is listed with the following items Information in the fax header Information on each of the fax jobs Start time Fax number sender or recipient Duration of the fax job Pages Mode Result Contents Table 1 38 Items in Printing Report Menu Item Printing Report Speed Dial List Activity Report Fax Setting List Memory J...

Page 74: ...al name 5 Speaker volume 6 Country 7 Auto Redial Tries 8 Sender Record 9 Reception Mode 10 Attached Phone Call Time Out 11 DRPD US model only 12 Activity Report 13 Transmission Report 14 Multi Trans Report 15 Software Version Fax Model C H E C K P O I N T 7 When the product is in Maintenance Mode the following items are added in the Fax Setting List Job Counter Information counts of transmitted re...

Page 75: ...C H A P T E R 2 OPERATINGPRINCIPLES ...

Page 76: ...all of the functions The diagram below shows the basic configuration of the product Figure 2 1 Basic Configuration of the Product MAIN FEATURES Host based controller using ESC Page S Printing System Engine specifications A4 Color 5 ppm Monochrome 25 ppm 600 dpi TOSHIBA TX4955 CPU is employed MFC is employed as new memory I O and ASIC with an image processing function 64 MB RAM Can be expanded up t...

Page 77: ...ration 90pin DIMM Device MT48LC16M16A2P 75 Micron 256 Mbit x16 Slot 2Slots including standard one slot Max capacity 576 MB ROM Capacity 8 MB FLASH ROM Mirror type Configuration C567RROG Connector configuration 90pin DIMM Device MBM29PL32BM 90TN A5E1 FUJITSU 32 Mbit x16 Slot 1 slot fixed for standard no vacancy EEPROM Capacity 256 Kbit SPI serial formula Device M95256 WMW6T ST micro Host I F USB It...

Page 78: ... CN705 CN502 CN704 IC701 IC701 IC401 IC401 JP3 JP1 JP2 JP4 R422 IC101 IC101 IC103 IC103 CN602 CN601 C588MAIN IC102 IC102 CN300 ROM RAM DIMM 90pin CN201 RAM DIMM A 90pin CN202 RAM DIMM B 90pin CN501 ADF I F 1 12Pin Sensor I F 2 2Pin Panel I F 30Pin CCD_A I F 14Pin CCD_B I F 13Pin Motor I F 4Pin Engine I F 16Pin Viedo I F 2Pin P S0 S1 Power 24V 2Pin FAX I F 2 40Pin USB I F 2Pin Power 5V 3 3V 2Pin Co...

Page 79: ...DS UART Pixel count Oscillator for VIDEO 27 779 MHz 3 3V 5V Reg Reg Reg 2 5V 1 5V 1 5V Reg CN 24V 12V SDCLK 0 96 MHz Data 32bit SDCLK 1 96 MHz Adr 20bit 96 MHz SDCLK 2 Power Supply CN RSTX 32 COLDRSTX VCCOK CPUCLK 96 MHz CPU TX4955BFG 192MHz MFC VIP3S PLL frequency multiplier Built in SSCG Built in PWM INTX 4 0 Reset IC EEPROM N3R USB E05C22AA Oscillator for USB 12 MHz MCLKOUT 48 MHz PCLK 24 MHz F...

Page 80: ...tection Not available Enter the paper size from control panel or printer driver MAIN UNIT Paper eject capacity Full detection Not available Others OHP sensor Available Reflective photosensor Temperature detection reference Available Environment sensor Humidity detection reference Available Environment sensor Density detection reference Available Reflective density sensor Toner Cartridge New part d...

Page 81: ...d to be replaced at the same time as the Fuser unit End detection Available Software counter Table 2 3 Sensor Scanner ADF Unit Detection Item Availability Detection Method Remarks Scanner unit Opening Closing of the DOC ADF covers Available Magnet sensor Connected directly to the controller with a cableDetection part on the upper housing Magnet on the cover side CR home sensor Available Photosenso...

Page 82: ...ferred to the Belt secondary transfer roller Full color printing is performed by overlaying each of the colors on the belt The major steps of the print process are described below 1 Charging The drum surface is charged 2 Exposure Image areas are exposed on the drum by a laser beam 3 Developing Image areas on the drum are developed with toner 4 Primary transfer The toner image on the drum is transf...

Page 83: ...X11F Revision B OPERATING PRINCIPLES Printer Section Operating Principle 85 2 2 1 2 Print Process Diagram The diagram below illustrates the entire print process Figure 2 5 Total Print Process Schematic Diagram Leg_06_002RA ...

Page 84: ...s contact with the drum and moves together with it BCR is a conductive roller that is negatively charged by HVPS applies a negative charge to the drum The drum surface is uniformly charged to a negative potential with DC bias voltage The drum is made of conductive material aluminum cylinder coated with a photosensitive material which becomes insulating material in darkness and becomes conductive w...

Page 85: ...a from the printer controller The laser beam is output only when a pixel data minute dot composing the print data exists On parts to be developed by toner the laser diode turns ON and on parts not to be developed the laser diode turns OFF The drum surface irradiated by the laser beam becomes a conductor the negative charge on the drum flows to the positive side and the potential on the surface of ...

Page 86: ... to the Magnet Roll located near the drum surface The developer is charged by the friction of stirring toner negative charge carrier positive charge and the charges are electrically attracted each other As the carrier is a magnetic body it is attracted to the magnetized Magnet Roll and a uniform layer of carrier is formed on the Magnet Roll by passing through a Trimmer Blade A minus voltage is app...

Page 87: ...e drum on which the toner image of each color is formed This is called the rotary developing system Figure 2 10 Development Process 2 The charging characteristics of the carrier is depleted due to dirt caused by the toner or due to scratches caused by stirring To maintain charging characteristics a minute amount of carrier is mixed into the toner in the Toner Cartridge While toner and carrier are ...

Page 88: ...conductor Unit by 1st BTR First Bias Transfer Roll The 1st BTR is a conductive roller and is positively charged by the HVPS The 1st BTR contacts the back side of the Belt and charge the back side to positive The negatively charged toner image on the drum surface is attracted to the positive charge on the back side of the Belt and is transferred to the Belt from the drum Figure 2 12 Primary transfe...

Page 89: ...al toner is removed from the drum surface Cleaning the drum Toner that was not transferred to the Belt at the Primary transfer process remains on the drum surface Since the remaining toner hinder subsequent processes it is scraped off by a Cleaning Blade that contacts with the drum and is collected in the Waste Toner Box Figure 2 13 Cleaning drum ...

Page 90: ...ETE TONER IMAGE At the Repeat formation of complete toner image process the toner images of each color formed on the drum surface are successively transferred to the Belt to form a complete toner image composed of the four colors on the Belt surface Figure 2 14 Repeat 1 Figure 2 15 Repeat 2 manuals4you com manuals4you com ...

Page 91: ...cted by the 2nd BTR Retract Sensor And the 2nd BTR Retract Motor moves the 2nd BTR to contact with the paper The 2nd BTR is a conductive roller It contacts with the back side of the paper the opposite side of the side to be printed and charged positively by the HVPS The Back Up Roll located on the opposite side of the Belt from the 2nd BTR is a conductive roller and earthed to the Frame ground By ...

Page 92: ...being destroyed The IBT Retract Motor moves the Belt Cleaner to contact the Belt Toner remaining on the Belt surface is absorbed by the Cleaning Roll Then the toner is absorbed by the brush and collected in the Waste Toner Box Figure 2 18 Cleaning FUSING At the Fusing process toner is fixed on paper with heat and pressure Fuser Assy does not have a pressure roll but has a Fuser Belt instead By MOT...

Page 93: ... image data by voltage levels from the printer controller 2 A single color image 2 D dot image is completed by performing the above operation repeatedly over the entire surface of the image To obtain a full color image formation of 2 D dot images is performed for each of the four colors Resolution is determined as follows Main direction dots inch Sub direction Lines inch Figure 2 21 Formation of 2...

Page 94: ...ED Rotation of DRIVE ASSY FEED is transmitted as follows Figure 2 22 Drive Transmission Flow Figure 2 23 Diagram of Drive Transmission Path DRIVE ASSY FEED CLUTCH ASSY FEED ROLL ASSY TURN 500 GEAR FEED ROLL ASSY FEED 500 500 FEEDER ASSY Leg_Sec06_035EB DRIVE ASSY FEED GEAR FEED CLUTCH ASSY FEED FRONT Leg_Sec06_042EB manuals4you com manuals4you com ...

Page 95: ...e Transmission Flow Figure 2 25 Diagram of Drive Transmission Path DRIVE ASSY PRO MOT ASSY P R FLANGE GEAR INPUT GEAR BRUSH 22 30 CAM ASSY DRUM GEAR BRUSH 32 GEAR DRIVE BRUSH ROLLASSY BRUSH IBT GEAR 19 CAM ASSY IBT CL GEAR IDLE 26 40 GEAR DTR 23 ROLL DTN Leg_Sec06_036EB MOT ASSY P R DRIVE ASSY PRO GEAR 19 GEAR INPUT GEAR BRUSH 32 GEAR IDLE 26 40 GEAR DTR 23 GEAR DRIVE BRUSH GEAR BRUSH 22 30 IBT AS...

Page 96: ...n Path MOT ASSY MAG MOT ASSY ROT GEAR IDLE DISP GEAR AUGER DISPENCE INPUT GEAR Developer ASSY DEVE DEVE ASSY AUGER DISPENCE GEAR AUGER ADMIX GEAR MAG ROLL MAG GEAR IDLE GEAR AUGER SUPPLY FRAM ASSY ROTARY AUGER SUPPLY AUGER ADMIX Leg_Sec06_037FB GEAR AGITATOR AGITATOR INPUT GEAR K INPUT GEAR Y INPUT GEAR M INPUT GEAR C MOT ASSY MAG MOT ASSY ROT FRAM ASSY ROTARY GEAR IDLE DISP K GEAR IDLE DISP C GEA...

Page 97: ...SY DUP MOTOR ASSY DUP INV GEAR 40 42 GEAR 36 GEAR 48H GEAR 40 42 TRANSPORT ASSY DUP INVERTER ASSY DUP GEAR 36 GEAR 36 GEAR 30 OW GEAR 36 ROLLER ASSY DUP OUT GEAR 30 ROLLER ASSY DUP GEAR 48H GEAR 20 21H GEAR 36 GEAR 30 ROLLER ASSY INVERTER Leg_Sec06_038FB GEAR 30 GEAR 30 GEAR 36 GEAR 20 21H GEAR 48H MOTOR ASSY DUP INV INVERTER ASSY DUP TRANSPORT ASSY DUP GEAR 36 GEAR 36 GEAR 40 42 GEAR 48H MOTOR AS...

Page 98: ...OR ASSY FSR Fuser Motor GEAR IDLER EXIT GEAR EXIT GEAR HR ROLL ASSY FUSER FUSER ASSY TRANSFER ASSY EXIT ROLLER BELT ASSY GEAR 2ND GEAR IDLER GEAR 27 2ND BTR ASSY MOT ASSY MICRO DRIVE ASSY BTR GEAR 28 CAM ASSY 2ND Leg_Sec06_039EB GEAR EXIT GEAR IDLER EXIT GEAR IDLER GEAR 27 GEAR 2ND FUSER ASSY DRIVE ASSY BTR TRANSFER ASSY 2ND BTR ASSY MOTOR ASSY FSR BELT ASSY ROLL ASSY FUSER GEAR HR GEAR 28 MOT ASS...

Page 99: ...33 Diagram of Drive Transmission Path GEAR 43 CLUTCH ASSY REGI GEAR 43 CLUTCH ASSY PRE REGI PH ASSY MSI ROLL REGI METAL ROLL ASSY PRE REGI ROLL REGI RUBBER GEAR 28 40 MOTOR PH GEAR 21 104 GEAR PICK UP ROLL ASSY MSI HOLDER ASSY RETARD MSI Leg_Sec06_040EB GEAR 21 104 MOTOR PH GEAR 28 40 GEAR PICK UP HOLDER ASSY RETARD MSI MSI PH ASSY CLUTCH ASSY REGI CLUTCH ASSY PRE REGI GEAR 43 GEAR 43 FRONT Leg_Se...

Page 100: ...tion explains and illustrates the main functional components that make up the paper feed section The components are divided into four blocks as follows based on the basic configuration MSI Multi Sheet Inserter Registration FUSER 500 Paper Feeder Figure 2 34 Paper Feed Path Layout Leg_06_004RA manuals4you com manuals4you com ...

Page 101: ...eed the shaft rotates releasing the clamping action of the cam and the paper is pressed against the ROLL MSI by spring pressure ROLL MSI Paper that is pressed down by the PLATE BOTTOM ASSY MSI is fed by the frictional force of the ROLL MSI SENSOR PAPER EMPTY The SENSOR PAPER EMPTY detects the presence of paper When the printer runs out paper the actuator of the sensor comes down by its own weight ...

Page 102: ...state Light enters the sensor CLUTCH ASSY REGI The drive from the MOTOR PH is transmitted to the ROLL REGI METAL and paper is fed to the transfer section MOTOR PH This DC motor drives the MSI and the Rolls in the registration section SENSOR FUSER IN This reflective sensor detects that paper has come to just before the fusing section FUSER ASSY This fixes the completed toner image that was transfer...

Page 103: ...rect position In the registration section the leading edge of the paper is aligned to the correct position by the Roll Loop system The paper which has passed through the ROLL ASSY PRE REGI is pressed against the stopped ROLL REGI METAL by the Roll Loop system to make the paper curved When the ROLL REGI METAL is rotated with the paper curved the paper can be fed from the ROLL REGI METAL without dis...

Page 104: ...h time a sheet is fed to control the feeding timing PLATE ASSY BOTTOM 500 The PLATE ASSY BOTTOM 500 locks on the bottom side when the 500 PAPER CASETTE ASSY is drawn out of the Paper Feeder When the 500 PAPER CASETTE ASSY is inserted into the Paper Feeder the PLATE ASSY BOTTOM is unlocked and paper is pressed against the ROLL ASSY FEED 500 by the force of the spring MOTOR ASSY FEEDER The MOTOR ASS...

Page 105: ...presence of paper When the printer runs out paper the actuator of the sensor comes down by its own weight to shield the sensor and the no paper state is detected No paper state Shielding the sensor SWITCH FEEDER DOOR SWITCH FEEDER DOOR detects whether the Tray door is opened or closed LOCK MC TO FDR Turn the levers on the left and right to firmly lock the 500 Paper Feeder to the main unit Figure 2...

Page 106: ... and illustrates the main functional components that consist of the Xerographic The Xerographic is divided into the following four blocks based on the basic configuration ROS ASSY Photoconductor Unit Development 2nd BTR FUSER ASSY Figure 2 44 Xerographic Structure ROS ASSY Development Leg_06_003RA 2nd BTR manuals4you com manuals4you com ...

Page 107: ...ror has six reflecting mirror surfaces and the angle of the reflected laser beam changes by rotation of the Scanner Motor This lets the laser beam scan across on the Drum from side to side The laser beam makes a single line on the Drum with one reflective mirror The laser beam reflected by the polygon mirror passes through the lens mirror and window to reach the drum surface The lens functions to ...

Page 108: ...aper with the 2nd BTR Toner remaining on the Belt surface is collected in the Waste Toner Box by the Cleaning Blade and brush in the Belt Cleaner The Drum is made of conductive material aluminum cylinder coated with a photosensitive material which becomes insulating material in darkness and becomes conductive when it is subjected to light The Drum Cleaner consists of a Cleaning Blade and Waste Ton...

Page 109: ...ing the silver sticker on the Belt surface outside the toner image formation area SENSOR ASSY ADC SENSOR ASSY ADC reads the toner patch densities on the Belt immediately before secondary transfer and converts the read densities to voltage values These voltage value are used for controlling toner density SENSOR HUM TEMP SENSOR HUM TEMP detects the temperature and humidity inside the printer and con...

Page 110: ...the Waste Toner Box The Waste Toner Box is provided with an actuator for blocking light entering the sensing element on the SENSOR TNER FULL The actuator is supported by a spring and is designed to gradually fall by the weight of the toner When the actuator falls and blocks the SENSOR TNER FULL the printer detects that the Waste Toner Box is full Figure 2 47 SENSOR TONER FULL Mechanism Leg_Sec06_0...

Page 111: ...ANTENNA CTRG is performed by wireless communications HOUSING ASSY DEVE The HOUSING ASSY DEVE is provided for each of the Y M C and K colors Each HOUSING ASSY DEVE consists of a special Auger for stirring and supplying Toner a Magnet Roll for attracting magnetic carrier forming the development layer and supplying toner to the drum and a Trimmer Blade for making a uniform development layer on the Ma...

Page 112: ...ARY HOME POSI The SENSOR ROTARY HOME POSI detects the position of the Rotary Developer to keep the Developer in the right position The home position is about 10 degrees CW from the transfer position of the black toner Developer LATCH ROTARY LATCH ROTARY is interlocked with movement of the Front Cover When the Front Cover is closed LATCH ROTARY is pressed by the acutuator on the Front Cover to lock...

Page 113: ...tact with the paper for transferring toner image on the BTR to the paper When the transferring is finished the motor starts to rotate again and the lever is returned to its original position by spring force causing the BTR to move away from the paper SENSOR 2BTR RETRACT The position of BTR is detected by the SENSOR 2BTR RETRACT The shaft with the cam for contacting releasing BTR is provided with a...

Page 114: ...f the circuit for the Heater Lamp when the temperature of the Heat Roll exceeds a certain level Temp Sensor Contact type Non contact type Non contact type Monitors the surface temperature of the Heat Roll and turns the Heat Roll on and off according to the temperature Contact type Monitors the surface temperature of the Heat Roll and shuts off the power supply for the Heat Roll when an abnormal hi...

Page 115: ...he Belt surface to measure the density by the SENSOR ASSY ADC According to the measured result the amount of toner supply the amount of laser radiation and the applied high voltage are controlled The execution sequence of the TC control is given on the next page Figure 2 53 Process control mechanism Laser Power Control Voltage Current Control Toner Dispense Control Toner Density Life Counter Temp ...

Page 116: ...and printer usage data from CRUM 3 Creation of toner patches The output value of HVPS laser light intensity value and toner supply amount are determined from the parameters calculated from various information sources and four toner patches one for each color are created on the Belt surface 4 Reading the toner patches SENSOR ASSY ADC reads the density of the toner patches created on the Belt surfac...

Page 117: ...inting Figure 2 55 PCDC Mechanism Control of Toner Cartridge 7 Near End Detection Counts the operating time of the Dispense Clutch that operates to supply toner from the cartridges and causes a Near End warning when the counted time exceeds the prescribed value 8 Detection of Empty status The judgement of the Empty status of Toner Cartridges is made based on toner patch density values read by ADC ...

Page 118: ...heet PWB ASSY ROT PWB ASSY ROT creates the pulse for the motors according to input signal from the PWBA MCU and supplies the pulse signal to the motors PWBA ESS Converts print data transmitted via a network USB parallel port or etc and communicates with a host computer The memory can be expanded up to 512 MB with an optionally available additional memory OP PANEL OP PANEL displays the printer stat...

Page 119: ...WITCH INLK FUSER is a switch to cut the 24VDC power supply for driving motors and other parts when the COVER FUSER is opened SWITCH INLK FRONT SWITCH INLK FRONT is a switch to cut the 24VDC power supply for driving motors and other parts when the COVER FRONT ASSY U is opened SWITCH FRONT DOOR SWITCH FRONT DOOR detects whether the COVER FRONT ASSY is opened or closed FUSER LOCK SWITCH This printer ...

Page 120: ...de The printer is currently printing LIGHT SLEEP mode FUSER is turned OFF to save power ERROR mode DEEP SLEEP mode In addition to the Fuser 24VDC is also turned OFF to save more power ERROR mode The printer has detected an error The following are not defined as the ERROR mode No paper when the printer detects there is no paper in the tray or cassette No paper tray when the printer detects there is...

Page 121: ...es to receive Yellow data of one page 2 While the Yellow image is being developed and transferred to the IBT Belt the next data Magenta is received 3 While the Magenta image is being developed and transferred to the IBT Belt the next data Cyan is received 4 While the Cyan image is being developed and transferred to the IBT Belt the next data Black is received 5 When the Black image has been develo...

Page 122: ...the Carriage Shaft which supports one side of the Carriage Unit Home sensor A transparent sensor attached to the bottom of the Carriage Unit Detects the carriage home position by detecting the flag located near the home position in the lower case of the scanner unit OTHERS Magnet sensor Detects the open close status of the document cover or the ADF It is attached on the backside of the upper case ...

Page 123: ...controller it does not have its own control circuit The power supply and the control signals to the scanner unit from the main controller are as follows Power Supply 24VDC to drive the CR Motor and power the Inverter Circuit 12VDC and 5VDC for the CCD Sensor 3 3VDC for the Home Sensor and the Magnet Sensor Control Signals CCD Sensor drive control CR Motor drive control ADF drive control ...

Page 124: ...speed according to the print resolution so that scanning in paper feed direction can be performed properly Exit Roller Transports document that has been scanned and transported by the Turning Roller to the eject tray Also changes the position of the document stopper lever inside the document tray SENSORS DOC Sensor Detects whether document is loaded on the document tray or not The document should ...

Page 125: ...y to the sensor ADF Open Status The sensor turns ON upon detecting that the magnet moved away from the sensor When the sensor turns ON during the scanner is in standby mode the lamp is turned on and the Carriage Unit moves to its home position after scanner initialization operation ADF Open Status The product judges that scanning operation using the document table will be performed Figure 2 60 Key...

Page 126: ...C H A P T E R 3 TROUBLESHOOTING manuals4you com manuals4you com ...

Page 127: ... or abrupt temperature change 5 The printer should not be located near waterworks near humidifiers near heaters or near flames in a dusty atmosphere or in a place where the printer can be exposed to air blasts from an air conditioner 6 The printer should not be located in a place where volatile or inflammable gases are produced 7 The printer should not be located in a place where it can be exposed...

Page 128: ...intain the set of information specific to the subject engine W A R N I N G Never touch any live parts unnecessarily when the power is on The power switch inlet part of the LVPS is alive even when the power switch is turned OFF Take care not to touch any live parts W A R N I N G If you perform work with the power turned ON covers removed and the interlock and safety switches turned ON there is a da...

Page 129: ...n recover from the error Scanner Error Start up initialization could not be performed nomally however the product can recover from the error Motor error Scanner error Table 3 2 Printer Dependent Error Panel Message Description Service Req Eggg Engine related service request 3 4 4 2 List of Service Request p149 Check Transparency Error list related to paper jam p146 Papaer Jam WWWWW Error list rela...

Page 130: ...ment to ADF When Legal is selected by Fax mode p 288 Fax Communication Error An error occurred during transitting receiving faxes p 288 No Report Print Info p 288 Cannot Send when Receiving Fax cannot be transmit during Fax reception p 288 Unable to Transmit Color Fax At the time of color Fax transmission if the telephone line is used it decides that color transmission is impossible For this reaso...

Page 131: ... printer fax panel and B unit and displays the result on the panel Procedures and details on the diagnosis are described below PROCEDURES TO ACCESS THE SELF DIAGNOSIS MODE 1 Hold down the Color Start Up Down and Right buttons and turn the printer on When the screen shown below appears select highlight Self Diagnosis and press Start to enter the screen for selecting tha part to be diagnosed 2 The U...

Page 132: ... shown below after Running is displayed for a while Diagnosed items and the descriptions are shown in Table 3 6 Note Once displayed press Left to return to the previous screen Self Diagnosis initial screen When the ADF is not installed the diagnosis for ADF cover open ADF jam and ADF paper detection are replaced with hyphen Note The diagnoses for ADF cover open ADF jam and ADF paper detection are ...

Page 133: ...orking normally the button name is displayed with 1 byte alpha numeric characters as shown in Table 3 7 Note The button name is displayed while pressing the button and disappears when the button is released If no button is pressed for more than six seconds the screen automatically returns to the previous screen Self Diagnosis initial screen Diagnosed button names are displayed as shown in the tabl...

Page 134: ...ed if it is operating normally and the result is displayed on the panel When you select B Unit and press Right the diagnosed result OK or NG will appear after Running is displayed for a whole Note Once displayed press Left to return to the previous screen Self Diagnosis initial screen Diagnosed as Normal Diagnosed as Abnormal manuals4you com manuals4you com ...

Page 135: ...Maintenance menu and press Right to enter the menu screen of the selected item DETAILS ON FAX MAINTENANCE ITEMS Details on each item in the Fax Maintenance menu are described in the following sections Memory Clear 3 3 2 1 Memory Clear p138 Memory Check 3 3 2 2 Memory Check p139 Parameter Check 3 3 2 3 Parameter Check p140 Module Check 3 3 2 4 Module Check p141 Signal Check 3 3 2 5 Signal Check p14...

Page 136: ...ayed when the process is completed normally NG is displayed with numbers that indicate the error when failed to complete the process Once the process is over press Stop to return to the previous screen Memory Clear menu screen Table 3 8 Memory Areas to be Cleared by Item in Memory Clear Item Memory Area Category Panel Indication Speed Dial Group Dial One Touch Dial Personal Number Name Communicati...

Page 137: ...ed during the Memory Read the display returns to the previous screen Memory Check initial screen MEMORY CHECK WRITE When an address is input with the numeric keypad current setting values in the address are displayed beside CURRENT When new setting values are entered beside NEW overwrite process is executed OK is displayed when the process is completed normally NG is displayed with numbers that in...

Page 138: ...eck Example of the Read Screen Note When the Stop button is pressed during the parameter check Read the display returns to the previous screen Parameter Check initial screen PARAMETER CHECK WRITE When main sub codes of the parameter and a new setting are entered with the numeric keypad the overwriting process is started OK is displayed when the process is completed normally NG is displayed with nu...

Page 139: ...anel When you select Module Check and press Right the screen as shown below will be displayed Select Highlight the module you wish to check and press Right to start the diagnosis Example of the Module Check Screen Note Once the process is over press Stop to return to the previous screen Module Check initial screen Module Check in Progress Diagnosed as Normal Diagnosed as Abnormal Numbers that indi...

Page 140: ...bers that indicate the error when failed to perform the process Example of Signal Check Result Screen Note For items other than Sub Code 103 relay 1 2 setting and Sub Code 104 phone line initialization the process is continued in the fax unit until the Stop button is pressed Press the Stop button to cancel the process Once the process is over press Stop button to return to the Fax Maintenance init...

Page 141: ...measuring tool to 2PIN on P J1 and set the minus side of the tool to 4PIN on P J3 6 When for example P J1 P J2 is indicated in FIP for the voltage check check for the all relating terminals between P J1 and P J2 with reference to Chapter7 Wiring Connection Diagrams p 571 7 Taking P J1 2PIN P J3 4PIN as an example the minus side P J3 4PIN is AG Analog Ground SG Signal Ground or RTN Return Therefore...

Page 142: ...density value of TC is being corrected according to the developing machine drive time 3 The PLC sequence creates and reads ADC patches to adjust toner and image density Yes No Error recovery processing See List of Errors and Warnings When IBT CLN Fail occurs Go to FIP 1 48 Fuser warm up time out within 45 secs Heater red hot When IBT CLN Fail occurs Go to FIP 1 52 Total 37 to 840 seconds depending...

Page 143: ...version of main controller and mechanical controller been updated Fix the trouble with reference to the FIP Perform troubleshooting with reference to 7 2 2 Wiring Connection Diagrams Ask the operator again to verify the condition at the time of jamming and execute a print job in the same conditions Is the printer jammed again Recheck the trouble condition and execute preventive maintenance by usin...

Page 144: ...SY REGI ON 29 p 186 Jam E F 4 5 The Exit Sensor did not turn ON and SENSOR FUSER IN turned OFF within the specified time from CLUTCH ASSY REGI ON 30 p 188 Jam C E F 4 5 The Exit Sensor did not turn ON and SENSOR FUSER IN turned ON within the specified time from CLUTCH ASSY REGI ON 31 p 192 Check Transparency 3 SENSOR OHP detected media other than OHP at the OHP setting or detected OHP at a setting...

Page 145: ...alue The printer however can be operated 69 p 242 Error Install Y TnrCart ON The Yellow toner cartridge is not mounted 1 p 153 Install M TnrCart ON The Magenta toner cartridge is not mounted 2 p 154 Install C TnrCart ON The Cyan toner cartridge is not mounted 3 p 155 Install K TnrCart ON The Black toner cartridge is not mounted 4 p 156 Install Photocondctr ON The photoconductor unit is not mounted...

Page 146: ...o ANTENNA CTRG CRUM CTRIG 23 p 175 A Black toner cartridge with a memory of different specification device is attached 24 p 176 Wrong Toner K ON A Black toner cartridge of a different specification is attached 25 p 177 Irregular Density ON The Coverage for 500msec of the image exceeds the limit 45 p 215 Replace Toner Y ON It is time to replace the Yellow toner cartridge 53 p 225 Replace Toner M ON...

Page 147: ...4 PAGE Timeout 37 p 204 The PAGEC PAGE signal was not received within 60sec after transmitting PFA Service Req E517 Communication Error Feeder 36 p 203 A communication error occurred between PWBA MCU and Feeder Service Req E520 BTR 2 Advance Error 47 p 217 The 2nd BTR Retract Sensor does not turn ON within the specified time Service Req E521 BTR 2 Error 46 p 216 The input of 2nd BTR Retract Sensor...

Page 148: ...stor did not detect a Ready even though the specified time elapsed from Main Lamp ON at Warm Up The Main Lamp continues to stay lit even after time specified for the Main Lamp elapsed after the Control Thermistor detected a Ready The Control Thermistor detected a temperature below the specified temperature even after the specified time elapsed from Main Lamp ON at Warm Up The latch lever of FUSER ...

Page 149: ...PU error bus error exception Load Store Service Req C0088 CPU error SYSCALL exception Service Req C0089 CPU error Break exception Service Req C0090 CPU error reserving command exception Service Req C0091 CPU error unused coprocessor exception Service Req C0092 CPU error FPU exception Service Req C0093 CPU error TLB exception Service Req C0094 CPU error XTLB exception Service Req C0095 CPU error ca...

Page 150: ...um error bit 0 to 7 program C4 p 247 Service Req C1121 ROM checksum error bit 8 to 15 program Service Req C1122 ROM checksum error bit 16 to 23 program Service Req C1123 ROM checksum error bit 24 to 31 program Service Req C1200 EEPROM writing error C1 p 245 Service Req C1210 EEPROM writing times limit Service Req C1400 Engine initialization error Service Req C1500 CCNV hardware error Service Req C...

Page 151: ...o Step 5 After re attachment Go to Step 5 5 Does the error recur even if the power is turned ON OFF several times Go to Step 6 End of procedure 6 Check after replacement of Toner Cartridge Y Replace Toner Cartridge Y Does the error recur when the power is turned ON Go to Step 7 End of procedure 7 ANTENNA CTRG operation check Disconnect and then re connect P J415 on PWBA MCU Does the error recur wh...

Page 152: ... Does the error recur even if the power is turned ON OFF several times Go to Step 6 End of procedure 6 Check after replacement of Toner Cartridge M Replace Toner Cartridge M Does the error recur when the power is turned ON Go to Step 7 End of procedure 7 ANTENNA CTRG operation check Disconnect and then re connect P J415 on PWBA MCU Does the error recur when the power is turned ON Go to Step 8 Go t...

Page 153: ...t Go to Step 5 5 Does the error recur even if the power is turned ON OFF several times Go to Step 6 End of procedure 6 Check after replacement of Toner Cartridge C Replace Toner Cartridge C Does the error recur when the power is turned ON Go to Step 7 End of procedure 7 ANTENNA CTRG operation check Disconnect and then re connect P J415 on PWBA MCU Does the error recur when the power is turned ON G...

Page 154: ... Does the error recur even if the power is turned ON OFF several times Go to Step 6 End of procedure 6 Check after replacement of Toner Cartridge K Replace Toner Cartridge K Does the error recur when the power is turned ON Go to Step 7 End of procedure 7 ANTENNA CTRG operation check Disconnect and then re connect P J415 on PWBA MCU Does the error recur when the power is turned ON Go to Step 8 Go t...

Page 155: ...rned ON Go to Step 3 End of procedure 3 ANTENNA CTRG operation check Disconnect and the re connect P J416 on PWBA MCU Does the error recur when the power is turned ON Go to Step 4 Go to Step 5 4 Continuity check of HARNESS ASSY XERO Disconnect the P J416 from PWBA MCU Do all of the wiring below have normal continuity J416 4 J109 2 J416 5 J109 1 Go to Step 5 Replace HARNESS ASSY XERO 5 Check after ...

Page 156: ...d to step 5 Go to Step 6 5 Does the error recur when the power is turned ON Go to Step 6 End of procedure 6 Continuity check of HARNESS ASSY XERO Disconnect P J416 from PWBA MCU Do all of the wiring below have normal continuity J416 4 J109 2 J416 5 J109 1 Go to Step 7 Replace HARNESS ASSY XERO 7 Check after replacement of GUIDE CRU ASSY D or ANTENNA ASSY Replace GUIDE CRU ASSY D or ANTENNA ASSY p ...

Page 157: ... Step 5 End of procedure 5 Continuity check of HARNESS ASSY XERO Disconnect P J416 from PWBA MCU Do all of the wiring below have normal continuity J416 4 J109 2 J416 5 J109 1 Go to Step 6 Replace HARNESS ASSY XERO 6 Check after replacement of GUIDE CRU ASSY D or ANTENNA ASSY Replace GUIDE CRU ASSY D or ANTENNA ASSY p 388 or p 391 Does the error recur when the power is turned ON Go to Step 7 End of...

Page 158: ... to Step 3 End of procedure 3 Check after replacement of Photoconductor Unit Replace Photoconductor Unit Does the error recur when the power is turned ON Go to Step 4 End of procedure 4 Power supply check to PWBA MCU Are the following power voltages being supplied to PWBA MCU from LV HVPS J410 1 J410 2 3 3 VDC J410 3 J410 4 5 VDC J410 5 6 J410 7 8 24 VDC Replace PWBA MCU p 432 Go to Step 5 5 Conti...

Page 159: ...oconductor Unit Replace Photoconductor Unit Does the error recur when the power is turned ON Go to Step 3 End of procedure 3 Power supply check to PWBA MCU Are the following power voltages being supplied to PWBA MCU from LV HVPS J410 1 J410 2 3 3 VDC J410 3 J410 4 5 VDC J410 5 6 J410 7 8 24 VDC Replace PWBA MCU p 432 Go to Step 4 4 Continuity check of HARNESS ASSY MAIN Disconnect P J410 from PWBA ...

Page 160: ... Go to Step 6 5 Does the error recur when the power is turned ON Go to Step 6 End of procedure 6 Continuity check of HARNESS ASSY MAIN Disconnect P J415 from PWBA MCU Do all of the wiring below have normal continuity J415 1 J106 2 J415 2 J106 1 Go to Step 7 Repair broken or shorted part 7 Check after replacement of ANTENNA ASSY CTRG or ANTENNA CTRG Replace ANTENNA ASSY CTRG or ANTENNA CTRG p 405 o...

Page 161: ...nd of procedure 5 Continuity check of HARNESS ASSY MAIN Disconnect P J415 from PWBA MCU Do all of the wiring below have normal continuity J415 1 J106 2 J415 2 J106 1 Go to Step 6 Repair broken or shorted part 6 Check after replacement of ANTENNA ASSY CTRG or ANTENNA CTRG Replace ANTENNA ASSY CTRG or ANTENNA CTRG p 405 or p 407 Does the error recur when the power is turned ON Go to Step 7 End of pr...

Page 162: ...tep 3 End of procedure 3 Check after replacement of Toner Cartridge Y Replace Toner Cartridge Y Does the error recur when the power is turned ON Go to Step 4 End of procedure 4 Power supply check to PWBA MCU Are the following power voltages being supplied to PWBA MCU from LV HVPS J410 1 J410 2 3 3 VDC J410 3 J410 4 5 VDC J410 5 6 J410 7 8 24 VDC Replace PWBA MCU p 432 Go to Step 5 5 Continuity che...

Page 163: ...rtridge Y Replace Toner Cartridge Y Does the error recur when the power is turned ON Go to Step 3 End of procedure 3 Power supply check to PWBA MCU Are the following power voltages being supplied to PWBA MCU from LV HVPS J410 1 J410 2 3 3 VDC J410 3 J410 4 5 VDC J410 5 6 J410 7 8 24 VDC Replace PWBA MCU p 432 Go to Step 4 4 Continuity check of HARNESS ASSY MAIN Disconnect P J410 from PWBA MCU and ...

Page 164: ... Go to Step 6 5 Does the error recur when the power is turned ON Go to Step 6 End of procedure 6 Continuity check of HARNESS ASSY MAIN Disconnect P J415 from PWBA MCU Do all of the wiring below have normal continuity J415 1 J106 2 J415 2 J106 1 Go to Step 7 Repair broken or shorted part 7 Check after replacement of ANTENNA ASSY CTRG or ANTENNA CTRG Replace ANTENNA ASSY CTRG or ANTENNA CTRG p 405 o...

Page 165: ...nd of procedure 5 Continuity check of HARNESS ASSY MAIN Disconnect P J415 from PWBA MCU Do all of the wiring below have normal continuity J415 1 J106 2 J415 2 J106 1 Go to Step 6 Repair broken or shorted part 6 Check after replacement of ANTENNA ASSY CTRG or ANTENNA CTRG Replace ANTENNA ASSY CTRG or ANTENNA CTRG p 405 or p 407 Does the error recur when the power is turned ON Go to Step 7 End of pr...

Page 166: ...tep 3 End of procedure 3 Check after replacement of Toner Cartridge M Replace Toner Cartridge M Does the error recur when the power is turned ON Go to Step 4 End of procedure 4 Power supply check to PWBA MCU Are the following power voltages being supplied to PWBA MCU from LV HVPS J410 1 J410 2 3 3 VDC J410 3 J410 4 5 VDC J410 5 6 J410 7 8 24 VDC Replace PWBA MCU p 432 Go to Step 5 5 Continuity che...

Page 167: ...rtridge M Replace Toner Cartridge M Does the error recur when the power is turned ON Go to Step 3 End of procedure 3 Power supply check to PWBA MCU Are the following power voltages being supplied to PWBA MCU from LV HVPS J410 1 J410 2 3 3 VDC J410 3 J410 4 5 VDC J410 5 6 J410 7 8 24 VDC Replace PWBA MCU p 432 Go to Step 4 4 Continuity check of HARNESS ASSY MAIN Disconnect P J410 from PWBA MCU and ...

Page 168: ... Go to Step 6 5 Does the error recur when the power is turned ON Go to Step 6 End of procedure 6 Continuity check of HARNESS ASSY MAIN Disconnect P J415 from PWBA MCU Do all of the wiring below have normal continuity J415 1 J106 2 J415 2 J106 1 Go to Step 7 Repair broken or shorted part 7 Check after replacement of ANTENNA ASSY CTRG or ANTENNA CTRG Replace ANTENNA ASSY CTRG or ANTENNA CTRG p 405 o...

Page 169: ...e 5 Continuity check of HARNESS ASSY MAIN Disconnect P J415 from PWBA MCU Do all of the wiring below have normal continuity J415 1 J106 2 J415 2 J106 1 Go to Step 6 Repair broken or shorted part 6 Check after replacement of ANTENNA ASSY CTRG or ANTENNA CTRG Replace ANTENNA ASSY CTRG or ANTENNA CTRG p 405 or p 407 Does the error recur when the power is turned ON Go to Step 7 End of procedure 7 Powe...

Page 170: ...tep 3 End of procedure 3 Check after replacement of Toner Cartridge C Replace Toner Cartridge C Does the error recur when the power is turned ON Go to Step 4 End of procedure 4 Power supply check to PWBA MCU Are the following power voltages being supplied to PWBA MCU from LV HVPS J410 1 J410 2 3 3 VDC J410 3 J410 4 5 VDC J410 5 6 J410 7 8 24 VDC Replace PWBA MCU p 432 Go to Step 5 5 Continuity che...

Page 171: ...rtridge C Replace Toner Cartridge C Does the error recur when the power is turned ON Go to Step 3 End of procedure 3 Power supply check to PWBA MCU Are the following power voltages being supplied to PWBA MCU from LV HVPS J410 1 J410 2 3 3 VDC J410 3 J410 4 5 VDC J410 5 6 J410 7 8 24 VDC Replace PWBA MCU p 432 Go to Step 4 4 Continuity check of HARNESS ASSY MAIN Disconnect P J410 from PWBA MCU and ...

Page 172: ... Go to Step 6 5 Does the error recur when the power is turned ON Go to Step 6 End of procedure 6 Continuity check of HARNESS ASSY MAIN Disconnect P J415 from PWBA MCU Do all of the wiring below have normal continuity J415 1 J106 2 J415 2 J106 1 Go to Step 7 Repair broken or shorted part 7 Check after replacement of ANTENNA ASSY CTRG or ANTENNA CTRG Replace ANTENNA ASSY CTRG or ANTENNA CTRG p 405 o...

Page 173: ... of procedure 5 Continuity check of HARNESS ASSY MAIN Disconnect P J415 from PWBA MCU Do all of the wiring below have normal continuity J415 1 J106 2 J415 2 J106 1 Go to Step 6 Repair broken or shorted part 6 Check after replacement of ANTENNA ASSY CTRG or ANTENNA CTRG Replace ANTENNA ASSY CTRG or ANTENNA CTRG p 405 or p 407 Does the error recur when the power is turned ON Go to Step 7 End of proc...

Page 174: ...tep 3 End of procedure 3 Check after replacement of Toner Cartridge K Replace Toner Cartridge K Does the error recur when the power is turned ON Go to Step 4 End of procedure 4 Power supply check to PWBA MCU Are the following power voltages being supplied to PWBA MCU from LV HVPS J410 1 J410 2 3 3 VDC J410 3 J410 4 5 VDC J410 5 6 J410 7 8 24 VDC Replace PWBA MCU p 432 Go to Step 5 5 Continuity che...

Page 175: ...rtridge K Replace Toner Cartridge K Does the error recur when the power is turned ON Go to Step 3 End of procedure 3 Power supply check to PWBA MCU Are the following power voltages being supplied to PWBA MCU from LV HVPS J410 1 J410 2 3 3 VDC J410 3 J410 4 5 VDC J410 5 6 J410 7 8 24 VDC Replace PWBA MCU p 432 Go to Step 4 4 Continuity check of HARNESS ASSY MAIN Disconnect P J410 from PWBA MCU and ...

Page 176: ...and to check Go to Step 5 Replace the ROLL in question 5 Does the error recur when a test print is made Go to Step 6 End of procedure 6 Operation check of SOLENOID FEED Does SOLENOID FEED operate correctly Make a test print and confirm Go to Step 12 Go to Step 7 7 Continuity check of HARNESS ASSY FEED MAIN Disconnect P J437 from PWBA TRAY 500 Do all of the wiring below have normal continuity J437 ...

Page 177: ...broken or shorted part 17 5 VDC power supply check to PWBA TRAY 500 The voltage of P435 6 P435 5 on PWBA TRAY 500 is 5 VDC Go to Step 9 Go to Step 18 Step Check Yes No 18 Continuity check of HARNESS ASSY FEED 1 Disconnect P J435 from PWBA TRAY CONT Do all of the wiring below have normal continuity J435 6 P608 5 J435 5 P608 6 Go to Step 19 Replace HARNESS ASSY FEED 1 p 458 19 Continuity check of HA...

Page 178: ...421 2 J608 9 J421 3 J608 8 J421 4 J608 7 Go to Step 28 Repair broken or shorted part 28 24 VDC power supply check to PWBA MCU Disconnect the P J410 from PWBA MCU The voltage of P410 5 6 P410 7 8 P410 7 8 on PWBA MCU is 24 VDC Replace PWBA MCU p 432 Go to Step 29 Step Check Yes No 29 Continuity check of HARNESS ASSY MAIN Disconnect P J410 from PWBA MCU and P J502 from LV HVPS Do all of the wiring b...

Page 179: ...operation check of ROLL ASSY PRE REGI and ROLL PINCH Open CHUTE ASSY REAR Are ROLL ASSY PRE REGI and ROLL PINCH attached correctly Also do these parts rotate smoothly without any dirt or damage Turn by hand to check Go to Step 6 Replace ROLL in question 6 Does the error recur when a test print is made Go to Step 7 End of procedure 7 Check of the paper position Is the leading edge of the paper pass...

Page 180: ...e HARNESS ASSY P H1 17 Check after replacement of MOTOR PH Replace MOTOR PH p 362 Does the error recur when a test print is made Replace PWBA MCU p 432 End of procedure Step Check Yes No 18 24 VDC power supply check to PWBA MCU The voltage of P410 5 6 P410 7 8 on PWBA MCU is 24 VDC Replace PWBA MCU p 432 Go to Step 19 19 Continuity check of HARNESS ASSY MAIN Disconnect P J410 from PWBA MCU and P J...

Page 181: ...ASSY TURN 500 HOLDER ASSY RETARD 500 ROLL ASSY FEED 500 and other parts attached correctly Also do these parts rotate smoothly without any dirt or damage Turn by hand to check Go to Step 6 Replace ROLL ASSY in question 6 Shape and operation check of ROLL PINCH A and ROLL PINCH B of Tray1 Feeder Open COVER REAR 500 Are ROLL PINCH A and ROLL PINCH B attached correctly Also do these parts rotate smoo...

Page 182: ...g below have normal continuity J410 3 J502 3 J410 4 J502 4 Replace LV HVPS p 435 Repair broken or shorted part Step Check Yes No 17 24 VDC power supply check to P H MOTOR The voltage of P409 6 P409 5 on PWBA MCU is 24 VDC Go to Step 18 Go to Step 20 18 Continuity check of HARNESS ASSY P H1 Disconnect the P J409 from PWBA MCU Do all of the wiring below have normal continuity J409 1 P604 6 J409 2 P6...

Page 183: ...of the wiring below have normal continuity P603 1 P202 2 P603 2 P202 1 Go to Step 24 Replace HARNESS ASSY P H2 24 Check of resistance value of CLUTCH ASSY PRE REGI Disconnect P J202 The winding resistance between the terminals of CLUTCH ASSY PRE REGI is 144Ω 10 20 C Go to Step 20 Replace CLUTCH ASSY PRE REGI p 363 Step Check Yes No ...

Page 184: ...OLL REGI RUBBER Open CHUTE ASSY REAR Are the ROLL REGI and ROLL REGI RUBBER attached correctly Also do these parts rotate smoothly without any dirt or damage Turn by hand to check Go to Step 6 Replace or re attach ROLL in question 6 Operation check of ACTUATOR REGI Does ACTUATOR REGI move smoothly without any damage Does ACTUATOR REGI enter the sensor sensing area when there is paper Does it leave...

Page 185: ...place HARNESS ASSY P H2 14 24 VDC power supply check to PWBA MCU The voltage of P410 5 6 P410 7 8 on PWBA MCU is 24 VDC Replace PWBA MCU p 432 Go to Step 15 15 Continuity check of HARNESS ASSY MAIN Disconnect P J410 from PWBA MCU and P J502 from LV HVPS Do all of the wiring below have normal continuity J410 5 J502 5 J410 6 J502 6 J410 7 J502 7 J410 8 J502 8 Replace LV HVPS p 435 Repair broken or s...

Page 186: ...move FUSER ASSY p 415 Is there any paper remaining at the Gate section inside FUSER ASSY Remove the remaining paper and proceed to step 5 Go to Step 6 5 Does the error recur when the power is turned ON Go to Step 6 End of procedure 6 Shape and operation check of ROLL REGI METAL Open CHUTE ASSY REAR Is ROLL REGI RUBBER attached correctly Also do these parts rotate smoothly without any dirt or damag...

Page 187: ...BRUSH CAM damaged Does any of them operate abnormally Replace 2ND BTR ASSY and other relevant parts Go to Step 18 18 Check after replacement of Photoconductor Unit Replace Photoconductor Unit Does the error recur when a test print is made Go to Step 19 End of procedure Step Check Yes No 19 Operation check of SENSOR FUSER IN The voltage of P418 2 P418 1 on PWBA MCU is 5 VDC when white paper is brou...

Page 188: ...voltage of P403 3 P403 2 on PWBA MCU is 24 VDC Go to Step 29 Go to Step 36 29 Check after replacement of MOT ASSY MICRO Replace MOT ASSY MICRO p 427 Does the error recur when a test print is made Replace PWBA MCU p 435 End of procedure Step Check Yes No 30 Operation check of EXIT SENSOR in FUSER ASSY The voltage of P417 8 P417 7 on PWBA MCU is 0 VDC when ACTUATOR enters the sensing area of EXIT SE...

Page 189: ...4 VDC Replace PWBA MCU p 432 Go to Step 37 37 Continuity check of HARNESS ASSY MAIN Disconnect P J410 from PWBA MCU and P J502 from LV HVPS Do all of the wiring below have normal continuity J410 5 J502 5 J410 6 J502 6 J410 7 J502 7 J410 8 J502 8 Replace LV HVPS p 435 Repair broken or shorted part Step Check Yes No W A R N I N G 38 Continuity check of HARNESS ASSY MCU C L Allow FUSER ASSY to cool d...

Page 190: ...emove FUSER ASSY p 415 Is there any paper remaining at the Gate section inside FUSER ASSY Remove the remaining paper and proceed to step 5 Go to Step 6 5 Does the error recur when the power is turned ON Go to Step 6 End of procedure 6 Shape and operation check of ROLL REGI METAL Open CHUTE ASSY REAR Is ROLL REGI RUBBER attached correctly Also do these parts rotate smoothly without any dirt or dama...

Page 191: ... Does any of them operate abnormally Replace 2ND BTR ASSY and other relevant parts Go to Step 18 18 Check after replacement of Photoconductor Unit Replace Photoconductor Unit Does the error recur when a test print is made Go to Step 19 End of procedure Step Check Yes No 19 Operation check of SENSOR FUSER IN The voltage of P418 2 P418 1 on PWBA MCU is 5 VDC when white paper is brought to the sensor...

Page 192: ...voltage of P403 3 P403 2 on PWBA MCU is 24 VDC Go to Step 29 Go to Step 36 29 Check after replacement of MOT ASSY MICRO Replace MOT ASSY MICRO p 427 Does the error recur when a test print is made Replace PWBA MCU p 435 End of procedure Step Check Yes No 30 Operation check of EXIT SENSOR in FUSER ASSY The voltage of P417 8 P417 7 on PWBA MCU is 0 VDC when ACTUATOR enters the sensing area of EXIT SE...

Page 193: ...place PWBA MCU p 432 Go to Step 37 37 Continuity check of HARNESS ASSY MAIN Disconnect P J410 from PWBA MCU and P J502 from LV HVPS Do all of the wiring below have normal continuity J410 5 J502 5 J410 6 J502 6 J410 7 J502 7 J410 8 J502 8 Replace LV HVPS p 435 Repair broken or shorted part Step Check Yes No W A R N I N G 38 Continuity check of HARNESS ASSY MCU C L Allow FUSER ASSY to cool down befo...

Page 194: ... 8 P408 7 on PWBA MCU is 5 VDC when white paper is brought to the sensor sensing area transparency must not be used and becomes 0 VDC when paper is removed Replace PWBA MCU p 432 Go to Step 6 6 Power supply check to SENSOR OHP Disconnect the P J408 from PWBA MCU The voltage of P408 9 P408 7 on PWBA MCU is 5 VDC Go to Step 7 Go to Step 9 7 Continuity check of HARNESS ASSY P H1 Disconnect the P J408...

Page 195: ...Turn by hand to check Go to Step 5 Replace ROLL in question 5 Does the error recur when a test print is made Go to Step 6 End of procedure 6 Check of paper position Is the leading edge of the paper passing through REGI ROLL Go to Step 7 Go to Step 24 7 Shape and operation check of 2ND BTR ASSY Remove 2ND BTR ASSY p 374 Is 2ND BTR ASSY damaged Are SHAFT CENT 2ND FRAME ASSY BTR and BEARING BRUSH CAM...

Page 196: ...Y ADC 17 5 VDC power supply check to PWBA MCU The voltage of P410 3 P410 4 on PWBA MCU is 5 VDC Replace PWBA MCU p 432 Go to Step 18 Step Check Yes No 18 Continuity check of HARNESS ASSY MAIN Disconnect P J410 from PWBA MCU and P J502 from LV HVPS Do all of the wiring below have normal continuity J410 3 J502 3 J410 4 J502 4 Replace LV HVPS p 435 Repair broken or shorted part 19 Continuity check of...

Page 197: ...place HARNESS ASSY P H2 27 Check of resistance value of CLUTCH ASSY REGI Disconnect P J203 The winding resistance between the terminals of CLUTCH ASSY REGI is 144Ω 10 20 C Go to Step 22 Replace CLUTCH ASSY REGI p 354 28 Check of 24 VDC power supply to MOTOR PH The voltage of P409 6 P409 5 on PWBA MCU is 24 VDC Go to Step 29 Go to Step 22 Step Check Yes No 29 Continuity check of HARNESS ASSY P H1 D...

Page 198: ...ck of ACTUATOR in EXIT SENSOR Does ACTUATOR move smoothly and enter the sensing area of EXIT SENSOR Go to Step 7 Replace FUSER ASSY p 415 W A R N I N G 7 Operation check of EXIT SENSOR in FUSER ASSY The voltage of P417 8 P417 7 on PABW MCU is 0 VDC when ACTUATOR on EXIT SENSOR is moved and entered the sensing area of EXIT SENSOR when there is no paper and is 5 VDC when the actuator leaves the sens...

Page 199: ... work Remove FUSER ASSY p 415 Are the gears Fuser Roll Exit Roll Pinch Roll and other parts in FUSER ASSY attached correctly Also do these parts rotate smoothly without any dirt or damage Turn by hand to check Go to Step 14 Replace FUSER ASSY p 415 Step Check Yes No W A R N I N G W A R N I N G 14 24 VDC power supply check to MOT ASSY FSR Fuser Motor The voltage of P404 6 P404 5 on PWBA MCU is 24 V...

Page 200: ...ere paper remaining on the problem Sensor Remove the remaining paper and proceed to Step 2 Go to Step 3 2 Does the error recur when a test print is made Go to Step 3 End of procedure 3 Operation check 1 of problem Sensor Does the ACTUATOR move smoothly without any damage Or is the light emitter of the Sensor clean Go to Step 4 Re attach or replace the actuator or clean the light emitter 4 Operatio...

Page 201: ...o to Step 3 Repair broken or shorted part 3 Continuity check of HARNESS ASSY FEED 1 of Feeder Remove Feeder Disconnect P J435 from PWBA TRAY 500 Is the continuity normal between all terminals of J435 P608 connector on Feeder to be connected to the printer Go to Step 4 Replace HARNESS ASSY FEED 1 p 458 4 Check after replacement of PWBA TRAY 500 Replace PWBA TRAY 500 p 452 Does the error recur when ...

Page 202: ... FFC ASSY ESS Re connect FFC ASSY ESS of PWBA ESS to PWBA MCU Does the error recur when a test print is made Go to Step 2 End of procedure 2 Check of connection of FFC ASSY ESS Is FFC ASSY ESS damaged or broken Replace FFC ASSY ESS p 437 Go to Step 3 3 Check after replacement of PWBA MCU Replace PWBA MCU p 432 Does the error recur when a test print is made Replace PWBA ESS p 437 End of procedure m...

Page 203: ...en after the power has been switched several times Go to Step 4 End of procedure 4 Disconnect and re connect all connectors connected to PWBA MCU Does the error recur when the power is turned ON Go to Step 5 End of procedure 5 Check after replacement of PWBA MCU Replace PWBA MCU p 432 Does the error recur when the power is turned ON Go to FIP 71 ElectricalNoise p 244 End of procedure C A U T I O N...

Page 204: ...y dirt or foreign bodies and go to step 6 Go to Step 7 6 Does the error recur when the power is turned ON Go to Step 7 End of procedure 7 Operation check of SENSOR TR 0 Remove Photoconductor Unit The voltage of P416 2 P416 3 on PWBA MCU is 5 VDC when silver paper or other reflective object comes close to the sensing area of SENSOR TR 0 and is 0 VDC when the object is released Replace PWBA MCU p 43...

Page 205: ...lace LV HVPS p 435 Repair broken or shorted part 14 5 VDC power supply check to PWBA MCU The voltage of P410 3 P410 4 on PWBA MCU is 5 VDC Replace PWBA MCU p 432 Go to Step 15 15 Continuity check of HARNESS ASSY MAIN Disconnect P J410 from PWBA MCU and P J502 from LV HVPS Do all of the wiring below have normal continuity J410 3 J502 3 J410 4 J502 4 Replace LV HVPS p 435 Repair broken or shorted pa...

Page 206: ...and PWB SOS The voltage of P407 16 P407 14 on PWBA MCU is 5 VDC Go to Step 4 Go to Step 6 4 Check after replacement of PWBA MCU Replace PWBA MCU p 432 Does the error recur when the power is turned ON Go to Step 5 End of procedure 5 Check after replacement of ROS ASSY Replace ROS ASSY p 401 Does the error recur when the power is turned ON Go to FIP 1 81 Electrical noise End of procedure 6 5 VDC pow...

Page 207: ...heck of SENSOR ROTARY HOME POSI The voltage of P413 7 P413 6 on PWBA MCU is 0 VDC when FRAME ASSY ROTARY enters the sensing area and is 5 VDC when it leaves the sensing area Replace PWBA MCU p 432 Go to Step 5 5 5 VDC power supply check to SENSOR ROTARY HOME POSI The voltage of P413 5 P413 6 on PWBA MCU is 5 VDC Go to Step 6 Go to Step 7 6 Continuity check of HARNESS ASSY MAIN Disconnect P J413 fr...

Page 208: ...C Go to Step 5 Go to Step 7 5 Continuity check of HARNESS ASSY ADC Disconnect P J422 from PWBA MCU Do all of the wiring below have normal continuity J422 8 J431 1 J422 4 J431 5 J422 2 J431 7 Go to Step 6 Replace HARNESS ASSY ADC 6 Check after replacement of SENSOR ASSY ADC Replace SENSOR ASSY ADC p 379 Does the error recur when the power is turned ON Go to Step 7 End of procedure 7 Power supply ch...

Page 209: ...ge of each color Does the error recur when the power is turned ON Go to Step 5 End of procedure 5 Check after replacement of Photoconductor Unit Replace Photoconductor Unit Does the error recur when the power is turned ON Go to Step 6 End of procedure 6 5 VDC and 24 VDC power supply check to SENSOR ASSY ADC The voltage of P422 2 P422 4 on PWBA MCU is 24 VDC And the voltage of P422 8 P422 4 is 5 VD...

Page 210: ... power is turned ON Replace LV HVPS p 435 End of procedure 14 Power supply check to PWBA MCU Are each of the power voltages being supplied to the following terminals on PWBA MCU from LV HVPS P410 1 P410 2 3 3 VDC P410 3 P410 4 5 VDC P410 5 6 P410 7 8 24 VDC Replace PWBA MCU p 432 Go to Step 15 15 Continuity check of HARNESS ASSY MAIN Disconnect P J410 from PWBA MCU and P J502 from LV HVPS Do all o...

Page 211: ...h color Does the error recur when the power is turned ON Go to Step 5 End of procedure 5 Check after replacement of Photoconductor Unit Replace Photoconductor Unit Does the error recur when the power is turned ON Go to Step 6 End of procedure 6 5 VDC and 24 VDC power supply check to SENSOR ASSY ADC The voltage of P422 2 P422 4 on PWBA MCU is 24 VDC And the voltage of P422 8 P422 4 is 5 VDC Go to S...

Page 212: ... power is turned ON Replace LV HVPS p 435 End of procedure 14 Power supply check to PWBA MCU Are each of the power voltages being supplied to the following terminals on PWBA MCU from LV HVPS P410 1 P410 2 3 3 VDC P410 3 P410 4 5 VDC P410 5 6 P410 7 8 24 VDC Replace PWBA MCU p 432 Go to Step 15 15 Continuity check of HARNESS ASSY MAIN Disconnect P J410 from PWBA MCU and P J502 from LV HVPS Do all o...

Page 213: ...ck after replacement of SENSOR ASSY ADC Replace SENSOR ASSY ADC p 379 Does the error recur when the power is turned ON Go to Step 5 End of procedure 5 Check after replacement of Photoconductor Unit Replace Photoconductor Unit Does the error recur when the power is turned ON Go to Step 6 End of procedure 6 Check after replacement of PWBA MCU Replace PWBA MCU p 432 Does the error recur when the powe...

Page 214: ... to SENSOR 2BTR RETRACT The voltage of P418 4 P418 5 on PWBA MCU is 5 VDC Go to Step 7 Go to Step 10 7 Continuity check of HARNESS ASSY ADC Disconnect the P J418 from PWBA MCU Do all of the wiring below have normal continuity J418 4 J112 3 J418 5 J112 2 J418 6 J112 1 Go to Step 8 Replace HARNESS ASSY ADC 8 Check after replacement of SENSOR 2BTR RETRACT Replace SENSOR 2BTR RETRACT Does the error re...

Page 215: ... or shorted part 5 24 VDC power supply check to MOT ASSY MICRO 2nd BTR Retract Motor The voltage of P403 3 P403 2 on PWBA MCU is 24 VDC Go to Step 6 Go to Step 11 6 Check after replacement of MOT ASSY MICRO Replace MOT ASSY MICRO p 427 Does the error recur when a test print is made Go to Step 7 End of procedure 7 5 VDC power supply check to SENSOR 2BTR RETRACT The voltage of P418 4 P418 5 on PWBA ...

Page 216: ... 4 5 VDC P410 5 6 P410 7 8 24 VDC Replace PWBA MCU p 432 Go to Step 12 12 Continuity check of HARNESS ASSY MAIN Disconnect P J410 from PWBA MCU and P J502 from LV HVPS Do all of the wiring below have normal continuity J410 1 J502 1 J410 2 J502 2 J410 3 J502 3 J410 4 J502 4 J410 5 J502 5 J410 6 J502 6 J410 7 J502 7 J410 8 J502 8 Replace LV HVPS p 435 Repair broken or shorted part Step Check Yes No ...

Page 217: ...tep 4 Replace FUSER LOCK SWITCH 4 Operation Check of the HARNESS ASSY MAIN Do all of the wiring below have normal continuity J410 10 J1 1 J410 9 J128 1 J1 3 J128 2 Go to Step 5 Repair broken or shorted part 5 Check after replacement of the FUSER ASSY Replace FUSER ASSY p 415 Does the error recur when the power is turned ON Go to Step 6 End of procedure 6 Continuity check of HARNESS ASSY MCU C L Al...

Page 218: ...0 Check after replacement of LV HVPS Replace LV HVPS p 435 Does the error occur when the power is turned ON Go to Step 11 End of procedure 11 Continuity check of HARNESS ASSY MAIN Disconnect P J1 from PWBA FUSER CONT and P J410 from PWBA MCU Do all of the wiring below have normal continuity P J1 1 P J410 10 P J1 3 P J410 9 Replace PWBA MCU p 432 Replace HARNESS ASSY MAIN Step Check Yes No manuals4...

Page 219: ... SENSOR HUM TEMP thermistor resistance value Disconnect P J413 from PWBA MCU The resistance value of P104 4 P104 3 is 10k Ω 1k Ω approx 20 C Go to Step 3 Replace SENSOR HUM TEMP p 428 3 Continuity check of HARNESS ASSY MAIN Disconnect the P J413 from PWBA MCU Is the continuity normal between all terminals of J413 J104 Replace PWBA MCU p 432 Repair broken or shorted part HARNESS ASSY MAIN SENSOR HU...

Page 220: ...P435 7 8 on PWBA TRAY 500 is 24 VDC Replace PWBA TRAY 500 p 452 Go to Step 6 6 Continuity check of HARNESS ASSY FEED 1 Disconnect P J435 from PWBA TRAY CONT Do all of the wiring below have normal continuity J435 10 P608 1 connector on Feeder to be connected to the printer J435 9 P608 2 J435 8 P608 3 J435 7 P608 4 Go to Step 7 Replace PWBA TRAY 500 p 452 7 Continuity check of HARNESS ASSY MAIN Disc...

Page 221: ...isconnect P J421 from PWBA MCU Do all of the wiring below have normal continuity J421 5 J608 6 connector on the printer to connect Feeder J421 6 J608 5 Go to Step 13 Repair broken or shorted part 13 5 VDC power supply check to PWBA MCU The voltage of P410 3 P410 4 on PWBA MCU is 5 VDC Replace PWBA MCU p 432 Go to Step 14 14 Continuity check of HARNESS ASSY MAIN Disconnect P J410 from PWBA MCU and ...

Page 222: ...MAIN Disconnect P J415 from PWBA MCU Do all of the wiring below have normal continuity J415 3 J107 3 J415 4 J107 2 J415 5 J107 1 Go to Step 6 Replace HARNESS ASSY MAIN 6 Check after replacement of SENSOR IBT RETRACT Replace SENSOR IBT RETRACT p 383 Does the error recur when a test print is made Go to Step 7 End of procedure 7 Check after replacement of PWBA MCU Replace PWBA MCU p 432 Does the erro...

Page 223: ...he power is turned ON Go to Step 4 End of procedure 4 Check of ANTENNA CTRG Is ANTENNA CTRG dirty and damaged Clean ANTENNA CTRG and then proceed to step 5 Go to Step 5 5 Operation check of ANTENNA CTRG Disconnect the P J415 from PWBA MCU and reconnect it Does the error recur when the power is turned ON Go to Step 6 End of procedure 6 Continuity check of HARNESS ASSY MAIN Disconnect P J415 from PW...

Page 224: ...ed ON Go to Step 4 End of procedure 4 Check of ANTENNA CTRG Is ANTENNA CTRG dirty and damaged Clean ANTENNA CTRG and then proceed to step 5 Go to Step 5 5 Operation check of ANTENNA CTRG Disconnect the P J415 from PWBA MCU and reconnect it Does the error recur when the power is turned ON Go to Step 6 End of procedure 6 Continuity check of HARNESS ASSY MAIN Disconnect P J415 from PWBA MCU Do all of...

Page 225: ...he power is turned ON Go to Step 4 End of procedure 4 Check of ANTENNA CTRG Is ANTENNA CTRG dirty and damaged Clean ANTENNA CTRG and then proceed to step 5 Go to Step 5 5 Operation check of ANTENNA CTRG Disconnect the P J415 from PWBA MCU and reconnect it Does the error recur when the power is turned ON Go to Step 6 End of procedure 6 Continuity check of HARNESS ASSY MAIN Disconnect P J415 from PW...

Page 226: ...ed ON Go to Step 4 End of procedure 4 Check of ANTENNA CTRG Is ANTENNA CTRG dirty and damaged Clean ANTENNA CTRG and then proceed to step 5 Go to Step 5 5 Operation check of ANTENNA CTRG Disconnect the P J415 from PWBA MCU and reconnect it Does the error recur when the power is turned ON Go to Step 6 End of procedure 6 Continuity check of HARNESS ASSY MAIN Disconnect P J415 from PWBA MCU Do all of...

Page 227: ...blocked and is 5 VDC when the sensing area is not blocked Replace PWBA MCU p 432 Go to Step 5 5 5 VDC power supply check to SENSOR TNER FULL The voltage of P413 12 P413 10 on PWBA MCU is 5 VDC Go to Step 6 Go to Step 8 6 Continuity check of HARNESS ASSY MAIN Do all of the wiring below have normal continuity J413 10 J617 3 J413 11 J617 2 J413 12 J617 1 Go to Step 7 Repair broken or shorted part 7 C...

Page 228: ...when SWITCH FRONT DOOR is pressed and does the continuity stop when SWITCH FRONT DOOR is released Go to Step 5 Replace SWITCH FRONT DOOR p 325 Actuator 5 Continuity check of HARNESS ASSY MAIN Do all of the wiring below have normal continuity J415 10 J125 2 J415 11 J125 1 Go to Step 6 Repair broken or shorted part 6 Power supply check to PWBA MCU Is the specified DC voltage being supplied to the fo...

Page 229: ...Disconnect the P J408 from PWBA MCU Do all of the wiring below have normal continuity J408 5 J603 8 J408 6 J603 7 Go to Step 4 Replace HARNESS ASSY P H1 Actuator 4 Continuity check of HARNESS ASSY P H2 Disconnect P J603 Do all of the wiring below have normal continuity P603 5 J100 2 P603 6 J100 1 Replace SWITCH PH DOOR p 364 Replace HARNESS ASSY P H2 5 Power supply check to PWBA MCU Is the specifi...

Page 230: ...f the wiring below have normal continuity J418 7 J621 2 J418 8 J621 1 Go to Step 4 Replace HARNESS ASSY ADC Actuator 4 Continuity check of HARNESS ASSY 2BTR SW Disconnect the P J418 from the PWBA MCU Do all of the wiring below have normal continuity P621 1 J113 2 P621 2 J113 1 Replace SWITCH 2BTR COVER p 378 Replace HARNESS ASSY 2BTR SW 5 Power supply check to PWBA MCU Is the specified DC voltage ...

Page 231: ...2 when SWITCH FUSER DOOR is pressed and does the continuity stop when the switch is released Go to Step 5 Replace SWITCH FUSER DOOR p 323 5 Continuity check of HARNESS ASSY MAIN Do all of the wiring below have normal continuity J403 11 J114 2 J403 12 J114 1 Go to Step 6 Repair broken or shorted part Actuator 6 Power supply check to PWBA MCU Is the specified DC voltage being supplied to the followi...

Page 232: ...ace HARNESS ASSY FEED MAIN Actuator 4 Continuity check of HARNESS ASSY FEED 1 Disconnect P J435 from PWBA TRAY CONT Is the continuity normal between all terminals of J435 P608 connector on Feeder to be connected to the printer Go to Step 5 Replace HARNESS ASSY FEED 1 p 458 5 Continuity check of HARNESS ASSY MAIN Disconnect P J421 from PWBA MCU Is the continuity normal between all terminals of J421...

Page 233: ... 4 Shape check of COVER FRONT ASSY U Is the actuator of COVER FRONT ASSY U that presses SWITCH INLK FRONT deformed or damaged Replace COVER FRONT ASSY U p 318 Go to Step 5 5 Shape check of COVER FUSER Is the actuator of COVER FUSER that presses SWITCH INLK FUSER deformed or damaged Replace COVER FUSER p 311 Go to Step 6 6 Operation check of SWITCH ASSY TOP Disconnect P J116 from SWITCH ASSY TOP Is...

Page 234: ...CU Is the specified DC voltage being supplied to the following terminals on PWBA MCU P410 1 P410 2 3 3 VDC P410 3 P410 4 5 VDC P410 5 6 P410 7 8 24 VDC Replace PWBA MCU p 432 Go to Step 10 10 Continuity check of HARNESS ASSY MAIN Disconnect P J410 from PWBA MCU and P J502 from LV HVPS Do all of the wiring below have normal continuity J410 1 J502 1 J410 2 J502 2 J410 3 J502 3 J410 4 J502 4 J410 5 J...

Page 235: ...wer is turned ON Go to Step 4 End of procedure 4 Check of ANTENNA CTRG Is ANTENNA CTRG dirty and damaged Clean ANTENNA CTRG and then proceed to step 5 Go to Step 5 5 Operation check of ANTENNA CTRG Disconnect the P J415 from the PWBA MCU Does the error recur when the power is turned ON Go to Step 6 End of procedure 6 Continuity check of HARNESS ASSY MAIN Disconnect P J415 from PWBA MCU Do all of t...

Page 236: ...ON Go to Step 4 End of procedure 4 Check of ANTENNA CTRG Is ANTENNA CTRG dirty and damaged Clean ANTENNA CTRG and then proceed to step 5 Go to Step 5 5 Operation check of ANTENNA CTRG Disconnect the P J415 from PWBA MCU and reconnect it Does the error recur when the power is turned ON Go to Step 6 End of procedure 6 Continuity check of HARNESS ASSY MAIN Disconnect P J415 from PWBA MCU Do all of th...

Page 237: ...hen the power is turned ON Go to Step 4 End of procedure 4 Check of ANTENNA CTRG Is ANTENNA CTRG dirty and damaged Clean ANTENNA CTRG and then proceed to step 5 Go to Step 5 5 Operation check of ANTENNA CTRG Disconnect the P J415 from PWBA MCU Does the error recur when the power is turned ON Go to Step 6 End of procedure 6 Continuity check of HARNESS ASSY MAIN Disconnect P J415 from PWBA MCU Do al...

Page 238: ...ON Go to Step 4 End of procedure 4 Check of ANTENNA CTRG Is ANTENNA CTRG dirty and damaged Clean ANTENNA CTRG and then proceed to step 5 Go to Step 5 5 Operation check of ANTENNA CTRG Disconnect the P J415 from PWBA MCU and reconnect it Does the error recur when the power is turned ON Go to Step 6 End of procedure 6 Continuity check of HARNESS ASSY MAIN Disconnect P J415 from PWBA MCU Do all of th...

Page 239: ...ng area is blocked and is 5 VDC when the sensing area is not blocked Replace PWBA MCU p 432 Go to Step 5 5 5 VDC power supply check to SENSOR TNER FULL The voltage of P413 12 P413 10 on PWBA MCU is 5 VDC Go to Step 6 Go to Step 8 6 Continuity check of HARNESS ASSY MAIN Do all of the wiring below have normal continuity J413 10 J617 3 J413 11 J617 2 J413 12 J617 1 Go to Step 7 Repair broken or short...

Page 240: ...r Unit Replace Photoconductor Unit Does the error occur when the power is turned ON Go to Step 4 End of procedure 4 Operation check of ANTENNA CTRG Disconnect the P J416 from the PWBA MCU Does the error recur when the power is turned ON Go to Step 6 End of procedure 5 Continuity check of HARNESS ASSY XERO Disconnect the J416 from PWBA MCU Do all of the wiring below have normal continuity J416 4 J1...

Page 241: ...pdate the firmware 2 Check if the firmware version of the printer controller Check the firmware version of the printer controller Is the version latest Go to Step 3 Update the firmware 3 Continuity check of FFC ASSY ESS 1 Disconnect the P J400 on the PWBA MCU 2 Disconnect the CN601 on the BOARD ASSY MAIN 3 Check each wiring for continuity Do all of the wiring have continuity Go to Step 4 Replace t...

Page 242: ... still continue after replacement Go to Step 4 End of procedure 4 Check of contact between Photoconductor Unit and HOUSING ASSY GUIDE AD Remove Photoconductor Unit Is the contact surface of Photoconductor Unit and CONDUCTOR attached to HOUSING ASSY GUIDE AD deformed or are there foreign objects on the surface Go to Step 5 Replace HOUSING ASSY GUIDE AD 5 Check of grounding of boards Are all screws ...

Page 243: ...Req C0083 Service Req C0255 Service Req C0084 Service Req C0256 Service Req C0085 Service Req C0257 Service Req C0086 Service Req C0258 Service Req C0087 Service Req C0800 Service Req C0088 Service Req C0998 Service Req C0089 Service Req C1400 Service Req C0090 Service Req C1500 Service Req C0091 Service Req C1550 Service Req C0092 Service Req C1600 Service Req C0093 Service Req C1610 Service Req ...

Page 244: ... procedure 3 External noise 1 Check the surrounding of the printer for electrical equipment 2 Disconnect all cables connected to the printer except the AC cable and make operation check Does the error occur Replace the PWBA ESS p 437 End of procedure Service Req C1020 Service Req C1021 PWBA ESS RAM DIMM Step Check Yes No 1 Check of RAM DIMM Check whether the installed RAM DIMM is the specified one...

Page 245: ... surrounding of the printer for electrical equipment 2 Disconnect all cables connected to the printer except the AC cable and make operation check Does the error occur Replace the PWBA ESS p 437 End of procedure Step Check Yes No 1 Check of host PC Restart the host PC Does the error occur To Step 2 End of procedure 2 Check of Printer Driver Reinstall the Printer Driver Does the error occur To Step...

Page 246: ...r cases that cannot be checked by the test print Test print with the engine alone is normal Printer controller trouble Test print on engine alone is abnormal Printer engine trouble If the probable cause is printer controller trouble replace with a normal printer controller and interface cable and check If the trouble recurs after replacing with the normal parts check on the host side and use the p...

Page 247: ...e short circuit the pad for test print on the PWBA MCU with a small screwdriver or a similar tool The pad is located at upper right of the interface connector Figure 3 5 The Pad for Test Print C A U T I O N The test print cannot be made if an engine related error has occurred W A R N I N G Never touch the energized or driving part when performing the following procedure W A R N I N G When short ci...

Page 248: ...EPSON AcuLaser CX11 CX11F Revision B TROUBLESHOOTING Printer 250 TEST PRINT PATTERN Figure 3 6 Test Print Pattern 400 dot line 400dpi 1 dot line 127 dot 508 dot 400dpi manuals4you com manuals4you com ...

Page 249: ...ak Tones FIP P1 Blank Print FIP P2 Solid Black Print FIP P3 Vertical White Bands or Lines FIP P4 Horizontal White Bands or Lines FIP P5 Vertical Black Lines FIP P6 Horizontal Black Lines FIP P7 Image is Partially Not Printed FIP P8 Toner Smudges FIP P9 Residual Image FIP P10 Dark or Dirty Background FIP P11 Skew Print FIP P12 Print Paper Damage FIP P13 Image Not Fixed FIP P14 Color Shift FIP P15 U...

Page 250: ...the relationship between the pitches shown in the table below note that the pitch does not necessarily match the perimeter of the roller Part Roller Name Outside Diameter Pitch mm FUSER FUSER ASSY EXIT ROLL φ15 6 49 1 PINCH ROLL φ8 0 25 1 H R φ26 2 84 5 BELT φ30 1 94 5 XERO CRU Photoconductor Unit DRUM φ47 0 147 7 BCR φ12 0 37 7 1st BTR φ10 0 31 4 BUR φ15 7 49 3 IDLE ROLL φ11 8 36 9 CNL BRUCH φ19 ...

Page 251: ...e problem image Is the image printed normally End of procedure Go to Step 5 5 Check of 2ND BTR ASSY Remove 2ND BTR ASSY p 374 Is 2ND BTR ASSY normal without any dirt damage or wear Go to Step 6 Replace 2ND BTR ASSY p 374 6 Check of contact between Photoconductor Unit and frame Are the contacts of Photoconductor Unit and HOUSING ASSY GUIDE AD dirty or deformed Clean or replace relevant parts Go to ...

Page 252: ...rogress during printing and check the toner image on IBT BELT Go to Step 13 Replace LV HVPS p 435 13 Check of image secondary transfer process Is the toner image on IBT BELT transferred normally to the paper Execute a test print turn the power OFF when you think that the image transfer process is in progress during printing and check the paper Replace ESS and possible parts that caused the error R...

Page 253: ...mage Is the image printed normally End of procedure Go to Step 5 5 Check of 2ND BTR ASSY Remove 2ND BTR ASSY p 374 Is 2ND BTR ASSY normal without any dirt damage or wear Go to Step 6 Replace 2ND BTR ASSY p 374 6 Check of contact between Photoconductor Unit and frame Are the contacts of Photoconductor Unit and HOUSING ASSY GUIDE AD dirty or deformed Clean or replace relevant parts Go to Step 7 7 Ch...

Page 254: ...13 Replace LV HVPS p 435 13 Check of image secondary transfer process Is the toner image on IBT BELT transferred normally to the paper Execute a test print turn the power OFF when you think that the image transfer process is in progress during printing and check the paper Go to Step 14 Replace LV HVPS p 435 14 Check after replacement of ESS Replace ESS Make a test print of the problem image Is the...

Page 255: ...nector firmly connected to ROS ASSY Go to Step 2 Connect the connector 2 Check of contact between Photoconductor Unit and frame Are the contacts of Photoconductor Unit and HOUSING ASSY GUIDE AD dirty or deformed Clean or replace relevant parts Go to Step 3 3 Cover the entire window of ROS ASSY and execute a test print Is the print completely black Replace LV HVPS p 435 Go to Step 4 4 Cover half of...

Page 256: ...o the ejecting section Remove obstacles Go to Step 3 3 Check of laser beam path Are there any obstructions between ROS ASSY and Photoconductor Unit Remove obstacles Go to Step 4 4 Check of ROS window Is ROS window dirty Clean the ROS window with CLEANER ASSY Go to Step 5 5 Check of 2ND BTR ASSY Remove 2ND BTR ASSY p 374 Is 2ND BTR ASSY normal without any dirt damage or wear Go to Step 6 Replace 2N...

Page 257: ... 3 Execution of a test print Make a test print of the problem image Is the image printed normally End of procedure Go to Step 4 4 Connection check of ROS ASSY connector Is the connector firmly connected to ROS ASSY Go to Step 5 Connect the connector 5 Check of 2ND BTR ASSY Remove 2ND BTR ASSY p 374 Is 2ND BTR ASSY normal without any dirt damage or wear Go to Step 6 Replace 2ND BTR ASSY p 374 6 Che...

Page 258: ...in progress during printing and check the paper Go to Step 11 Replace LV HVPS p 435 11 Check of Heat Roll and Pressure Roll Allow FUSER ASSY to cool down before performing work Remove FUSER ASSY p 415 Turn the Gear by hand and inspect Heat Roll and Pressure Roll Are Heat Roll and Pressure Roll scratched or dirty and damaged Replace FUSER ASSY p 415 Replace ESS and possible parts that caused the er...

Page 259: ...f procedure Go to Step 3 3 Check of 2ND BTR ASSY Remove 2ND BTR ASSY p 374 Is 2ND BTR ASSY normal without any dirt damage or wear Go to Step 4 Replace 2ND BTR ASSY p 374 4 Check after replacement of Photoconductor Unit Replace Photoconductor Unit Make a test print of the problem image Is the image printed normally End of procedure Go to Step 5 5 Check after replacement of ROS ASSY Replace ROS ASSY...

Page 260: ...lace Photoconductor Unit Make a test print of the problem image Is the image printed normally End of procedure Go to Step 5 5 Check after replacement of ROS ASSY Replace ROS ASSY p 401 Make a test print of the problem image Is the image printed normally End of procedure Go to Step 6 6 Check of image primary transfer process Is the toner image on the drum transferred normally to IBT BELT Execute a ...

Page 261: ...ocedure Go to Step 4 4 Check of image primary transfer process Is the toner image on the drum transferred normally to IBT BELT Execute a test print turn the power OFF when you think that the primary transfer process is in progress during printing and check the toner image on IBT BELT Go to Step 5 Replace LV HVPS p 435 5 Check of image secondary transfer process Is the toner image on IBT BELT trans...

Page 262: ...uctor Unit and HOUSING ASSY GUIDE AD dirty or deformed Clean or replacerelevant parts Go to Step 4 4 Check of 2ND BTR ASSY Remove 2ND BTR ASSY p 374 Is 2ND BTR ASSY normal without any dirt damage or wear Go to Step 5 Replace 2ND BTR ASSY p 374 5 Check after replacement of Photoconductor Unit Replace Photoconductor Unit Make a test print of the problem image Is the image printed normally End of pro...

Page 263: ... Did any residual images appear Go to Step 3 End of procedure Advise the customer not to print same image in large quantities at a time 3 Check of contact between Photoconductor Unit and frame Are the contacts of Photoconductor Unit and HOUSING ASSY GUIDE AD dirty or deformed Clean or replace relevant parts Go to Step 4 4 Check after replacement of Photoconductor Unit Replace Photoconductor Unit M...

Page 264: ...G ASSY GUIDE AD dirty or deformed Clean or replace relevant parts Go to Step 3 3 Check after replacement of Photoconductor Unit Replace Photoconductor Unit Make a test print of the problem image Is the image printed normally End of procedure Go to Step 4 4 Check of dirt and foreign bodies on surface of SENSOR ASSY ADC Are there any dirt or foreign bodies on the SENSOR ASSY ADC surface Clean to rem...

Page 265: ...nted normally End of procedure Go to Step 3 3 Operation check of PLATE ASSY BOTTOM 500 in the Paper Cassette Remove the Paper Cassette Does the PLATE ASSY BOTTOM 500 in the Paper Cassette rise up correctly without any inclination on the left or right sides Go to Step 4 Re attach PLATE ASSY BOTTOM p 444 4 Check the Rollers on the paper feed path for damage and wear and check attachment Are Rollers ...

Page 266: ...e image printed normally End of procedure Go to Step 2 2 Check of paper feed path Are there any dirt or obstacles on the paper feed path from the paper feed tray to the output section Remove dirt and obstacles Go to Step 3 3 Check of all Rollers on the paper feed path Are all Rollers on the paper feed path normal without any dirt damage or wear Go to Step 4 Clean the relevant Rollers 4 Attachment ...

Page 267: ...inter set to a Transfer Voltage suited to the type of paper in use Go to Step 3 Adjust the Transfer Voltage 3 Check of Heat Roll and Pressure Roll Allow FUSER ASSY to cool down before performing work Remove FUSER ASSY p 415 Turn the Gear by hand and inspect Heat Roll and Pressure Roll Are Heat Roll and Pressure Roll scratched or dirty and damaged Replace FUSER ASSY p 415 Go to Step 4 W A R N I N G...

Page 268: ... 0 Photoconductor Unit MOT ASSY P R PWBA ESS Step Check Yes No 1 Check of SENSOR TR 0 attachment Is SENSOR TR 0 attached correctly Go to Step 2 Re attach and go to step 3 2 Check after replacement of Photoconductor Unit Replace Photoconductor Unit Is the image printed normally End of procedure Go to Step 3 3 Check after replacement of MOT ASSY P R Replace MOT ASSY P R p 426 Is the image printed no...

Page 269: ...s Problems Uneven density thin spots appear on entire surface This occurs due to disconnection of connector D from LV HVPS ESS and possible parts that caused the error WIRE ASSY BTR LV HVPS Step Check Yes No 1 Check the connectors for LV HVPS Make sure that the connector P J504 on LV HVPS and the connector P J512 on 1st BTR are connected properly Print the problem image Or execute the test print W...

Page 270: ...olor over the entire surface is faint This occurs due to disconnection of connector C from LV HVPS ESS and possible parts that caused the error WIRE ASSY DEVE LV HVPS Step Check Yes No 1 Check the connectors for LV HVPS Make sure that the connector P J509 on LV HVPS and the connector P J510 on DEVE are connected properly Print the problem image Or execute the test print Was the trouble fixed End o...

Page 271: ...f the four colors are printed all over the page resulting in completely black printout This occurs due to disconnection of connector A from LV HVPS ESS and possible parts that caused the error WIRE ASSY BCR LV HVPS Step Check Yes No 1 Check the connectors for LV HVPS Make sure that the connector P J508 on LV HVPS and connector P J514 on BCR are connected properly Print the problem image Or execute...

Page 272: ...n entire surface This occurs due to disconnection of connector F from PWBA HVPS ESS and possible parts that caused the error WIRE ASSY 2BTR PWBA HVPS Step Check Yes No 1 Check connector of PWBA HVPS Check connection of connector P J505 of PWBA Also make sure that 2ND BTR ASSY that contacts with T2 shown in the figure left is correctly attached Print the problem image Or execute the test print Was ...

Page 273: ...in the horizontal direction in high density color areas color is faint in a stripe pattern is occurring This occurs due to disconnection of connector G from PWBA HVPS ESS and possible parts that caused the error WIRE ASSY IBT PWBA HVPS Step Check Yes No 1 Check the connectors for PWBA HVPS Make sure that the connector P J506 on PWBA and the connector P J513 on IBT are connected properly Print the ...

Page 274: ...oting inspect the feed path of the printer paper Check the paper feed path for metal staples paper clips paper scraps and other foreign matter Step Check Yes No 1 Clean the ROS ASSY window Clean ti using ROS CLEANER Print the problem image or execute a test print Was the trouble fixed End of procedure Go to Step 2 2 Check after replacement of Photoconductor Unit Replace the Photoconductor Unit Pri...

Page 275: ...ery time a color print is made On a B W print the position is different from a color print It is caused by dirt on the Photoconductor Unit ESS and possible parts that caused the error 1 Photoconductor Unit Before starting troubleshooting inspect the feed path of the printer paper Check the paper feed path for metal staples paper clips paper scraps and other foreign matter Step Check Yes No 1 Check...

Page 276: ... a line and position of them shift by page It is caused by a scratch on the Photoconductor Unit ESS and possible parts that caused the error 1 Photoconductor Unit Before starting troubleshooting inspect the feed path of the printer paper Check the paper feed path for metal staples paper clips paper scraps and other foreign matter Step Check Yes No 1 Check after replacement of Photoconductor Unit R...

Page 277: ...y or coated paper NOTE Do not replace the FUSER ASSY immediately The symptom may disappear as the printer is used for while ESS and possible parts that caused the error 1 FUSER ASSY Before starting troubleshooting inspect the feed path of the printer paper Check the paper feed path for metal staples paper clips paper scraps and other foreign matter Step Check Yes No 1 Check after replacement of FU...

Page 278: ...EPSON AcuLaser CX11 CX11F Revision B TROUBLESHOOTING Printer 280 3 4 6 Abnormal Noise related Trouble 3 4 6 1 Abnormal noise related troubleshooting entry chart manuals4you com manuals4you com ...

Page 279: ...oise being generated by 2ND BTR ASSY that is driven by MOT ASSY MICRO Clean or replace 2ND BTR ASSY Go to Step 5 5 Is abnormal noise being generated by MOT ASSY P R Replace MOT ASSY P R Go to Step 6 6 Is abnormal noise being generated from inside Photoconductor Unit Replace Photoconductor Unit Go to Step 7 7 Is abnormal noise being generated by MOTOR PH inside FRAME ASSY PH Replace FRAME ASSY PH G...

Page 280: ...generated from MOT ASSY FSR It rotates when the temperature of FUSER ASSY reaches the specified value Replace MOT ASSY FSR Go to Step 2 2 Is abnormal noise being generated by FUSER ROLL in FUSER ASSY that is driven by MOT ASSY FSR Clean or replace FUSER ROLL Go to Step 3 3 Is abnormal noise being generated from 2ND BTR ASSY that is driven by MOT ASSY FSR Clean or replace 2ND BTR ASSY manuals4you c...

Page 281: ...tep 7 7 Is abnormal noise being generated from ROLL MSI that is driven by MOTOR PH Clean or replace ROLL MSI Go to Step 8 8 Is abnormal noise being generated from GEAR ASSY DRIVE that is driven by MOTOR PH Replace FRAME ASSY PH Go to Step 9 9 Is abnormal noise being generated from MOT ASSY FSR Replace MOT ASSY FSR Go to Step 10 10 Is abnormal noise being generated by FUSER ROLL in FUSER ASSY that ...

Page 282: ...ted by MOT ASSY MICRO Replace MOT ASSY MICRO Go to Step 20 20 Is abnormal noise being generated by FRAME ASSY 2ND that is driven by MOT ASSY MICRO Replace FRAME ASSY 2ND Go to Step 21 21 Is abnormal noise being generated by ROS ASSY Replace ROS ASSY Step Check Yes No manuals4you com manuals4you com ...

Page 283: ...ed properly 3 p 286 Service Req C2011 The ADF is not installed Fax model only 4 p 286 Step Point to be checked Yes No 1 Is the Carriage Unit in the scanner still locked by the Carriage Lock Lever Move the lever to unlock position and follow the description displayed on the panel Go to Step 2 2 Is the Carriage Lock Lever in the lock position despite the carriage is not in the position to be locked ...

Page 284: ... not in the ADF but on the document glass directly and start scanning Go to Step 3 3 Are there any paper dust labels or foreign materials in the paper path Remove the foreign materials Go to Step 4 4 Is there any accumulation of paper dust on the Pick up roller surface of the ADF Clean the roller surface wipe the roller surface with soft cloth wrung out of water Go to Step 5 5 Does the paper slip ...

Page 285: ...s not copied correctly Image failure as shown below occurs Too light or dark too much density Odd colors Dark Too bright Letters and figures cannot be copied clearly Check the panel settings below and change them according to the paper characteristics Document type Density Contrast R G B Refer to 1 2 2 5 Consumables Periodic Replacement Unit p37 Step Point to be checked Remedy 1 Warm up operation ...

Page 286: ...s Set Document to ADF This error occurs if paper size is set to Legal when sending a fax with the ADF is in the conditions listed below Because feeding scanning the Legal size is available only with the ADF due to the specification No document is loaded on the ADF The ADF is open The ADF Cover is open Check the condition of the ADF Unit or load the document on the ADF and resume the sending operat...

Page 287: ...ngs Reception mode in Setup mode if it is set to phone only Change the setting to auto switch or fax only 2 Check the ring frequency setting When using PBX check if the minimum maximum setting values for ring frequency is appropriate LIN_RING_CYCLE_MIN 300 015 LIN_RING_CYCLE_MAX 300 016 Reboot the product in MFP Maintenance mode and change the settings using the Fax Maintenance Parameter Check Par...

Page 288: ...ttings they might have been overwritten incorrectly Initialize the system parameter settings Be sure to follow the procedure given below not to erase the user defined information 1 Backup the information set by the user using the Fax Maintenance Tool 2 Initialize the system parameter settings using the menu in the MFP Maintenance mode 3 Download the backup copy of the user information manuals4you ...

Page 289: ... to the line quality echo noise Call the recipient to check the line quality Use another communication method The fax signal level is too low Get the communication protocols log and analyze it Change the corresponding system parameter settings Transmitting troubles from other fax machines to the product Cannot establish the communication with the product The protocols do not meet the ITU T standar...

Page 290: ... the trouble The document scanning range of the sending fax machine is too wide Number of lines page setting of the sending fax machine exceeds a standard level due to additional header Regular sized one page transmitted from the product is divided into two or more pages on the receiving fax machine The product has trouble to feed the documents miss feed skew feed Check the scanner and ADF if they...

Page 291: ...ploads the user data into the product fax unit Rewrites the user data into the product Trouble Info Collection Menu Retrieves a backup data This function is intended to collect error information on the product The error information can be retrieved and stored into a computer as a file When fax troubles especially due to environment configuration occur get the error information using Trouble Info C...

Page 292: ... and enter a name for the file 3 When retrieving the backup data is finished a message notifying the completion of the task is displayed A backup data file is stored on the specified destination when the process is completed normally Figure 3 7 Trouble Info Collection Screen Figure 3 8 Backup Data Specify the destination to save and file name Repeats number of times same as the number of fax jobs ...

Page 293: ...ting List See 3 6 4 3 System Parameter Settings p298 on how to change the parameter setting Job Counter Information Total counts of transmitted pages Total counts of received pages Total counts of transmitted pages in G3 mode successful jobs Total counts of transmitted pages in G3 mode Unsuccessful jobs Total counts of received pages in G3 mode successful jobs Total counts of received pages in G3 ...

Page 294: ...r 0XXXXXXXXX Personal Name EPSON Speaker Volume 1 Country Japan Auto Redialing Times 5times Sender Record ON Answering Mode Fax Only Ring Response Time 10sec DRPD Normal Activity Report Never Output Transmission Report OFF Multi Trans Report only when an error occurs Software Version FAX Ver 0003 BOOT1 Ver 0004 BOOT2 Ver 0003 User Modem 5K6E6E01 Corresp Counter Total Pages Sent 12443 Total Pages R...

Page 295: ...al names FCF Facsimile Control Field FIF Facsimile Information Field The Protocol Monitor List can be printed out by changing the parameter setting as follows The system parameter REP_PROTOCOL_OUT Maintenance code Main Sub 330 001 Setting value 0 Not print default 1 Only when an error occurs 2 Print always Figure 3 10 Sample of Protocol Monitor List Protocol Monitor Date Time 03 05 06 11 33 Person...

Page 296: ...in Step 3 6 Confirm the setting values for the target system parameter and enter a proper value beside the VALUE HEX 7 After confirming OK is displayed beside the Result turn the product off 8 Reboot the product and perform required operaions SETTING EXAMPLE When changing Tone level to fix frequent communication errors Communication errors occur p 289 Corresponding parameter name COM_TX_ATT_LEVEL ...

Page 297: ...C H A P T E R 4 DISASSEMBLYANDASSEMBLY ...

Page 298: ...assembling the printer If you need to work on the printer with power applied strictly follow the instructions in this manual Always wear gloves for disassembly and reassembly to avoid injury from sharp metal edges To protect sensitive microprocessors and circuitry use static discharge equipment such as anti static wrist straps when accessing internal components Never replace the fuse on the Power ...

Page 299: ...n for the screw for sheet metal its threads will be broken leading to a crushed screw hole or trouble Do not pick up the spilt toner with a vacuum cleaner for home use To do so may cause the sucked toner particles to catch fire by sparks of the electric contacts If the toner has spilt on the floor etc clean it with a broom or wipe it with a cloth moistened with neural detergent If it is necessary ...

Page 300: ...dy whenever possible When must work without an antistatic wrist band or any other goods for static protection touch metallic portion of the printer connected to the earth before getting started After work is finished use CLEANER ASSY to clean the window of ROS ASSY Category Disassembly Reassembly Reference Page Section No COVER p 308 4 2 2 MSI p 329 4 2 3 PH ASSY p 349 4 2 4 TRANSFER p 366 4 2 5 X...

Page 301: ...rew tip is fine This is a self tapping screw It threads the screw hole so take care not to screw it diagonally 2 For plastic Screw Silver tapping with flange Plastic Silver colored With flange Screw threads are rougher than metal plate TYPE Screw tip is fine This is a self tapping screw It threads the screw hole so take care not to screw it diagonally 3 For plastic Screw Silver tapping with washer...

Page 302: ...m S type B head 11 M2x10mm G type P head 2 M3x8mm P type A head 7 M3x6mm G type C head W spring washer W ø5 flat washer 12 M3x12mm P type P head 3 M3x8mm S type A head 8 M3x10mm B type F head 13 M1 7x6mm B Type F head 4 M3x8mm P type B head 9 M2x8mm B type P head 5 M3x10mm P type B head 10 M3x6mm B type P head Name Commercial Availability Code Name Commercial Availability Code Phillips screwdriver...

Page 303: ...nter Orientation Sections in procedures described as In the case of the specification refer to work to be performed on printers of a specific specification Work is not to be performed on printers that do not fall under this specification Screws in illustrations are to be loosened and removed using a Phillips screwdriver unless otherwise specified Black arrows in illustrations indicate that the par...

Page 304: ... of the SCANNER from the clamp 7 Remove the two screws silver with flange 8 mm that secure the SPRING SC FFC to the main unit and remove the SPRING SC FFC from the main unit 8 Remove the five screws silver with flange 8mm x 4 silver no flange 8mm x 1 that secure the SCANNER to the main unit 9 Lift the SCANNER straight above the main unit to remove the SCANNER from the main unit Figure 4 2 Removal ...

Page 305: ... unit together with the HINGE COVER L 8 Attach the COVER ASSY LH p321 9 Attach the accordion shaped rubber covers HINGE COVER L HINGE COVER R to the left and right hinge sections C A U T I O N When securing the two SPRING SC FFCs make sure that the part of the SCANNER harnesses with black tape are located between the two SPRING SC FFCs C H E C K P O I N T When reassembling the AcuLaser CX11F fax m...

Page 306: ...fastening the COVER LEG RH OUTER to the main unit 5 Remove COVER LEG RH OUTER from the main unit 6 Slide COVER LEG LH INNER upward and remove it 7 Remove the screw silver with flange 8mm and remove the STOPPER PLATE 8 Remove the 2 E rings fastening the COVER ASSY TOP to the main unit 9 Open COVER ASSY TOP and silde it to the right to remove it Figure 4 3 Removal of COVER ASSY TOP Leg_Sec03_002RC 8...

Page 307: ...OP with the 2 E rings 4 Fit COVER LEG LH INNER to the main unit 5 Secure COVER LEG LH INNER to the main unit with the screw silver with flange 8 mm 6 Fit COVER LEG LH OUTER to the main unit 7 Secure COVER SIDE LH ASSY to the main unit with the 2 screws silver with flange 8 mm 8 Install Fuser ASSY p415 9 Attach COVER ASSY RH p326 10 Attach COVER ASSY RH p321 C A U T I O N When performing the follow...

Page 308: ... into the hole on COVER TRAY and attach the TRAY EXTENSION boss on the other side into the hole on COVER TRAY while bending down the TRAY EXTENSION boss 2 Close TRAY EXTENSION 3 Align COVER TRAY with the attachment position on COVER ASSY TOP and attach COVER TRAY together with TRAY EXTENSION 4 Close COVER ASSY TOP 5 Push in COVER TRAY gently until it comes to a stop Figure 4 4 Removal of TRAY EXTE...

Page 309: ...ER REMOVAL 1 Open COVER FUSER 2 Bow COVER FUSER to pull out its right and left convex potions and remove the COVER FUSER REINSTALLATION 1 Insert the right and left convex potions of the COVER FUSER 2 Close COVER FUSER Figure 4 6 Removal of COVER FUSER Leg_Sec03_005EB 2 1 2 2 1 LEFT Protrusion ...

Page 310: ...m the main unit REINSTALLATION 1 Match the hole on the COVER TOP SIDE L with the boss on the main unit 2 Fasten COVER TOP SIDE L to the main unit with the screw silver with flange 8 mm 3 Fit COVER LEG LH INNER to the main unit 4 Secure COVER LEG LH INNER to the main unit with the screw silver with flange 8mm 5 Install Fuser ASSY p415 6 Attach COVER ASSY LH p321 Figure 4 7 Removal of COVER TOP SIDE...

Page 311: ...with flange 8 mm fastening the COVER TOP SIDE R to the main unit 4 Remove the COVER TOP SIDE R from the main unit REINSTALLATION 1 Match the hole on the COVER TOP SIDE R with the boss on the main unit 2 Fasten COVER TOP SIDE R to the main unit with the screw silver with flange 8 mm 3 Close COVER ASSY TOP 4 Close COVER FUSER p321 Figure 4 8 Removal of COVER TOP SIDE R Leg_Sec03_503EA 4 3 ...

Page 312: ...OP with the boss on the main unit and attach 2 Fasten SWITCH ASSY TOP to the main unit with the screw silver with flange 8 mm 3 Connect connector P J116 blue of SWITCH ASSY TOP 4 Clamp the harness of SWITCH ASSY TOP with the two clamps 5 Attach COVER ASSY RH p326 Figure 4 9 Removal of SWITCH ASSY TOP C A U T I O N When performing the following work leave the intermediate connector blue on the harn...

Page 313: ...nd connector P J125 to SWITCH ASSY FRONT 2 Match the hole on SWITCH ASSY FRONT with the boss on the main unit 3 Fasten SWITCH ASSY FRONT to the main unit with the screw silver with flange 8 mm 4 Fasten the harness of SWITCH ASSY FRONT with the clamp 5 Attach COVER ASSY RH p326 Figure 4 10 Removal of SWITCH ASSY FRONT C A U T I O N When performing the following work leave the intermediate connector...

Page 314: ...R ROS WINDOW with the attachment position on the rear of COVER RH slide COVER ROS WINDOW along the ribs on COVER RH and attach COVER ROS WINDOW to SLIDE BAR 3 Fasten COVER ROS WINDOW to SLIDE BAR with the screw silver with flange tapping 8 mm 4 Match the holes on GUIDE BAR with the boss of COVER RH attach GUIDE BAR and fasten by the four hooks 5 Attach COVER ASSY RH p326 Figure 4 11 Removal of COV...

Page 315: ... 2 Slide COVER MSI in a slightly open state to the right to remove from the main unit REINSTALLATION 1 Match the hole on COVER MSI with the boss on the main unit with COVER MSI in a slightly open state and slide COVER MSI to the left to attach 2 Attach COVER ASSY RH p326 Figure 4 12 Removal of COVER MSI Leg_Sec03_008EA 2 1 2 2 ...

Page 316: ...m the holes on the main unit and remove COVER FRONT L together with COVER FRONT ASSY U 6 Press the bosses on the left and right of COVER FRONT ASSY U by inserting a screwdriver and draw out from the holes on COVER FRONT L to remove COVER FRONT ASSY U from COVER FRONT L Figure 4 13 Removal of COVER FRONT L and COVER FRONT ASSY U 1 Figure 4 14 Removal of COVER FRONT L and COVER FRONT ASSY U 2 C A U ...

Page 317: ...SY U to COVER FRONT L 2 Match the two hooks on the rear of COVER FRONT L with the holes on the main unit and attach COVER FRONT L together with COVER FRONT ASSY U 3 Fasten COVER FRONT L to the main unit with the 3 screws silver with flange 8 mm 4 Attach COVER MSI p317 5 Attach COVER ASSY LH p321 6 Attach COVER ASSY RH p326 C A U T I O N When performing the following work take care not to damage th...

Page 318: ...ct connector CN1 and the terminal to OP PANEL 2 While extending COVER RH and COVER LH each to the left and right put the protrusions on the left and right of OP PANEL inside COVER RH and COVER LH and attach OP PANEL to the main unit 3 Fasten OP PANEL to the main unit with the 3 screws silver with flange 6 mm 4 Close COVER FRONT ASSY U 5 Close COVER ASSY TOP Figure 4 15 Removal of OP PANEL C A U T ...

Page 319: ...atch the 4 hooks on the rear side of the COVER ASSY LH with the holes on the main unit while inserting the protrusion on the front side of the COVER ASSY LH into the concave portion on the COVER FRONT L and attach the COVER ASSY LH 2 Fasten the COVER ASSY LH to the main unit with the 5 screws silver with flange 8 mm 3 Attach COVER ESS p322 4 Close COVER MSI 5 Close COVER FRONT ASSY U 6 Close COVER...

Page 320: ...ning COVER ESS to the main unit 2 Remove COVER ESS from the main unit EINSTALLATION 1 Match the two protrusions on the bottom side of COVER ESS with the holes on COVER LH and attach COVER ESS 2 Fasten COVER ESS to the main unit with the screw Figure 4 17 Removal of COVER ESS Leg_Sec03_188RA 1 2 manuals4you com manuals4you com ...

Page 321: ...nect the connector P J114 to the SWITCH FUSER DOOR 2 Match the hooks on the SWITCH FUSER DOOR with the attachment position and attach to the BRACKET SW FUSER 3 Connect the connector P J117 blue to the SWITCH ASSY FUSER 4 Match the hole on the SWITCH ASSY FUSER with the boss on the main unit 5 Fasten the SWITCH ASSY FUSER to the main unit with the screw silver with flange 8 mm 6 Fasten the harness ...

Page 322: ...6 mm fastening COVER INNER TOP to the main unit 3 Remove COVER INNER TOP from the main unit REINSTALLATION 1 Match the hole on COVER INNER TOP with the boss on the main unit 2 Fasten COVER INNER TOP to the main unit with the 2 screws silver with flange 6 mm 3 Attach OP PANEL p320 Figure 4 19 Removal of COVER INNER TOP Leg_Sec03_187EB 3 2 2 manuals4you com manuals4you com ...

Page 323: ...T DOOR to BRACKET INLK FRONT and remove SWITCH FRONT DOOR REINSTALLATION 1 Match the hooks on SWITCH FRONT DOOR with the attachment position and attach to BRACKET INLK FRONT 2 Match the hole on SWITCH INLK FRONT with the boss on BRACKET INLK FRONT 3 Fasten SWITCH INLK FRONT to BRACKET INLK FRONT with the screw gold 8 mm 4 Attach SWITCH ASSY FRONT p315 5 Attach COVER ASSY RH p326 Figure 4 20 Remova...

Page 324: ...n the COVER ASSY RH into the concave portion on the COVER FRONT L place the A section of the COVER ASSY RH under the COVER FRONT L as shown in Figure 4 21 and attach the COVER ASSY RH to the COVER FRONT L with four tabs 2 Secure the COVER ASSY RH with the four screws silver with flange 8mm 3 Close COVER MSI 4 Close COVER FRONT ASSY U 5 Close COVER ASSY TOP Figure 4 21 Removal of COVER ASSY RH C A ...

Page 325: ...to the main unit 6 Unhook the hook on the rear of COVER INNER L from the hole on the main unit and remove COVER INNER L REINSTALLATION 1 Match the hook on the rear of COVER INNER L with the hole on the main unit and attach COVER INNER L 2 Fasten COVER INNER L to the main unit with the 2 screws silver with flange 8 mm 3 Attach COVER FRONT L and COVER FRONT ASSY U p318 4 Attach COVER MSI p317 5 Atta...

Page 326: ...ITCH INLK FUSER to the BRACKET SW FUSER 5 Remove the SWITCH INLK FUSER from the BRACKET SW FUSER REINSTALLATION 1 Attach the SWITCH INLK FUSER to the BRACKET SW FUSER matching the boss on the BRACKET SW FUSER with the hole of the SWITCH INLK FUSER 2 Secure the SWITCH INLK FUSER to the BRACKET SW FUSER with the screw silver 8 mm 3 Attach SWITCH ASSY FUSER p323 4 Secure the COVER LEG LH OUTER with t...

Page 327: ...rews silver with flange tapping 8 mm fastening MSI ASSY to the main unit 10 Draw out MSI ASSY slightly toward you lift up MSI ASSY slightly to avoid TIE PLATE under the main unit gently draw out MSI ASSY forward again and draw out HARNESS ASSY P H 1 from the hole on the main unit to remove MSI ASSY Figure 4 24 Removal of MSI ASSY C A U T I O N Step numbers with in the figure indicate the step of r...

Page 328: ... 500 sheet Cassette Unit to the main unit 6 Connect connector P J408 and connector P J409 to PWBA MCU 7 Fasten the harness of HARNESS ASSY P H 1 with the two clamps on CHASSIS ESS 8 Attach FRAME ASSY PH p352 9 Attach COVER FRONT L and COVER FRONT ASSY U p318 10 Attach COVER MSI p317 11 Attach COVER ASSY LH p321 12 Attach COVER ASSY RH p326 Figure 4 25 Reinstallation of MSI ASSY C A U T I O N When ...

Page 329: ...f SHAFT ASSY MSI and slide the left and right CAM PICK UP MSI to the inside 11 Match the notch of BEARING MSI with the positioning pin of SHAFT ASSY MSI and slide the left and right BEARING MSIs to the inside from the left and right holes of MSI ASSY 12 Temporarily slide ROLL ASSY MSI to the left and draw out the shaft of ROLL ASSY MSI from the right side bearing of MSI ASSY to remove ROLL ASSY MS...

Page 330: ...ach SOLENOID PICK UP p344 7 Attach MSI ASSY p329 8 Attach FRAME ASSY PH p352 9 Attach COVER FRONT L and COVER FRONT ASSY U p318 10 Attach COVER MSI p317 11 Attach COVER ASSY LH p321 12 Attach COVER ASSY RH p326 C A U T I O N When performing the following work attach with the retainer of PAPER GUIDE facing down C A U T I O N The notch of CAM PICK UP MSI must be properly matched with the positioning...

Page 331: ...ALLATION 1 Place the U cut section of ROLL MSI on SHAFT ASSY MSI and slide to the left and insert the positioning pin of SHAFT ASSY MSI into the notch of ROLL ASSY to attach ROLL ASSY to SHAFT ASSY MSI 2 Slide the right side CORE to the left and fasten the CORE hook to the groove on SHAFT ASSY MSI 3 Attach FRAME ASSY PH p352 Figure 4 27 Removal of ROLL MSI C A U T I O N Pay attention to the attach...

Page 332: ...e boss on CHUTE MSI from the right side hole on MSI ASSY to remove CHUTE MSI REINSTALLATION 1 Insert the left side boss on CHUTE MSI into the left side hole of MSI ASSY then bend down CHUTE MSI insert the right side boss of CHUTE MSI and attach CHUTE MSI 2 Attach FRAME ASSY PH p352 Figure 4 28 Removal of CHUTE MSI Leg_Sec03_044EB 2 1 2 2 RIGHT manuals4you com manuals4you com ...

Page 333: ...Y SIDE R with the attachment section of FRAME ASSY BOTTOM insert the tension section of GUIDE ASSY SIDE R into the groove of FRAME ASSY BOTTOM and slide the lever of GUIDE ASSY SIDE R to attach 2 Match the protrusion of GUIDE SIDE L with the attachment section of FRAME ASSY BOTTOM insert the tension section of GUIDE ASSY SIDE L into the groove of FRAME ASSY BOTTOM and slide GUIDE ASSY SIDE L to th...

Page 334: ...om the boss on PLATE BOTTOM ASSY MSI while extending the attachment sections on the left and right of PLATE BOTTOM 2 10 Lift up PLATE BOTTOM ASSY MSI and remove the holes on the left and right of PLATE BOTTOM ASSY MSI from the left and right shafts of MSI ASSY 11 Remove the right side of PLATE BOTTOM ASSY MSI from the right side notch of MSI ASSY and remove PLATE BOTTOM ASSY MSI Figure 4 31 Remova...

Page 335: ... MSI ASSY and attach PLATE BOTTOM ASSY MSI 3 Insert the holes of PLATE BOTTOM 2 into the boss on PLATE BOTTOM ASSY MSI to attach while extending the left and right attachment sections of PLATE BOTTOM 2 4 Attach ROLL ASSY MSI p331 5 Attach SOLENOID PICK UP p344 6 Attach MSI ASSY p329 7 Attach FRAME ASSY PH p352 8 Attach COVER FRONT L and COVER FRONT ASSY U p318 9 Attach COVER MSI p317 10 Attach COV...

Page 336: ...remove CHUTE ASSY PAPER GUIDE 4 Unhook the hooks of CORE on the left and right sides fastening SHAFT ASSY MSI and slide each to the outside 5 Remove ROLL MSI p333 6 Remove HOLDER ASSY RETARD MSI from FRAME ASSY BOTTOM while bending down the boss on both sides of HOLDER ASSY RETARD MSI Figure 4 32 Removal of HOLDER ASSY RETARD MSI 1 C A U T I O N When performing the following work take care not to ...

Page 337: ...ight sides to inside attach CHUTE ASSY PAPER GUIDE and fasten the hooks on the PAPER GUIDEs to the grooves on the SHAFT ASSY MSI 5 Attach CHUTE MSI p334 6 Attach FRAME ASSY PH p352 Figure 4 33 Removal of HOLDER ASSY RETARD MSI 2 C A U T I O N When SPRING RETARD MSI has come off from HOLDER ASSY RETARD MSI attach SPRING RETARD MSI to the boss on HOLDER ASSY RETARD MSI and then perform the following...

Page 338: ...ft and right from the boss on FRAME ASSY BOTTOM and remove PLATE ASSY RETARD 5 Bend down PLATE ASSY RETARD remove the holes on the left and right from the boss on FRAME ASSY BOTTOM and remove PLATE ASSY RETARD Figure 4 34 Removal of PLATE ASSY RETARD C A U T I O N Step numbers with in the figure indicate the step of reinstallation C A U T I O N When performing the following work do not fold or ben...

Page 339: ...crum while bending down PLATE ASSY RETARD insert the bosses on the rear side of FRAME ASSY BOTTOM into the left and right holes of PLATE ASSY RETARD and attach PLATE ASSY RETARD 3 Attach HOLDER ASSY RETARD MSI p338 4 Attach ROLL MSI p333 5 Attach CHUTE MSI p334 6 Attach FRAME ASSY PH p352 Figure 4 35 Reinstallation of PLATE ASSY RETARD C A U T I O N When performing the following work do not fold o...

Page 340: ...e FRAME ASSY PH p352 6 Remove MSI ASSY p329 7 Unhook the hook on GEAR PICK UP fastened to SHAFT ASSY MSI from MSI ASSY and remove GEAR PICK UP 8 Remove the 2 screws silver with flange tapping 8 mm fastening DAMPER BRACKET to the MSI ASSY 9 Remove OIL DAMPER together with DAMPER BRACKET from MSI ASSY 10 Remove OIL DAMPER from DAMPER BRACKET Figure 4 36 Removal of OIL DAMPER Leg_Sec03_200FA 9 8 8 7 ...

Page 341: ...KET 3 Fasten DAMPER BRACKET to MSI ASSY with the 2 screws silver with flange tapping 8 mm 4 Attach GEAR PICK UP to SHAFT ASSY MSI and fasten the hook on GEAR PICK UP to the groove on SHAFT ASSY MSI 5 Attach MSI ASSY p329 6 Attach FRAME ASSY PH p352 7 Attach COVER FRONT L and COVER FRONT ASSY U p318 8 Attach COVER MSI p317 9 Attach COVER ASSY LH p321 10 Attach COVER ASSY RH p326 C A U T I O N When ...

Page 342: ...R PICK UP fastened to SHAFT ASSY MSI from MSI ASSY and remove GEAR PICK UP 8 Disconnect connector P J605 from SOLENOID PICK UP and remove the harness from the groove on MSI ASSY 9 Remove the screw silver tapping 8mm fastening SOLENOID PICK UP to MSI ASSY 10 Remove SOLENOID PICK UP from MSI ASSY Figure 4 37 SRemoval of SOLENOID PICK UP C A U T I O N When performing the following work leave the inte...

Page 343: ...ng 8mm 3 Connect connector P J605 to SOLENOID PICK UP and route the harness in the notch and groove on MSI ASSY 4 Attach GEAR PICK UP to SHAFT ASSY MSI while pulling the lever on SOLENOID PICK UP and fasten the hook on GEAR PICK UP to the groove on SHAFT ASSY MSI 5 Attach MSI ASSY p329 6 Attach FRAME ASSY PH p352 7 Attach COVER FRONT L and COVER FRONT ASSY U p318 8 Attach COVER MSI p317 9 Attach C...

Page 344: ...tool and turn ACTUATOR EMPTY to remove SENSOR PAPER EMPTY 8 Disconnect connector P J103 from SENSOR PAPER EMPTY REINSTALLATION 1 Connect connector P J103 to SENSOR PAPER EMPTY 2 Turn ACTUATOR EMPTY to align the three hooks on SENSOR PAPER EMPTY to the attachment position and attach SENSOR PAPER EMPTY to FRAME ASSY BOTTOM 3 Attach MSI ASSY p329 4 Attach FRAME ASSY PH p352 5 Attach COVER FRONT L and...

Page 345: ... remove the bosses on the left and right of PLATE BOTTOM 2 from the notches of MSI ASSY and remove PLATE BOTTOM 2 11 Remove the groove on the left side shaft on ACTUATOR EMPTY from the hook on MSI ASSY and draw out the right side shaft on ACTUATOR EMPTY from the hole on MSI ASSY 12 Slide ACTUATOR EMPTY to the left slide the shaft of ACTUATOR EMPTY along the notch of MSI ASSY and remove ACTUATOR EM...

Page 346: ...I ASSY with PLATE BOTTOM 2 raised 90 and attach PLATE BOTTOM 2 4 Insert the holes of PLATE BOTTOM 2 into the boss on PLATE BOTTOM ASSY MSI while extending the left and right attachment sections of PLATE BOTTOM 2 5 Attach SENSOR PAPER EMPTY p346 6 Attach GUIDE SIDE L and GUIDE ASSY SIDE R p335 7 Attach MSI ASSY p329 8 Attach FRAME ASSY PH p352 9 Attach COVER FRONT L and COVER FRONT ASSY U p318 10 A...

Page 347: ...nhook the hooks on both the left and right sides fastening COVER PH to CHUTE ASSY REAR and remove COVER PH REINSTALLATION 1 Match the two hooks under COVER PH with CHUTE ASSY REAR attach COVER PH and fasten with the hooks on both the left and right sides 2 Close COVER PH Figure 4 41 Removal of COVER PH Leg_Sec03_142EA 2 1 2 1 1 2 2 ...

Page 348: ...he CHUTE ASSY REAR into the hole on the left side of the FRAME PH insert the right boss on the CHUTE ASSY REAR into the hole on the right side of the FRAME PH by sliding the right boss from the obliquely upward 2 Close CHUTE ASSY REAR 3 Attach COVER PH p349 Figure 4 42 Removal of CHUTE ASSY REAR C A U T I O N Step numbers with in the figure indicate the step of reinstallation C A U T I O N Be care...

Page 349: ...TALLATION 1 Match the hole on CHUTE REAR LOW with the boss on CHUTE REAR UP and insert the protrusion on CHUTE REAR UP into the concave portion on CHUTE REAR LOW to attach 2 Fasten CHUTE REAR LOW to CHUTE REAR UP with the 2 screws silver with flange tapping 8 mm 3 Attach CHUTE ASSY REAR p350 Figure 4 43 Removal of CHUTE REAR UP and CHUTE REAR LOW C A U T I O N Step numbers with in the figure indic...

Page 350: ... little away from the main unit together with the CHUTE ASSY REAR 6 Disconnect P J603 and P J604 connectors and remove the FRAME ASSY PH together with the CHUTE ASSY REAR 7 Attach CHUTE ASSY REAR p350 Figure 4 44 Removal of FRAME ASSY PH C A U T I O N Step numbers with in the figure indicate the step of reinstallation C A U T I O N Be careful not to pull the FRAME ASSY PH too much when removing it...

Page 351: ...6 Close CHUTE ASSY REAR 7 Attach COVER PH p349 Figure 4 45 Reinstallation of FRAME ASSY PH Figure 4 46 Check point after installing FRAME ASSY PH C A U T I O N When performing the following procedure be careful not to let the harness caught between the main unit and the FRAME ASSY PH C A U T I O N Make sure to confirm that the film part of the HOLDER ASSY RETARD MSI is located lateral to the FRAME...

Page 352: ... surface on the shaft of ROLL REGI METAL and attach CLUTCH ASSY REGI so that the protrusion of FRAME ASSY PH enters the concave portion on CLUTCH ASSY REGI 2 Fasten CLUTCH ASSY REGI to FRAME ASSY PH with the E ring 3 Route the harness of CLUTCH ASSY REGI in the groove on FRAME ASSY PH and connect the connector P J203 to CLUTCH ASSY REGI 4 Attach DRIVE ASSY PH p365 5 Attach MOTOR PH p362 6 Attach F...

Page 353: ...ight side bearing on FRAME ASSY PH and remove ROLL REGI METAL REINSTALLATION 1 Insert the shaft left side on ROLL REGI METAL into the left side bearing on FRAME ASSY PH and slide ROLL REGI METAL to the right to attach 2 Close CHUTE ASSY REAR 3 Match the double D cut surface of BEARING METAL with the left and right bearings of FRAME ASSY PH attach BEARING METAL and fasten ROLL REGI METAL 4 Attach G...

Page 354: ...e right side BEARING RUBBER and SPRING REGI R METAL fastening ROLL REGI RUBBER from FRAME ASSY PH 7 Remove the E ring fastening ROLL REGI RUBBER from FRAME ASSY PH and BEARING RUBBER and SPRING REGI L BLACK on the left side 8 Temporarily slide ROLL REGI RUBBER to the left draw out the shaft on ROLL REGI RUBBER from the right side bearing on FRAME ASSY PH and remove ROLL REGI RUBBER Figure 4 49 Rem...

Page 355: ...e left side bearing of FRAME ASSY PH fastening ROLL REGI RUBBER 5 Attach GEAR REGI to the right side of the shaft on ROLL REGI RUBBER and fasten with the two E rings on the left and right of the shaft 6 Attach CLUTCH ASSY REGI p354 7 Attach DRIVE ASSY PH p365 8 Attach MOTOR PH p362 9 Attach FRAME ASSY PH p352 C A U T I O N Attach ROLL REGI RUBBER to FRAME ASSY PH so that the D cut surface of the s...

Page 356: ...d remove ROLL ASSY PRE REGI REINSTALLATION 1 Insert the shaft left side on ROLL ASSY PRE REGI into the left side bearing on FRAME ASSY PH and slide ROLL ASSY PRE REGI to the right to attach 2 Close CHUTE ASSY REAR 3 Match the double D cut surface of BEARING METAL with the left and right bearings of FRAME ASSY PH attach BEARING METAL and fasten ROLL ASSY PRE REGI 4 Fasten the shaft right side of RO...

Page 357: ...1 Match the boss on SENSOR OHP with the hole on BRACKET SENSOR OHP and attach SENSOR OHP to BRACKET SENSOR OHP 2 Fasten SENSOR OHP to BRACKET SENSOR OHP with the screw silver tapping 8 mm 3 Connect connector P J101 to SENSOR OHP 4 Match the hole on BRACKET SENSOR OHP with the boss on FRAME ASSY PH and attach BRACKET SENSOR OHP together with SENSOR OHP 5 Fasten BRACKET SENSOR OHP to FRAME ASSY PH w...

Page 358: ...CTUATOR REGI REINSTALLATION 1 Attach SPRING ACTUATOR to ACTUATOR REGI 2 Insert the right side shaft on ACTUATOR REGI into the hole on FRAME ASSY PH and hook SPRING ACTUATOR onto the notch on FRAME ASSY PH 3 Fasten the left side shaft on ACTUATOR REGI by the hook on FRAME ASSY PH 4 Attach FRAME ASSY PH p352 Figure 4 52 Removal of ACTUATOR REGI C A U T I O N Step numbers with in the figure indicate ...

Page 359: ... down ACTUATOR REGI with your fingers press and remove SENSOR REGI 5 Disconnect connector P J102 from SENSOR REGI REINSTALLATION 1 Connect connector P J102 to SENSOR REGI 2 Press down ACTUATOR REGI with your fingers match the hooks on SENSOR REGI with the attachment position and attach to FRAME ASSY PH 3 Attach DRIVE ASSY PH p365 4 Attach MOTOR PH p362 5 Attach FRAME ASSY PH p352 Figure 4 53 Remov...

Page 360: ...PH REINSTALLATION 1 Attach MOTOR PH to FRAME ASSY PH with the harness of MOTOR PH facing the front 2 Fasten MOTOR PH to FRAME ASSY PH with the 2 screws silver with flange 6 mm 3 Route the harness of MOTOR PH in the groove on FRAME ASSY PH and fasten with the clamp on DRIVE ASSY PH 4 Match the boss and protrusion of COVER HARNESS with the hole on FRAME ASSY PH attach and fasten with the 2 hooks 5 A...

Page 361: ...EGI into the hole on FRAME ASSY PH 2 Match the hole position of CLUTCH ASSY PRE REGI with the D cut surface on the shaft of ROLL ASSY PRE REGI and attach CLUTCH ASSY PRE REGI so that the protrusion on FRAME ASSY PH enters the concave portion on CLUTCH ASSY PRE REGI 3 Fasten CLUTCH ASSY PRE REGI to FRAME ASSY PH with an E ring 4 Route the harness of CLUTCH ASSY PRE REGI in the groove on FRAME ASSY ...

Page 362: ...SY REAR 4 Unhook the two hooks fastening SWITCH PH DOOR to FRAME ASSY PH and remove SWITCH PH DOOR REINSTALLATION 1 Open CHUTE ASSY REAR 2 Match the hooks on SWITCH PH DOOR with the attachment position and attach to FRAME ASSY PH 3 Connect connector P J100 to SWITCH PH DOOR 4 Attach FRAME ASSY PH p352 Figure 4 56 Removal of SWITCH PH DOOR Leg_Sec03_068FC 2 4 2 4 1 3 manuals4you com manuals4you com...

Page 363: ...ASSY PH REINSTALLATION 1 Match the hole on DRIVE ASSY PH with the boss on FRAME ASSY PH and attach DRIVE ASSY PH 2 Fasten DRIVE ASSY PH to FRAME ASSY PH with the 2 screws silver with flange tapping 8 mm 3 Fasten the harness with the clamp on DRIVE ASSY PH 4 Attach MOTOR PH p362 5 Attach FRAME ASSY PH p352 Figure 4 57 Removal of DRIVE ASSY PH C A U T I O N When performing the following work make su...

Page 364: ...nd remove CHUTE ASSY FSR from the main unit 3 Disconnect the connector P J620 from CHUTE ASSY FSR connected to the main unit Figure 4 58 Removal of CHUTE ASSY FSR C A U T I O N When performing the following work take care not to remove CHUTE ASSY FSR too far as it is connected by a harness C A U T I O N When performing the following work leave the intermediate connector on the harness side Leg_Sec...

Page 365: ...rews silver with flange 8 mm fastening COVER ASSY RR 2ND to the main unit 8 Remove COVER ASSY RR 2ND from the main unit Figure 4 59 Removal of COVER ASSY RR 2ND C H E C K P O I N T When HARNESS ASSY 2BTR SW need not be removed in the following procedure COVER ASSY RR 2ND can be removed without removing COVER ASSY LH by disconnecting connector P J113 from SWITCH 2BTR COVER instead of connector P J6...

Page 366: ...fasten the harness by the clamp CHUTE ASSY FSR 6 Attach the connector P J620 on CHUTE ASSY FSR connected to the main unit and insert the connector into the main unit from the left side notch on COVER ASSY RR 2ND 7 Fit the U groove on the both the left and right side hinges of CHUTE ASSY FSR into the shaft on CAM ASSY 2ND and attach CHUTE ASSY FSR to the main unit 8 Close CHUTE ASSY FSR 9 Attach CO...

Page 367: ... silver with washer tapping 8 mm fastening CHUTE FSR and PLATE DIS 2ND to CHUTE ASSY FSR 5 Remove PLATE DIS 2ND from CHUTE ASSY FSR 6 Remove CHUTE FSR from CHUTE ASSY FSR 7 Disconnect connector P J111 from SENSOR FUSER IN 8 Remove the screw silver tapping 6 mm fastening SENSOR FUSER IN to CHUTE ASSY FSR 9 Remove SENSOR FUSER IN from CHUTE ASSY FSR Figure 4 60 Removal of SENSOR FUSER IN 2 Figure 4 ...

Page 368: ...ith the screw silver with washer tapping 8 mm 7 Match DIODE FUSER with the concave portion on CHUTE ASSY FSR and attach 8 Fasten the right side terminal of DIODE FUSER to CHUTE ASSY FSR with the screw silver with washer tapping 8 mm 9 Fasten both the left side terminal of DIODE FUSER and the left side of PLATE DIS 2ND to CHUTE ASSY FSR with the screw silver with washer tapping 8 mm 10 Attach CHUTE...

Page 369: ...COVER ASSY RR 2ND p366 3 Remove 2ND BTR ASSY p374 4 Remove PLATE BIAS 2ND ASSY p384 5 Remove CAM ASSY 2ND p376 6 Remove SPRING 2ND fastening both the left and right sides of FRAME ASSY 2ND to the main unit Figure 4 62 Removal of FRAME ASSY 2ND 1 C A U T I O N Step numbers with in the figure indicate the step of reinstallation Leg_Sec03_146RB CAUTION CAUTION 6 6 ...

Page 370: ... FRAME ASSY 2ND to the right and draw out the shaft on FRAME ASSY 2ND from the left side bearing on the main unit and remove FRAME ASSY 2ND together with BEARING BRUSH CAM 9 Remove BEARING BRUSH CAM from FRAME ASSY 2ND Figure 4 63 Removal of FRAME ASSY 2ND 2 C A U T I O N When performing the following work take care not to drop or lose BEARING BRUSH CAM Leg_Sec03_147RB 7 2 7 1 9 8 3 1 9 manuals4yo...

Page 371: ...ING BRUSH CAM on FRAME ASSY 2ND into the right side bearing on the main unit and fasten with an E ring 5 Fasten both the left and right sides of FRAME ASSY 2ND to the main unit with SPRING 2ND 6 Attach CAM ASSY 2ND p376 7 Attach PLATE BIAS 2ND ASSY p384 8 Attach 2ND BTR ASSY p374 9 Attach CHUTE ASSY FSR and COVER ASSY RR 2ND p366 10 Attach COVER ASSY RH p326 A D J U S T M E N T R E Q U I R E D Be ...

Page 372: ...Y draw out the right side of 2ND BTR ASSY from FRAME ASSY 2ND and then draw out the left side to remove 2ND BTR ASSY from the main unit Figure 4 64 Removal of 2ND BTR ASSY C A U T I O N Do not touch the roller surface with bare hands C A U T I O N When performing the following work press LATCH ROTARY on LATCH ASSY ROTARY to release the latch turn FRAME ASSY ROTARY by hand and move HOUSING ASSY DEV...

Page 373: ... C A U T I O N When performing the following work press LATCH ROTARY on LATCH ASSY ROTARY to release the latch turn FRAME ASSY ROTARY by hand and move HOUSING ASSY DEVE to prevent it from contacting MAG ROLL When performing the following work the right side shaft on 2ND BTR ASSY must be inserted into the bottom side of the terminal on PLATE BIAS 2ND ASSY C A U T I O N After attaching 2ND BTR ASSY ...

Page 374: ...ND together with BEARING 8 Remove BEARING from CAM ASSY 2ND Figure 4 65 Removal of CAM ASSY 2ND C A U T I O N When performing the following work there is no need to remove WIRE ASSY 2BTR from PLATE BIAS 2ND ASSY C A U T I O N When performing the following work there is no need to remove SENSOR 2BTR RETRACT from BRACKET SENSOR PHOTO C A U T I O N When performing the following work take care not to ...

Page 375: ...n CAM ASSY 2ND into the right side bearing on the main unit and fasten with an E ring 5 Remove SENSOR 2BTR RETRACT p382 6 Attach PLATE BIAS 2ND ASSY p384 7 Attach 2ND BTR ASSY p374 8 Attach CHUTE ASSY FSR and COVER ASSY RR 2ND p366 9 Attach COVER ASSY RH p326 C H E C K P O I N T When performing the following work work can be performed more easily by pressing FRAME ASSY 2ND in the direction of the ...

Page 376: ...hooks fastening SWITCH 2BTR COVER to BRACKET SWITCH 2ND and remove SWITCH 2BTR COVER REINSTALLATION 1 Match the hooks on SWITCH 2BTR COVER with the attachment position and attach to BRACKET SWITCH 2ND 2 Match the hole on BRACKET SWITCH 2ND with the boss on COVER RR 2ND and attach together with SWITCH 2BTR COVER 3 Fasten BRACKET SWITCH 2ND to COVER RR 2ND with the screw silver tapping 6 mm 4 Connec...

Page 377: ...1 from SENSOR ASSY ADC REINSTALLATION 1 Connect connector P J431 to SENSOR ASSY ADC 2 Match the boss on SENSOR ASSY ADC with the hole on the main unit and attach SENSOR ASSY ADC 3 Fasten SENSOR ASSY ADC to the main unit with the 2 screws silver with washer tapping 8 mm 4 Attach CHUTE ASSY FSR and COVER ASSY RR 2ND p366 Figure 4 67 Removal of SENSOR ASSY ADC C A U T I O N When performing the follow...

Page 378: ...nit p371 9 Remove FUSER ASSY p415 10 Disconnect connector P J431 from SENSOR ASSY ADC 11 Remove the two screws silver with flange 8 mm that secure the HOLDER ADC 2ND to the main unit 12 Remove the HOLDER ADC 2ND from the main unit together with the SENSOR ASSY ADC 13 Remove the two screws silver with washer tapping 8 mm that secure the SENSOR ASSY ADC to the HOLDER ADC 2ND 14 Remove the SENSOR ASS...

Page 379: ...DC 2ND to the main unit together with the SENSOR ASSY ADC matching the protrusion of the HOLDER ADC 2ND with the hole on the main unit 4 Secure the HOLDER ADC 2ND to the main unit with the two screws silver with flange 8 mm 5 Connect P J431 to the SENSOR ASSY ADC 6 Attach FUSER ASSY p415 7 Fasten both the left and right sides of FRAME ASSY 2ND to the main unit with SPRING 2ND p371 8 Attach CAM ASS...

Page 380: ...ve SENSOR 2BTR RETRACT REINSTALLATION 1 Match the hooks on SENSOR 2BTR RETRACT with the attachment position and attach to BRACKET SENSOR PHOTO 2 Match the hole on BRACKET SENSOR PHOTO with the boss on the main unit and attach BRACKET SENSOR PHOTO together with SENSOR 2BTR RETRACT 3 Fasten BRACKET SENSOR PHOTO to the main unit with the screw silver with flange 8mm 4 Connect connector P J112 to SENS...

Page 381: ...SOR CLN and remove SENSOR IBT RETRACT REINSTALLATION 1 Match the hooks on SENSOR IBT RETRACT with the attachment position and attach to BRACKET SENSOR CLN 2 Match the hole on BRACKET SENSOR CLN with the boss on the main unit and attach BRACKET SENSOR CLN together with SENSOR IBT RETRACT 3 Fasten BRACKET SENSOR CLN to the main unit with the screw silver with flange 6 mm 4 Connect connector P J107 t...

Page 382: ...mp fastening WIRE ASSY 2BTR and slightly release PLATE BIAS 2ND ASSY from the main unit 6 Remove the screw silver tapping 6 mm fastening the terminal of WIRE ASSY 2BTR to PLATE BIAS 2ND ASSY 7 Remove WIRE ASSY 2BTR from PLATE BIAS 2ND ASSY and remove PLATE BIAS 2ND ASSY Figure 4 71 Removal of PLATE BIAS 2ND ASSY C A U T I O N When performing the following work take care not to remove PLATE BIAS 2N...

Page 383: ... BIAS 2ND ASSY to the main unit with the 2 screws silver with flange tapping 6 mm and fasten WIRE ASSY 2BTR with the clamp 5 Attach 2ND BTR ASSY p374 6 Attach CHUTE ASSY FSR and COVER ASSY RR 2ND p366 7 Attach COVER ASSY RH p326 C A U T I O N When performing the following work route WIRE ASSY 2BTR connected to PLATE BIAS 2ND ASSY so that it does not come into contact with CAM ASSY 2ND C H E C K P ...

Page 384: ...EINSTALLATION 1 Insert the shaft left side of CAM ASSY IBT CL into the left side bearing of the main unit slide CAM ASSY IBT CL to the right and attach CAM ASSY IBT CL 2 Fasten CAM ASSY IBT CL to the main unit by the left and right BEARING BRUSH CAMs 3 Fasten CAM ASSY IBT CL to the main unit by the left and right E rings 4 Attach SENSOR IBT RETRACT p383 5 Attach PWBA MCU p432 6 Attach COVER INNER ...

Page 385: ...TR 0 to PLATE TR 0 4 Remove SENSOR TR 0 from PLATE TR 0 5 Disconnect connector P J108 from SENSOR TR 0 REINSTALLATION 1 Connect connector P J108 to SENSOR TR 0 2 Match the hole on SENSOR TR 0 with the boss on PLATE TR 0 and attach SENSOR TR 0 3 Fasten SENSOR TR 0 to PLATE TR 0 with the screw silver with flange 10mm 4 Attach Photoconductor Unit 5 Close COVER ASSY TOP Figure 4 73 Removal of SENSOR T...

Page 386: ...SY RR 2ND p366 6 Remove FUSER LOCK SWITCH p417 7 Remove SENSOR TR 0 p387 8 Remove the 2 screws silver with flange tapping 6 mm fastening PLATE TR 0 to GUIDE CRU ASSY D and GUIDE CRU ASSY AD 9 Remove PLATE TR 0 from GUIDE CRU ASSY D and GUIDE CRU ASSY AD Figure 4 74 Removal of GUIDE CRU ASSY D 1 C H E C K P O I N T When performing the following work connectors need not be disconnected from PWBA ESS...

Page 387: ...the main unit with the 5 screws silver with flange tapping 6 mm 3 Fasten HARNESS ASSY XERO on the left side of the main unit with the clamp 4 Attach PLATE TR 0 to GUIDE CRU ASSY D and GUIDE CRU ASSY AD 5 Fasten PLATE TR 0 to GUIDE CRU ASSY D and GUIDE CRU ASSY AD with the 2 screws silver with flange tapping 6 mm 6 Attach SENSOR TR 0 p387 7 Attach FUSER LOCK SWITCH p417 8 Attach CHUTE ASSY FSR and ...

Page 388: ...Remove SPRING TORSION D from LATCH ASSY D REINSTALLATION 1 Attach SPRING TORSION D to LATCH ASSY D 2 Attach LATCH ASSY D to GUIDE CRU ASSY D together with SPRING TORSION D and insert the bottom front side of LATCH ASSY D into the notch on GUIDE CRU ASSY D 3 Hook SPRING TORSION D onto the hook on GUIDE CRU ASSY D 4 Attach ANTENNA ASSY p391 5 Attach GUIDE CRU ASSY D p388 6 Attach SENSOR TR 0 p387 7 ...

Page 389: ...BA MCU p432 4 Remove CHASSIS ASSY ESS p440 5 Remove SENSOR TR 0 p387 6 Remove GUIDE CRU ASSY D p388 7 Unhook the hook fastening ARM COUPLING to GUIDE CRU ASSY D and remove ARM COUPLING from the shaft on GUIDE CRU ASSY D together with SPRING TORSION ARM 8 Turn ARM COUPLING 90 and remove ARM COUPLING Figure 4 77 Removal of ANTENNA ASSY 1 Leg_Sec03_079FB CAUTION 8 2 8 1 7 ...

Page 390: ...into the long oblong hole on ARM COUPLING 4 Turn ARM COUPLING 90 attach ARM COUPLING to the shaft on GUIDE CRU ASSY D fasten with a hook and hook SPRING TORSION ARM onto the notch of GUIDE CRU ASSY D 5 Attach GUIDE CRU ASSY D p388 6 Attach SENSOR TR 0 p387 7 Attach CHASSIS ASSY ESS p440 8 Attach PWBA MCU p432 9 Attach COVER ASSY LH p321 10 Attach 2ND BTR ASSY p374 Figure 4 78 Removal of ANTENNA AS...

Page 391: ...ND BTR ASSY p374 3 Remove FRAME ASSY PH p352 4 Remove BCR CLN XERO ASSY p399 5 Remove SENSOR TR 0 p387 6 Remove the 2 screws silver with flange tapping 6 mm fastening PLATE TR 0 to GUIDE CRU ASSY D and GUIDE CRU ASSY AD 7 Remove PLATE TR 0 from GUIDE CRU ASSY D and GUIDE CRU ASSY AD Figure 4 79 Removal of GUIDE CRU ASSY AD 1 Leg_Sec03_081RA 7 6 6 ...

Page 392: ...E CRU ASSY AD 12 Remove the screw silver with flange tapping 6 mm fastening both PLATE ASSY GND and GUIDE CRU ASSY AD to the main unit and remove PLATE ASSY GND Figure 4 80 Removal of GUIDE CRU ASSY AD 2 13 Remove the 7 screws silver with flange tapping 6 mm fastening GUIDE CRU ASSY AD to the main unit 14 Draw out the protrusion on GUIDE CRU ASSY AD from the hole on the main unit and remove GUIDE ...

Page 393: ...silver with flange tapping 6 mm 7 Attach WIRE ASSY BTR WIRE ASSY IBT and WIRE ASSY BCR to GUIDE CRU ASSY AD 8 Attach PLATE TR 0 to GUIDE CRU ASSY D and GUIDE CRU ASSY AD 9 Fasten PLATE TR 0 to GUIDE CRU ASSY D and GUIDE CRU ASSY AD with the 2 screws silver with flange tapping 6 mm 10 Attach SENSOR TR 0 p387 11 Attach BCR CLN XERO ASSY p399 12 Attach FRAME ASSY PH p352 13 Attach 2ND BTR ASSY p374 1...

Page 394: ... of the arrow match the notch on LEVER LATCH PR with the protrusion on the boss of GUIDE CRU ASSY AD and remove LEVER LATCH PR REINSTALLATION 1 Match the notch on LEVER LATCH PR with the protrusion on the boss of GUIDE CRU ASSY AD and attach LEVER LATCH PR 2 Attach GUIDE CRU ASSY AD p393 3 Attach SENSOR TR 0 p387 4 Attach BCR CLN XERO ASSY p399 5 Attach FRAME ASSY PH p352 6 Attach 2ND BTR ASSY p37...

Page 395: ...gether with CAP PLATE PR 9 Unhook the hook on CAP PLATE PR and remove CAP PLATE PR from PLATE ASSY PR REINSTALLATION 1 Attach CAP PLATE PR to PLATE ASSY PR 2 Match the notch on PLATE ASSY PR with the protrusion on GUIDE CRU ASSY AD and attach PLATE ASSY PR together with CAP PLATE PR 3 Attach LEVER LATCH PR p396 4 Attach GUIDE CRU ASSY AD p393 5 Attach SENSOR TR 0 p387 6 Attach BCR CLN XERO ASSY p3...

Page 396: ...m LATCH ASSY AD REINSTALLATION 1 Attach SPRING TORSION AD to LATCH ASSY AD 2 Attach LATCH ASSY AD together with SPRING TORSION AD to GUIDE CRU ASSY AD 3 Hook SPRING TORSION AD onto the hook on GUIDE CRU ASSY AD 4 Attach GUIDE CRU ASSY AD p393 5 Attach SENSOR TR 0 p387 6 Attach BCR CLN XERO ASSY p399 7 Attach FRAME ASSY PH p352 8 Attach 2ND BTR ASSY p374 9 Attach COVER ASSY RH p326 Figure 4 84 Remo...

Page 397: ...Fasten BCR CLN XERO ASSY to the main unit with the 2 screws silver with flange 6 mm 3 Take out the harness of BCR CLN XERO ASSY to the outside from the hole on the right side of the main unit and connect connector P L617 for BCR CLN XERO ASSY to the harness 4 Fasten the harness on BCR CLN XERO ASSY with the clamp on the right side of the main unit 5 Attach FRAME ASSY PH p352 6 Attach COVER ASSY RH...

Page 398: ...FULL 3 Unhook the two hooks fastening SENSOR TNER FULL to the main unit and remove SENSOR TNER FULL REINSTALLATION 1 Match the hook on SENSOR TNER FULL with the attachment position and attach to the main unit 2 Connect connector P J126 to SENSOR TNER FULL 3 Attach FRAME ASSY PH p352 Figure 4 86 Removal of SENSOR TNER FULL Leg_Sec03_183EB 2 3 1 3 2 3 1 manuals4you com manuals4you com ...

Page 399: ...s of the ROS ASSY 9 Remove the five screws silver with flange 10 mm that secure the ROS ASSY to the main unit 10 Lift the ROS ASSY a little to remove the boss of the assy from the hole of the main unit and remove the ROS ASSY toward rear of the main unit Figure 4 87 Removal of ROS ASSY C A U T I O N When performing the subsequent procedures be sure to perform the followings to avoid touching the M...

Page 400: ... connector P J602 to ROS ASSY 4 Attach CLEANER ASSY p403 5 Attach FRAME ASSY PH p352 6 Attach COVER INNER L p327 7 Attach COVER FRONT L and COVER FRONT ASSY U p318 8 Attach COVER MSI p317 9 Attach COVER ASSY LH p321 10 Attach COVER ASSY RH p326 C A U T I O N When performing the following work press LATCH ROTARY on LATCH ASSY ROTARY to release the latch turn FRAME ASSY ROTARY by hand and move HOUSI...

Page 401: ... unit 3 Remove GUIDE ROS CLN from the main unit 4 Remove CLEANER ASSY from the main unit REINSTALLATION 1 Align CLEANER ASSY with the rails on the main unit and insert 2 Match the boss on GUIDE ROS CLN with the hole on the main unit and attach 3 Fasten GUIDE ROS CLN to the main unit with the 2 screws silver with flange 10mm 4 Attach COVER ASSY RH p326 Figure 4 88 Removal of CLEANER ASSY Leg_Sec03_...

Page 402: ...h the hook on LATCH ASSY ROTARY with the attachment position and attach to the main unit 2 Fasten LATCH ASSY ROTARY to the main unit with the 3 screws silver with flange tapping 8 mm 3 Attach LV HVPS p435 4 Attach COVER ASSY LH p321 Figure 4 89 Removal of LATCH ASSY ROTARY C A U T I O N Pay attention to the levers and springs inside LATCH ASSY ROTARY as they easily come loose When a part on LATCH ...

Page 403: ...the attachment position of ANTENNA ASSY CTRG 2 Match the boss on ANTENNA ASSY CTRG with the attachment position and attach to the main unit 3 Press ANTENNA ASSY CTRG from the inside of the main unit hole on FRAME ASSY ROTARY and firmly insert the boss on ANTENNA ASSY CTRG into the hole on the main unit 4 Fasten ANTENNA ASSY CTRG to the main unit with the 2 screws silver with flange tapping 8 mm 5 ...

Page 404: ...installing the ET Cartridge be careful not to sandwich the LEVER LATCH between the cartridge and the main unit as shown in the left figure below Install the ET cartridges correctly as shown in the right figure below C A U T I O N Be sure to clean the ROS ASSY window with the CLEANER ASSY after installing the ET Cartridges manuals4you com manuals4you com ...

Page 405: ...om ANTENNA CTRG 3 Unhook the hook fastening ANTENNA CTRG to ANTENNA ASSY CTRG and remove ANTENNA ASSY CTRG REINSTALLATION 1 Match the boss on ANTENNA ASSY CTRG with the hole on ANTENNA CTRG attach ANTENNA CTRG and fasten with a hook 2 Connect connector P J106 to ANTENNA CTRG 3 Attach COVER ASSY RH p326 Figure 4 92 Removal of ANTENNA CTRG Leg_Sec03_091EC 2 3 2 3 1 ...

Page 406: ...down match the protrusion on HOLDER ASSY BIAS with the notch on the main unit and remove HOLDER ASSY BIAS REINSTALLATION 1 Match the protrusion on HOLDER ASSY BIAS with the notch of the attachment hole on the main unit and attach and slide HOLDER ASSY BIAS upwards and fasten with a hook 2 Attach WIRE ASSY DEVE to HOLDER ASSY BIAS 3 Attach COVER ASSY RH p326 Figure 4 93 Removal of HOLDER ASSY BIAS ...

Page 407: ...ree hooks fastening SENSOR ROTARY HOME POSI to BRACKET SENSOR and remove SENSOR ROTARY HOME POSI REINSTALLATION 1 Match the hooks on SENSOR ROTARY HOME POSI with the attachment position and attach to BRACKET SENSOR 2 Connect connector P J105 to SENSOR ROTARY HOME POSI 3 Match the hole on BRACKET SENSOR with the boss on the main unit and attach BRACKET SENSOR together with SENSOR ROTARY HOME POSI 4...

Page 408: ...tion where is easy to work Figure 4 95 Removal of HOUSING ASSY DEVE 1 C A U T I O N When removing the Toner Cartridge put several sheets of copy paper on COVER FRONT ASSY U and other parts to prevent them from getting dirty Before removing HOUSING ASSY DEVE be sure to wipe off any residual toner on it When wiping off the residual toner on HOUSING ASSY DEVE take care to prevent any toner from stati...

Page 409: ...lver with flange tapping 8mm fastening PIVOT ASSY fastening the left side of HOUSING ASSY DEVE to FRAME ASSY ROTARY and remove PIVOT ASSY 12 Lift up the right side of HOUSING ASSY DEVE remove the gear on the left side of HOUSING ASSY DEVE from the gear on FRAME ASSY ROTARY and remove HOUSING ASSY DEVE Figure 4 96 Removal of HOUSING ASSY DEVE 2 CAUTION Leg_Sec03_095RB CHECK POINT Thin Thick 10 2 10...

Page 410: ...gure 4 97 LEVER LATCH Position C A U T I O N Holes are provided in the protrusion portion on FRAME ASSY ROTARY for preventing mis insertion of HOUSING ASSY DEVE The attachment positions of each color of HOUSING ASSY DEVE is indicated as K Y M and C on FRAME ASSY ROTARY C A U T I O N The spring under both sides of the bottom of HOUSING ASSY DEVE must be placed firmly on the spring receptacle of FRA...

Page 411: ... 10 Remove LV HVPS p435 11 Remove CHASSIS ASSY ESS p440 12 Remove DRIVE ASSY PRO p421 13 Remove MOT ASSY MAG p423 14 Remove LATCH ASSY ROTARY p404 15 Remove SENSOR ROTARY HOME POSI p409 16 Remove FRAME ASSY PH p352 17 Remove BCR CLN XERO ASSY p399 18 Remove SENSOR TR 0 p387 19 Remove GUIDE CRU ASSY D p388 20 Remove GUIDE CRU ASSY AD p393 21 Remove HOUSING ASSY DEVE p410 22 Remove the three screws ...

Page 412: ...it with the two screws silver with flange 6 mm 5 Secure the SHAFT ASSY ROTARY attached to the right side of the main unit with the two screws silver with flange 6 mm 6 Attach the BRACKET ASSY 2ND GEAR and the GEAR 2ND to the main unit 7 Secure the BRACKET ASSY 2ND GEAR to the main unit with the three screws silver with flange 6 mm 8 Attach HOUSING ASSY DEVE p410 9 Attach GUIDE CRU ASSY AD p393 10 ...

Page 413: ...direction of the arrow 3 Move the levers on both sides of the FUSER ASSY upward to unlock and remove the FUSER ASSY Actuator 4 Pull out the shaft of the Actuator with the Chute of the FUSER ASSY opened and remove the Actuator together with the Spring 5 Remove the Spring from the Actuator Figure 4 99 Removal of FUSER ASSY C A U T I O N Be extremely careful not to burn your hand when handling the FU...

Page 414: ... of the FUSER ASSY with the connector and the hole of the main unit and push the levers on the both sides of the FUSER ASSY to secure it to the main unit 4 Return the COVER FUSER GUIDE to its original position and secure the COVER TOP SIDE L with the hook of the COVER FUSER GUIDE 5 Close COVER FUSER Figure 4 100 NIP Release Lever Fixing Parts C A U T I O N Be sure to reset the life counter of the ...

Page 415: ...R LOCK SWITCH to the inside the main unit from the hole on the main unit 6 Remove the screw silver with flange tapping 6 mm fastening FUSER LOCK SWITCH to the main unit 7 Slide FUSER LOCK SWITCH to the right unhook the hook on FUSER LOCK SWITCH from the hole on the main unit and remove FUSER LOCK SWITCH Figure 4 101 Removal of FUSER LOCK SWITCH C A U T I O N When performing the following work leav...

Page 416: ...SER LOCK SWITCH with the screw silver with flange tapping 6 mm 3 Bring out the connector on FUSER LOCK SWITCH to the outside from the hole on the main unit 4 Attach the connector P J128 blue to FUSER LOCK SWITCH and fasten the harness on FUSER LOCK SWITCH with the two clamps 5 Attach CHUTE ASSY FSR and COVER ASSY RR 2ND p366 6 Attach COVER ASSY LH p321 7 Attach FUSER ASSY p415 C A U T I O N When p...

Page 417: ... ASSY MCU C L from BRACKET RIZ while pressing the claw on HARNESS ASSY MCU C L REINSTALLATION 1 Insert the claw on HARNESS ASSY MCU C L into the hole on BRACKET RIZ to attach 2 Fasten BRACKET RIZ to the main unit with the 2 screws silver with flange 6 mm and fasten each harness with the clamps 3 Attach the harness yellow to the connector P417 on PWBA MCU 4 Connect the harness black and white to PW...

Page 418: ...astening DRIVE ASSY BTR to the main unit 9 Remove DRIVE ASSY BTR from the main unit REINSTALLATION 1 Match the shaft on DRIVE ASSY BTR with the hole on the main unit and attach DRIVE ASSY BTR 2 Fasten DRIVE ASSY BTR to the main unit with the 2 screws silver with flange 6mm 3 Attach CHUTE ASSY FSR and COVER ASSY RR 2ND p366 4 Attach GUIDE CRU ASSY D p388 5 Attach SENSOR TR 0 p387 6 Attach CHASSIS A...

Page 419: ...IVE ASSY PRO to the main unit 7 Remove DRIVE ASSY PRO from the main unit REINSTALLATION 1 Inset the motor section and harness on DRIVE ASSY PRO into the hole on the main unit match the hole on DRIVE ASSY PRO with the boss on the main unit and attach DRIVE ASSY PRO 2 Fasten DRIVE ASSY PRO to the main unit with the 4 screws silver with flange 6 mm 3 Fasten the harness on DRIVE ASSY PRO with the clam...

Page 420: ...e MOT ASSY FSR from the main unit REINSTALLATION 1 Attach MOT ASSY FSR to the main unit 2 Fasten MOT ASSY FSR to the main unit with the 2 screws silver with flange 4mm 3 Connect the P J404 to the PWBA MCU 4 Fasten the harness of MOT ASSY FSR with the clamp 5 Attach COVER ASSY LH p321 Figure 4 105 Removal of MOT ASSY FSR Table 4 8 Symptoms when the connector is loose Connector No Panel Indication S...

Page 421: ... hole on the main unit and attach 2 Fasten MOT ASSY MAG to the main unit with the 3 screws silver with flange 10 mm 3 Connect connector P J405 and connector P J406 to PWBA MCU 4 Attach CHASSIS ASSY ESS p440 5 Attach COVER ASSY LH p321 Figure 4 106 Removal of MOT ASSY MAG C H E C K P O I N T When performing the following work the connector of PWBA ESS does not need to be removed Table 4 9 Symptoms ...

Page 422: ...PS p435 6 Unclamp the clamp fastening WIRE ASSY DEVE and remove WIRE ASSY DEVE 7 Disconnect connector P J433 from PWB ASSY ROT 8 Remove the 4 screws silver with flange 6 mm fastening MOT ASSY ROT to the main unit 9 Remove MOT ASSY ROT from the main unit Figure 4 107 Removal of MOT ASSY ROT Leg_Sec03_101EB CAUTION Leg_Sec03_101EB CAUTION FFC ASSY ESS WIREASSY BTR WIRE ASSY DEVE FFC ASSY ESS 6 9 8 8...

Page 423: ...SY DEVE with the clamp 5 Attach LV HVPS p435 6 Attach COVER FRONT L and COVER FRONT ASSY U p318 7 Attach COVER MSI p317 8 Attach COVER ASSY LH p321 9 Attach COVER ASSY RH p326 C A U T I O N When doing the following work take care so that WIRE ASSY DEVE WIRE ASSY BTR and FFC ASSY ESS are not sandwiched between the main unit and MOT ASSY ROT Table 4 10 Symptoms when the connector is loose Connector ...

Page 424: ...TION 1 Attach MOT ASSY P R to the main unit while lightly pressing LINK COUPLING 2 Fasten MOT ASSY P R to the main unit with the 4 screws silver with flange 10 mm 3 Attach connector P J200 and connector P J201 to MOT ASSY P R 4 Attach COVER ASSY LH p321 Figure 4 108 Removal of MOT ASSY P R C A U T I O N Step numbers with in the figure indicate the step of reinstallation C A U T I O N Lightly open ...

Page 425: ...Remove MOT ASSY MICRO from the main unit REINSTALLATION 1 Attach MOT ASSY MICRO to the main unit with the harness on MOT ASSY MICRO facing the rear side 2 Fasten MOT ASSY MICRO to the main unit with the 2 screws silver with flange 4mm 3 Connect connector P J600 to MOT ASSY MICRO 4 Fasten the harness on MOT ASSY MICRO with the clamp 5 Attach COVER ASSY LH p321 Figure 4 109 Removal of MOT ASSY MICRO...

Page 426: ... from the main unit REINSTALLATION 1 Attach SENSOR HUM TEMP to the main unit 2 Fasten SENSOR HUM TEMP to the main unit with the screw silver with flange tapping 8 mm 3 Connect the connector P J104 to SENSOR HUM TEMP 4 Attach COVER ASSY RH p326 Figure 4 110 Removal of SENSOR HUM TEMP Table 4 11 Symptoms when the connector is loose Connector No Panel Indication Symptom Error Caused by Connector Disc...

Page 427: ...nector P J516 to PWBA HVPS and attach WIRE ASSY 2BTR WIRE ASSY IBT and WIRE ASSY DTN white 4 Attach COVER INNER L p327 5 Attach COVER FRONT L and COVER FRONT ASSY U p318 6 Attach COVER MSI p317 7 Attach COVER ASSY LH p321 8 Attach COVER ASSY RH p326 Figure 4 111 Removal of PWBA HVPS C A U T I O N Avoid staticky places such as on a carpet especially when removing or inserting a Board Before startin...

Page 428: ...tor P J430 connector P J432 and connector P J433 to PWB ASSY ROT 4 Attach COVER FRONT L and COVER FRONT ASSY U p318 5 Attach COVER MSI p317 6 Attach COVER ASSY LH p321 7 Attach COVER ASSY RH p326 Figure 4 112 Removal of PWB ASSY ROT C A U T I O N Avoid staticky places such as on a carpet especially when removing or inserting a Board Before starting work with the Board make sure to touch metallic p...

Page 429: ...MOT ASSY ROT p424 5 Attach LV HVPS p435 6 Attach COVER FRONT L and COVER FRONT ASSY U p318 7 Attach COVER MSI p317 8 Attach COVER ASSY LH p321 9 Attach COVER ASSY RH p326 Figure 4 113 Removal of PWBA CRUM C A U T I O N When the printer is turned on after replacing either the PWBA MCU or the PWBA CRUM the information that specific to each printer unit is automatically stored on a memory of replaced...

Page 430: ...BA MCU to the main unit with the 4 screws silver with flange 6 mm 3 Connect all connectors to the PWBA MCU 4 Attach COVER ASSY LH p321 Figure 4 114 Removal of PWBA MCU C A U T I O N Avoid staticky places such as on a carpet especially when removing or inserting a Board Before starting work with the Board make sure to touch metallic portion of the printer connected to the earth to let your body com...

Page 431: ...lver with flange 6mm fastening PWBA MCU to the main unit 6 Remove PWBA MCU from the main unit C A U T I O N When the printer is turned on after replacing either the PWBA MCU or the PWBA CRUM the information that specific to each printer unit is automatically stored on a memory of replaced circuit board Due to this reason the board becomes unique to specific printer unit and the board is no longer ...

Page 432: ...eady Service Req E537 Printing is not possible Fuser error P J403 C Open Printing is not possible The Cover Fuser is open P J404 Ready Æ Jam E F Paper Jam at 2nd BTR P J405 Ready Entirely Faint P J406 Ready Normal printing P J407 Ready Æ Service Req E510 All LEDs light ROS Motor error P J408 E Open Printing is not possible P J409 Service Req E547 Printing is not possible Feeder Moter error P J410 ...

Page 433: ...art of LV HVPS inside the protrusion of the bracket while inserting the front side of LV HVPS in between the main unit frame and COVER FRONT L to attach LV HVPS 2 Fasten LV HVPS to the main unit with the 6 screws silver with flange 6 mm 3 Connect all connectors to the LV HVPS 4 Attach COVER ASSY LH p321 Figure 4 115 Removal of LV HVPS C A U T I O N Avoid staticky places such as on a carpet especia...

Page 434: ...tion P J500 Ready Service Req E537 All LEDs flash P J501 Printing is not possible P J502 Service Req C0998 All LEDs light P J503 Printed light and faint P J510 Release Cariage Lock Printed light and faint P J515 Ready Entirely Faint FIP P17 A 508 Ready Entirely Fogged in Black FIP P18 C 509 Ready Entirely Faint FIP P17 D 504 Ready Uneven Density Thin Spot FIP P16 manuals4you com manuals4you com ...

Page 435: ...he interface connector from the hole on the CHASSIS ESS Figure 4 116 Removal of PWBA ESS C A U T I O N Avoid staticky places such as on a carpet especially when removing or inserting a Board Before starting work with the Board make sure to touch metallic portion of the printer connected to the earth to let your body come out free of static electricity C A U T I O N The following Step 2 to 4 are fo...

Page 436: ...aser CX11F fax model make sure to put CN701 14 pin and CN702 13 pin FFCs through the FERRITE CORE as shown in the figure The following Step 4 to 6 are for the AcuLaser CX11F fax model The AcuLaser CX11 base model does not have PWBA FAX and four screws silver with flange 6 mm are attached instead of the four SPACERs Attach the four screws when reassembling the base model Table 4 16 Symptoms when th...

Page 437: ... to the main unit with the screw silver with external toothed washer 5 mm 3 Fasten PWBA FUSER CONT to the main unit with the 2 screws silver with flange 8mm 4 Connect all connectors to the PWBA FUSER CONT 5 Attach CHASSIS ASSY ESS p440 6 Attach COVER ASSY LH p321 Figure 4 117 Removal of PWBA FUSER CONT C A U T I O N Avoid staticky places such as on a carpet especially when removing or inserting a ...

Page 438: ...main unit 6 Remove the screw silver with flange 8 mm that secures the HARNESS ASSY PANEL 7 Remove the CHASSIS ASSY ESS from the main unit Figure 4 118 Removal of CHASSIS ASSY ESS C A U T I O N Avoid staticky places such as on a carpet especially when removing or inserting a Board Before starting work with the Board make sure to touch metallic portion of the printer connected to the earth to let yo...

Page 439: ...HASSIS ASSY ESS 7 Attach COVER ASSY LH p321 C A U T I O N When performing the following work take care to prevent the harness from being sandwiched between the main unit and CHASSIS ESS C A U T I O N The CN701 CN702 and CN704 FFCs are resemble each other in shape as their pin numbers are so close 14 13 and 12 respectively Be careful not to connect them wrongly When reassembling the AcuLaser CX11F ...

Page 440: ...hen slightly lift up the front side and remove 500 PAPER CASSETTE ASSY from 500 PAPER FEEDER REINSTALLATION 1 Insert the front side of 500 PAPER CASSETTE ASSY into 500 PAPER FEEDER with the front side of 500 PAPER CASSETTE ASSY slightly lifted up then hold it horizontal and insert it all the way seated in 500 PAPER FEEDER Figure 4 119 Removal of 500 PAPER CASSETTE ASSY Leg_Sec03_013EA 1 manuals4yo...

Page 441: ...es on CASSETTE 500 and lift up to remove REINSTALLATION 1 Match the 4 protrusions on GUIDE END ASSY with the notches on CASSETTE 500 and attach 2 Slide GUIDE END ASSY to the front and insert the protrusion on GUIDE END ASSY into the groove on PAPER SLIDE 500 3 Attach PLATE ASSY BOTTOM 500 p444 4 Attach 500 PAPER CASSETTE ASSY p442 Figure 4 120 Removal of GUIDE END ASSY C A U T I O N Step numbers w...

Page 442: ...ft and right PLATE ROLL STOPPER 500s to 500 PAPER CASSETTE ASSY 5 Remove the protrusion on PLATE ROLL STOPPER from the hole on 500 PAPER CASSETTE ASSY and remove the left and right PLATE ROLL STOPPERs 6 Press the two hooks on CASSETTE 500 and release the front side of PLATE ASSY BOTTOM 500 7 Remove the protrusion of PLATE ASSY BOTTOM 500 from the indent on PAPER SLIDE 500 8 Draw out the shaft on P...

Page 443: ...ch the left and right PLATE ROLL STOPPERs 5 Fasten the left and right PLATE ROLL STOPPERs to 500 PAPER CASSETTE ASSY with the 4 screws silver tapping 6 mm 2 each on left and right 6 Attach LOCK LIFT R LOCK LIFT L and ROLL LINK to the bearing on PLATE ASSY BOTTOM 500 on both the left and right sides and fasten the hook on ROLL LINK to the groove on the shaft of PLATE ASSY BOTTOM 500 7 Press PLATE A...

Page 444: ...he left match the 3 protrusions on GUIDE PAPER R ASSY 500 with the notches on CASSETTE 500 and lift up to remove REINSTALLATION 1 Match the 3 protrusions on GUIDE PAPER R ASSY 500 with the notches on CASSETTE 500 and attach 2 Match the 3 protrusions on GUIDE PAPER L ASSY 500 with the notches on CASSETTE 500 and attach 3 Set GUIDE PAPER L ASSY 500 and GUIDE PAPER R ASSY 500 to their maximum open st...

Page 445: ... 500 towards you to release the three protrusions on the rear of COVER FRONT CST 500 from the hole on the 500 PAPER CASSETTE ASSY and remove COVER FRONT CST 500 REINSTALLATION 1 Match the three protrusions on the rear of COVER FRONT CST 500 with the hole on 500 PAPER CASSETTE ASSY attach COVER FRONT CST 500 and fasten the hook on the base of COVER FRONT CST 500 2 Fasten COVER FRONT CST 500 to 500 ...

Page 446: ...ASSY REINSTALLATION 1 Match the attachment holes on the main unit with the three bosses on 500 PAPER FEEDER ASSY and attach the main unit to 500 PAPER FEEDER ASSY 2 Turn LOCK MC TO FDR on both the left and right sides CCW by 90 to lock with the main unit 3 Attach 500 PAPER CASSETTE ASSY p442 Figure 4 125 Removal of 500 PAPER FEEDER ASSY C A U T I O N When performing the following work the lengthwi...

Page 447: ...COVER LEFT 500 outward REINSTALLATION 1 Match the boss on COVER LEFT 500 with the hole on 500 PAPER FEEDER ASSY while inserting the metal plate section of the frame at the front and rear of 500 PAPER FEEDER ASSY into the clearance between the rib sections on the front and rear of COVER LEFT 500 and attach COVER LEFT 500 2 Fasten COVER LEFT 500 to 500 PAPER FEEDER ASSY with the 5 screws silver with...

Page 448: ...R FEEDER ASSY and remove CHUTE FDR ASSY 500 REINSTALLATION 1 With CHUTE FDR ASSY 500 slightly open insert the boss on the left side into the hole on 500 PAPER FEEDER ASSY then attach CHUTE FDR ASSY 500 to 500 PAPER FEEDER ASSY while bending down the boss on the right side 2 Close CHUTE FDR ASSY 500 3 Fasten CHUTE FDR ASSY 500 with the screw silver with flange tapping 8 mm 4 Attach COVER RIGHT 500 ...

Page 449: ...EINSTALLATION 1 Match the boss on COVER RIGHT 500 with the hole on 500 PAPER FEEDER ASSY while inserting the metal plate section of the frame at the front and rear of 500 PAPER FEEDER ASSY into the clearance between the rib sections on the front and rear of COVER RIGHT 500 and attach COVER RIGHT 500 2 Fasten COVER RIGHT 500 to 500 PAPER FEEDER ASSY with the 5 screws silver with flange 8 mm 3 Attac...

Page 450: ... flange 6 mm 3 Connect connector P J435 connector P J436 and connector P J437 to PWBA TRAY 500 4 Attach COVER LEFT 500 p449 Figure 4 129 Removal of PWBA TRAY 500 C A U T I O N Avoid staticky places such as on a carpet especially when removing or inserting a Board Before starting work with the Board make sure to touch metallic portion of the printer connected to the earth to let your body come out ...

Page 451: ...PER FEEDER ASSY with the 3 screws silver with flange 6 mm 3 Connect connector P J440 and connector P J446 to PWBA MOT 4 Attach COVER LEFT 500 p449 Figure 4 130 Removal of PWBA MOT C A U T I O N Avoid staticky places such as on a carpet especially when removing or inserting a Board Before starting work with the Board make sure to touch metallic portion of the printer connected to the earth to let y...

Page 452: ...ASSY FEED to 500 PAPER FEEDER ASSY with the 4 screws silver 6 mm 3 Connect connector P J446 to PWBA MOT and connector P J610 to SOLENOID FEED 4 Attach CLUTCH ASSY FEED p457 5 Attach COVER LEFT 500 p449 Figure 4 131 Removal of DRIVE ASSY FEED C A U T I O N When performing the following work leave the intermediate connector of the connector P J610 on SOLENOID FEED on the harness side C A U T I O N T...

Page 453: ...he screw silver 6 mm fastening SOLENOID FEED to DRIVE ASSY FEED 5 Remove SOLENOID FEED from DRIVE ASSY FEED REINSTALLATION 1 Match the hole on SOLENOID FEED with the boss on DRIVE ASSY FEED 2 Fasten SOLENOID FEED to DRIVE ASSY FEED with the screw silver 6 mm 3 Attach DRIVE ASSY FEED p454 4 Attach CLUTCH ASSY FEED p457 5 Attach COVER LEFT 500 p449 Figure 4 132 Removal of SOLENOID FEED Leg_Sec03_024...

Page 454: ...SSY FEED with the harness of MOTOR ASSY FEEDER facing up 2 Fasten MOTOR ASSY FEEDER to DRIVE ASSY FEED with the 2 screws silver 6 mm 3 Connect connector P J446 to PWBA MOT 4 Fasten the harness on MOTOR ASSY FEEDER with the clamp on DRIVE ASSY FEED 5 Attach COVER LEFT 500 p449 Figure 4 133 Removal of MOTOR ASSY FEEDER C A U T I O N When performing the following work pay attention to the attachment ...

Page 455: ...th the D cut surface on the shaft of ROLL ASSY TURN 500 and attach CLUTCH ASSY FEED so that the protrusion of DRIVE ASSY FEED enters the concave portion on CLUTCH ASSY FEED 2 Fasten CLUTCH ASSY FEED to 500 PAPER FEEDER ASSY with the KL ring 3 Connect connector P J609 to CLUTCH ASSY FEED 4 Fasten the harness on CLUTCH ASSY FEED with the clamp on DRIVE ASSY FEED 5 Attach COVER LEFT 500 p449 Figure 4...

Page 456: ... through the hole on 500 PAPER FEEDER ASSY 2 Attach HARNESS ASSY FEED 1 to 500 PAPER FEEDER ASSY and fasten with the hook 3 Connect connector P J435 to PWBA TRAY 500 4 Fasten the harness of HARNESS ASSY FEED 1 with the clamp 5 Attach COVER LEFT 500 p449 6 Attach 500 PAPER FEEDER ASSY p448 Figure 4 135 Removal of HARNESS ASSY FEED 1 Table 4 24 Symptoms when the connector is loose Connector No Panel...

Page 457: ...f ROLL ASSY TURN 500 from the right side bearing on 500 PAPER FEEDER ASSY to remove ROLL ASSY TURN 500 REINSTALLATION 1 Insert the shaft left side on ROLL ASSY TURN 500 into the left side bearing on 500 PAPER FEEDER ASSY and slide ROLL ASSY TURN to the right to attach 2 Match the double D cut surface of BEARING FEED with the left and right bearings of 500 PAPER FEEDER ASSY attach BEARING FEED and ...

Page 458: ...harness of the connector on SWITCH FEEDER DOOR from the outside of 500 PAPER FEEDER ASSY and take up any slack from the harness on the SWITCH FEEDER DOOR side 4 Match the boss on CAP FEEDER with the hole on 500 PAPER FEEDER ASSY and attach CAP FEEDER 5 Fasten CAP FEEDER to 500 PAPER FEEDER ASSY with the screw silver tapping 8 mm 6 Attach COVER LEFT 500 p449 7 Attach CHUTE FDR ASSY 500 p450 Figure ...

Page 459: ... J436 from PWBA TRAY 500 5 Unhook the 2 hooks fastening HARNESS ASSY FEED 2 to 500 PAPER FEEDER ASSY and remove HARNESS ASSY FEED 2 REINSTALLATION 1 Attach HARNESS ASSY FEED 2 to 500 PAPER FEEDER ASSY and fasten with the hook 2 Connect connector P J436 to PWBA TRAY 500 3 Fasten the harness of HARNESS ASSY FEED 2 with the clamp 4 Attach COVER LEFT 500 p449 5 Attach 500 PAPER FEEDER ASSY p448 Figure...

Page 460: ... Remove the 2 screws silver tapping 8 mm fastening CHUTE ASSY 500 to 500 PAPER FEEDER ASSY 9 Remove the screw silver 6 mm fastening BRACKET MAG R to 500 PAPER FEEDER ASSY 10 Remove BRACKET MAG R from 500 PAPER FEEDER ASSY 11 Remove the right side shaft on CHUTE ASSY 500 from the bearing on GUIDE CST R 12 Remove the left side shaft on CHUTE ASSY 500 from the bearing on GUIDE CST L and remove CHUTE ...

Page 461: ...R FEEDER ASSY while inserting BRACKET MAG R into the notch on 500 PAPER FEEDER ASSY and attach BRACKET MAG R 4 Fasten BRACKET MAG R to 500 PAPER FEEDER ASSY with the screw silver 6 mm 5 Fasten CHUTE ASSY 500 to 500 PAPER FEEDER ASSY with the 2 screws silver tapping 8 mm 6 Attach HOUSING ASSY FEED p472 7 Attach DRIVE ASSY FEED p454 8 Attach CLUTCH ASSY FEED p457 9 Attach COVER LEFT 500 p449 10 Atta...

Page 462: ...n the bosses on both sides of LEVER 500 10 Remove HOLDER ASSY RETARD 500 from CHUTE ASSY 500 while bending down the bosses on both sides of HOLDER ASSY RETARD 500 Figure 4 141 Removal of HOLDER ASSY RETARD 500 C A U T I O N When performing the following work take care not to damage the LEVER 500 boss When performing the following work take care not to lose SPRING LEVER 500 C A U T I O N When perfo...

Page 463: ...ttach COVER LEFT 500 p449 8 Attach COVER RIGHT 500 p451 9 Attach CHUTE FDR ASSY 500 p450 10 Attach 500 PAPER CASSETTE ASSY p442 C A U T I O N When performing the following work take care not to damage the boss of the HOLDER ASSY RETARD 500 C A U T I O N Make sure that SPRING RETARD is in the boss on HOLDER ASSY RETARD 500 and the boss on CHUTE ASSY 500 When performing the following work take care ...

Page 464: ...move FILM ASSY FDR from CHUTE ASSY 500 REINSTALLATION 1 Match the hole on FILM ASSY FDR with the boss on CHUTE ASSY 500 and attach FILM ASSY FDR while inserting the film base on FILM ASSY FDR to the inside of CHUTE ASSY 500 2 Fasten FILM ASSY FDR to CHUTE ASSY 500 with the 4 screws silver tapping 8 mm 3 Close CHUTE FDR ASSY 500 Figure 4 142 Removal of FILM ASSY FDR Leg_Sec03_205FB 1 3 2 manuals4yo...

Page 465: ...STALLATION 1 Attach SPG LOCK CST LL to the boss on STOPPER CST R and attach STOPPER CST R to GUIDE CST R 2 Attach GUIDE CST R p468 3 Attach CHUTE ASSY 500 p462 4 Attach HOUSING ASSY FEED p472 5 Attach DRIVE ASSY FEED p454 6 Attach CLUTCH ASSY FEED p457 7 Attach COVER LEFT 500 p449 8 Attach COVER RIGHT 500 p451 9 Attach CHUTE FDR ASSY 500 p450 10 Attach 500 PAPER CASSETTE ASSY p442 Figure 4 143 Rem...

Page 466: ...500 PAPER FEEDER ASSY together with SPG LOCK CST LL and STOPPER CST R 11 Remove STOPPER CST R p467 REINSTALLATION 1 Attach STOPPER CST R p467 2 Match the boss on the GUIDE CST R with the hole on 500 PAPER FEEDER ASSY and attach GUIDE CST R 3 Fasten GUIDE CST R to 500 PAPER FEEDER ASSY with the 5 screws silver tapping 6mm 4 Attach CHUTE ASSY 500 p462 5 Attach HOUSING ASSY FEED p472 6 Attach DRIVE A...

Page 467: ...ve CHUTE ASSY 500 p462 9 Remove the screw silver tapping 8 mm fastening CAP FEEDER to 500 PAPER FEEDER ASSY 10 Remove CAP FEEDER from 500 PAPER FEEDER ASSY 11 Remove the 5 screws silver tapping 6mm fastening GUIDE CST L to 500 PAPER FEEDER ASSY 12 To remove GUIDE CST L from SWITCH FEEDER DOOR slide GUIDE CST L slightly to the right and remove GUIDE CST L from 500 PAPER FEEDER ASSY together with SP...

Page 468: ... PAPER FEEDER ASSY with the 5 screws silver tapping 6mm 4 Match the boss on CAP FEEDER with the hole on 500 PAPER FEEDER ASSY and attach CAP FEEDER 5 Fasten CAP FEEDER to 500 PAPER FEEDER ASSY with the screw silver tapping 8 mm 6 Attach CHUTE ASSY 500 p462 7 Attach HOUSING ASSY FEED p472 8 Attach DRIVE ASSY FEED p454 9 Attach CLUTCH ASSY FEED p457 10 Attach COVER LEFT 500 p449 11 Attach COVER RIGH...

Page 469: ...ION 1 Attach SPG LOCK CST LL to the boss on STOPPER CST L and attach STOPPER CST L to GUIDE CST L 2 Attach GUIDE CST L p469 3 Attach CHUTE ASSY 500 p462 4 Attach HOUSING ASSY FEED p472 5 Attach DRIVE ASSY FEED p454 6 Attach CLUTCH ASSY FEED p457 7 Attach COVER LEFT 500 p449 8 Attach COVER RIGHT 500 p451 9 Attach CHUTE FDR ASSY 500 p450 10 Attach 500 PAPER CASSETTE ASSY p442 Figure 4 146 Removal of...

Page 470: ...SSY FEED to 500 PAPER FEEDER ASSY 8 Insert both hands from the front side of 500 PAPER FEEDER ASSY pull the 2 levers on HOUSING ASSY FEED towards you and remove the boss on HOUSING ASSY FEED from the hole on 500 PAPER FEEDER ASSY 9 Slide HOUSING ASSY FEED to the front side unhook the 4 hooks at the top fastened to 500 PAPER FEEDER ASSY remove the hole on HOUSING ASSY FEED from the protrusion at th...

Page 471: ...G ASSY FEED 5 Attach GEAR FEED to the shaft on HOUSING ASSY FEED and fasten the hook on GEAR FEED to the groove on the shaft of HOUSING ASSY FEED 6 Attach DRIVE ASSY FEED p454 7 Attach CLUTCH ASSY FEED p457 8 Attach COVER LEFT 500 p449 9 Attach 500 PAPER CASSETTE ASSY p442 C A U T I O N When performing the following work take care not to damage ACTUATOR T R attached to HOUSING ASSY FEED Also make ...

Page 472: ...ON 1 Connect connector P J119 to SENSOR NO PAPER 2 Match the hook on SENSOR NO PAPER with the attachment position while inserting ACTUATOR NO PAPER CST into the sensor on SENSOR NO PAPER and attach to HOUSING ASSY FEED 3 Attach COVER FEED to HOUSING ASSY FEED 4 Fasten COVER FEED to HOUSING ASSY FEED with the 2 screws silver tapping 8 mm 5 Attach HOUSING ASSY FEED p472 6 Attach DRIVE ASSY FEED p454...

Page 473: ...ing CAP ACTUATOR to HOUSING ASSY FEED and remove CAP ACTUATOR 7 Remove the 2 screws silver tapping 8 mm fastening COVER FEED to HOUSING ASSY FEED 8 Remove COVER FEED from HOUSING ASSY FEED 9 Draw out the shaft of ACTUATOR NO PAPER CST from the hook on HOUSING ASSY FEED slide along the notch on HOUSING ASSY FEED and remove ACTUATOR NO PAPER CST Figure 4 149 Removal of ACTUATOR NO PAPER CST 1 Figure...

Page 474: ...COVER FEED to HOUSING ASSY FEED 4 Fasten COVER FEED to HOUSING ASSY FEED with the 2 screws silver tapping 8 mm 5 Match the hole on CAP ACTUATOR with the boss on HOUSING ASSY FEED and attach CAP ACTUATOR 6 Attach HOUSING ASSY FEED p472 7 Attach DRIVE ASSY FEED p454 8 Attach CLUTCH ASSY FEED p457 9 Attach COVER LEFT 500 p449 10 Attach 500 PAPER CASSETTE ASSY p442 C A U T I O N When performing the fo...

Page 475: ... with SPRING ACTUATOR 9 Remove SPRING ACTUATOR from ACTUATOR T R REINSTALLATION 1 Attach SPRING ACTUATOR to ACTUATOR T R 2 Fit the shaft on ACTUATOR T R into the hook on HOUSING ASSY FEED and attach ACTUATOR T R together with SPRING ACTUATOR 3 Hook SPRING ACTUATOR onto the notch on HOUSING ASSY FEED 4 Attach ROLL ASSY FEED 500 p479 5 Attach HOUSING ASSY FEED p472 6 Attach DRIVE ASSY FEED p454 7 At...

Page 476: ...ENSOR T R 9 Unhook the three hooks fastening SENSOR T R to HOUSING ASSY FEED and remove SENSOR T R REINSTALLATION 1 Match the hooks on SENSOR T R with the attachment positions and attach to HOUSING ASSY FEED 2 Connect connector P J120 to SENSOR T R 3 Attach ACTUATOR T R p477 4 Attach ROLL ASSY FEED 500 p479 5 Attach HOUSING ASSY FEED p472 6 Attach DRIVE ASSY FEED p454 7 Attach CLUTCH ASSY FEED p45...

Page 477: ...emove the E rings fastening both sides of SHAFT FEED from HOUSING ASSY FEED and remove the left and right BEARING SLEEVEs 9 Temporarily slide SHAFT FEED to the right draw out SHAFT FEED from the left side bearing on HOUSING ASSY FEED and remove together with ROLL ASSY FEED 500 and ROLL SUPPORT 500 10 Unhook the hook on ROLL SUPPORT 500 on the right side fastened to SHAFT FEED and remove ROLL SUPPO...

Page 478: ...to the left and attach together with ROLL ASSY FEED 500 and ROLL SUPPORT 500 4 Match the double D cut surface of BEARING SLEEVE with the left and right bearings of HOUSING ASSY FEED attach BEARING SLEEVE and fasten both sides of SHAFT FEED with the E rings 5 Attach COVER FEED to HOUSING ASSY FEED 6 Fasten COVER FEED to HOUSING ASSY FEED with the 2 screws silver tapping 8 mm 7 Attach HOUSING ASSY F...

Page 479: ...head that secure the ADF Unit to the IR A Assy 4 Open the ADF Unit and remove it toward upward REINSTALLATION 1 Insert the ADF HINGE of the ADF Unit into the hole on the IR A Assy and close the ADF Unit 2 Secure the ADF Unit to the IR A Assy with the two screws M3 x 12 mm P type P head 3 Connect the cable of the ADF Unit to the IR A Assy 4 Install the Scanner p306 Figure 4 154 Removal of ADF Unit ...

Page 480: ...SSY 4 Turn the Scanner over and remove the two screws M3 x 10 mm P type B head that secure the left and right HINNGE HOLDER 2s to the IR BASE A ASSY to remove the two HINGE HOLDER 2s from the assy 5 Remove the seven screws M3 x 10 mm P type B head that secure the IR COVER A ASSY to the IR BASE A ASSY Figure 4 155 Removal of IR COVER A ASSY 1 Figure 4 156 Removal of IR COVER A ASSY 2 Obverse Side 3...

Page 481: ... out the IR COVER A ASSY harness through the hole on the IR BASE A ASSY Figure 4 157 Removal of IR COVER A ASSY 3 Figure 4 158 Removal of IR COVER A ASSY 4 C H E C K P O I N T The two hooks of the IR BASE A ASSY that secure the IR COVER A ASSY are indicated on the picture below If the IR ENGINE LOCK ASSY and the ADF IR LOCK ASSY prevent the IR COVER A ASSY from separating from the IR BASE A ASSY a...

Page 482: ...crews M3 x 10 mm P type B head respectively 7 Attach the ADF Unit p481 8 Install the Scanner p306 Figure 4 159 Reinstallation of IR COVER A ASSY Figure 4 160 Reinstallation of HINGE HOLDER 2 C H E C K P O I N T The IR ENGINE LOCK ASSY may fall off the IR BASE A ASSY while attaching the IR COVER A ASSY In such case reattach it following the procedure given below 1 Pass the pintle through the center...

Page 483: ...rn the CCD MODULE ASSY upward upon the IR SHAFT and hold it to remove the two screws M3 x 6 mm B type P head that secure the FFC CR to the CCD MODULE ASSY 7 Disconnect the FFC CR from the connector on the CCD MODULE ASSY 8 Release the left end of the IR SHAFT from the bearing of the IR BASE ASSY and remove the CCD MODULE ASSY together with the IR SHAFT 9 Pull out the IR SHAFT from the CCD MODULE A...

Page 484: ...he PULLEY ASSY to the IR BASE ASSY 5 Draw the FFC CR through the FFC CLIP and turn the CCD MODULE ASSY upward upon the IR SHAFT and hold it to secure the FFC CLIP to the CCD MODULE ASSY with the two screws M3 x 6 mm B type P head See Figure 4 162 6 Connect the FFC CR to the connector on the CCD MODULE ASSY 7 Hitch the IR TIMING BELT to the gear of the MOTOR ASSY and to the pulley of the PULLEY ASS...

Page 485: ...roove on the IR BASE A ASSY 6 Remove the screw M3 x 8 mm P type B head that secure the harness tie 7 Cut the harness tie and remove the ferrite core from the harnesses 8 Remove the two screws M3 x 8 mm P type B head that secure the MOTOR ASSY to the IR BASE A ASSY and remove the MOTOR ASSY from the IR BASE A ASSY Figure 4 164 Removal of MOTOR ASSY C A U T I O N When removing reinstalling the MOTOR...

Page 486: ...ure the harness tie to the IR BASE A ASSY with the screw M3 x 8 mm P type B head 6 Put the harnesses of the MOTOR ASSY through the hole of the IR BASE A ASSY and secure the harnesses on the groove of the IR BASE A ASSY 7 Attach the CCD MODULE ASSY p485 8 Attach the IR COVER A ASSY p482 9 Attach the ADF Unit p481 10 Install the Scanner p306 Figure 4 165 Reinstallation of MOTOR ASSY C H E C K P O I ...

Page 487: ...head that secure the PCB ASSY to the IR BASE A ASSY and remove the PCB ASSY from the IR BASE A ASSY REINSTALLATION 1 Match the positioning holes of the PCB ASSY and the guide pins of the IR BASE A ASSY and secure the PCB ASSY to the IR BASE A ASSY with the two screws M3 x 8 mm P type B head 2 Connect the FFC BOARD to the P201 connector on the PCB ASSY 3 Attach the IR COVER A ASSY p482 4 Attach the...

Page 488: ...rrow shown in the figure to remove it from the IR BASE A ASSY See Figure 4 167 8 Disconnect the FFC BOARD from the connector on the PCB ASSY 9 Remove the sponge adhered to the FFC CR and pull the FFC CR to the inner side of the IR BASE A ASSY through the hole of the assy 10 Remove the piece of tape that bundles the FFC CR and remove the FFC CR from the ferrite core of the CORE ASSY 11 Remove the F...

Page 489: ...x 8 mm P type B head 5 Secure the PLATE HARNESS 2 to the IR BASE A ASSY with the two screws M3 x 8 mm P type B head matching the positioning holes of the PLATE HARNESS 2 with the guide pins of the IR BASE A ASSY 6 Connect the FFC BOARD to the connector on the PCB ASSY 7 Install the MOTOR ASSY p487 8 Attach the CCD MODULE ASSY p485 9 Attach the IR COVER A ASSY p482 10 Attach the ADF Unit p481 11 In...

Page 490: ...remove the screw M3 x 8 mm S type A head that secures the ADF COVER R See Figure 4 172 5 Release the seven tabs of the ADF COVER R from the SDH COVER in the order shown in and remove the ADF COVER R See Figure 4 173 Figure 4 171 Removal of HOOK FIX PLATE Figure 4 172 Removal of ADF COVER R 1 Figure 4 173 Removal of ADF COVER R 2 C H E C K P O I N T To release the seven tabs push them with a flat b...

Page 491: ...order shown in Figure 4 173 3 Secure the ADF COVER R to the SDH COVER with the screw M3 x 8 mm S type A head See Figure 4 172 4 Match the positioning hole of the HOOK FIX PLATE with the guide pin of the SDH COVER and secure the HOOK FIX PLATE to the SDG COVER with the two screws M3 x 8 mm P type A head See Figure 4 174 5 Attach the ADF Unit p481 6 Install the Scanner p306 Figure 4 174 Reinstallati...

Page 492: ...move the screw M3 x 6 mm S type A head that secures the grounding wire of the CABLE and remove the CABLE REINSTALLATION 1 Secure the grounding wire of the CABLE with the screw M3 x 6 mm S type A head 2 Connect the CABLE connector to P301 connector on the ADF PCB ASSY 3 Attach the ADF COVER R p492 4 Attach the ADF Unit p481 5 Install the Scanner p306 Figure 4 175 Removal of CABLE CABLE 4 Grounding ...

Page 493: ...CB COVER and remove the PCB COVER REINSTALLATION 1 Insert the longer lateral side of the PCB COVER into the gap between the ADF PCB ASSY and the SDH COVER and secure the PCB COVER with the two screws M3 x 8 mm P type A head See Figure 4 176 2 Attach the ADF COVER R p492 3 Attach the ADF Unit p481 4 Install the Scanner p306 Figure 4 176 Removal of PCB COVER PCB COVER ADF PCB ASSY SDH COVER The Long...

Page 494: ...SY toward the direction shown in Figure 4 178 REINSTALLATION 1 Close the ADF BASE ASSY and attach the ADF COVER C to the ADF BASE ASSY matching the hooks of the ADF COVER C with the holes on the ADF BASE ASSY See Figure 4 179 2 Secure the ADF COVER C to the ADF BASE ASSY with the two screws M3 x 8 mm P type A head 3 Attach the ADF COVER R p492 4 Attach the ADF Unit p481 5 Install the Scanner p306 ...

Page 495: ...d that secure the left and right ADF HINGEs to the SDH COVER and remove the two ADF HINGEs REINSTALLATION 1 Secure the left and right ADF HINGEs to the SDH COVER with the two screws M3 x 12mm P type P head 2 Attach the ADF COVER R p492 3 Attach the ADF Unit p481 4 Install the Scanner p306 Figure 4 180 Removal of ADF HINGE 1 Figure 4 181 Removal of ADF HINGE 2 Obverse Side 4 1 ADF HINGE SDH COVER R...

Page 496: ... p492 4 Remove the PAPER GUIDE ASSY p526 5 Remove the ADF COVER C p496 6 Disconnect the all connectors on the ADF PCB ASSY 7 Remove the four screws M3 x 8 mm P type A head that secure the ADF FRAME ASSY to the SDH COVER remove the COVER SPRING ASSY and then remove the ADF FRAME ASSY together with the ADF BASE ASSY Figure 4 182 Removal of ADF BASE ASSY 1 7 COVER SPRING ASSY manuals4you com manuals4...

Page 497: ...the notch on the ADF BASE ASSY 11 Open the ADF BASE ASSY 12 Viewed from the direction as shown in Figure 4 184 push the right frame of the ADF FRAME ASSY outward to remove the right pintle of the ADF BASE ASSY from the bearing of the ADF FRAME ASSY 13 Pull out the left pintle of the ADF BASE ASSY from the left bearing of the ADF FRAME ASSY and remove the ADF BASE ASSY Figure 4 183 Removal of ADF B...

Page 498: ...e tie 5 Install the ADF FRAME ASSY to the SDH COVER matching the positioning hole of the ADF FRAME ASSY with the guide pin of the SDH COVER 6 Attach the COVER SPRING ASSY to the ADF FRAME ASSY matching the positioning hole of the COVER SPRING ASSY with the guide pin of the ADF FRAME ASSY and secure them to the SDH COVER with the four screws M3 x 8 mm P type A head 7 Connect the CABLE connector of ...

Page 499: ...ecure the CLUTCH FIX PLATE 9 Release the CLUTCH FIX PLATE from the guide pin of the ADF BASE and slide the CLUTCH FIX PLATE leftward 10 Pull out the TRANSFER SHAFT leftward from the hole on the ADF BASE 11 Pull out the CLUTCH SHAFT from the MAGNETIC CLUTCH 12 Release the harnesses of the MAGNETIC CLUTCH from the notch of the ADF BASE and remove the MAGNETIC CLUTCH See Figure 4 186 Figure 4 185 Rem...

Page 500: ...ure 4 187 Reinstallation of E CLUTCH UNIT C H E C K P O I N T Attach BUSH D4 GEAR 33T M0 8 and BUSH D6 to the CLUTCH SHAFT before attaching the CLUTCH SHAFT to the bearing of the CLUTCH FIX PLATE C H E C K P O I N T After securing the MAGNETIC CLUTCH make sure that the antirotation tab is properly inserted into the hole of the ADF BASE MAGNETIC CLUTCH BUSH D6 CLUTCH SHAFT GEAR 33T M0 8 BUSH D4 C H...

Page 501: ...the two screws M3 x 8 mm P type A head See Figure 4 188 5 Secure the harnesses of the MAGNETIC CLUTCH into the notch of the ADF BASE See Figure 4 186 6 Attach the GEAR 20T to the TRANSFER SHAFT See Figure 4 185 7 Attach the ADF BASE ASSY p498 8 Attach the ADF COVER C p496 9 Attach the ADF COVER R p492 10 Attach the ADF Unit p481 11 Install the Scanner p306 Figure 4 188 Reinstallation of E CLUTCH U...

Page 502: ...SION SPRING from the hook of the PICK UP ASSY and the ADF ROLLER FIX PLATE 9 Remove the screw M3 x 8 mm P type A head that secure the ADF ROLLER FIX PLATE and remove the ADF ROLLER FIX PLATE 10 Lift the left shaft of the PICK UP ASSY and pull out the right shaft of the PICK UP ASSY from the bearing of the ADF BASE and then remove the PICK UP ASSY from the ADF BASE Figure 4 189 Removal of PICK UP A...

Page 503: ... PLATE with the guide pin on the ADF BASE 3 Secure the ADF ROLLER FIX PLATE to the ADF BASE with the screw M3 x 8 mm P type A head 4 Hitch the both ends of the TENSION SPRING to the hook of PICK UP ASSY and the hook of ADF ROLLER FIX PLATE respectively 5 Attach the E CLUTCH UNIT p501 6 Attach the ADF BASE ASSY p498 7 Attach the ADF COVER C p496 8 Attach the ADF COVER R p492 9 Attach the ADF Unit p...

Page 504: ...SENSOR releasing its two tabs from the ADF BASE See Figure 4 192 REINSTALLATION 1 Attach the AS SENSOR to the ADF BASE inserting the two tabs of the AS SENSOR into holes on the ADF BASE See Figure 4 192 2 Route the harnesses of the AS SENSOR as shown in the figure and secure them with three hooks and three notches of the ADF BASE See Figure 4 191 3 Attach the ADF BASE ASSY p498 4 Attach the ADF CO...

Page 505: ...R LEVER from the bearing and pull out the other shaft from the bearing to remove the SENSOR LEVER from the ADF BASE See Figure 4 193 REINSTALLATION 1 Insert the right shaft of the SENSOR LEVER into the right bearing of the ADF BASE and push the other shaft into the left bearing of the ADF BASE See Figure 4 193 2 Attach the ADF BASE ASSY p498 3 Attach the ADF COVER C p496 4 Attach the ADF COVER R p...

Page 506: ...IT ACEMU from the tab of the ADF BASE to remove the CONNECTOR UNIT ACEMU REINSTALLATION 1 Push the CONNECTOR UNIT ACEMU into the place on the ADF BASE and secure it with the tab of the ADF BASE 2 Route the harnesses of the CONNECTOR UNIT ACEMU as shown in the figure and secure them with the notch on the ADF BASE 3 Attach the SENSOR LEVER p507 4 Attach the E CLUTCH UNIT p501 5 Attach the ADF BASE A...

Page 507: ... the harnesses 9 Remove the two screws M3 x 6 mm S type A head that secure the MOTOR CUSHION to the ADF FRAME ASSY and remove the MOTOR CUSHION together with the MOTOR See Figure 4 195 10 Remove the two screws M3 x 6 mm G type C head W spring washer Φ5 flat washer that secure the MOTOR to the MOTOR CUSHION See Figure 4 196 11 Move the MOTOR toward the relief hole on the MOTOR CUSHION and remove th...

Page 508: ...ses of the MOTOR around the ferrite core once and secure the ferrite core to the harness with a tie wrap 4 Bundle the harnesses and the grounding wire of the MOTOR with a tie wrap 5 Attach the ADF BASE ASSY p498 6 Attach the ADF COVER C p496 7 Attach the PAPER GUIDE ASSY p526 8 Attach the ADF COVER R p492 9 Attach the ADF Unit p481 10 Install the Scanner p306 C A U T I O N Make sure to attach the ...

Page 509: ...e screws M3 x 6 mm S type A head that secure the MOTOR FIX PLATE to the FIX PLATE R and remove the two LOCKING CABLE CLIPs and then remove the MOTOR FIX PLATE from the ADF BASE ASSY 10 Remove the five gears attached on the FIX PLATE R in the order shown below 1 GEAR 60T 18T 2 GEAR 48T 3 GEAR 40T 18T 4 GEAR 30T 5 GEAR 33T M0 5 Figure 4 198 Removal of GUIDE FRONT ASSY 1 Figure 4 199 Removal of GUIDE...

Page 510: ... the ADF FRAME UNIT and remove the FIX PLATE R from the ADF FRAME UNIT 12 Remove BUSH D6 from the shaft of the TURNING ROLLER and the shaft of the EXIT ROLL ASSY respectively Figure 4 200 Removal of GUIDE FRONT ASSY 3 Figure 4 201 Removal of GUIDE FRONT ASSY 4 11 FIX PLATE R 12 Shaft of EXIT ROLL ASSY Shaft of TURNING ROLLER manuals4you com manuals4you com ...

Page 511: ...the shaft of the TURNING ROLLER and the shaft of the EXIT ROLL ASSY respectively 15 Remove the two screws M3 x 8 mm P type A head that secure the GUIDE FRONT ASSY to the ADF FRAME UNIT and remove the GUIDE FRONT ASSY Figure 4 202 Removal of GUIDE FRONT ASSY 5 Figure 4 203 Removal of GUIDE FRONT ASSY 6 Figure 4 204 Removal of GUIDE FRONT ASSY 7 13 FIX PLATE ASSY 14 Shaft of EXIT ROLL ASSY Shaft of ...

Page 512: ... 2 GEAR 30T 3 GEAR 40T 18T 4 GEAR 48T 5 GEAR 60T 18T 6 Secure the MOTOR FIX PLATE and the two LOCKING CABLE CLIPS to the FIX PLATE with the three screws M3 x 6 mm S type A head See Figure 4 198 7 Secure the grounding wire of the CABLE to the MOTOR FIX PLATE with the screw M3 x 6 mm S type A head See Figure 4 198 8 Attach the MOTOR p509 9 Attach the ADF BASE ASSY p498 10 Attach the ADF COVER C p496...

Page 513: ...ove the two screws M3 x 8 mm P type A head that secure the PAPER GUIDE R to the ADF FRAME UNIT and remove the PAPER GUIDE R from the ADF FRAME UNIT REINSTALLATION 1 Secure the PAPER GUIDE R to the ADF FRAME UNIT with the two screws M3 x 8 mm P type A head 2 Attach the GUIDE FRONT ASSY p511 3 Attach the MOTOR p509 4 Attach the ADF BASE ASSY p498 5 Attach the ADF COVER C p496 6 Attach the PAPER GUID...

Page 514: ...ASSY p498 7 Remove the MOTOR p509 8 Remove the GUIDE FRONT ASSY p511 9 Remove the PAPER GUIDE R p515 10 Remove the two screws M3 x 8 mm P type A head that secure the FRAME COVER ASSY to the ADF FRAME UNIT 11 Open the FRAME COVER ASSY from the NEUTRALIZING BRUSH side and remove the FRAME COVER ASSY from the ADF FRAME UNIT Figure 4 206 Removal of FRAME COVER ASSY 1 Figure 4 207 Removal of FRAME COVE...

Page 515: ...ure 4 206 5 Attach the PAPER GUIDE R p515 6 Attach the GUIDE FRONT ASSY p511 7 Attach the MOTOR p509 8 Attach the ADF BASE ASSY p498 9 Attach the ADF COVER C p496 10 Attach the PAPER GUIDE ASSY p526 11 Attach the ADF COVER R p492 12 Attach the ADF Unit p481 13 Install the Scanner p306 Figure 4 208 Reinstallation of FRAME COVER ASSY 1 Figure 4 209 Reinstallation of FRAME COVER ASSY 2 C H E C K P O ...

Page 516: ...th longer cut surface into the right shaft hole of the ADF FRAME UNIT and then insert the other end into the left shaft hole of the ADF FRAME UNIT 2 Attach the FRAME COVER ASSY p516 3 Attach the PAPER GUIDE R p515 4 Attach the GUIDE FRONT ASSY p511 5 Attach the MOTOR p509 6 Attach the ADF BASE ASSY p498 7 Attach the ADF COVER C p496 8 Attach the PAPER GUIDE ASSY p526 9 Attach the ADF COVER R p492 ...

Page 517: ...and then pull out its right shaft from the ADF FRAME UNIT to remove the TURNING ROLLER REINSTALLATION 1 First insert the one end of the TURNING ROLLER shaft with longer cut surface into the shaft hole of the ADF FRAME UNIT and then insert the other end into the shaft hole of the ADF FRAME UNIT 2 Attach the FRAME COVER ASSY p516 3 Attach the PAPER GUIDE R p515 4 Attach the GUIDE FRONT ASSY p511 5 A...

Page 518: ...E to the MOTOR FIX PLATE and remove the grounding wire of the CABLE 9 Remove the three screws M3 x 6 mm S type A head that secure the MOTOR FIX PLATE to the FIX PLATE R and remove the two LOCKING CABLE CLIPs and then remove the MOTOR FIX PLATE from the ADF BASE ASSY 10 Remove the three gears attached on the FIX PLATE R in the order shown below 1 GEAR 60T 18T 2 GEAR 48T 3 GEAR 40T 18T Figure 4 212 ...

Page 519: ... 11 Release the COVER SENSOR from the two clamps of the FIX PLATE R 12 Remove the screw M2 x 10 mm G type P head that secure the COVER SENSOR to the FIX PLATE R and remove the COVER SENSOR from the FIX PLATE R Figure 4 214 Removal of COVER SENSOR 3 12 11 FIX PLATE R COVER SENSOR ...

Page 520: ... two LOCKING CABLE CLIPS to the FIX PLATE with the three screws M3 x 6 mm S type A head See Figure 4 212 5 Secure the grounding wire of the CABLE to the MOTOR FIX PLATE with the screw M3 x 6 mm S type A head See Figure 4 212 6 Attach the MOTOR p509 7 Attach the ADF BASE ASSY p498 8 Attach the ADF COVER C p496 9 Attach the PAPER GUIDE ASSY p526 10 Attach the ADF COVER R p492 11 Attach the ADF Unit ...

Page 521: ...elease the CONNECTOR UNIT ACEMU from the tab of the ADF FRAME ASSY to remove the CONNECTOR UNIT ACEMU REINSTALLATION 1 Insert the CONNECTOR UNIT ACEMU into the place on the ADF FRAME ASSY and secure the CONNECTOR UNIT ACEMU with the hook of the ADF FRAME ASSY 2 Attach the ADF BASE ASSY p498 3 Attach the ADF COVER C p496 4 Attach the PAPER GUIDE ASSY p526 5 Attach the ADF COVER R p492 6 Attach the ...

Page 522: ...d remove the SENSOR ARM REINSTALLATION 1 Insert the shaft of the SENSOR ARM into the bearing of the PAPER GUIDE F See Figure 4 216 2 Attach the CONNECTOR UNIT ACEMU p523 3 Attach the ADF BASE ASSY p498 4 Attach the ADF COVER C p496 5 Attach the PAPER GUIDE ASSY p526 6 Attach the ADF COVER R p492 7 Attach the ADF Unit p481 8 Install the Scanner p306 Figure 4 216 Removal of SENSOR ARM C H E C K P O ...

Page 523: ...VER and remove the ADF PCB ASSY REINSTALLATION 1 Secure the ADF PCB ASSY to the SDH COVER with the screw M3 x 8 mm P type A head 2 Connect the all harnesses to the nine connectors on the ADF PCB ASSY See Figure 4 218 3 Attach the PCB COVER p495 4 Attach the ADF COVER R p492 5 Attach the ADF Unit p481 6 Install the Scanner p306 Figure 4 217 Removal of ADF PCB ASSY Figure 4 218 Connector Layout 5 6 ...

Page 524: ...ve the PAPER GUIDE ASSY from the SDH COVER ASSY REINSTALLATION 1 Attach the PAPER GUIDE ASSY to the SDH COVER matching the protrusion on the PAPER GUIDE ASSY with the hole on the SDH COVER and secure the PAPER GUIDE ASSY with its hook 2 Open the ADF COVER and attach the KNOB to the ADF FRAME ASSY 3 Attach the ADF COVER R p492 4 Attach the ADF Unit p481 5 Install the Scanner p306 Figure 4 219 Remov...

Page 525: ...ad that secure the TRAY COVER to the DOC PAPER GUIDE 6 Release the hook and remove TRAY GEAR 24T 7 Release the hook and remove the two GEAR PLATEs 8 Release the hook and remove the DOC ADJUST L and R Figure 4 220 Removal of GEAR PLATE TRAY GEAR 24T DOC ADJUST L R 1 Figure 4 221 Removal of GEAR PLATE TRAY GEAR 24T DOC ADJUST L R 2 Figure 4 222 Removal of GEAR PLATE TRAY GEAR 24T DOC ADJUST L R 3 TR...

Page 526: ...OC PAPER GUIDE 4 Secure the TRAY COVER to the DOC PAPER GUIDE with the two screws M3 x 8 mm P type A head 5 Attach the PAPER GUIDE ASSY p526 6 Attach the ADF COVER R p492 7 Attach the ADF Unit p481 8 Install the Scanner p306 Figure 4 223 Reinstallation of GEAR PLATE TRAY GEAR 24T DOC ADJUST L R A D J U S T M E N T R E Q U I R E D Be sure to lubricate the specified locations after reinstalling the ...

Page 527: ...OC PAPER GUIDE and remove the PAPER SENSOR SWITCH L and the PAPER SENSOR SWITCH R REINSTALLATION 1 Pull the two harnesses for the PAPER SENSOR SWITCH L and PAPER SENSOR SWITCH R outward through the hole of the DOC PAPER GUIDE 2 Secure the PAPER SENSOR SWITCH L and the PAPER SENSOR SWITCH R to the DOC PAPER GUIDE with the screw M2 x 8 mm B type P head respectively 3 Secure the TRAY COVER to the DOC...

Page 528: ...C H A P T E R 5 ADJUSTMENT manuals4you com manuals4you com ...

Page 529: ...rfere with the product operations and or functions Table 5 1 Adjustment Item List Repaired Part Adjustment Item Execution Timing Adjustment Execution Means Reference FUSER ASSY Life counter clear After replacement with a new one With the control panel execute Reset Fuser Counter in Maintenance Menu p553 2ND BTR ASSY Life counter clear After replacement with a new one With the control panel execute...

Page 530: ...tion Tool Operating Environment OS Windows95 OSR2 0 or later Windows98 Windows Me Windows 2000 XP Port LPT USB INSTALLATION METHOD AND BASIC OPERATION 1 Copy all the Main Board Initialization Tool files in a folder onto a computer 2 Double click on the icon to start up the program and select AcuLaser CX11 or AcuLaser CX11F in the Select Model 3 Select the port used to connect the printer at the In...

Page 531: ...to that on the label attached on the product Refer to 1 4 Status Sheet p71 Table 5 2 Writing Method Condition of Main Board Check of the previous ID Writing Method Button Name Explanation Communication is impossible between PC and the Main Board The previous ID can be confirmed by a status sheet or something else that has been already printed out Store optional ID Enter the previous ID to write it...

Page 532: ...X11 CX11F can be updated by transferring the program update data from the PC to the product via USB using a dedicated tool The dedicated tool is shown below Name Firmware Update Tool Unit Data Format Updating Method Panel Operation Tool Controller p535 RCC NR Required CRB Required Required MCU p537 BIN Required Required Color table p540 RCC NR Required manuals4you com manuals4you com ...

Page 533: ...disconnect other interface cables from the product 3 Prepare the update data Turn the computer on and copy the program update file the extension is RCC onto the computer Turn the computer on and copy the program update file the extension is CRB onto the computer 4 Start up the Printer Turn the product ON while holding down the Color Start Reset and Down buttons The product will start up in Program...

Page 534: ...he data LED of the printer is turned off and the LCD panel displays Ready turn the printer power off and turn back on again Pressing the Right button on the control panel reboots the product 10 Print the status sheet Prints the status sheet Prints the status sheet 11 Check the version on the status sheet Confirm that the program firmware version has been updated correctly by comparing the status s...

Page 535: ...he printer with the computer After turning the power off for both the printer and computer connect them with a USB cable Before connecting the USB cable make sure to disconnect other interface cables from the product 3 Prepare the update data Turn the computer on and copy the program update file the extension is MOT onto the computer 4 Start up the Printer Turn the product ON while holding down th...

Page 536: ...e Firmware Update Tool Specify the port and the program update file on the selection window of the tool 6 Transmit the data Click the Send on the Firmware Update Tool screen Table 5 4 MCU Firmware Update Procedure Method LCD Panel send size XXX SENT SIZE XXX Type XXX sum XXX manuals4you com manuals4you com ...

Page 537: ...d on the LCD panel Confirm the checksum 9 Reboot the Printer Turn the printer off and back on 10 Print the status sheet Prints the status sheet or engien status sheet 11 Check the version on the status sheet Confirm that the program firmware version has been updated correctly by comparing the status or engine status sheet with that printed in step 1 Refer to 1 4 Status Sheet p71 6 4 2 1 Engine Sta...

Page 538: ...the computer on and copy the program update file the extension is RCC onto the computer 4 Start up the Printer Start up the product in normal mode 5 Prepare to send the data Start up the Firmware Update Tool Specify the port and the program update file on the selection window of the tool 6 Transmit the data Click the Send on the Firmware Update Tool screen Completion pop up window will be displaye...

Page 539: ...m EPSON MFP Maintenance Utility Operating Environment OS Windows 98 Windows 98 Second Edition Windows Me Windows 2000 Professional Windows XP Professional Home Edition PC AT compatible machine with a USB port USB 1 1 USB Cable INSTALLING AND STARTING UP THE SOFTWARE Install Execute the Setup EXE Start up Start up the MFP Maintenance Utility from the Windows menu C H E C K P O I N T It is not neces...

Page 540: ...ithout changing the format File Name File Name Description BackUpDataYY MM DD SysParam Txt System Parameter Information G3 ID Bin G3 ID information TxHeader Bin Information in the fax header SpeedDial Bin Speed Dial information GroupDial Bin Group Dial information OneTuch Bin One Touch button information C A U T I O N Do not shuffle the order or delete the settings Only changing the setting values...

Page 541: ...enance Tool 4 Retrieve the user data Click on the User Data tab and select the Read user data then click the Start button Select the destination to save the user data in the selection window and click the OK button Once the communication and the transaction are started when the MFP Maintenance Tool is executed the message Using Fax Tool is displayed on the LCD panel Note When the folder already ex...

Page 542: ...2 Start up the computer and the product Turn the power ON for both the computer and the product 3 Start up the tool Start up the Fax Maintenance Tool 4 Write the user data Click on the User Data tab and select the Write user data then click the Start button Select the folder in which the user data is stored in the selection window and click the OK button Note When the OK is clicked the tool search...

Page 543: ...C H A P T E R 6 MAINTENANCE ...

Page 544: ... them into fire W A R N I N G Take extra care not to let the laser beam get into your eye or it could cause loss of sight While servicing the laser printer never open any cover on which a Warning Label for Laser beam is attached Understand hazardous nature of the laser beam use extreme caution to avoid injury of yourself and anyone around you When you need to work on the hot part or unit Fuser Ass...

Page 545: ...s that are replaced and not to leave them on the site Before starting your work spread a sheet of cloth or paper over the working place to prevent the site from getting dirt with spilt toner Which is the Purpose of Visit Maintenance Repair Preventive maintenance Perform troubleshooting according to the procedure given in Chapter 3 What to Do Last 1 Check the printer appearance 2 Train the user as ...

Page 546: ...nd how the product has been used TROUBLE REPEATABILITY CHECK Perform troubleshooting according to the procedure given in Chapter 3 1 Refer to Section 3 4 3 FIP p145 and confirm the trouble conditions and execute troubleshooting 2 If a fatal image quality problem all white all black etc has occurred due to engine failure perform troubleshooting with reference to Section 3 4 Image Quality related Tr...

Page 547: ... inner side of the product in the direction of the arrow Figure 6 3 Cleaning the Exposure Window 1 3 Slowly pull the cleaner outward and push it back 1 cycle Figure 6 4 Cleaning the Exposure Window 2 4 Push the lever back to its original position C A U T I O N Do not use chemical solvent such as thinner benzine acetone to clean the housing or any other exterior part of the product Doing so may det...

Page 548: ...t Note The judgement whether to replace components needing periodic replacement can be done by the cumulative numbers of printed sheets Replace the components as the occasion arises REPLACEMENT OF CONSUMABLES AND COMPONENTS NEEDING PERIODIC REPLACEMENT Do the replacement with reference to 6 5 Consumables and Components needing Periodic Replacement p562 GENERAL OPERATION CHECKS After completion of ...

Page 549: ...part requires lubrication for this unit is as below Parts Name CHUTE ASSY FSR Lubrication Part Spring attached on the CHUTE ASSY FSR Types of oil applied Parts Name GREASE G 76 Parts Number 1304691 Amount of lublicate About 5mm Note Lubrication is required when CHUTE ASSY FSR and FRAME ASSY 2ND are replaced at the same time When replacing only one of them lubrication is not necessary as the grease...

Page 550: ...rts Name GREASE G 31 Parts Number 1080618 Amount of lublicate A little modest amount Lubrication Part Lubrication Part DOC PAPER GUIDE Parts Name TRAY GEAR 24T Lubrication Part Parts of the TRAY GEAR 24T indicated in the figure Types of oil applied Parts Name GREASE G 31 Parts Number 1080618 Amount of lublicate A little modest amount TRAY GEAR 24T Lubrication Part manuals4you com manuals4you com ...

Page 551: ...nts a log file of printing status Reset 2ndBTRCounter Resets the life counter of the 2nd BTR ASSY After executing the counter reset open and close the Cover A and do not turn the printer off until the engine stops completely The counter must be reset after the 2nd BTR ASSY is replaced with a new one When resetting the counter the number of printed pages for the previous 2nd BTR ASSY at that point ...

Page 552: ...u Be sure not to turn the product OFF until the engine stops operating Figure 6 6 Maintenance Menu Flowchart C A U T I O N Executing MCU DATA BackUp and MCU DATA Restore is not possible when the product in the following statuses In sleep mode During warming up During printing During adjusting the printer Do not turn the power OFF until the engine completely stops after executing MCU DATA BackUp an...

Page 553: ...FUSER ASSY Fuser Change Number of replacements of FUSER ASSY Number of pages printed at the time of replacing the previous one 2nd BTR Total number of pages printed using the current 2nd BTR 2nd BTR Change Number of replacements of 2nd BTR ASSY Development Unit C Development Operating time of the motor for Housing ASSY DEVE C M Development Operating time of the motor for Housing ASSY DEVE M Y Deve...

Page 554: ...n sensor 16 At Dup Out sensor 15 After Exit sensor turns off Dup In sensor does not turn off 14 After Dup In sensor turns on Dup Out sensor stays off 13 After Duplex loading signal Regi sensor stays off 12 After Regi sensor turns on Exit sensor stays off 11 After Regi Roll turns on Exit Fuser In sensor is stays off 10 9 The setting is for transparency but media other than transparencies was fed Th...

Page 555: ...ed The date and time is not re calculated even if the time difference is changed yy are the lower two digits of the calendar year In the non synchronous mode is displayed 2 The value of the total dot counter on ASIC is used in the dot calculation Threshold is 128 Figure 6 7 Engine Status Sheet Table 6 2 Paper Type Paper Type Front Side Back Side Plain paper 1 17 High quality paper 8 24 Thick paper...

Page 556: ...3 647 0 99 999 999 0 2 147 483 647 0 255 0 255 0 255 0 255 0 255 0 255 0 255 0 255 msec msec msec msec msec msec msec msec Times Times Times Times Times Times Times Times During printing Fixed value 4096dots During printing Fixed value 4096dots During printing Fixed value 4096dots During printing Fixed value 4096dots When replaced C Toner When replaced C Toner When replaced M Toner When replaced M...

Page 557: ...SemiThk Thick ExtraThk Card Envelope Engine Engine Engine Engine Engine Engine 0 15 0 15 0 15 0 15 0 15 0 15 Setting value Setting value Setting value Setting value Setting value Setting value Setting Setting Setting Setting Setting Setting Power On Times power is turned on Sleep Number of recoveries from standby Controller Controller 0 99 999 999 0 99 999 999 Times Times At Power on When returnin...

Page 558: ...rinted pages by paper size Total Number of printed pages Mono Simplex Monochrome Number of printed pages by one side printing Color Simplex Color process color Number of printed pages by one side printing Print of mode Number of printed pages by print mode Coverage Duty Percentage of printed dots in total dots per page of each color It is avaraged each time one page is printed Dots 1 dots Number o...

Page 559: ...ing During printing During printing New C toner detected New M toner detected New Y toner detected New K toner detected Print pages Total Mono Simplex Mono Duplex Color Simplex Color Duplex Dummy Controller Controller Controller Controller Controller Controller 0 99 999 999 0 99 999 999 0 99 999 999 0 99 999 999 0 99 999 999 0 99 999 999 pages pages pages pages pages pages During printing During p...

Page 560: ...requent power on off etc Hence the number of printable pages of the consumables and periodical replacement parts may become less than a half depending on the operating conditions and environment of the user Table 6 5 Information on Consumables Part Name Part Code Life Pages Service life indication Remarks Toner Cartridge Yellow LPCA4ETC4Y 1500 1 Replace Toner C 1500 pages by the K toner is the fig...

Page 561: ...que of the heat roller HOUSING ASSY DEVE K 1292991 100000 Worn K Dev Unit PIVOT AD Execute Reset X DvlpCounter X Y M C or K in the Maintenance Menu to reset the life counter After executing the counter reset open and close the Cover A Do not turn the printer off until the engine completely stops While it can still be printed it is desirable to replace the unit The PIVOT AD is packed with the ASP H...

Page 562: ...C H A P T E R 7 APPENDIX manuals4you com manuals4you com ...

Page 563: ...n Board Block Diagram CN704 ADF I F 1 12Pin CN705 Sensor I F 2 2Pin CN405 Panel I F 30Pin CN701 CCD_A I F 14Pin CN702 CCD_B I F 13Pin CN703 Motor I F 4Pin Control Panel CN601 Engine I F 16Pin CN602 Viedo I F 2Pin CN300 ROM RAM DIMM P 90Pin CN201 RAM DIMM A 90Pin CN202 RAM DIMM B 90Pin P S0 S1 CN502 Power 24V 2Pin CN410 FAX I F 2 40Pin CN402 USB I F 2Pin CN501 Power 5V 3 3V 2Pin CN407 Cobalt I F 30...

Page 564: ...IN 117 D 105 Connects SWITCH INLK FUSER and HARNESS ASSY MAIN 125 G 108 Connects SWITCH FRONT DOOR and HARNESS ASSY MAIN 126 F 138 Connects SENSOR TNER FULL and HARNESS ASSY TNER FULL 128 G 153 Connects FUSER LOCK SWITCH and HARNESS ASSY MAIN 200 H 153 Connects MOT ASSY P R and HARNESS ASSY MAIN 201 G 153 Connects MOT ASSY P R and HARNESS ASSY MAIN 202 F 124 Connects CLUTCH ASSY PRE REGI and HARNE...

Page 565: ...Y MAIN 601 H 138 Connects ROS ASSY and HARNESS ASSY MAIN 602 H 138 Connects ROS ASSY and HARNESS ASSY MAIN 603 F 124 Connects HARNESS ASSY P H1 and HARNESS ASSY P H2 604 F 124 Connects MOTOR PH and HARNESS ASSY P H1 605 E 124 Connects SOLENOID PICK UP and HARNESS ASSY P H1 607 E 140 Not used 614 E 105 Connects FUSER ASSY and HARNESS ASSY MCU C L 617 D 140 Connects HARNESS ASSY TNER FULL and HARNES...

Page 566: ...EED2 437 E 309 Connects PWBA TRAY 500 and HARNESS ASSY FEED MAIN CN1 E 308 Connects PWBA MOT and HARNESS ASSY FEED MAIN CN2 D 308 Connects PWBA MOT and MOTOR ASSY FEEDER 608 D 307 Connects HARNESS ASSY MAIN and HARNESS ASSY FEED1 609 C 309 Connects CLUTCH ASSY FEED and HARNESS ASSY FEED MAIN 610 C 308 Connects SOLENOID FEED and HARNESS ASSY FEED MAIN 618 D 307 Connects HARNESS ASSY FEED MAIN and H...

Page 567: ...r IOT 2 Figure 7 4 Plug and Jack Layout for IOT 3 604 603 605 103 100 202 101 102 203 A 117 118 119 120 121 122 123 124 125 126 127 128 129 130 116 B C D E F G H I J K L Leg_04_002RA 126 617 431 111 620 112 113 601 607 602 621 A 132 133 134 135 136 137 138 139 140 141 142 143 144 145 131 B C D E F G H I J K L Leg_04_003RB ...

Page 568: ... 415 412 403 404 405 421 420 411 413 409 406 416 414 422 418 417 401 410 408 407 600 201 200 CN602 CN405 CN502 128 CN705 CN703 CN410 CN704 CN702 CN701 A 147 148 149 150 151 152 153 154 155 156 157 158 159 160 146 B C D E F G H I J K L Leg_04_004RC 121 608 618 120 119 CN2 609 610 4358 436 435 437 CN1 A 302 303 304 305 306 307 308 309 310 311 312 313 314 315 301 B C D E F G H I J K L Leg_Sec04_006EB...

Page 569: ...such as a leaf spring Indicates a connection between parts with a screw Indicates Frame Ground Indicates a connector and the connector No Indicates a connection terminal with a leaf spring or other spring on a board and the connector terminal No Indicates a connector attached directly to the board and the connector No Box with a part name in it indicates the part Indicates a functional component i...

Page 570: ...SSY MICRO PL11 1 7 MOT ASSY FSR PL11 1 3 FUSER ASSY PL10 1 1 SWITCH INLK FUSER PL1 1 34 MOTOR PH PL5 2 20 P J604 SOLENOID PICK UP PL4 1 23 P J605 CLUTCH ASSY PRE REGI PL5 2 22 P J202 CLUTCH ASSY REGI PL5 2 2 P J203 SWITCH PH DOOR PL5 2 23 P J100 SENSOR PAPER EMPTY PL4 1 24 P J103 P J603 P J408 P J409 P J418 P J620 P J621 P J422 P J600 PWB ASSY ROT PL12 1 10 P J433 P J430 P J412 P J405 P J406 MOT A...

Page 571: ...L X Y Z Heater Control Indicates a connection between parts with a harness or wire and its signal name details An arrow indicates the direction of the signal Indicates the logical value Low L High H of the signal for enabling the function The voltage is the value when the signal is High An arrow indicates the direction of the signal Indicates the logical value Low L High H of the signal when the f...

Page 572: ... between PWBA MCU and SENSOR OHP Connection between PWBA MCU and SENSOR REGI Connection between PWBA MCU and SENSOR PAPER EMPTY 3 FEEDER 500 p578 Connection between PWBA MCU and PWBA TRAY 500 Connection between PWBA TRAY 500 and CLUTCH ASSY FEED Connection between PWBA TRAY 500 and SWITCH FEEDER Connection between PWBA TRAY 500 and SENSOR NO PAPER Connection between PWBA TRAY 500 and SENSOR T R Co...

Page 573: ...ER IN Connection between PWBA MCU and SENSOR 2BTR RETRACT Connection between PWBA MCU and SWITCH 2BTR COVER Connection between PWBA MCU and SENSOR ASSY ADC Connection between PWBA MCU and MOT ASSY MICRO 9 FUSER p584 Connection between PWBA MCU and MOT ASSY FUSER Connection between PWBA MCU and FUSER ASSY Connection between PWBA MCU and SWITCH FUSER DOOR Connection between PWBA MCU and FUSER LOCK S...

Page 574: ...mes the power source of the LV HVPS internal Relay coil This signal opens closes Relay contacts and controls INTERLOCK 24VDC and INTERLOCK 5VDC Figure 7 8 DC POWER SUPPLY Connection and Wiring Diagram Name of Signal Line Remarks POWER SAVE Signal for turning 24VDC OFF Name of Signal Line Remarks I L 5VDC LV HVPS PL12 2 3 Power Save P J500 3 5VDC Supply 24VDC Supply 3 3VDC Supply 15 P J500 5 P J502...

Page 575: ...aper detection signal at REGI section generated by Sensor Photo REGI Sensor SG PWBA MCU PL12 2 1 2 3 4 5 P H MOT ON H 3 3VDC P H MOT PWM 3 3VDC P H MOT TG 3 3VDC P H MOT ON CW CCW SG P J409 1 6 I L 24VDC P J604 6 5 4 3 2 1 1 2 3 4 5 6 M MOTOR PH PL5 2 20 P J409 7 I L 24VDC 8 FEED SOL ON L 24VDC P J605 2 1 1 2 P J408 1 PRE REGI CL ON L 24VDC 2 I L 24VDC P J202 2 1 1 2 3 REGI CL ON L 24VDC 4 I L 24V...

Page 576: ...XD 6 SG 7 6 4 5 5 5VDC 5 6 5 6 4 4 SG 3 SG 4 3 7 8 2 I L 24VDC 2 9 8 9 7 1 I L 24VDC 1 10 10 PWBA TRAY 500 PL14 3 3 5VDC INTERLOCK 24VDC INTERLOCK 24VDC PWBA TRAY 500 PL 14 3 3 P J437 1 2 4 5 6 7 8 9 10 11 12 16 17 FEED MOT ON H I L 24VDC SG 1 2 4 CN1 5 PWBA MOT PL14 3 4 CN2 1 2 3 4 5 6 MOTOR ASSY FEEDER PL14 3 9 M I L 24VDC FEED CL ON L 24VDC 1 P J609 2 2 1 SG P J121 2 1 SWITCH FEEDER DOOR PL14 3...

Page 577: ...SY SOS SENSED L 5VDC Reference signal for start of laser scanning SOS PWB SCANNER PWB SCANNER MOTOR PWBA LD PWBA ESS PL12 2 7 CN602 1 2 P J407 1 2 3 4 5 6 7 8 9 10 11 12 13 14 15 16 P J424 9 8 7 6 5 4 3 2 1 P J425 5 4 3 1 P J426 3 2 1 PWBA MCU PL12 2 1 P J602 2 1 P J601 16 15 14 13 12 11 10 9 8 7 6 5 4 3 2 1 1 1 2 2 3 4 5 6 7 8 9 10 11 12 13 14 15 16 P J427 2 1 DATA DATA DATA DATA P CONT LASER ON ...

Page 578: ... FG P R MOT ON L P R MOTOR drive control signal PWBA MCU PL12 2 1 2 3 4 5 6 IBT BRUSH MOT ON IBT BRUSH MOT PWM IBT BRUSH MOT TG IBT BRUSH MOT CW CCW SG I L 24VDC I L 24VDC IBT BRUSH MOTOR M P J411 1 1 2 3 IBT CLEN RET MOT ON SG IBT CLEANER RETRACT MOTOR P J414 M P J413 8 9 I L 24VDC RETRACT SOL ON L 24VDC 10 11 SG FULL TONER SENSED H 5VDC 12 PULL UP 5VDC P J606 2 1 P J617 3 2 1 1 2 3 P J126 3 2 1 ...

Page 579: ...ON 2nd BTR Bias ON OFF signal DEVE BIAS CLK DEVE AC Bias cycle control signal 2nd BTR CONT 2nd BTR Bias voltage control signal BCR CLK BCR Bias cycle control signal LV HVPS 12 2 3 12 13 14 15 16 17 18 19 20 21 P J500 22 11 10 9 8 7 6 6 P J515 1 2 3 4 5 7 8 9 D 1 C 1 A 1 P J401 1 2 3 4 5 6 7 8 9 10 11 12 13 14 15 16 17 P J516 9 8 7 6 5 4 3 2 1 H 1 F 1 G 1 PWBA MCU PL12 2 1 PWBA HVPS PL12 1 9 1st BT...

Page 580: ...en close detection signal PWBA MCU PL12 2 1 P J405 1 2 3 MAGNET ROLL MOTOR MAG ROLL MOT ON 3 5 7 P J406 1 PULL UP 5VDC 4 5 6 MAG ROLL MOT PWM MAG ROLL MOT TG MAG ROLL MOT CW CCW SG I L 24VDC M 2 DISP CLUTCH ON L 24VDC I L 24VDC P J413 5 6 7 SG HOME POSITION SENSED H 5VDC P J105 3 3 1 2 2 1 SENSOR ROTARY HOME POSI PL9 1 18 HOLD ANTENNA IN P J415 1 2 1 ANTENNA CTRG PL9 1 12 P J415 6 7 8 9 CLOCK ON H...

Page 581: ...sor ADC internal color toner patch ADC LED BLACK ON L 5VDC Lighting signal of LED for detection of Sensor ADC internal black toner patch ADC SENSOR Toner patch density data measured by the sensor analog value RETRACT MOT ON H 3 3VDC RETRACT MOT PWM 2nd BTR Retract Motor control signal PWBA MCU PL12 2 1 4 5 6 PULL UP 5VDC Interlock 24VDC 7 8 SG RETRACT SENSED H 5VDC SG COVER OPENED H 3 3VDC P J112 ...

Page 582: ...4VDC Fuser Lamp Relay ON OFF signal in PWBA Fuser Cont FUSER DOOR SW OPEND H 3 3VDC Cover Fuser open close detection signal RL PWBA MCU PL12 2 1 P J404 1 2 3 4 5 Interlock 24VDC 5VDC 6 P J417 1 2 3 4 5 6 7 8 FUSER MOT ON H 3 3VDC FUSER MOT PWM FUSER MOT TG 5VDC SG I L 24VDC SG SG Vc PULL UP 5VDC SG FUSER EXIT SENSED L 5VDC FUSER ASSY PL10 1 1 Safety Temp Sensor Temp Sensor 1 2 P J615 2 1 1 2 3 3 P...

Page 583: ...ure 7 17 CONTROLLER Connection and Wiring Diagram PWBA ESS PL12 2 7 CN601 1 2 3 4 5 6 7 8 9 10 11 12 13 14 15 16 CN501 1 2 3 4 5 6 P J400 16 15 14 13 12 11 10 9 8 7 6 5 4 3 2 1 P J501 1 2 3 4 5 6 CN405 CN1 PWBA MCU PL12 2 1 LV HVPS PL12 2 3 OP PANEL PL1 1 17 3 3VDC 5VDC CN502 1 2 P J510 1 2 Leg_007_011FA ...

Page 584: ... T I O N Carrying the product should be done by two or more people keeping it in a horizontal position Since the rear side of the product is heavier than its front side be aware of the difference when carrying the product Use extreme care during the installation to avoid an accident and injury 1 Main Unit 2 Toner Cartridge YMCK 3 POWER CORD 4 Anticounterfeit Label 15 countries Note Photoconductor ...

Page 585: ...IX Packaging Specification 587 Base Model 500 SHEET CASSETTE 1 Main Unit 2 IBT ASSY 3 Toner Cartridge YMCK 4 POWER CORD 5 CAUTION SHEET 6 Anticounterfeit Label 15 countries Note Photoconductor unit is packed separately 2 4 1 3 5 6 1 Main Unit 1 ...

Page 586: ... 01 24 COVER INNER TOP 01 01 26 EXIT CHUTE SWITCH 01 01 27 SWITCH INLK FRONT 01 01 28 COVER ASSY RH 01 01 32 COVER DUP 01 01 33 COVER INNER L 01 01 34 SWITCH INLK FRONT 01 01 36 EXIT CHUTE SWITCH 01 01 99 KIT SLIDE BAR 12 02 01 PWBA MCU 12 02 02 FFC ASSY LV MCU 12 02 03 LV HVPS 12 02 04 HARNESS ASSY AC 12 02 05 FFC ASSY ESS 12 02 07 BOARD ASSY MAIN 12 02 08 BOARD ASSY MEMORY 12 02 10 HARNESS ASSY ...

Page 587: ...NSOR 06 01 04 HARNESS ASSY 2BTR SENS 06 01 06 DIODE FUSER 06 01 07 FRAME ASSY 2ND Table 7 5 Main Unit Diagram No Part Name 06 01 08 GEAR 27 06 01 12 2ND BTR ASSY 06 01 13 CAM ASSY 2ND 06 01 15 COVER ASSY RR 2ND 06 01 16 HARNESS ASSY 2BTR SW 06 01 18 EXIT CHUTE SWITCH 06 01 20 SENSOR ASSY ADC 06 01 21 HOLDER ADC 2ND 06 01 22 SENSOR UPPER PASS 06 01 26 SENSOR UPPER PASS 06 01 27 PLATE BIAS 2ND ASSY ...

Page 588: ...ASSY DEVE C 09 02 09 FRAME ASSY ROTARY 09 02 10 PIVOT ASSY 09 02 11 PIVOT AD 09 02 13 BEARING BALL 10 01 01 FUSER ASSY 10 01 02 HARNESS ASSY MCU C L 10 01 06 FUSER LOCK SWITCH 11 01 01 DRIVE ASSY BTR 11 01 02 DRIVE ASSY PRO 11 01 03 MOT ASSY FSR 11 01 04 MOT ASSY MAG 11 01 05 MOT ASSY ROT 11 01 06 MOT ASSY P R 11 01 07 MOT ASSY MICRO 11 01 09 GEAR 2ND 12 01 06 SENSOR HUM TEMP Table 7 5 Main Unit D...

Page 589: ...WBA MOT 01 03 08 SOLENOID FEED 01 03 09 MOT ASSY FSR 01 03 10 GEAR ASSY DRIVE 01 03 11 GEAR FEED 01 03 12 CLUTCH ASSY FEED 01 03 14 HARNESS ASSY FEED 1 01 03 16 ROLL ASSY TURN 500 01 03 18 EXIT CHUTE SWITCH 01 03 20 FOOT FEEDER 01 03 21 BLOCK CST 01 03 22 HARNESS ASSY FEED 2 01 03 23 CHUTE ASSY 500 01 03 24 HOLDER ASSY RETARD 500 01 03 26 FILM ASSY FDR 01 03 29 LEVER 500 01 03 32 GUIDE CST R 01 03...

Page 590: ...1 9 TWO_SIDE_TAPE_4 01 10 SCREW 02 CORE_ASSY 03 IR_TIMING_BELT 04 IR_SHAFT 05 PLATE_HW 06 FFC_CR 07 SPONGE1 08 SPONGE3 09 PLATE_HARNESS 10 ASSLUG_ASSY_GND 11 ASSLUG_ASSY_GND_2 12 PULLEY_ASSY 13 MOTOR_ASSY 14 CCD_MODULE_ASSY 15 IR_COVER_A_ASSY 16 FFC_CLIP 17 FERRITE_BEAD 18 LOCK_CR 19 SHEET_ESD 20 SCREW 21 SCREW 22 SCREW 23 FFC_BOARD 24 IR_ENGINE_LOCK_ASSY 25 ADF_IR_LOCK_ASSY 26 PLATE_HARNESS_2 27 ...

Page 591: ...1 SCREW 02 CORE_ASSY 03 IR_TIMING_BELT 04 IR_SHAFT 05 PLATE_HW 06 FFC_CR 07 SPONGE1 08 SPONGE3 09 PLATE_HARNESS 10 ASSLUG_ASSY_GND 11 ASSLUG_ASSY_GND_2 12 PULLEY_ASSY 13 MOTOR_ASSY 14 CCD_MODULE_ASSY 15 IR_COVER_B_ASSY 16 FFC_CLIP 17 FERRITE_BEAD 18 LOCK_CR 19 SHEET_ESD 20 SCREW 21 SCREW 22 SCREW 23 SCREW 24 HINGE_HOLDER_1 25 SCREW Table 7 9 Document_Cover_Assy Diagram No Part Name 01 DOCUMENT_COV...

Page 592: ...1 ADF_FRAME_ASSY 02 ADF_BASE_ASSY 03 PAPER_GUIDE_ASSY 04 ADF_COVER_C 05 ADF_COVER_R 06 SDH_COVER_EXTEND 07 PCB_COVER 08 ADF_PCB_ASSY 09 SDH_COVER 10 HOOK_FIX_PLATE 11 SCREW 12 COVER_SPRING_ASSY 13 SCREW 14 WHITE_PAD_ASSY 15 CABEL_TIE 16 SCREW 17 MAGNETIC 18 SCREW 19 ADF_HINGE 20 CABEL 21 SCREW 22 RUBBER_FOOT manuals4you com manuals4you com ...

Page 593: ...SSY 06 ADF_FRAME_UNIT 07 EXIT_ROLL_ASSY 08 CLIP 09 KNOB 10 FIX_PLATE_R 11 COVER_SENSOR 12 COVER_HOOK 13 BUSH_D6 14 MOTOR_FIX_PLATE 15 MOTOR_CUSHION 16 MOTOR 17 TURNING_ROLLER 18 PAPER_GUIDE_R 19 EXIT_ROLLER 20 EXIT_ROLLER_SPRING 21 SCREW 22 SCREW 23 SCREW 24 SCREW 25 GEAR_30T 26 GEAR_40T_18T 27 GEAR_15T 28 GEAR_60T_18T 29 GEAR_33T_M0 5 30 GEAR_26T 31 GEAR_48T 32 GEAR_32T_15T 33 E_RING 34 LOCKING_C...

Page 594: ...L 04 4 SHAFT 04 5 PAPER_GUIDE_F 04 6 CONNECTOR_UNIT_ACEMU 04 7 SENSOR_ARM 04 8 TORSION_SPRING 04 9 ELASTIC_SHEET 04 10 SCREW 05 FIX_PLATE_ASSY 05 1 FIX_PLATE_LID 05 2 FIX_PLATE_F 06 ADF_FRAME_UNIT 06 1 ADF_FRAME 06 2 COPPER_SHEET 06 3 READING_PLATE_SPRING 06 4 READING_PLATE 06 5 READING_PLATE_STUD 06 6 GAP_SHEET 06 7 READING_SHEET 07 EXIT_ROLL_ASSY 07 1 PRESS_SPRING_STOPPER_R 07 2 STOPPER_ARM_L 07...

Page 595: ...e 7 14 ADF_BASE_ASSY Diagram No Part Name 01 PICK_UP_ASSY 01 1 ADF_ROLLER 01 2 PICK_UP_ROLLER 01 3 ADF_SHAFT 01 4 PICK_UP_SHAFT 01 5 PICK_UP_PLATE 01 6 GEAR_19T_23T 01 7 GEAR_23T 01 8 STOPPER_CUSHION 02 E_CLUTCH_UNIT 02 1 MAGNETIC_CLUTCH 02 2 BUSH_D4 02 3 GEAR_33T_M0 8 02 4 CLUTCH_SHAFT 02 5 BUSH_D6 02 6 CLUTCH_FIX_PLATE 02 7 SCREW 03 GEAR_20T 04 TENSION_SPRING 05 GEAR_12T 06 E_RETAINING_RING 07 C...

Page 596: ...EPSON AcuLaser CX11 CX11F Revision B APPENDIX Exploded Diagram 598 7 5 Exploded Diagram Printer Section Scanner ADF Section manuals4you com manuals4you com ...

Page 597: ...e service parts C567 CASE 001A 01 01 99 01 01 36 01 01 34 01 01 22 01 01 28 01 01 32 01 01 13 01 01 18 01 01 17 01 01 16 01 01 15 Front 01 01 13 01 01 12 01 01 12 01 01 06 01 01 05 01 01 04 01 01 20 01 01 21 01 01 10 01 01 07 01 01 03 01 01 02 01 01 33 01 01 27 01 01 26 01 01 24 01 01 23 01 01 19 Leg_Sec005_001EC A 01 01 14 A ...

Page 598: ...ference number is assigned will not be available as after sale service parts C567 ELEC 001A C C B B A A Front 12 02 01 12 02 09 12 02 08 12 02 07 12 02 05 12 02 04 12 02 03 12 02 02 Leg_Sec005_013EB 12 02 13 12 02 12 12 02 10 manuals4you com manuals4you com ...

Page 599: ...r is assigned will not be available as after sale service parts C567 MECH 001A All this page including 04 01 01 04 01 16 04 01 15 04 01 02 Leg_Sec005_002EB 04 01 17 04 01 26 04 01 25 04 01 24 04 01 23 04 01 20 04 01 22 04 01 13 04 01 09 04 01 12 04 01 11 04 01 08 A manuals4you com ...

Page 600: ...00 NO 5 1 Rev 01 C567 The parts to which no reference number is assigned will not be available as after sale service parts C567 MECH 002A Leg_Sec005_003EB Ref PL5 2 1 05 01 02 05 01 01 manuals4you com manuals4you com ...

Page 601: ...ce number is assigned will not be available as after sale service parts C567 MECH 003A All this page including 05 02 01 Leg_Sec005_004EB 05 02 25 05 02 24 05 02 08 05 02 23 05 02 22 05 02 21 05 02 20 05 02 19 05 02 18 05 02 17 05 02 16 05 02 12 05 02 11 05 02 06 05 02 06 05 02 02 E E ...

Page 602: ...ill not be available as after sale service parts C567 MECH 004A 06 01 06 06 01 07 06 01 27 06 01 15 06 01 01 06 01 04 06 01 08 06 01 16 06 01 30 06 01 29 06 01 26 06 01 22 06 01 21 06 01 20 06 01 18 06 01 13 06 01 12 06 01 03 Leg_Sec005_005EA E E D D A A C B B manuals4you com manuals4you com ...

Page 603: ...parts to which no reference number is assigned will not be available as after sale service parts C567 MECH 005A Leg_Sec005_006EB 07 01 27 07 01 20 07 01 13 07 01 04 07 01 12 07 01 27 07 01 16 07 01 15 07 01 24 07 01 30 07 01 31 07 01 33 07 01 32 07 01 02 E F A ...

Page 604: ...C567 FOR LP V500 NO 8 1 The parts to which no reference number is assigned will not be available as after sale service parts C567 MECH 006A 08 01 02 08 01 05 Leg_Sec005_007EB 08 01 01 manuals4you com manuals4you com ...

Page 605: ...67 FOR LP V500 NO 9 1 The parts to which no reference number is assigned will not be available as after sale service parts C567 MECH 007A Leg_Sec005_008EB 09 01 18 09 01 15 09 01 20 09 01 17 09 01 04 09 01 10 09 01 01 ...

Page 606: ...gned will not be available as after sale service parts C567 MECH 008A 09 02 13 09 02 10 09 02 13 09 02 10 09 02 11 09 02 11 09 02 11 09 02 11 09 02 10 09 02 10 09 02 09 09 02 08 with 11 09 02 07 with 11 with 11 09 02 06 with 11 09 02 05 Leg_Sec005_009EB manuals4you com manuals4you com ...

Page 607: ...Rev 01 C567 FOR LP V500 NO 10 1 The parts to which no reference number is assigned will not be available as after sale service parts C567 MECH 009A Leg_Sec005_010EB 10 01 06 10 01 02 10 01 01 Front ...

Page 608: ...00 NO 11 1 The parts to which no reference number is assigned will not be available as after sale service parts C567 MECH 010A Leg_Sec005_011EA 11 01 07 11 01 06 11 01 04 11 01 05 11 01 03 11 01 02 11 01 01 manuals4you com manuals4you com ...

Page 609: ... V500 NO 12 1 The parts to which no reference number is assigned will not be available as after sale service parts C567 MECH 011A Leg_Sec005_012EB 12 01 06 12 01 09 12 01 10 12 01 11 Front manuals4you com manuals4you com ...

Page 610: ...NO 1 1 The parts to which no reference number is assigned will not be available as after sale service parts C802 OPTI 049 Leg_Sec005_014EB 01 01 03 01 01 04 01 01 04 01 01 06 01 01 02 Ref PL1 3 1 Ref PL1 2 1 manuals4you com manuals4you com ...

Page 611: ...signed will not be available as after sale service parts C802 OPTI 050 Leg_Sec005_015EA 01 02 28 01 02 23 01 02 29 01 02 29 01 02 23 01 02 21 01 02 20 01 02 18 01 02 17 01 02 16 01 02 15 01 02 10 01 02 09 01 02 08 01 02 07 01 02 04 01 02 03 01 02 01 01 02 22 01 02 05 Front A A C C B B ...

Page 612: ...ailable as after sale service parts C802 OPTI 051 01 03 03 01 03 32 01 03 30 01 03 30 Leg_Sec005_016EB with RING KL 01 03 99 with RING KL 01 03 99 01 03 24 01 03 01 01 03 25 01 03 25 01 03 22 01 03 23 Ref PL1 4 01 03 10 01 03 09 01 03 12 01 03 11 01 03 07 A A C C B B Front manuals4you com manuals4you com ...

Page 613: ...he parts to which no reference number is assigned will not be available as after sale service parts C802 OPTI 052 Leg_Sec005_017EA 01 04 07 01 04 07 01 04 14 01 04 13 01 04 09 01 04 08 01 04 08 01 04 07 01 04 07 01 04 06 01 04 10 01 04 17 01 04 01 ...

Page 614: ...o which no reference number is assigned will not be available as after sale service parts C802 OPTI 053 Leg_Sec005_018EA All this page including 01 01 05 01 01 02 01 01 06 01 01 14 01 01 10 01 01 12 01 01 10 01 01 09 01 01 05 01 01 04 Front manuals4you com manuals4you com ...

Page 615: ...ch no reference number is assigned will not be available as after sale service parts C802 OPTI 054 Leg_Sec005_019EA Ref PL1 1 1 Ref PL1 3 1 01 02 10 01 02 01 01 02 02 Front FOR 500 Sheet Paper Cassette Unit LPA4CZ1CU2 NO 1 2 ...

Page 616: ...r sale service parts C802 OPTI 055 Leg_Sec005_020EA 01 03 34 01 03 32 Ref PL1 4 1 01 03 21 01 03 22 01 03 20 01 03 21 01 03 20 01 03 26 01 03 20 01 03 20 01 03 18 01 03 16 01 03 29 01 03 24 01 03 23 01 03 08 01 03 04 01 03 03 01 03 02 01 03 14 01 03 12 01 03 11 01 03 10 01 03 09 E F F E D D A A C C B B Front manuals4you com manuals4you com ...

Page 617: ...2 NO 1 4 The parts to which no reference number is assigned will not be available as after sale service parts C802 OPTI 056 Leg_Sec005_021EB 01 04 15 01 04 14 01 04 11 01 04 07 01 04 06 01 04 05 01 04 04 01 04 03 All this page including 01 04 01 Front ...

Page 618: ...IR A ASSY manuals4you com manuals4you com ...

Page 619: ...IR B ASSY ...

Page 620: ...1 4 3 01 1 01 2 2 DOC COVER manuals4you com manuals4you com ...

Page 621: ...2 3 4 5 6 7 8 9 10 11 1 13 11 17 18 12 22 14 19 16 20 21 15 11 11 13 ADF UNIT ASSY ...

Page 622: ...1 2 3 9 5 12 13 17 7 13 10 11 12 14 15 16 6 19 18 20 23 24 21 21 21 22 21 21 21 4 20 23 23 23 01 1 01 2 25 32 31 26 27 28 29 30 33 34 8 33 8 34 ADF frame assy manuals4you com manuals4you com ...

Page 623: ...4 5 7 6 2 1 2 2 2 2 3 2 4 2 5 3 3 1 3 2 5 1 5 2 4 1 4 2 4 3 4 4 4 5 4 8 4 7 4 6 4 9 4 10 4 10 6 1 6 2 6 3 6 4 6 5 6 7 6 6 6 5 7 1 7 3 7 6 7 2 7 5 7 3 7 4 ADF frame assy sub ...

Page 624: ...PAPER GUIDE ASSY manuals4you com manuals4you com ...

Page 625: ...02 7 02 6 02 2 02 3 02 5 02 4 02 1 1 3 11 6 15 5 14 8 2 9 12 10 13 4 7 01 1 01 5 01 7 01 8 01 3 01 6 01 2 01 4 ADF base assy manuals4you com ...

Page 626: ...EPSON AcuLaser CX11 CX11F Revision B APPENDIX Schematic Circuit Diagram 628 7 6 Schematic Circuit Diagram C588 MAIN manuals4you com manuals4you com ...

Page 627: ...Board C588MAIN BOARD Model Aculaser CX11 CX11F Sheet 1 of 6 Rev A ...

Page 628: ...Board C588MAIN BOARD Model Aculaser CX11 CX11F Sheet 2 of 6 Rev A manuals4you com manuals4you com ...

Page 629: ...Board C588MAIN BOARD Model Aculaser CX11 CX11F Sheet 3 of 6 Rev A ...

Page 630: ...Board C588MAIN BOARD Model Aculaser CX11 CX11F Sheet 4 of 6 Rev A manuals4you com manuals4you com ...

Page 631: ...Board C588MAIN BOARD Model Aculaser CX11 CX11F Sheet 5 of 6 Rev A ...

Page 632: ...Board C588MAIN BOARD Model Aculaser CX11 CX11F Sheet 6 of 6 Rev A manuals4you com manuals4you com ...

Page 633: ...eter Check p140 3 6 4 3 System Parameter Settings p298 C A U T I O N Some of the system parameter settings are restricted according to the regulations or standards of the country or region To prevent those settings from being changed by mistake changing system parameter settings that are not described in this manual is prohibited Be sure to observe the specified setting range for the system parame...

Page 634: ... 0x04 Germany 0x07 Argentine 0x09 Australia 0x0A Austria 0x0F Belgium 0x16 Brazil 0x20 Canada 0x26 China 0x2E Czechoslovakia 0x31 Denmark 0x3C Finland 0x3D France 0x46 Greece 0x50 Hong Kong 0x51 Hungary 0x57 Ireland 0x59 Italy 0x61 Korea 0x69 Luxembourg 0x6C Malaysia 0x73 Mexico 0x7B Holland 0x7E New Zealand 0x82 Norway 0x8A Poland 0x8B Portugal 0x9C Singapore 0xA0 Spain 0xA5 Sweden 0xA6 Swiss 0xA...

Page 635: ...aker volume setting 1 OFF 2 Minimum 3 Medium 4 Full Medium 3 SYS_INFORMATION_SERVICE 300 004 007 Enables or disables the notification function 0 Disable 1 Enable Disable 0 Not used SYS_FILE_MEM_SIZE 300 008 008 Total memory size SDRAM for a file 1 to 4 Mbytes 4Mbytes Not used SYS_FORCED_POLLING 300 012 009 Enables or disables the forced polling function 0 Disable 1 Enable Disable 0 Not used SYS_DR...

Page 636: ...MM_YY YY_MM_DD 0 SYS_TIME_FORMAT 100 004 011 Time display format 0 Displays on a 12 hour basis 1 Displays on a 24 hour basis 24 hour basis 1 SYS_MANRX_POLL_SEL 100 006 012 Start button function during a call Sets the Start button to receive a fax manually or performs manual polling when it is pressed during a call 0 Manual receiving 1 Manual polling Manual receiving 0 Not used SYS_OVERSEAS_SENDING...

Page 637: ...PRN_CAS2_ENABLE 200 002 025 Cassette 2 available not available 0 Not available 1 Available Available 1 Not used PRN_CAS3_ENABLE 200 003 026 Cassette 3 available not available 0 Not available 1 Available Available 1 Not used PRN_CAS4_ENABLE 200 004 027 Cassette 4 available not available 0 Not available 1 Available Not available 0 For expansion PRN_CAS5_ENABLE 200 005 028 Cassette 5 available not av...

Page 638: ..._OFSET_L_600DPI 200 024 035 Amount of left margin reduction for 300 x 600 dpi image 0 to 255 dots in increments of 8 dots 120dot Not used PRN_OFSET_R_600DPI 200 025 036 Amount of right margin reduction for 300 x 600 dpi image 0 to 255 dots in increments of 8 dots 120dot Not used PRN_OFSET_T_600DPI 200 026 037 Amount of top margin reduction for 300 x 600 dpi image 0 to 255 dots 120dot Not used PRN_...

Page 639: ...CLE_MAX 300 016 056 Maximum ringer frequency 0 127 5 ms 1step 0 5ms 100m 200 LIN_MAKE_10PPS 300 017 057 10 PPS Make time Make time for dialing at DP 10 PPS 0 255 ms 1step 0 417ms 31 275ms 75 LIN_BREAK_10PPS 300 018 058 10 PPS Break time Break time for dialing at DP 10 PPS 0 255 ms 1step 0 417ms 67 137ms 161 LIN_MAKE_20PPS 300 019 059 16 20 PPS Make time Make time for dialing at DP 16 20 PPS 0 255 ...

Page 640: ...0 to 450Hz 2 300 to 500Hz 3 450 to 650Hz 400Hz 0 LIN_BUSYTONE_PATTERN 300 035 065 Busy tone pattern 0 ON 0 30 0 80S OFF 0 30 0 80S 1 ON 0 20 0 60S OFF 0 30 0 60S 2 ON 0 50 1S OFF 0 50 1S 3 ON 0 12 1 2S OFF 0 12 1 2S 0 LIN_NCU_TYPE 300 036 066 NCU type 0 For Japan 0 Not used LIN_20PPS_ENABLE 300 037 067 Enables or disables 20 PPS setting When this is set to disable 20 PPS setting specified in the d...

Page 641: ...ds 24 LIN_DRPD_OFF_MIN 300 045 06F Minimum OFF time of distinctive ring 0 to 25 5 sec 1 step 100 ms 3 2 seconds 32 LIN_DRPD_OFF_MAX 300 046 070 Maximum OFF time of distinctive ring 0 to 25 5 sec 1 step 100 ms 4 8 seconds 48 LIN_OFFHOOK_ALARM 300 047 071 Enables or disables the off hook alarm after finishing fax communication The alarm goes off when off hook condition of the attached phone is detec...

Page 642: ...A_REG17 300 052 075 SiDAA country setting register 2 0x00 bit0 Billing Tone Detected 0 No billing tone detected 1 Billing tone detected 0 bit1 ReceiVe OVerload 0 Normal receiVe input leVel 1 ExcessiVe receiVe input leVel 0 bit2 Billing Tone Protect Enable 0 Billing Tone Protect disabled 1 Billing Tone Protect enabled 0 bit3 OVerload Protect Enable 0 Disable oVerload protection 1 Enable oVerload pr...

Page 643: ...77 SiDAA operating mode 0 bit0 Automatic adjustment of boundary value between On hook and Off hook 0 Enable 1 Disable DAA base is used for the boundary value 0 bit1 Automatic adjustment of DCT mode 0 Enable 1 Disable 0 bit2 Line monitor setting at ringer check 0 Ringer check without monitoring line 1 Ringer check with monitoring line 0 bit3 Setting value of country register 16 0 Recommended value ...

Page 644: ...10 1 10 n 2 n 1 n 0 10 0 LIN_DTMF_TX_TIME 300 062 07F PB DTMF transmitting time Tone transmitting time at PB DTMF dialing 0 to 255 ms 1 step 1 ms 100 ms 100 LIN_DTMF_PAUSE_TIME 300 063 080 PB DTMF pose time Interdigit time at PB DTMF dialing 0 to 255 ms 1 step 1 ms 101 ms 101 LIN_DTMF_TX_LEVEL 300 064 081 PB DTMF transmitting level DTMF transmitting attenuator level at PB DTMF dialing 4 to 15 4 to...

Page 645: ...pt is made the set number of times 0 to 5 times 1 step 1 time 3 times 3 LIN_COMM_INTERVAL 310 026 087 Time interval between the independent communications 3 to 255 sec 1 step 1 sec 8 sec 8 LIN_NUM_CHECK_ENABLE 310 027 088 Enables or disables calling control for identical destination 0 Disable 1 Enable Enable 1 LIN_NUM_CHECK_INTERVAL 310 028 089 Calling control time for identical destination 1 to 2...

Page 646: ...fax manually 0 Not send 1 Send Send 1 COM_RX_ATT_LEVEL 300 025 0A2 Receiving level Set the tone level to be detected as an incoming fax 0 43 dBm 1 38 dBm 2 33 dBm 3 48 dBm 43 dBm 0 COM_CED_DETECT_TIME 310 006 0A3 CED detecting time 0 to 2550 ms 1 Step 10 ms 100 ms 10 COM_V34_SYM_RATE_MAX 310 007 0A4 Symbol speed maximum variation tolerance This setting is enabled only when receiving a fax 0 2400 b...

Page 647: ...ble 1 bit6 High carrier frequency transmitting ability at 3200 baud symbol speed 0 Disable 1 Enable Enable 1 bit7 Transmitting at 3429 baud symbol speed 0 Not allow 1 Allow Allow 1 COM_V34_BIT_RATE_ENABLE1 310 010 0A7 Direction to enable bit speed 1 This setting is used during MPh sequence 0xFF bit0 V 34 2400 bps ability 0 Disable 1 Enable Enable 1 bit1 V 34 4800 bps ability 0 Disable 1 Enable Ena...

Page 648: ... Disable 1 Enable Enable 1 COM_V34_CTRL_BIT_RATE 310 012 0A9 Control channel bit speed 0 1200 bps 1 2400 bps 1200 bps 0 COM_V34_SYM_RATE_THRESH1 310 013 0AA Symbol speed threshold value 1 Phone line characteristic distortion permissible level The smaller value the more difficult it is to select higher symbol speed 0xFA 6 dB Difficult to judge 0xFB 5 dB 0xFC 4 dB 0xFD 3 dB 0xFE 2 dB 0xFF 1 dB 0x00 ...

Page 649: ...C 4 dB 0xFD 3 dB 0xFE 2 dB 0xFF 1 dB 0x00 0 dB Standard 0x01 1 dB 0x02 2 dB 0x03 3 dB 0x04 4 dB 0x05 5 dB 0x06 6 dB 0x06 7 dB Difficult to judge 1dB 0x01 COM_V8_ANSAM_REVERSE 310 016 0AD ANSam signal phase reversing Set whether perform phase reversing for 450 ms when transmitting ANSam 0 Not perform 1 Perform Perform 1 COM_V8_TE_TIME 310 017 0AE Te time at V 8 When this is set to more than 1 secon...

Page 650: ... or disables the ECM performance auto resending function When line fault occurs in the middle of sending a fax the function allows the fax to be resend automatically immediately after the line is restored 0 Disable 1 Enable Enable 1 COM_RTN_TX_RATE 310 034 0B6 RTN command transmitting criterion percentage RTN Indicates that training is required because messages are not received correctly 0 to 100 ...

Page 651: ...00 COM_DIS_RESEND_TIME 310 047 0C3 NSF DIS resend timer NSF Signal to indicate that the receiving fax machine supports functions other than those given in ITU T G3 standard DIS Signal to notify the sender that the receiving fax machine features meet the ITU T G3 standard 0 3 seconds 1 3 45 seconds 2 2 55 seconds 3 4 5 seconds 3 seconds 0 COM_TX_SPEED 310 048 0C4 Transmitting speed performance Enab...

Page 652: ... speed is rejected by the receiving machine 0 All 2 FTT Fall Back 2 All 1 FTT Fall Back All 2 FTT 0 COM_TCF_CHECK 310 055 0CB TCF signal judging time TCF Training check signal consists of 0 signal for about 1 5 seconds 0 1 2 seconds 1 1 0 second 1 2 seconds 0 COM_TX_CABLE_EQU 310 056 0CC Transmitting cable equalizer 0 0db equivalent to 0 Km 1 4db equivalent to 1 8 Km 2 8db equivalent to 3 6 Km 3 1...

Page 653: ...T transmitting criterion 0x3A COM_EQM_72 310 065 0D5 EQU comparison value at 7200 bps 0 to 0x7F FTT transmitting criterion 0x32 COM_EQM_96 310 066 0D6 EQU comparison value at 9600 bps 0 to 0x7F FTT transmitting criterion 0x3A COM_EQM_120 310 067 0D7 EQU comparison value at 12000 bps 0 to 0x7F FTT transmitting criterion 0x4F COM_EQM_144 310 068 0D8 EQU comparison value at 14400 bps 0 to 0x7F FTT tr...

Page 654: ...nishing dialing to when issuing the first CNG signal 0 to 25 5 sec 1 step 100 ms 3 seconds 30 COM_MANTX_CNG_DELAY 310 077 0E1 Time interval for CNG signal when sending a fax manually Time interval from when starting to send a fax manually to when issuing the first CNG signal 0 to 25 5 sec 1 step 100 ms 0 second 0 COM_COLOR_MONO_CHG 320 010 0E2 Action when the receiving machine does not support col...

Page 655: ...ot print 0 REP_ACTIV_OUT 100 009 0F3 Activity report automatic printing 0 Not print 1 Print Not print 0 REP_PROTOCOL_OUT 330 001 0F4 Protocol monitor report automatic printing 0 Not print 1 Print only when an error occurs 2 Print Not print 0 REP_SEL_OPP_NAME 310 003 0F5 The second priority for Name of The Other End on the activity report Select which to be printed at Name of The Other End column o...

Page 656: ... a fax 0 Not perform OR process 1 Perform OR process Not perform 0 Not used IMG_JBIG_L0 320 006 101 102 Number of lines for one stripe of JBIG encoding to transmit a fax 1 to 65535 lines 128 lines 128 Not used IMG_JBIG_ATMOVE 320 007 103 Maximum horizontal offset allowed for AT pixels in JBIG encoding 0 to 127 0 Not used IMG_JBIG_TP 320 008 104 Use or not use TP for prescribed layers in JBIG encod...

Page 657: ...isplayed as XXX XXX on the Error Code column in the Error History Example 300 048 DCN reception During faxing something went wrong with the other end machine and the fax could not be completed Internal Error Code This code can be checked by the backup data obtained using the MFP Maintenance Tool The code is displayed in two bytes binary form XXXX on the Error Code column in the Internal Error Hist...

Page 658: ...ion Diagnosing job termination 100 005 0x1005 An error occurs in reading and writing SRAM during power on sequence Not used 100 006 0x1006 SRAM backup failure Not used 100 007 0x1007 Normal writing on the EEPROM was not performed Not used 100 008 0x1008 Fault of parts in the PWBA CONT An error of writing reading image data on the memory SDRAM failure Replace the fax board 1 2 External error code 3...

Page 659: ...e center is displayed 200 000 0x2000 Fault of parts in the PWBA MCU Not used 200 001 0x2001 MODEM NCU LOOPBACK TEST NG Not used 200 900 This code is used by the MFP Using for fax is prohibited Table 7 22 Service Call Error External Error Code Internal Code Description Cause Remedies Panel Display reference Report Display Trigger for Stopping Operation Notification Message MAIN SUB ...

Page 660: ...tion of the modular cable or etc Check the line GND and the modular cable and try the failed operation again 3 Transmitting failure Receiving failure 50H Forced stop Transmitting a fax is finished Receiving a fax is finished 300 006 0x3006 CS of the modem did not become ON for RS request while training in high speed Noises in the line or GND or loose connection of the modular cable or etc Check th...

Page 661: ...dular cable get disconnected Check that the modular cable is properly connected confirm the condition of the other end and try the failed operation 3 Transmitting failure 50H Forced stop Transmitting a fax is finished 300 017 0x3011 Fallback error Line quality is not good Try the operation again 3 Transmitting failure Receiving failure 50H Forced stop Transmitting a fax is finished Receiving a fax...

Page 662: ...vation Not used 300 026 0x301A Time out between frames in ECM Not used 300 027 0x301B PIN reception except EOR Line quality is not good Try the operation again 3 Transmitting failure 50H Forced stop Transmitting a fax is finished 300 028 0x301C The product could not detect EOL within 13 seconds default time when receiving image data in G3 mode Line quality is not good or there is something wrong w...

Page 663: ... condition of the other end machine and ask the sender to resend the fax 4 External error code 50H Forced stop Transmitting a fax is finished 300 046 0x302E The other end machine is not ready or available for receiving a fax The other end machine runs out of paper or the memory is full Confirm the condition of the other end machine and resend the fax 4 External error code 50H Forced stop Transmitt...

Page 664: ...ter Exchange error Line quality is not good or a GND for the product is not established properly Check the line and the GND condition and try the failed operation again 3 Transmitting failure Receiving failure 50H Forced stop Transmitting a fax is finished Receiving a fax is finished 300 059 0x303B Primary channel re synchronizing error Line quality is not good or a GND for the product is not esta...

Page 665: ... writing reading in encoding decoding process caused an error There is something wrong with the fax board or the S W Replace the fax board Transmitting failure 50H Forced stop Transmitting a fax is finished 300 106 0x3106 The number of lines that indicate the processed lines in encoding decoding process is 0 There is something wrong with the fax board or the S W Replace the fax board Transmitting ...

Page 666: ...waits for the jobs to be send or delete the jobs for starting the latest job 21H Fax memory is insufficient Fax scanning job is finished Writing pages is finished Printing of the received fax is finished Reading pages is finished 300 400 0x3400 When transferring data between PRMs time out error occurred before finishing the transferring Not used 300 500 0x3500 The product failed to create a power ...

Page 667: ...scanning job is finished 300 508 0x3508 Creating a report file and log file for a report printing job could not be made Memory full Pre stored received faxes are printed out When sending faxes are stored the product waits for the jobs to be send or delete the jobs for starting the latest job 1 2 50H Forced stop Printing report is finished 300 509 0x3509 Opening closing a report file for a report p...

Page 668: ...ort task 0x6E00 0x6E14 Internal error Self diagnosis report 0x6E90 0x6EBC Internal error Report common function 0x6F00 0x6F20 Internal error REPORT FILE creating process 0x6F88 Internal error ERROR CODE converting process 0x6FC2 0x6FC4 Internal error REPORT FILE related 0x7000 0x7080 Internal error Self diagnosis task 0x7100 0x7140 Internal error Self diagnosis processing 0x7400 0x7420 Internal er...

Reviews: