background image

Epson Perfection 2580 Photo

4 - Epson Perfection 2580 Photo

6/04

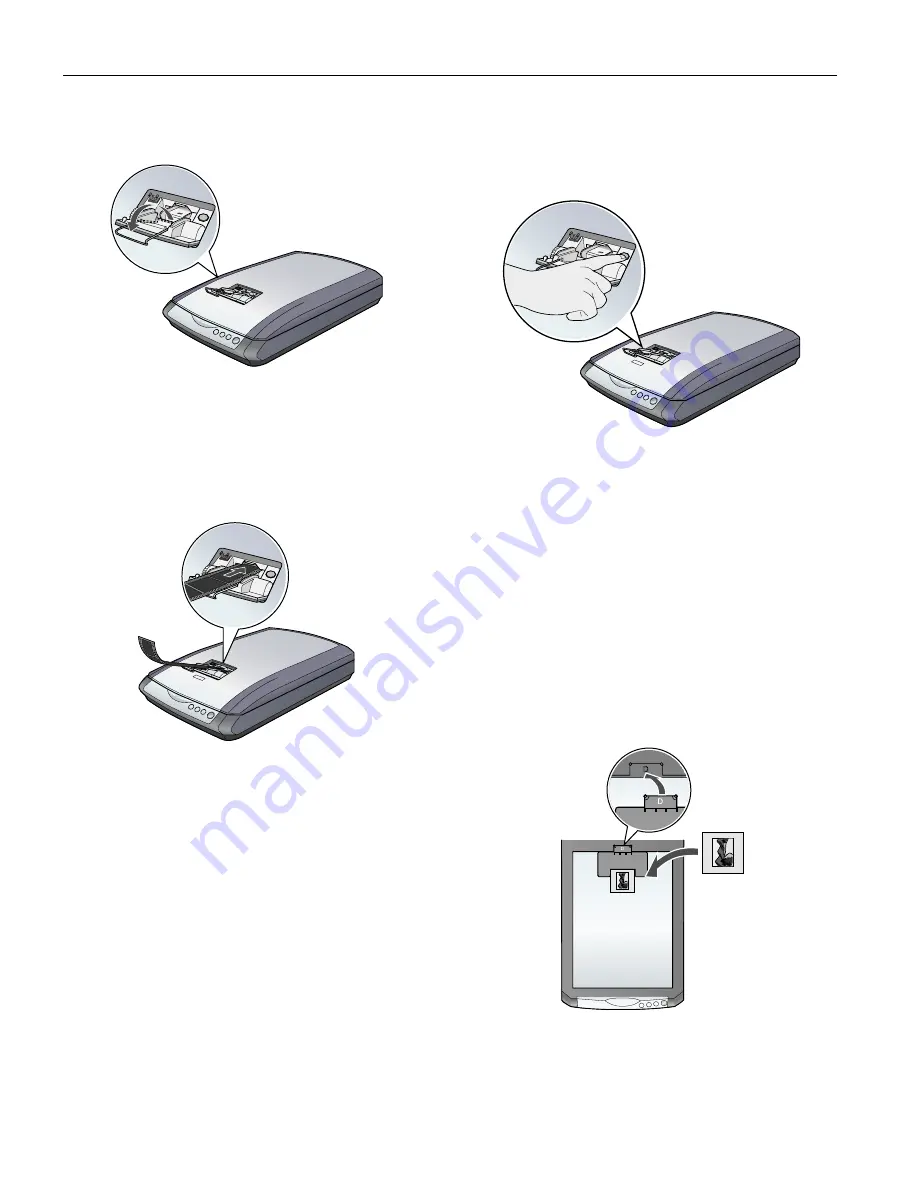
3. Flip out the metal film guide and press it down until it 

clicks into place.

Caution: 

Before loading a film strip, make sure it contains at 

least 2 photos, but no more than 6. Don’t load folded, creased, 
curled, or sticky film into the auto film loader or it may damage 
the film or your scanner.

4. Place the film strip in the film loader with the shiny base 

side facing down. Your images and any wording on the film 
strip should appear backward on the side that faces up.

5. Slowly slide the film into the loader. Let go of the film when 

the scanner begins to automatically feed it into position. 

6. To scan each frame in your film strip as a separate image, 

press the 

4

Scan and Save button or open EPSON Smart 

Panel and select 

Scan and Save

.


This scans each frame 

using ideal settings in Full Auto Mode and opens each one 
separately in ArcSoft PhotoImpression for viewing, editing, 
and printing. See your on-screen 

Reference Guide

 and Smart 

Panel help for instructions on selecting scan modes and 
complete scanning details.

7. When you finish scanning the film strip, press the 

Eject


button inside the auto film loader to eject the film. Wait for 
the 

]

 Start light to stay on green, then remove the film 

strip.

Caution: 

Don’t turn off the scanner with a film strip loaded in the 

auto film loader. Never pull film out of the loader by force.

8. Flip the film guide back inside the auto film loader and 

press it down until it clicks into place.

9. Close the auto film loader cover.

10. Replace the document mat before you resume scanning 

reflective (paper) documents.

Scanning a Slide

1. Make sure you removed the reflective document mat, as 

described in the previous column.

2. Place the slide holder on the top of the scanner glass so that 

the tab labelled “D” fits into the area labelled “D” on the 
document table.

Summary of Contents for 2580 - Perfection PHOTO

Page 1: ...pi in 1 dpi increments and 12800 dpi 12800 dpi performed with zoom function Color separation RGB color filters on CCD Image data 16 bits per pixel per color internal 1 8 and 16 bits per pixel per color external Line art settings Adjustable threshold Gamma correction 1 type for user defined Interface USB 2 0 Hi Speed Type B connector Light source White cold cathode fluorescent lamp Dimensions Width...

Page 2: ...type One receptacle Type B Transparency Unit Supplied voltage DC 24 0 to 26 4 V Rated current 0 5 A 35 mm film types Strip two to six 35 mm frames Readable width length 1 142 9 134 inches 29 232 mm Slide one 35 mm slide AC Adapter Input AC 100 to 120 V 50 to 60 Hz Output DC 24 0 to 26 4 V 1 4 A Temperature 41 to 95 F 5 to 35 C Scanning and Restoring Photos If you have faded photos slides or negati...

Page 3: ...on 2580 Photo scanner cover has an automatic film loader that lets you load 35 mm negatives without even opening the cover You can use the slide holder to scan a 35 mm slide from the scanner glass Tip Make sure your negatives or slides are dust free for the best scan You can also select the Dust Removal setting in EPSON Scan to improve your scan Before scanning negatives or a slide lift the scanne...

Page 4: ...ng ideal settings in Full Auto Mode and opens each one separately in ArcSoft PhotoImpression for viewing editing and printing See your on screen Reference Guide and Smart Panel help for instructions on selecting scan modes and complete scanning details 7 When you finish scanning the film strip press the Eject button inside the auto film loader to eject the film Wait for the Start light to stay on ...

Page 5: ...anner status Transporting the Scanner Before transporting the scanner for a long distance or storing it for an extended period of time you need to lock the scanner s carriage to prevent damage 1 Plug in the scanner connect it to your computer and wait until the carriage moves to the home position position nearest the buttons While the Start light is green unplug the scanner 2 If the cover cable is...

Page 6: ...on Do not turn the scanner over this may damage it 4 Attach the protective materials and repack the scanner in its original box Related Documentation CPD 17962 Epson Perfection 2480 2580 Photo Start Here sheet CPD 17964 Epson Perfection 2480 2580 Photo Scanner Software CD ROM CPD 17965 Epson Perfection 2480 2580 Photo Notices booklet Epson Perfection 2480 2580 Photo Reference Guide HTML ...

Reviews: