background image

12

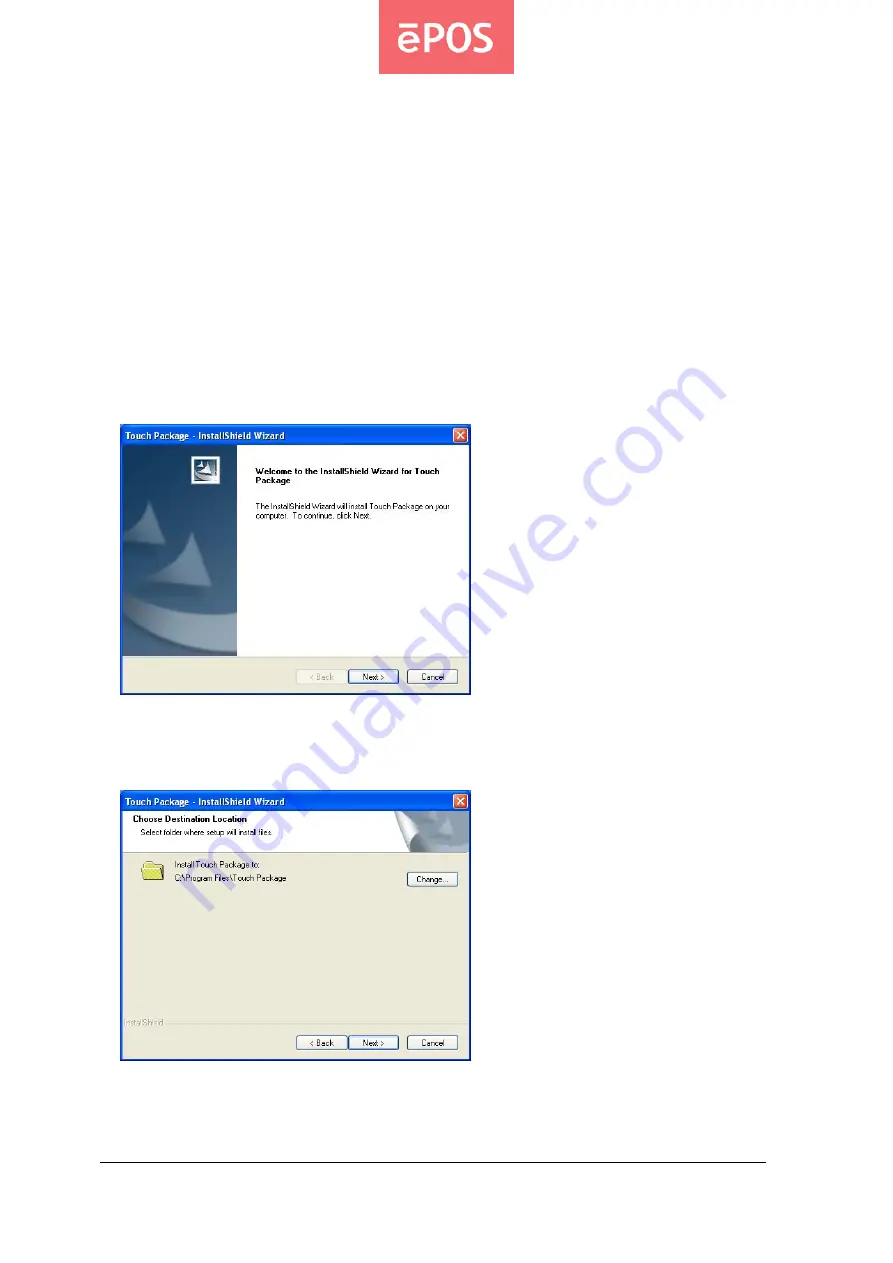
3.3 Touch Screen Driver 

a. Double click the folder “Touch” “5W Resistive” and then double click the subfolder according 

to the operating system. 

b. Double click the file “setup” to start the installation. 

c. Click “Next” on the welcome window. 

d. Select the destination folder and click “Next.” 

e. Click “Next”. 

www.eposcom.ru

Summary of Contents for Touch Vision 1553

Page 1: ...USER MANUAL ePOS TOUCH VISION 1553 www eposcom ru...

Page 2: ...acking 2 1 2 Product Overview 3 1 3 I O Ports and Connectors 5 1 4 Specifications 6 2 Monitor Setting 7 2 1 OSD Control Panel 7 2 2 On Screen Display 8 3 Peripherals Driver Installation 10 3 1 Second...

Page 3: ...or 1 1 Unpacking The contents may vary with different options If there s any physical damage or missing parts please contact your supplier immediately Please keep all packing materials in case you nee...

Page 4: ...3 1 2 Product Overview z Front View z Rear View z Side View www eposcom ru...

Page 5: ...4 Bottom View www eposcom ru...

Page 6: ...I O Ports and Connectors A PS 2 interface MSR cable B USB interface MSR cable C RS 232 interface MSR cable D USB interface touch cable E RS 232 interface touch cable F Audio cable G VGA cable www epos...

Page 7: ...1 for Touch Panel RJ 45 PS2 or USB Optioned for MSR VGA 1 x DB 15 Female Support up to XGA SXGA at 75Hz Audio In 1 x Audio Jack with Internal Speaker 2W x 2 Others Option MSR VFD 2nd Display Speaker...

Page 8: ...screen settings b Exit the OSD menu Up a Increase the volumn b Increase the value of the function selected or move to the previous function as the OSD menu is active Down a Decrease the volumn b Decre...

Page 9: ...lock signal Sharpness Adjust the clarity and visibility of the edges Image Setting Back Go back to menu H Position Adjust the horizontal position of the screen image V Position Adjust the vertical pos...

Page 10: ...Set the OSD menu language to Chinese Traditional Chinese Simple Set the OSD menu language to Chinese Simple Japanese Set the OSD menu language to Japanese Signal Source D SUB analog input only Reset...

Page 11: ...Pass the cord through the hole Plug the cable into the VGA port on a PC Connect the extension power cord and plug the power adaptor to an AC outlet b Tighten the bundled screws specified for the stan...

Page 12: ...hole Plug the cable into a free COM port on a PC Connect the extension power cord and plug the power adaptor to an AC outlet b Press the stand of the customer display into place Note The rear top moun...

Page 13: ...ouch 5W Resistive and then double click the subfolder according to the operating system b Double click the file setup to start the installation c Click Next on the welcome window d Select the destinat...

Page 14: ...13 f Click Install to start the installation g Click Finish to exit the setup and restart the system www eposcom ru...

Page 15: ...nearity to start the 9 point calibration Or select Advance to select 4 Pts calibration or 25 Pts Linearity The more points are calibrated the more accurate the calibration will be i Press the red dot...

Page 16: ...times in turn on the screen j After the calibration is done click the lower button to save it Note Refer to the file Userguide2_8 for more information on the setting of the touch package www eposcom...

Page 17: ...stomer display follow the steps below to test the function 4 1 Magnetic Stripe Card Reader a Open the folder Peripherals MSR and double click the file BREAKOUT exe b After the testing window pops up s...

Page 18: ...ay a Open the folder Peripherals Customer Display and double click the file BREAKOUT exe b Enter any keys on the window and the typed words will appear on the customer display www eposcom ru ePOS Comp...

Reviews: