background image

T EC H N I C A L    ASS I STA N C E

R E P L A C I N G   K E Y C A P S   A N D   S W I T C H E S

For technical assistance, please email to 

[email protected]

 with your purchase order number and 

a detailed description of your issue. 

We normally respond to enquiries within 24 hours. If you 
purchased your keyboard from a distributor or not from any 
official store of Epomaker, please contact them directly for any 
additional help.

WA R R A N T Y 

EPOMAKER’s Warranty covers any factory defects that might 
affect the proper functionality of your purchase. It doesn’t 
cover any damage that may occur from normal wear and tear. 
If your product is defective we will send you a replacement 
unit. Replacement units might require you to send the 
defective unit back to Epomaker.

We provide a 1 year warranty for our products when bought 
from our website (EPOMAKER.com). Your item will not be 
covered by your 1 year warranty if the inspection shows any 
sign of modification or changes unsupported by the original 
product, these include: Changing internal components, 
Assembling and reassembling the product, Replacing 
Batteries, etc.

We will ONLY cover the item if it is bought from our official 
stores. You do not have a warranty with us if you bought the 
item from another reseller or likewise. Please contact the store 
that you bought your product from to resolve issues. 
 

CO M M U N I T Y  FO RU M S

https://discord.gg/2q3Z7C2

Join our community and learn together with 
other keyboard enthusiasts. 

EN

https://www.reddit.com/user/epomaker/

Logo

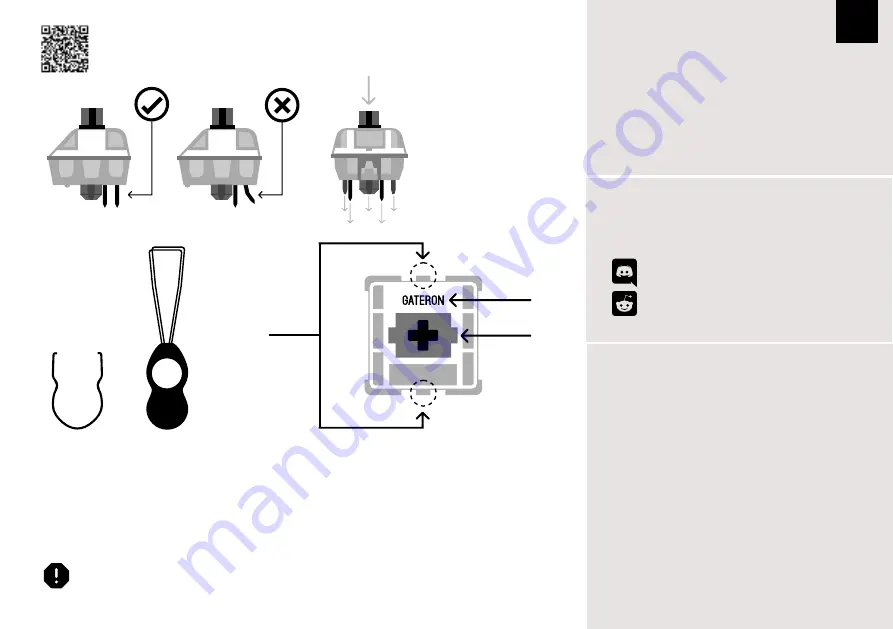
Switch Shaft

The Switch Puller tool aligns Vertically to the Switch to 
unclip the plastic securing the switch to the plate. 

Example of a switch 
as seen from top 
after you remove the 
keycap to prepare for 
switch removal.

Mechanical
Switch

Switch Puller

Keycap Puller

For a full guide on how to remove keycaps and switches scan the QR Code or type in your browser:


https://epomaker.com/blogs/guides/diy-guide-how-to-remove-and-replace-your-mechanical-keyboard-switches

Included
Tools

1.  Grab your Switch Removal Tool and align the gripping teeth 

vertically (on the Y-Axis) at the center of the switch, as shown in 
the example graphic above. 

2.  Grab the switch with the Switch Puller and apply pressure until 

the switch releases itself from the plate.

3.  Using firm but gentle force pull the switch away from the 

keyboard using a vertical motion.

Remove Switches

1.  Check that all the switch metallic pins are perfectly straight and clean.
2.  Align the switch vertically to have the Gateron logo facing north. The 

pins should align themselves to the keyboard PBC. 

3.  Press the switch down until you hear a click. This means your switch 

clips have attached themselves to the keyboard plate.

4.  Inspect the switch to ensure it’s properly attached to your keyboard, 

and test it.

Install Switches

Note: If the key doesn’t work its possible you may have bent one of the switches while installing it. Pull the switch out and repeat the process.

Pins may be damaged beyond repair and need replacement if this process is not done correctly. Never apply excessive force when replacing
keycaps or switches. If you cannot remove or install keycaps or switches please contact customer service as soon as possible to avoid
damage to the keyboard due to operating errors. 

Please be gentle. Be sure 
the pins are aligned with 
the slots.

Before installing switches, be sure the pins are clean and straight.

Push Straight 
Down

Summary of Contents for EVERGLIDE SK87

Page 1: ...ARK NEW MALLOW ROAD CORK T23 AT2P IRELAND Contact Wells Tel 353212066339 Email info apex ce com This Quick Guide is an introduction to the use and functionality of the EPOMAKER EVERGLIDE SK87 For in d...

Page 2: ...r entering Bluetooth mode long press Fn Enter for 5 seconds to begin pairing The enter key backlight will change colors when pairing has started 3 On your computer s Bluetooth device discovery menu se...

Page 3: ...the switch to the plate Example of a switch as seen from top after you remove the keycap to prepare for switch removal Mechanical Switch Switch Puller Keycap Puller For a full guide on how to remove k...

Page 4: ...D CORK T23 AT2P IRELAND Contact Wells Tel 353212066339 Email info apex ce com Diese Kurzanleitung ist eine Einf hrung in die Nutzung und Funktionalit t des EPOMAKER EVERGLIDE SK87 Eine ausf hrliche An...

Page 5: ...u aktivieren 2 Dr cken Sie nach dem Aufrufen des Bluetooth Modus 5 Sekunden lang Fn Enter um die Kopplung zu starten Die Hintergrundbeleuchtung der Eingabetaste ndert ihre Farbe wenn das Pairing begon...

Page 6: ...nadat u de toetskap hebt verwijderd om het verwijderen van de schakelaar voor te bereiden Mechanische schakelaar Schakelaar Toetskap trekker Voor een volledige handleiding over het verwijderen van toe...

Page 7: ...W MALLOW ROAD CORK T23 AT2P IRELAND Contact Wells Tel 353212066339 Email info apex ce com Esta gu a r pida es una introducci n al uso y funcionalidad del EPOMAKER EVERGLIDE SK87 Para una gu a en profu...

Page 8: ...odo Bluetooth 2 Despu s de entrar en el modo Bluetooth presione prolongadamente Fn Enter durante 5 segundos para iniciar el emparejamiento La luz de fondo de la tecla Enter cambiar de color cuando se...

Page 9: ...a del teclado para preparar la extracci n del interruptor Interruptor mec nico Extractor de interruptores Extractor de tapas de teclas Para obtener una gu a completa sobre c mo quitar las tapas de las...

Page 10: ...RK T23 AT2P IRELAND Contact Wells Tel 353212066339 Email info apex ce com Ce guide rapide est une introduction l utilisation et aux fonctionnalit s de l EPOMAKER EVERGLIDE SK87 Pour un guide approfond...

Page 11: ...etooth 1 Appuyez longuement sur Fn F2 pendant 5 secondes pour entrer en mode Bluetooth 2 Apr s avoir acc d au mode Bluetooth appuyez longuement sur Fn Enter pendant 5 secondes pour commencer le coupla...

Page 12: ...r le re trait de l interrupteur Interrupteur m canique Extracteur d interrupteur Extracteur de capu chon de touche Pour obtenir un guide complet sur la fa on de retirer les capuchons et les interrupte...

Page 13: ...Email support epomaker com Web www epomaker com EC REP APEX CE SPECIALISTS LIMITED Address UNIT 3D NORTH POINT HOUSE NORTH POINT BUSINESS PARK NEW MALLOW ROAD CORK T23 AT2P IRELAND Contact Wells Tel 3...

Page 14: ...SPACEBAR FN F1 USB 5 USB C FN F2 5S Bluetooth 1 Bluetooth 1 FN F3 5S Bluetooth 2 Bluetooth 2 FN F4 5S Bluetooth 3 5S Bluetooth Bluetooth 3 Bluetooth FN Q FN ENTER 1 Fn F2 5 Bluetooth 2 Bluetooth Fn E...

Page 15: ...KER EPOMAKER epomaker com epomaker com https discord gg 2q3Z7C2 JA https www reddit com user epomaker QR https epomaker com blogs guides diy guide how to remove and replace your mechanical keyboard sw...

Page 16: ...ess UNIT 3D NORTH POINT HOUSE NORTH POINT BUSINESS PARK NEW MALLOW ROAD CORK T23 AT2P IRELAND Contact Wells Tel 353212066339 Email info apex ce com EPOMAKER EVERGLIDE SK87 epomaker https epomaker com...

Page 17: ...5 FN FN 1 FN HOME 5 FN TAB FN LEFTSHIFT RGB FN UP ARROW KEY FN DOWN ARROW KEY FN BACKSPACE FN PAGE UP FN PAGE DOWN FN SPACE DOUBLE TAP SPACEBAR FN F1 5S USB USB C FN F2 5S FN F3 5S FN F4 5S 5S FN Q F...

Page 18: ...er Epomaker Epomaker epomaker com 1 https discord gg 2q3Z7C2 CN https www reddit com user epomaker https epomaker com blogs guides diy guide how to remove and replace your mechanical keyboard switches...

Reviews: