Jog Menu
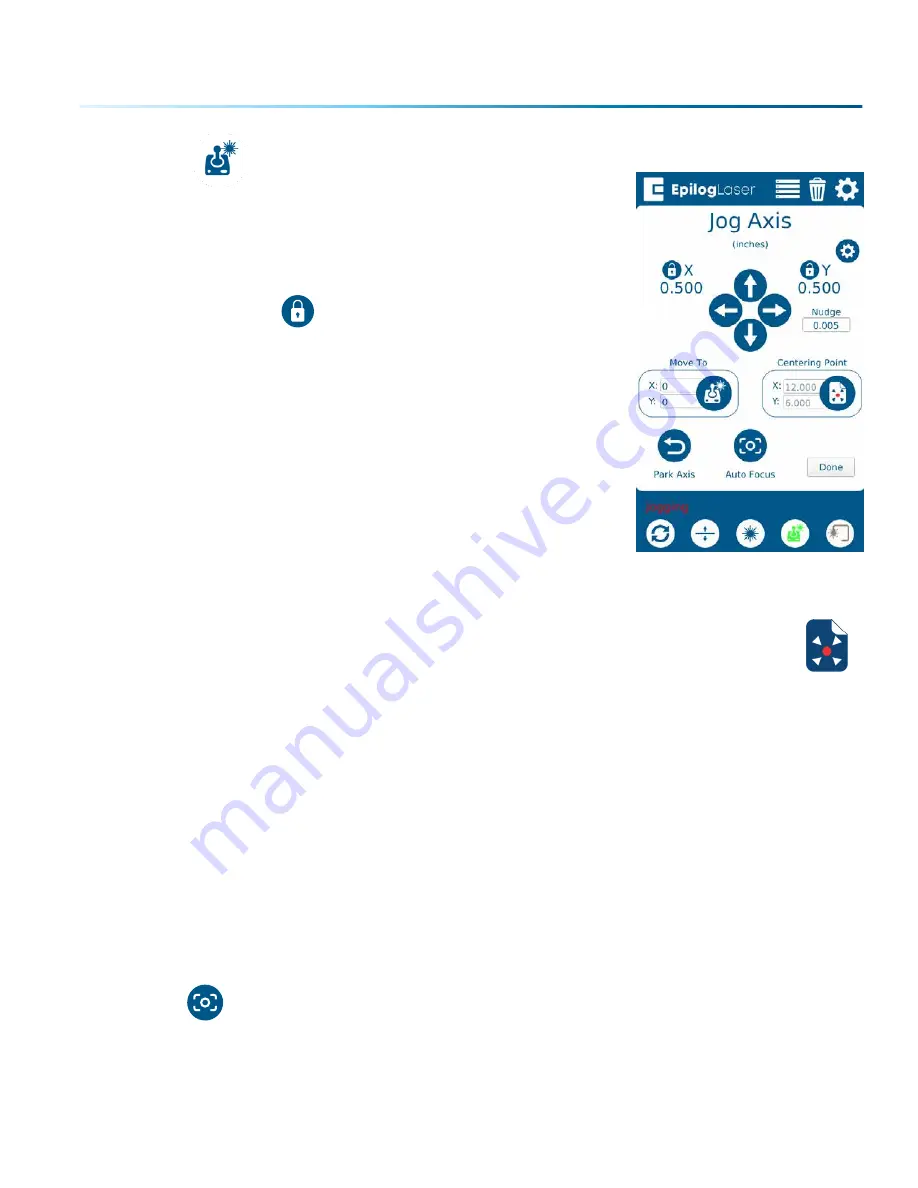
Access the Jog Menu by pressing the Jog key, which will turn green
when active. The Jog Menu allows you to adjust the current X and Y axis
positions of the laser head. You may change the current position of the
laser head either using the Joystick, or by entering precise coordinates
under “Move To”.
Locking Coordinates
The X and Y coordinates may be locked and unlocked to help you fine-
tune the laser head’s position. Tap the lock icons to lock or unlock the
X and Y coordinates. When only the X coordinate is locked, the joystick
will only move the laser head in the Y direction (toward the front or back
of the machine). When only the Y coordinate is locked, the joystick will
only move the laser head in the X direction (left or right). If both the X
and Y coordinates are locked, the laser head will not move until they
are unlocked.
Move To
Enter X and Y coordinates to move the laser to a specific location on
the table.
Centering Point
Pressing this button tells the laser where you want the center of your artwork to be. While
jogging the laser head across the table, use the red dot pointer to help identify the center
point of your engraving. The Centering Point feature is used with Center-Engraving enabled
jobs. To return to the Centering Point you have previously set, long-press the Centering
Point button and the laser head will return to that point. For more information on the Center
Engraving feature,
see “Center Engraving” on page 116.
Park Axis
Park Axis returns the laser head to the default home position in the upper left corner of the table.
Home Axis
The Home Axis button homes the laser head and then returns it back to the home position, the default
every time you turn on the machine.
Nudge
The Nudge arrows allow you to fine-tune the position of the laser down to a thousandth of an inch. To
change the increments you want to nudge the laser’s position, click the text box under “Nudge” and enter
an amount.
Auto Focus
The Auto Focus button is in the center of the Nudge arrows. When you have jogged the lens carriage
above your material, press the Auto Focus button to use the plunger Auto Focus. The table will rise until
the material touches the plunger, then set the table to the correct height. Your job should now be in focus.
- 99 -
SECTION 6: CONTROL PANEL
Summary of Contents for Fusion Pro 32
Page 2: ......
Page 6: ......
Page 14: ...Fusion Pro 48 8 SECTION 1 SAFETY ...
Page 15: ... 9 SECTION 1 SAFETY ...
Page 18: ......
Page 28: ......
Page 60: ......
Page 98: ......
Page 108: ......
Page 132: ......
Page 162: ......
Page 184: ......
Page 202: ......
Page 214: ......
Page 216: ......
Page 242: ......


