background image

17

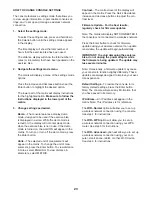
 HOW TO USE THE MANUAL MODE

 1.   Begin pedaling or press any button on the 

console to turn on the console.


 When you turn on the console, the display will turn 
on. The console will then be ready for use.

 2.   Select the manual mode.


 The manual mode will be selected automatically 
each time you turn on the console.


 Note: If the console is connected to iFit Live 
through your wireless network, the display will 
cycle between the manual mode and the iFit Live 
welcome message. Press the Home button repeat-
edly to select the manual mode.


 You can also press any of the workouts buttons 
repeatedly to select the manual mode.

3.   Change the resistance of the pedals as desired.


 As you pedal, you can change the resistance of the 
pedals. To change the resistance, press the Quick 
Resistance increase and decrease buttons or press 
one of the numbered Quick Resistance buttons.


 Note: After you press a button, it will take a 
moment for the pedals to reach the selected resis-
tance level. 

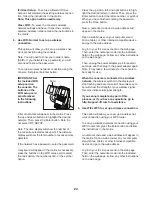
 4.  Follow your progress.


 The display can show the following workout 
information:


 Calories

——This display mode will show the approx-

imate number of calories you have burned.


Calories per Hour (Calories/Hr)

——This display 

mode will show the approximate number of calories 
you are burning per hour.


Distance

——This display mode will show the dis-

tance that you have pedaled in miles or kilometers. 


Laps

——This display mode will show a track that 

represents 1/4 mile (400 m). As you exercise, indi-
cators will appear in succession around the track 
to show your progress. The Laps display mode will 
also show the number of laps you complete.


Pulse

——This display mode will show your heart rate 

when you use the handgrip heart rate monitor or 
the chest heart rate monitor (see step 5).


 Resistance

——This display mode will show the 

resistance level of the pedals for a few seconds 
each time the resistance level changes. 


 RPM

——This display mode will show your pedaling 

speed in revolutions per minute (rpm).


 Speed

——This display mode will show your pedaling 

speed in miles or kilometers per hour.


Time

——This display mode will show the elapsed 

time.


 The matrix offers several display modes. Press the 
increase and decrease buttons near the Enter but-
ton until the desired display mode is shown. 


Speed

——This display mode will show a history of 

the speed settings of your workout. A new segment 
will appear at the end of each minute.


Calorie

——This display mode will show the approxi-

mate amount of calories you have burned. The 
height of each segment represents the amount of 
calories burned during that segment. A new seg-
ment will appear at the end of each minute.

Summary of Contents for A17r Bike

Page 1: ...uture reference www epicfit com QUESTIONS If you have questions or if parts are damaged or missing DO NOT CONTACT THE STORE please contact Customer Care IMPORTANT Please register this product see the...

Page 2: ...shown Note The decal s may not be shown at actual size WARNING DECAL PLACEMENT 2 IMPORTANT PRECAUTIONS 3 BEFORE YOU BEGIN 4 PART IDENTIFICATION CHART 5 ASSEMBLY 6 THE CHEST HEART RATE MONITOR 13 HOW...

Page 3: ...red patio or near water 6 Place the exercise bike on a level surface with at least 2 ft 0 6 m of clearance around the exercise bike To protect the floor or carpet from damage place a mat under the exe...

Page 4: ...s designed to make your workouts at home more effective and enjoyable For your bene t read this manual carefully before you use the exercise bike If you have questions after reading this manual please...

Page 5: ...RT IDENTIFICATION CHART Use the drawings below to identify the small parts needed for assembly The number in parentheses below each drawing is the key number of the part from the PART LIST near the en...

Page 6: ...tools one Phillips screwdriver one rubber mallet Assembly may be easier if you have a set of wrenches To avoid damaging parts do not use power tools ASSEMBLY 1 Set a sturdy piece of packing material u...

Page 7: ...n the Seat Handlebar 5 fully into the Pulse Receptacle 64 on the left side of the exercise bike 4 Orient the Backrest Frame 17 as shown Insert the Backrest Frame into the Seat Carriage 24 below the Se...

Page 8: ...ebar 5 with four M8 x 40mm Screws 86 start all four Screws and then tighten them 46 85 5 Identify the Right and Left Accessory Trays 46 85 Attach the Right Accessory Tray 46 to the right side of the S...

Page 9: ...the Frame 1 See the inset drawing Pull the other end of the wire tie until the Main Wire Harness 58 and the Pulse Wire 64 are routed through the Upright 4 and out of the indicated hole 9 9 Tip Avoid...

Page 10: ...me way 11 While another person holds the Console 13 near the Console Bracket 35 insert the console wires into the hole in the center of the Console Bracket Tip Avoid pinching the wires It may be neces...

Page 11: ...to the Console Bracket 35 with two M4 x 12mm Screws 75 Make sure that the indicated wire is not covered by the Lower Pivot Cover see the drawing in step 14 Next press the Upper Pivot Cover 9 onto the...

Page 12: ...press the ends of the strap onto the tabs on the Right Pedal Adjust the strap on the Left Pedal not shown in the same way 16 Plug the Power Adapter 67 into the receptacle on the front of the exercise...

Page 13: ...tures above 122 F 50 C or below 14 F 10 C Do not excessively bend or stretch the sensor when using or storing the heart rate monitor To clean the sensor use a damp cloth and a small amount of mild soa...

Page 14: ...orward or backward to the desired posi tion and then pull upward on the seat handle to lock the seat in place HOW TO ADJUST THE ANGLE OF THE CONSOLE AND THE HANDLEBARS To adjust the angle of the conso...

Page 15: ...the resistance of the pedals and prompts you to vary your pedaling speed as it guides you through an effective workout You can also set a time distance or calorie goal The console also offers user de...

Page 16: ...console to your wireless network 3 Check for firmware updates See HOW TO CHANGE CONSOLE SETTINGS on page 23 and check for firmware updates The console is now ready for you to begin working out The fo...

Page 17: ...e approximate number of calories you are burning per hour Distance This display mode will show the dis tance that you have pedaled in miles or kilometers Laps This display mode will show a track that...

Page 18: ...eart rate monitor with your palms resting against the contacts Avoid moving your hands or gripping the contacts tightly When your pulse is detected your heart rate will be shown For the most accurate...

Page 19: ...ercise keep your pedaling speed near the target rpm for the current segment IMPORTANT The target rpm is intended only to provide motivation Your actual pedaling speed may be slower than the target rpm...

Page 20: ...Follow your progress See step 4 on page 17 5 Measure your heart rate if desired See step 5 on page 18 6 Turn on the fan if desired See step 6 on page 18 7 When you are finished exercising the console...

Page 21: ...is too high or too low you can manually override the set ting by pressing the Quick Resistance buttons IMPORTANT When the current segment of the workout ends the pedals will automatically adjust to t...

Page 22: ...ut the display will show the name duration and distance of the workout The display will also show the approxi mate number of calories you will burn during the workout and a profile of the resistance s...

Page 23: ...press the Enter button To view distance in miles select ENGLISH To view distance in kilometers select METRIC Contrast The contrast level of the display will appear in the matrix Press the Quick Resist...

Page 24: ...number Then press the Enter button to select the letter number or symbol When you have finished entering the password press the Done button Next a numerical code and a web address will appear in the...

Page 25: ...address such as 192 168 0 1 8080 Open a web browser on your computer smart phone tablet or other Wi Fi device Next type in the IP address on the con sole into the URL bar in your browser Example http...

Page 26: ...t off and on try to correct the interference by one or more of the following measures Reorient or relocate the receiving antenna Increase the separation between the equipment and the receiver Connect...

Page 27: ...your heart rate when you use the chest heart rate monitor see TROUBLESHOOTING on page 13 HOW TO ADJUST THE REED SWITCH If the console does not display correct feedback the reed switch should be adjust...

Page 28: ...c Exercise If your goal is to strengthen your cardiovascular system you must perform aerobic exercise which is activity that requires large amounts of oxygen for prolonged periods of time For aerobic...

Page 29: ...lles Stretch With one leg in front of the other reach forward and place your hands against a wall Keep your back leg straight and your back foot flat on the floor Bend your front leg lean forward and...

Page 30: ...30 NOTES...

Page 31: ...31 NOTES...

Page 32: ...Frame Cover 50 1 Large Shaft Block 51 1 Small Shaft Block 52 1 Lower Frame Cover 53 1 Heart Rate Monitor Strap 54 1 Drive Belt 55 2 Magnet 56 1 Clamp 57 1 Reed Switch Wire 58 1 Main Wire Harness 59 1...

Page 33: ...108 8 M4 x 15mm Flat Head Screw 109 2 M6 x 10mm Screw 110 10 M6 x 16mm Washer 111 1 Brake Plate 112 3 M8 Nut Assembly Tool User s Manual Key No Qty Description Key No Qty Description Note Specificatio...

Page 34: ...42 51 58 59 60 60 61 63 63 66 66 68 68 70 70 70 50 72 72 72 2 34 33 76 77 77 74 74 77 73 73 75 75 75 75 81 83 82 69 89 89 84 90 105 112 55 55 39 71 38 5 24 46 110 28 75 86 86 86 88 88 91 25 25 86 17...

Page 35: ...35 22 20 62 31 43 43 78 36 36 78 78 19 31 18 62 21 78 8 78 49 7 37 10 18 44 52 78 11 108 108 EXPLODED DRAWING B Model No EPEX14912 2 R0912A...

Page 36: ...anty does not extend to freight damage to the product This warranty will automatically be voided if the product is used as a store display model if the product is purchased or transported outside the...

Reviews: