


24
EN
First make a rectangular cut-out in the cabin wall
as shown in the Fig. 5.
The wall above the radiator should be hollow
inside to let the hot air rise.
Draw the connection cable from the radiator up
to the ceiling through the duct in the cabin wall.
Pay attention that the cable connection of the
radiator must be oriented downwards
For details and safety gaps please refer to the
illustrations shown in Fig. 4, 5, 8 and 9.
Installation
Fig. 5
do
wn
ATTENTION!
Not
suitable for horizontal installation
and installation in the cabin ceiling.
Risk of fire due to heat congestion.
200
1040
167
1020
~60
15
Front view
Dimensions in mm
Wall cut-out
with rear ventilation
Fig
. 7
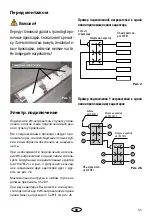
At first insert the rear side panel into the cut-
out in the wall (fig. 6). Then insert the IR heater
into this rear side panel, so that it’s mounting
holes get lined up with those of the rear side
panel. Then screw the IR heater with the rear
side panel through these holes to the cabin
wall (fig. 7).
As the last step mount the front safety cover
grill with two screws at the top and at the bot-
tom to the IR heater.
Fig
. 6
Summary of Contents for Vitae protect+
Page 2: ...2 Deutsch 3 English 16 29...
Page 29: ...29 RU 30 32 33 33 33 33 34 35 36 38 36 36 37 39 40 ASB 41...
Page 30: ...30 RU...
Page 31: ...31 RU 8 EU60335 2 53 VDE0700 53...
Page 32: ...32 RU...
Page 35: ...35 RU 94 7812 2 2b 3 5 9 3 5 2b 1 3 5 2 4 7 9 6 8 1 3500 2 2b 94 7813 94 7811 94 7812 3500 5 9...
Page 37: ...37 RU 5 4 5 8 9 5 200 1040 167 1020 60 15 7 6 7 6...
Page 39: ...39 RU 10 10...
Page 41: ...41 RU ASB I II III IV V VI 24 www eos sauna com agb 08 2018...


