background image

13

EN

Important notes for use

Check the devices in the IR-cabin regularly.

Clean and descale the device if required. In case 

of obvious defects or wear out, please contact 

your dealers or the manufacturer directly.

If you have not used your IR-cabin over a longer 

period, please make sure before switching it or 

the vaporiser on that there are no cloths, clean-

sing agents or other items lying on the vaporiser. 

 Warming! Danger of scalding!

There are high temperatures at the steam- 
outlet (essence / herbs holder). 
Never add essences, essential oils or other 
additives directly to the water, but give them 
into the provided holder cup.
They will be carried with the rising steam 
which will spread them throughout the cabin.

Disconnect the unit from mains (remove 
the mains plug from the socket) for any 
kind of service or maintenance.

Operation

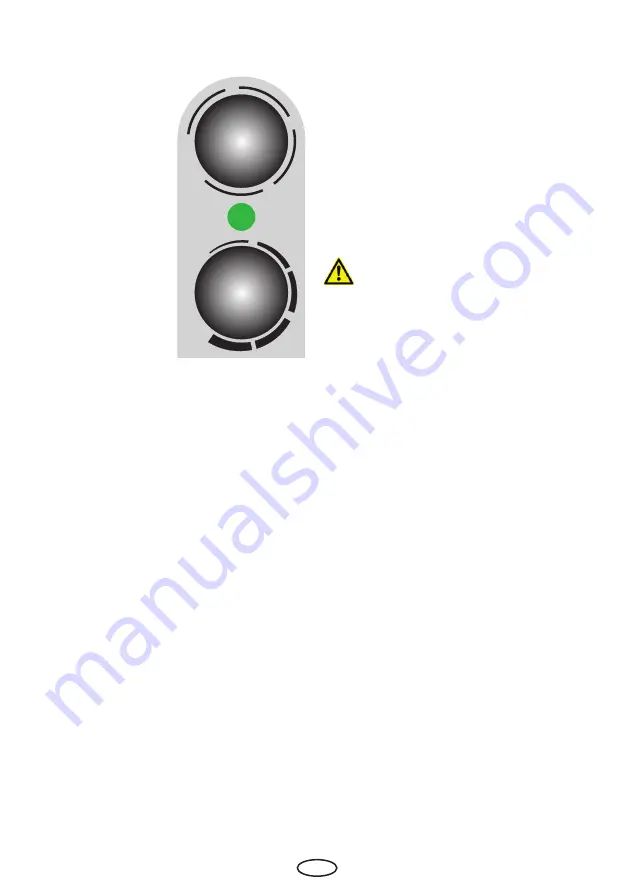
The device is switched on with the 

upper knob


(timer setting). You can choose the operating 

time by turning the konb to the right side. The 

timer will cut-off the device automatically after 

the selected time expires.

If you want to turn off the device before expi-

ration of the selected time, turn the knob in 

counterclockwise direction to „0“.

With the 

lower knob

 (power output) you can 

adjust the intensity of steam.

Please bear in mind that you cannot regulate the 

relative air humidity value but only the steam 

output of the vaporiser.

The relative air humidity in the cabin depends on 

the cabin size, ambient temperature, ventilation 

and other factors.

Based on the fact that hot air can retain more 

humidity, the relative air humidity at the same 

intensity of evaporation will be lower at higher 

temperatures.

Since these values and temperature dependen-

cies may vary, you should find the desired adjust-

ment of the power output contol know (lower 

knob) according to your individual preferences.

min.

30

0

60

90

120

0

1

2

3

Lower knob

Power output

Pos. 1 - 250 W

Pos. 2 - 500 W

Pos. 3 - 750 W

Fig. 5

Upper knob

Operation time setting, up 

to 120 minutes.

Summary of Contents for Infrasteam 200

Page 1: ...out control без блока управления Infrasteam 200 Zusatzverdampfer für Infrarot Wärmekabine Supplementary vaporiser for infrared cabin ДополнительныйиспарительдляИК кабин Druck Nr 29344504 11 17 D Montage und Gebrauchsanweisung Assembly and operating instruction Инструкция по эксплуатации EN RU ...

Page 2: ...2 Deutsch 3 English 10 Русский 17 ...

Page 3: ...sche Daten 7 Service Adresse 8 Recycling 8 Allgemeine Servicebedingungen ASB 9 Summer Buzzer Temp Begrenzer Temp limiter Netz Mains Kontrollleuchte Control lamp Energieregler Power controller 750 W L N PE P1 P2 2 4 M Summer Temp Begrenzer 120 Trockengehschutz sw 1 bl 3 gn ge 4 sw PE N L 1000W 750 W Schaltbild mit Steuerung Schaltbild ohne Steuerung ...

Page 4: ...eßlich Kinder mit eingeschränkten physischen senso rischen oder geistigen Fähigkeiten oder mangels Erfahrung und oder mangels Wissen benutzt zu werden es sei denn sie werden durch eine für ihre Sicherheit zuständige Person beaufsichtigt oder er hielten von ihr Anweisungen wie das Ge rät zu benutzen ist Kinder sollten beaufsichtigt werden um sicherzustellen dasssienichtmitdemGe rät spielen Vergewis...

Page 5: ...teln zur Luftbefeuchtung ist ein gesundheitliches Risiko nicht auszuschließen Von der Verwendung dieser Zusätze wird daher abgeraten es sei denn sie werden vom Gerätehersteller oder Saunalieferanten ausdrücklich empfohlen Sind dem Wasser einmal versehentlich Zu sätze beigegeben worden so führt dies in derRegelzueinemschäumigenÜberkochen desWassers In diesem Fall muss das Wasser abgelassen werden u...

Page 6: ...r Zeitschaltuhr neh men Sie das Gerät in Betrieb Durch Drehung nach rechts stellen Sie die gewünschte Be triebsdauer ein Die Zeitschaltuhr schaltet dann nach Ablauf der eingestellten Zeit das Gerät automatisch aus WollenSiedasGerätvorAblaufdereingestellten Zeit ausschalten drehen Sie den Knopf der Zeit schaltuhr entgegen dem Uhrzeigersinn auf 0 Mit dem unteren Drehknopf regeln Sie die Ver dampfung...

Page 7: ...e Wassereinfül löffnung 4 Anlage nach ca 5 Minuten einschalten und solange laufen lassen bis der Summer der Wassermangelsicherung ertönt 5 Sofort ca 1 l klares Wasser in die Wasserein füllöffung einfüllen Der Summton erlischt und die Anlage erwärmt erneut das Ver dampfersystem hierbei werden die Restkalk teilchen gelöst 6 Nach ca 10 Minuten Anlage ausschalten ab kühlen lassen und Wasser ablassen D...

Page 8: ...cycling Bitte diese Adresse zusammen mit der Monta geanweisung gut aufbewahren Damit wir Ihre Fragen schnell und kompetent beantworten können geben Sie uns immer die auf dem Typenschild vermerkten Daten wie Ty penbezeichnung Artikel Nr und Serien Nr an Nicht mehr gebrauchte Geräte Leuchtmittel sind gem Richtlinie 2002 96 EG bzw ElektroG zum Recy celn bei einer Werkstoffsammelstelle abzugeben Nicht...

Page 9: ...erpackungenunsererProduktesindfürdenStückgut versand Palette konzipiert WirweisenandieserStelle ausdrücklich darauf hin dass unsere Verpackungen nicht für den Einzelversand per Paketdienst geeignet sind Für Schäden die aufgrund von unsachgemäßer Verpackung im Einzelversand entstehen übernimmt der Hersteller keine Haftung VI Herstellergarantie Wir übernehmen die Herstellergarantie nur in dem Fall d...

Page 10: ...bl 3 gn ge 4 sw PE N L 1000W 750 W Wiring diagram vaporiser with con trol unit Wiring diagram vaporiser without control unit English Table of Contents Important notes 11 Installation 11 Start up 12 Operation 13 Important notes for use 13 How to decalcify the device 14 Technical data 14 Service Address 15 General Terms and Conditions of Service 16 Temp limiter Dry run protection Summer buzzer ...

Page 11: ...igned for being used by persons including children that are physically or mentally handicap ped or have sensory disabilities Moreover it is not allowed to use this device without sufficient experience and or knowledge unless these persons will be supervised by persons responsible for their security or in case they have been instructed how to use this device Children are to be supervised in order t...

Page 12: ...own Timer Power controller Addherbsandessencestotheherbal holder only By adding essences or any other additivesforairhumidity ahealthhazard cannotbeexcluded Itisadvisednottouse thoseadditivesunlesstheyarerecommen ded by the manufacturer of the oven Ifadditivesareputinthewater thisgenerally leadstoafoamyboilingoverofthewater In this case the water must be drained and the interiorofthecoldreservoirw...

Page 13: ...mer setting You can choose the operating time by turning the konb to the right side The timer will cut off the device automatically after the selected time expires If you want to turn off the device before expi ration of the selected time turn the knob in counterclockwise direction to 0 With the lower knob power output you can adjust the intensity of steam Pleasebearinmindthatyoucannotregulatethe ...

Page 14: ...s solution into the water tank 4 Switch on the device after about 5 minutes and let it run until the low water protection buzzer starts to sound 5 Immediately pour ca 1 L of clear water into the water tank The buzzing fades and the device heats up again which dissolves the remaining scale deposits 6 Switch off the device after about 10 minutes let it cool down and drain the water Repeat this proce...

Page 15: ...w eos sauna de Please keep this address in a safe place togeth er with the installation guide To help us answer your questions quickly and competently please provide the information printed on the type shield including the model item no and serial no in all inquiries Equipment commissioning date Stamp and signature of the authorized elec trician 15 EN ...

Page 16: ...ip ping of individually packed goods pallet We expressly point out that our packaging is not suitable for individual shipments via parcel post The manufacturer shall accept no liability for damage incurred as a result of improper packaging in an individual shipment VI Manufacturer s Warranty The manufacturer s warranty shall apply only in the event that installation operation and maintenance have ...

Page 17: ...schutz sw 1 bl 3 gn ge 4 sw PE N L 1000W 750 W Принципиальная схема системы с блоком управления Принципиальная схема системы без блока управления Русский Содержание Важные указания 18 Монтаж испарителя 18 Ввод в эксплуатацию 19 Управление 20 Указания для использования 20 Удаление накипи 21 Технические характеристики 21 Адрес сервисного центра 22 Общие условия обслуживания ASB 23 ...

Page 18: ...вания лицами включая детей с ограниченными физически ми сенсорными или умственными способностями а также лицами не об ладающими опытом и или знаниями за исключением случаев когда они находятся под присмотром человека отвечающего за их безопасность или получают от него инструкции по ис пользованию устройства За детьми необходимо присматривать чтобы обеспечить что они не играют с прибором Перед любы...

Page 19: ...я выдерните штепсель из розетки Таймер Регулятор мощности При использовании ароматиче ских средств или других добавок для ароматизации воздуха не исключена опасность для здоровья Использова ние таких добавок не рекомендуется если они не одобрены производите лем устройства или поставщиком ИК кабины Случайное попадание добавок в воду приводит с сильному пенообразованию и переливанию через край бака ...

Page 20: ...егулятора направо таймера Путем пово рота вправо задается необходимое время эксплуатации до 120 мин По истечении установленного времени таймер автомати чески выключит прибор Если вы хотите выключить прибор до исте чения установленного времени поверните регулятор таймера против часовой стрелки в положение 0 С помощью нижнего регулятора изменятеся выходная мощность и интенсивность ис парения Обратит...

Page 21: ... минут включить прибор и оставить работать до тех пор пока не раз дастся сигнал устройства защиты от недо статка воды 5 Немедленно залить прибл 1 л чистой воды в отверстие для залива воды Звук сигнала исчезнет и прибор вновь начнет нагрев при этом растворяются оставшие ся частицы накипи 6 Прибл через 10 минут выключить уста новку дать ей остыть и слить воду Эту процедуру повторять до тех пор пока ...

Page 22: ...ирменной табличке обозначение типа номер артикула и серийный номер Изготовитель EOS Saunatechnik GmbH Schneiderstriesch 1 35759 Driedorf Germany Германия Дата покупки Печать и подпись дилера Адрес сервисного центра в РФ ООО EOC Премиум СПА Технологии 108811 Москва Киевское ш БП Румянцево 928 г Телефоны 7 495 66 55 192 8 800 1000 539 info eos sauna ru www eos sauna ru ...

Page 23: ...тировку на поддонах Поэтомумыобращаемособоевнимание на то что наша упаковка не предназначена для штучной отправки службами доставки За ущерб возникший во время доставки оборудования из за его ненадлежащей упаковки производитель ответственности не несет VI Гарантия производителя Мы берем на себя гарантию производителя только в том случае если монтаж эксплуатация и техобслуживаниебылипроизведенывсоо...

Reviews: