background image

Call 1300 369 273 

www.enware.com.au

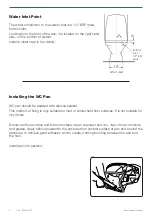
Water Inlet Point

The water connection to the cistern inlet is a 1/2" BSP male, 

bottom inlet.
Looking from the front of the pan, it is located on the right hand 

side, on the bottom of cistern. 
Install a cistern tap in the vicinity. 

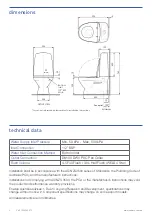
205

355

25

10

300

435

100*

70

Minimum

740

420

190

535

* For set-out information please refer to installation instructions

15

Pan outlet

95

Bottom

Inlet

1/2” BSP

Male

FRONT VIEW

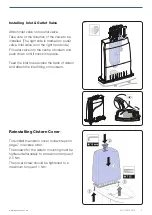
Installing the WC Pan

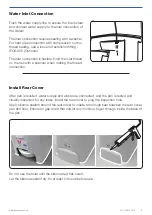
WC pan should be bedded with silicone sealant. 
This method of fixing is only suitable for tiled or similar hard floor surfaces. It is not suitable for 
vinyl floors.

Ensure the floor surface and bottom surface of pan are clean and dry - free of dust, moisture 
and grease. Apply silicone sealant to the entire bottom contact surface of pan and around the 
perimeter, to achieve good adhesion and to create a strong bonding between the pan and 
the floor.

Install pan into position. 

Summary of Contents for Ifo Sign Junior Toilet-S Trap

Page 1: ...73 info enware com au Installation and Maintenance Instructions Ifo Sign Junior Toilet S Trap The more stars the more water efficient WATER RATING www waterrating gov au 3 3litres average flush 4 5 L...

Page 2: ...complying with AS NZS 3500 the PCA or the manufacturer s instructions may void the product and performance warranty provisions Enware Australia advises 1 Due to ongoing Research and Development speci...

Page 3: ...e location and set out for the toilet pan Minimum Set Out The minimum set out to allow air circulation behind the WC pan Distance from finished wall to front of pan 565mm Distance from finished wall t...

Page 4: ...95 Bottom Inlet 1 2 BSP Male FRONT VIEW Installing the WC Pan WC pan should be bedded with silicone sealant This method of fixing is only suitable for tiled or similar hard floor surfaces It is not s...

Page 5: ...get through inside the base of the pan Water Inlet Connection Flush the water supply line to ensure the line is clear and connect water supply to the inlet connection of the cistern The inlet connect...

Page 6: ...side the Cover Screw Rod by opening the flush button and releasing the tablet in the blue Cover Screw Rod as illustrated The tablet produces a fresh odour and cleaning effect on the whole bowl and col...

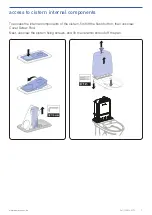
Page 7: ...9 273 7 access to cistern internal components To access the internal components of the cistern first lift the flush button then unscrew Cover Screw Rod Next unscrew the cistern fixing screws and lift...

Page 8: ...valve first lift the complete cistern up off the pan Release the inlet hose from cistern by pulling down and out Release the catch of the inlet valve on the side of outlet valve and lift up the inlet...

Page 9: ...ide Fit outlet valve into the centre of cistern and push down until it clicks into place Feed the inlet hose across the back of cistern and attach the inlet fitting onto cistern Reinstalling Cistern C...

Page 10: ...it of its original qualities Strong acids such as hydrochloric acid or sulphuric acid strong alkaline such as caustic soda and cleaning powders or pastes must not be used Running WC units should be r...

Page 11: ...Valve Seal Cistern Seating Washer IFO96765 9 Inlet Valve Assembly Inlet valve body with locking clip shuttle piston and rubber seal IFO96766 replaced by IFOS 105 IFOS 105 10 Inlet Pipe Assembly Inlet...

Page 12: ...ct and have completed the Online Product Service and Warranty Form available on website www enware com au warranty service form All notifications and accompanying forms must be sent to us marked for t...

Reviews: