Envision EN-780e User Manual Download Page 9

EN-780e

9

31MY02

EN-780e

Operating Instructions

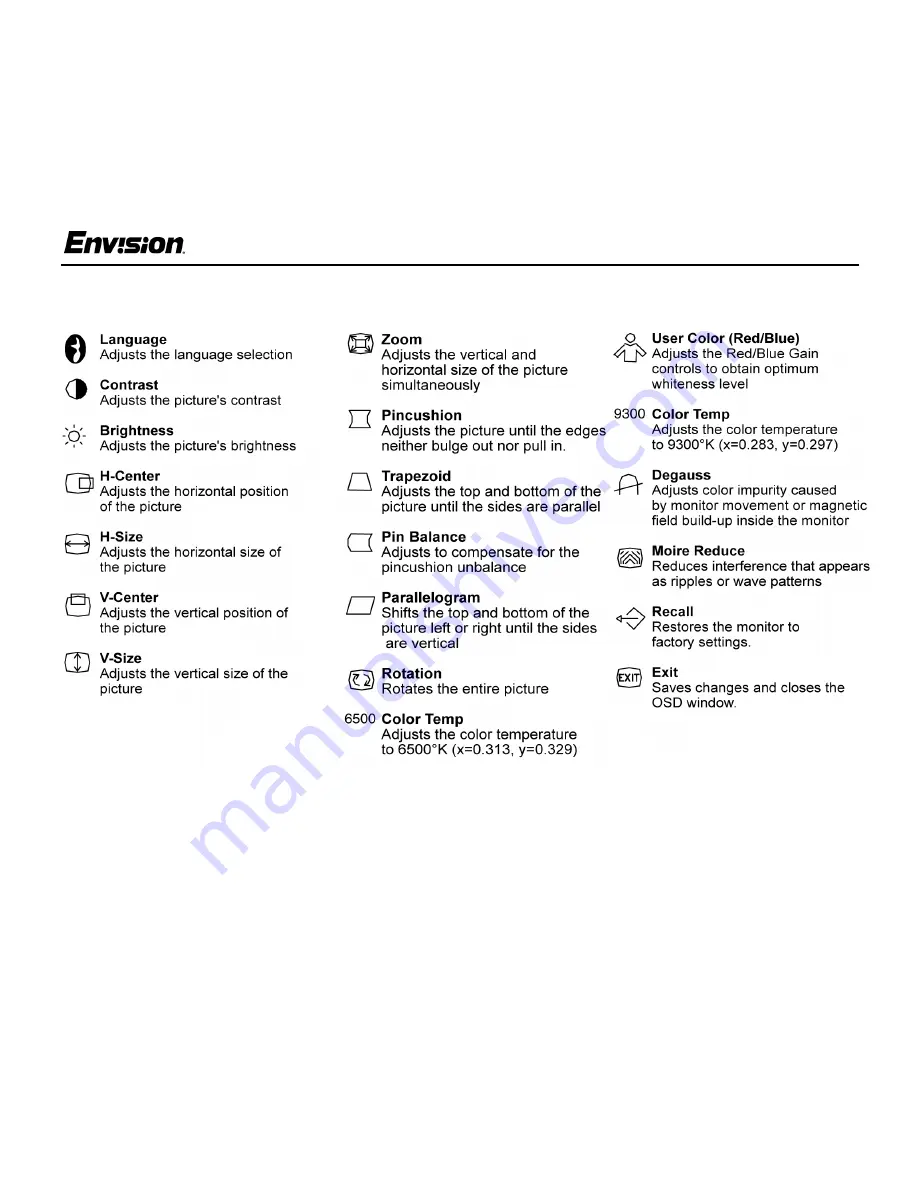
Adjusting the OSD Settings

1. Press the MENU button to open the OSD

window.

2. Press the or buttons until the desired

function is highlighted.

3. Press MENU to open the function’s window.

4. Press the or buttons to change the settings

of the function.

5. To save and exit, press the EXIT icon or leave

the monitor alone for 10 seconds. If you want
to adjust any other function, repeat steps 2-4.

Note: When the OSD window is open, the input
signal timing settings appear at the top.
H: stands for horizontal frequency and
V: stands for vertical frequency.

Summary of Contents for EN-780e

Page 1: ...N 780e 1 31MY02 EN 780e_31MY02 EN 780e 17 inch Flat CRT Color Monitor User s Manual by Envision Peripherals Inc www ENVISIONmonitor com Before operating your monitor please read this manual thoroughly...

Page 2: ...ceiving antenna 2 Increase the separation between the equipment and receiver 3 Connect the equipment into an outlet on a circuit different from that to which the receiver is connected 4 Consult the de...

Page 3: ...r supplied to your home consult your dealer or local power company The monitor is equipped with a three pronged grounded plug a plug with a third grounding pin As a safety feature this plug will only...

Page 4: ...net Always unplug the monitor before cleaning it Using the Right Power Cord The supplied power cord is a NEMA 5 15 style plug It is UL listed and CSA labeled for 125 volts AC If the monitor will be co...

Page 5: ...EN 780e 5 31MY02 EN 780e Before You Operate the Monitor Installing Removing the Base...

Page 6: ...your monitor s power input socket 3 Plug the other end of the power cord into a grounded AC outlet or UL approved power strip Caution Make sure the power cord is the correct type that is required in y...

Page 7: ...your monitor to a power supply using the power input socket on the back of your computer you must purchase a power cord with CEE 22 terminated connectors see illustration above Follow these steps 1 C...

Page 8: ...st the picture s contrast If the OSD window is open this button allows you to move within the window and select desired functions MENU Press this button to open the OSD window or select a highlighted...

Page 9: ...ss MENU to open the function s window 4 Press the or buttons to change the settings of the function 5 To save and exit press the EXIT icon or leave the monitor alone for 10 seconds If you want to adju...

Page 10: ...play to the host that continuously transmits EDID information The DDC2B is a bidirectional data channel based on the I C protocol The host can request EDID information over the DDC2B Windows INF Drive...

Page 11: ...rom the monitor They may be causing electrical interference Power LED is ON green or orange light is ON but there is no video or pic ture Press a key on the keyboard or wiggle the mouse to re activate...

Page 12: ...Resolution 1600 x 1200 pixels Plug Play VESA DDC1 2B TM Input Video Red Green Blue Analog Interface Separate Sync H V TTL H V Sync Positive Negative H Frequency 30 kHz 95 kHz V Frequency 50 Hz 160 Hz...

Page 13: ...780e Appendix Specifications continued Optimal Viewing Mode 1024 x 768 85 Hz Environmental Considerations Operating Temp 32 to 104 F 0 to 40 C ambient Operating Humidity 10 to 90 Signal Cable Attache...

Page 14: ...Resolution in pixels Horizontal Frequency Vertical Frequency VGA 720 400 31 5 kHz 70 Hz 640 480 31 5 kHz 60 Hz VESA 85 640 480 43 3 kHz 85 Hz 800 600 53 7 kHz 85 Hz 1024 768 68 7 kHz 85 Hz 1280 960 8...

Page 15: ...Connector Pin Assignment Pin Number Description Pin Number Description 1 Red 9 NC 2 Green 10 Ground 3 Blue 11 Monitor Ground 4 Ground 12 DDC Serial Data 5 Ground 13 H Sync 6 R Ground 14 V Sync 7 G Gro...

Reviews: