Quick Start User Guide
v.1.1
2.1 Ensure a suitable PMR antenna is connected.
2.2 Plug the LAN cable into the Gateway.
2.3 Apply power to the Gateway. The Gateway’s Power LED will illuminate
green
.
2.4 Once the Gateway has connected to the E-PoC Server the Gateway Status LED will blink
amber
every 5-seconds.
5.1 Browse to pocentel.co.uk and log in.
5.2 Select the server
the Gateway is
being used on
and click ‘Manage
radios’.
You should see
the Gateway
serial number at
the top of the list.
5.3 You can now
configure the
Gateway’s E-PoC
Group etc. as well
as the Gateway
radio’s RF
channel, group
etc.
Amber flash every 5 seconds
– Idle
(Wired LAN connected)
Green flash every 5 seconds
– Idle
(Wi-Fi connected)
Green steady
– Transmitting to PMR
(E-PoC Receiving)
Red steady
– Transmitting to E-PoC
(PMR Receiving)
Amber steady
– PMR Channel busy
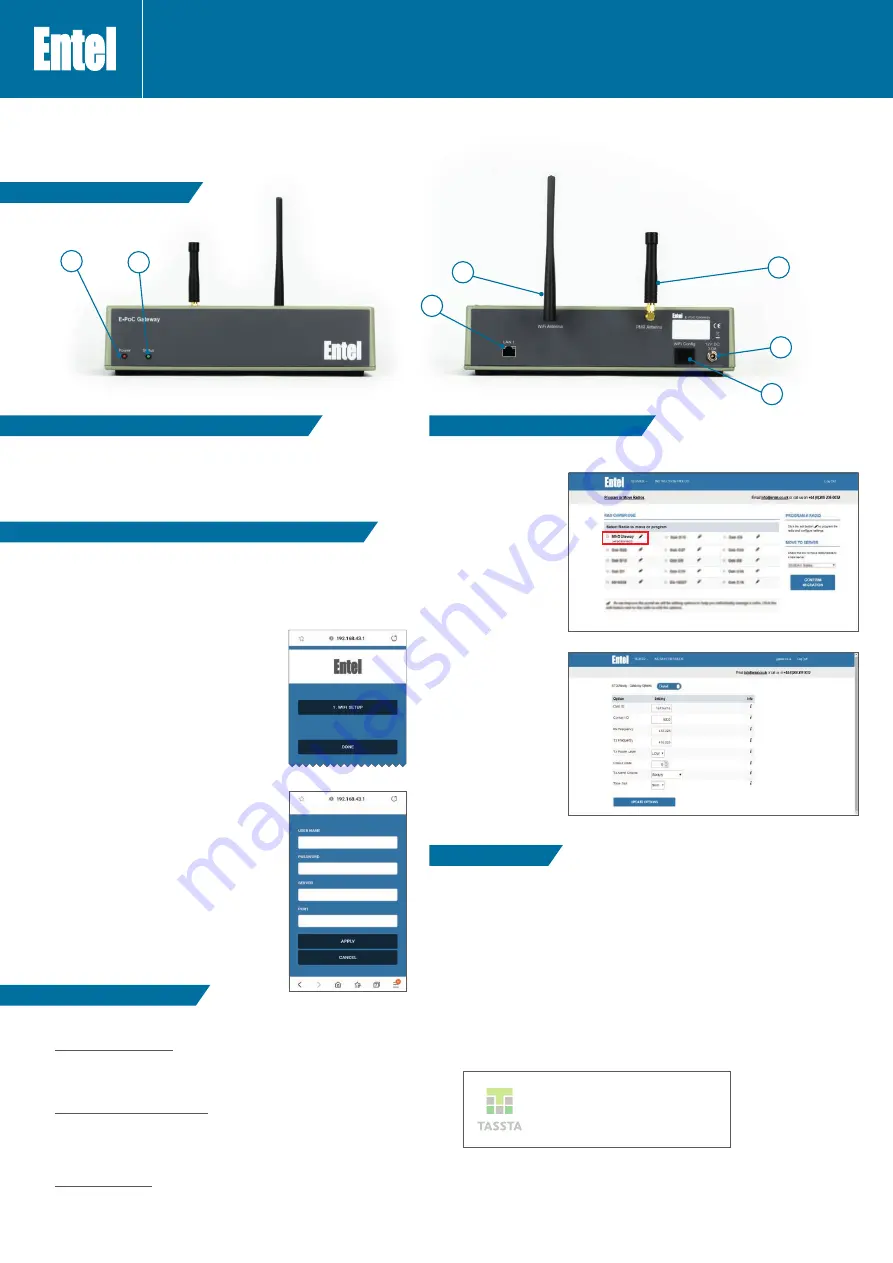
1.0 CONTROLS & INDICATORS
2.0 HOW TO INSTALL: CONNECTING VIA A WIRED LAN
5.0 PROGRAMMING THE GATEWAY
6.0 STATUS LED
3.0 HOW TO INSTALL: CONNECTING VIA A WIRELESS LAN (WI-FI)
IMPORTANT
By using this product you agree to the terms and conditions of Entel’s E-PoC Service License which
can be viewed here:
www.entel.co.uk/EPoC_LICENSE
1.
Power LED
2.
Status LED
3.
PMR antenna
4.
Wireless LAN (Wi-Fi) antenna
5.
LAN cable socket
6.
Wi-Fi configuration button
7.
Power socket
1
2
3
4
5
6
7
3.1 Ensure a suitable PMR antenna is connected.
3.2 Ensure the wireless LAN (Wi-Fi) antenna is connected.
3.3 Press and hold the Wi-Fi configuration button then apply power to the Gateway. The Gateway’s
Power LED will illuminate
green
.
3.4 When you see the Status LED flashing
red
/
green
slowly, release the Wi-Fi configuration button.
3.5 Connect to the Gateway via its Wi-Fi hotspot using
your Smartphone, Tablet or PC.
The Gateway appears in your network list as
‘GW-’ (with the Gateways serial number appended).
Click on ‘Wi-Fi SETUP’.
NOTE:
If your device does not automatically open the
webpage, browse to: 192.168.43.1
3.6 Enter Wi-Fi credentials and then click ‘APPLY’.
Your web browser will now return to the screen shown
in 3.4.
Click ‘DONE’ which will restart the Gateway and it
will then connect to your Wi-Fi network. This will be
confirmed by the Status LED flashing
green
every 5
seconds.
Entel’s E-PoC software has
been optimised in conjunction
with TASSTA GmbH
Amber slow flash
– No Internet connection
Amber
/
red slow flash
– No connection to E-PoC Server
Red
/
green slow flash
– Wi-Fi configuration mode
Red
/
green rapid flash
– Programming mode
Amber
/
red rapid flash
– Bootloader mode
Red rapid flash
– Settings transfer fail
Red rapid double flash
– Error: E-PoC
Red slow flash
– Critical error
4.0 NETWORK PORT SETTINGS
If you have a Firewall on your Gateways internet connection the following ports need to be open
(outgoing only).
4.1 To Entel’s provisioning server (provisioning.entelpoc.net):
1234 TCP
1235 TCP
1236 TCP
This is to enable remote programming of the Gateway by your Dealer.
4.2 To Entel’s E-PoC EMEA E-PoC server (emea1.entelpoc.net *)
80 TCP
443 TCP
4000 TCP
And your unique server port (which will be advised by your Dealer) that is TCP & UDP
* If you are using a different server please substitute the address accordingly.
4.3 To Entel’s update server (server1.entelpoc.net)
80
TCP
443
TCP
This is to allow for software updates. These ports must be opened to this server address no
matter which PoC server address you are using.


