


-
2 -
Important Safety Notification
Do not expose the product to rain or moisture, such as a
bathtub, a washbowl, a kitchen sink, a laundry tub, and
a swimming pool.
Do not expose the machine under direct sunlight, and
keep it away from any heat source.
Do not place the product on an unstable location, stand
or table. If the machine falls, it may injure a person or
cause serious damage to the appliance.
Do not allow anything to rest on the power cord.
Do not locate the product where people may walk on the
cord.
Do not make the power outlet and extension cords
overload. Overload can result in fire or electric shock.
If any of the following situations occurs, unplug the
product from the power outlet immediately and consult
with a qualified service person:
1.
The power cord or plug is damaged or frayed.
2.
Liquid is spilled into the system.
3.
The product is dropped and damaged.
Use a soft cloth to clean the product when it is dirty. In
case the dirt is hard to remove, use a mild detergent and
wipe the product gently.
Turn OFF and unplug the product before cleaning.
When the product is not in use, clean and stores it with
care.
Summary of Contents for PRP-188
Page 1: ...Save the user manual for future reference Thermal Receipt Printer Instruction Manual ...
Page 2: ......
Page 4: ......
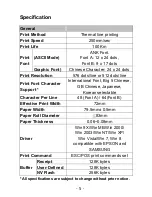
Page 12: ... 8 Dimensions ...
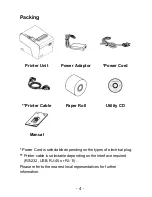
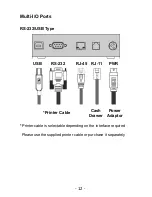
Page 17: ... 13 Parallel Type Parallel Port RJ 11 PWR Printer Cable Cash Drawer Power Adaptor ...
Page 19: ... 15 Baud Rate Setting DIP 7 DIP 8 19200 Default 9600 115200 38400 ...
Page 23: ... 19 3 Replace the Cover and tear out the paper ...
Page 26: ... 22 4 Click Next to continue ...
Page 29: ... 25 1 Select Module Number Select the proper Printer Model Number ...
Page 44: ... 40 4 As the location of the driver is specified Click Next to continue ...
Page 45: ... 41 5 Start Notification Click Continue Anyway to continue ...
Page 46: ... 42 6 The wizard is installing the driver ...
Page 54: ... 50 Printer Status This menu displays the printer status and can perform print test ...
Page 62: ... 58 6 Additional Port Information Select Custom and click Setting to continue ...
Page 64: ... 60 8 Click Finish to complete ...
Page 71: ... 67 ...
Page 72: ...20121110 ...