6/16
ENGLISH
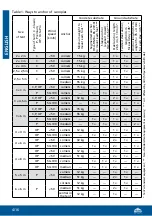
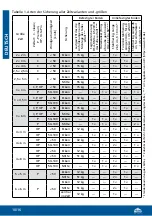
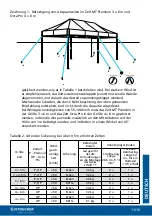
i.e. with height increased by max 0,5 m. Tent may be used with wind up to
14 m/s (50 km/h) provided it is protected against wind gusts as described
in table no. 2. During stronger wind, it is recommended in all cases
to disassemble the tent (first remove the wall and then fold the
roof). Mechanical damage resulting from failure to follow the above
recommendations are not covered by the warranty.
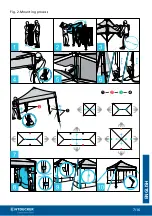
ASSEMBLY SEQUENCE
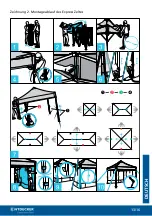
1. Take the structure out of the case and arrnage it on a level ground. Hold the
legs and stretch.
2. Put the roof on. Velcro together roof and frame corners.
ATTENTION! For MT Premium in sizes 4 × 4 m, 5 × 5 m, 6 × 6 m pull out the
mast and block it.
3. Holding the lower sabres, stretch the structure.
4. Fasten the locks in corner legs. Remember to lock the blocks on center legs.
For better stability put your foot on the basis of the leg of the tent.
5. Fasten the roof with clip buckles.
6. Press the lock located on the leg, slide out the inner leg and lift the tent.
ATTENTION! Assemblers should lift the same side of the tent.
7. Unblock and slide out the leg on the opposite side. Depending on the
tent dimensions and number of legs, please unblock and slide out the legs
according to the assembly sequence. For MT Premium in size 6 × 6 m insert
additional leg, this is included in the accessories, in the hole of the middle
mast.
8. Velcro the wall to the valance of the roof. Fasten wall side Velcro’s around
the legs.
9. Connect the walls with a velcro/zip (depending on version).
10. On the ground, secure legs of a tent with 26,5 cm long anchors. Connect one
side of the guy rope, with the tent roof and anchor the other end with 34 cm
twisted steel tent peg. Then stretch the guy rope at an angle of 45 degrees
and anchor it. When on concrete surface, secure the tent with ballast or
sleeve anchor.
DISASSEMBLY SEQUENCE
1. First detach the walls, then detach the tent lines and remove anchors.
2. Pull out the anchors in the basis of the tent (remove the weights or remove
the sleeve anchors).
3. Ensure that the base of the tent and internal legs are clean. The sand and
clay accumulated on the frame can prevent the legs from sliding in. Press the
lock located on the leg, slide in the inner leg and let the tent down. Note!
When letting it down, the installers should be on the same side of the tent.
4. Unfasten the clip buckles.
5. Release the locks in the corner and center legs.
6. Holding the lower sabres, fold the structure.
Summary of Contents for MT CLASSIC
Page 1: ...EN DE MANUAL GEBRAUCHSANWEISUNG FALTZELTE EXPRESS TENT MT CLASSIC MT PREMIUM OCTA PRO ...
Page 7: ...7 16 ENGLISH Fig 2 Mounting process ...
Page 13: ...13 16 DEUTSCH Zeichnung 2 Montageablauf des Express Zeltes ...
Page 15: ...15 16 DEUTSCH ...
Page 16: ...EKS20180702 EN DE MANUAL GEBRAUCHSANWEISUNG FALTZELTE MT CLASSIC MT PREMIUM OCTA PRO ...


