background image

1. Please make sure to refer to the installation instructions in the 

Operating Instructions to avoid damage caused by installation 

errors.

2. The product included the battery inside and can not be replaced, 

do not disassemble or replace the battery by yourself.

3. Please install the product in a proper location to avoid the 

possibility of this product being hit and prevent damage to the 

product.

4. The product has certain waterproof function, but cannot be used 

in deep water or soaked in rain for a long time.

5. Please use the product at the specified temperature, high 

temperature environment may cause damage to the product.

This product can be directly installed with double-sided tape, the 

installation method is as follows:

a)  Clean properly the surfaces

Note: Make 

sure the surface is flat and the oil is clean 

enough.

b)  Remove protection from double-sided 

tape

Note: when removing the double-sided 

tape protector, make sure that the 

double-sided tape is not exposed to water or 

oil on both sides.

c)  Stick the double-sided tape on the back of 

the product. Note: before pasting the 

double-sided tape, please make sure the 

back of the product is clean and tidy, without 

moisture or grease.

d)  Fix the hour meter in a proper position. 

Note: before pasting the double-sided tape, 

please confirm that the pasted place is clean 

and tidy, no moisture or oil.

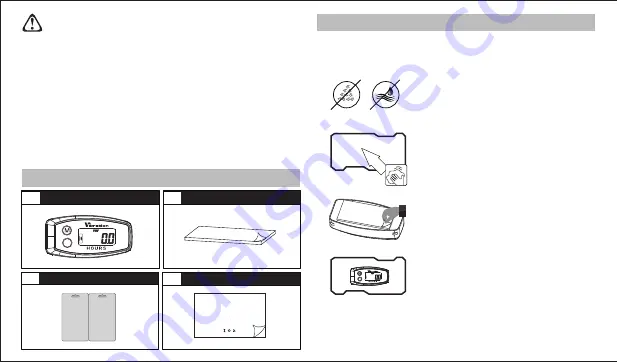
Product Accessories List

Product Installation

1. Double-sided tape installation:

Proper position requirement: no moisture, no grease, is a plane, no violent 

vibration, and the temperature not exceed 125F.

user manual*1

4

Operating Instruction

Vibration Activated Hour Meter

double-sided tape*1

2

product*1

1

paper card*1

3

s

s

Summary of Contents for T56E Series

Page 1: ...ided tape on the back for mounting on surface along with two side holes for extra wire mounting for more security The internal battery supplies all the necessary power for the gauge to operate for yea...

Page 2: ...defects in material or workmanship will be repaired or replaced at ENM s option without charge to the consumer when returned with proof of purchase to any authorized ENM dealer in the United States tr...

Page 3: ...Operating Instruction Vibration Activated Hour Meter s...

Page 4: ...and understand the following notices carefully and correctly install and operate the product before using Product Accessories List Product Installation Product Operation Product Specifications Produc...

Page 5: ...an properly the surfaces Note Make sure the surface is flat and the oil is clean enough b Remove protection from double sided tape Note when removing the double sided tape protector make sure that the...

Page 6: ...rom 0 2 JOB Hours of operation since the timer was reset a To view JOB time press the M button once at TOT interface b To reset JOB time press the M button until display shows JOB icon release the M b...

Page 7: ...tenance interval time is reached and the LCD display will flashing press the M button or S button to clear the status the next maintenance interval time starts timing b Programming SVC time 1 Press th...

Page 8: ...the life of your product you can apply it as follows There are several cases about the service life of the battery this is the theoretical calculation the actual battery life is related to the applica...

Page 9: ...OT JOB JOB1 Timing range 0 99999H Timing accuracy 0 1H 1H SVC TIMER setting range Display mode Display window size visible 0 1000H OFF LCD 28x13mm Product size Battery type Waterproof level 67x33x14mm...

Reviews: