background image

11g Wireless Outdoor Client Bridge/AP  


          Version 1.36 


 12 


3  Switch between Bridge/ Bridge Router/ 

AP 


This device can be configured as a Bridge or Access Point.  The default IP address 
of the device is 

192.168.1.1

 in Bridge mode. This chapter will describe the steps to 

switch from Bridge to Access Point and Access Point to Bridge.   
 

3.1  Bridge/Bridge Router to Access Point  

Enter the default IP address (192.168.1.1) of the bridge into the address bar of 
the web-browser. 

By default, a user name and password has not been configured. If you have 
configured a user name and password, please enter them into the field to 
continue 

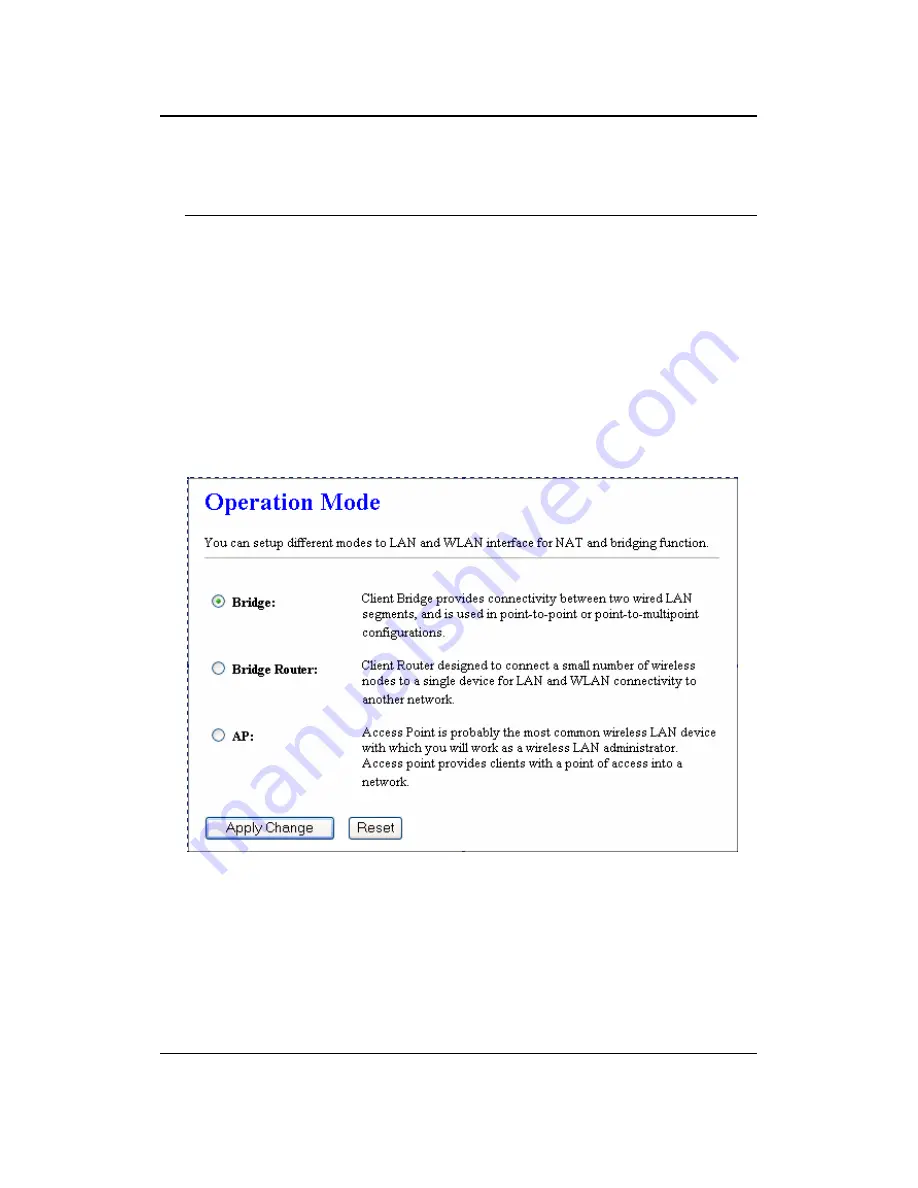
3  Once you have logged in, click on the 

Operation Mode

 link under the 

Management

 menu.  


Since this device is currently in Bridge mode, the 

Bridge

 radio button will be 

selected by default.  

5 Select 

the 

AP

 radio button to and then click on the 

Apply Change

 to switch the 

operation mode to Access Point.  

Wait for about 1 minute and the device will automatically restart into Access 
Point mode.  


Summary of Contents for EOC-3220

Page 1: ...11g Wireless Outdoor Client Bridge AP User s Manual Version 1 36 ...

Page 2: ...G IN 14 4 2 MANAGEMENT 15 4 2 1 OPERATION MODE 15 4 2 2 STATUS 17 4 2 3 STATISTICS 18 4 2 4 LOG 18 4 2 5 UPGRADE FIRMWARE 19 4 2 6 SAVE RELOAD SETTINGS RESET TO DEFAULT 19 4 2 7 PASSWORD 20 4 3 TCP IP SETTINGS 21 4 3 1 LAN INTERFACE 21 4 4 WIRELESS 22 4 4 1 BASIC SETTINGS INFRASTRUCTURE ADHOC 22 4 4 2 ADVANCED SETTINGS INFRASTRUCTURE ADHOC 23 4 4 3 SECURITY 25 4 4 3 1 ENCRYPTION DISABLED 25 4 4 3 ...

Page 3: ...ESS 40 5 4 1 BASIC SETTINGS 41 5 4 2 ADVANCED SETTINGS 41 5 4 3 SECURITY 43 5 4 3 1 ENCRYPTION DISABLED 44 5 4 3 2 WEP 64 BIT 128 BIT 45 5 4 3 3 WPA WPA2 WPA2 MIXED PASSPHRASE 46 5 4 3 4 WPA WPA2 WPA2 MIXED RADIUS AUTHENTICATION 47 5 4 4 ACCESS CONTROL 48 5 4 5 WDS 49 APPENDIX A SPECIFICATIONS 51 APPENDIX B FCC INTERFERENCE STATEMENT 52 ...

Page 4: ...11g Wireless Outdoor Client Bridge AP Version 1 36 4 Revision History Version Date Notes 1 36 April 26 2006 ...

Page 5: ...exactly which stations should have access to your network This chapter describes the features benefits package contents applications and network configuration 1 1 Features Benefits Features Benefits High Speed Data Rate Up to 54Mbps Capable of handling heavy data payloads such as MPEG video streaming High Output Power and High Sensitivity Spreads the operation distance and reduce the roaming betwe...

Page 6: ... h 48V 0 375A AC DC adapter with wall plug power cable h Inline Power Injector PoE h 1 8m Grounding Cable h User s manual CD ROM h Wall mounting kit h Mast mounting kit h Waterproof kit 1 3 Outdoor Unit Description 1 4 System Requirements The following are the minimum system requirements in order configure the device h PC AT compatible computer with an Ethernet interface h Operating system that su...

Page 7: ...tly changed environments Show rooms meeting rooms retail stores and manufacturing sites where frequently rearrange the workplace e Small Office and Home Office SOHO networks SOHO users need a cost effective easy and quick installation of a small network f Wireless extensions to Ethernet networks Network managers in dynamic environments can minimize the overhead caused by moves extensions to networ...

Page 8: ... the easiest and least expensive way for the SOHO to set up a wireless network The image below depicts a network in ad hoc mode b Infrastructure Mode The infrastructure mode requires the use of an access point AP In this mode all wireless communication between two computers has to be via the AP It doesn t matter if the AP is stand alone or wired to an Ethernet network If used in stand alone the AP...

Page 9: ...11g Wireless Outdoor Client Bridge AP Version 1 36 9 ...

Page 10: ... adapter into the PoE injector port labeled DC240V and the other end into the power socket on the wall This diagram depicts the hardware configuration 2 2 IP Address Configuration This device can be configured as a Bridge or Access Point The default IP address of the device is 192 168 1 1 In order to log into this device you must first configure the TCP IP settings of your PC Notebook 1 In the con...

Page 11: ... your PC Notebook 3 Select Use the following IP Address radio button and then enter the IP address and subnet mask Ensure that the IP address and subnet mask are on the same subnet as the device For Example Device IP address 192 168 1 1 PC IP address 192 168 1 10 PC subnet mask 255 255 255 0 4 Click on the OK button to close this window and once again to close LAN properties window ...

Page 12: ...8 1 1 of the bridge into the address bar of the web browser 2 By default a user name and password has not been configured If you have configured a user name and password please enter them into the field to continue 3 Once you have logged in click on the Operation Mode link under the Management menu 4 Since this device is currently in Bridge mode the Bridge radio button will be selected by default ...

Page 13: ...ured a user name and password please enter them into the field to continue 3 Once you have logged in click on the Operation Mode link under the Management menu 4 Since this device is currently in Access Point mode the AP radio button will be selected by default 5 Select the Bridge or Bridge Router radio button to and then click on the Apply Change to switch the operation mode to Bridge 6 Wait for ...

Page 14: ...gging in you will graphical user interface GUI of the bridge The navigation drop down menu on left is divided into three main sections 1 Management This includes operation mode status statistics logs upgrade firmware save reload settings and password 2 TCP IP Settings This includes the configuration of the LAN port and settings for the LAN IP subnet mask DHCP client spanning tree and MAC cloning 3...

Page 15: ...current state of the bridge It may be scanning or associated or disabled TCP IP Configuration o Attain IP Protocol The IP address setting may be fixed or static o IP Address Displays the current IP address of the LAN port o Subnet Mask Displays the current subnet mask for the IP address o Default Gateway Displays the default gateway for the device o DHCP Displays the DHCP setting o MAC Address Dis...

Page 16: ...Apply Change button Wait for about a minute until you see the following Pop Up message Click on the OK button and then enter the specified IP address into the web browser Switch to other mode the configuration settings will continue using Refer to Chapter 5 to learn how to configure this device in Access Point mode ...

Page 17: ...ge AP or WDS o Band Frequency and IEEE 802 11 operation mode b only g only or b g o SSID The name used to identify the wireless network o Channel Number The channel used to communicate on the wireless network o Encryption The type of security used on this network It may be disabled WEP WPA etc o BSSID The MAC address of the SSID o State The current state of the bridge It may be scanning or associa...

Page 18: ...kets on the Ethernet and Wireless interface Since the packet counter is not dynamic you must click on the Refresh button for the most recent statistics 4 2 4 Log Click on the Log link under the Management menu The Log page displays a list of events that are triggered on the Ethernet and Wireless interface This log can be referred when an unknown error occurs on the system or when a report needs to...

Page 19: ...rmware from your vendor Click on the Browse button and then select the appropriate firmware and then click on the Upload button Note The upgrade process may take about 1 minute to complete Do not power off the device during this process as it may crash the device and make it unusable The device will restart automatically once the upgrade is complete 4 2 6 Save Reload Settings Reset to Default Clic...

Page 20: ...the Password link under the Management menu This option allows you to create a user name and password for the device By default this device is configured without a user name and password For security reasons it is highly recommended that you create a user name and password Enter a user name into the first field Enter a password into the New Password field and then re type the password into the Con...

Page 21: ...IP Address Enter the IP address Subnet Mask Enter the subnet mask for the IP address Default Gateway Enter the IP address for the default gateway DHCP If this device is a DHCP client and will receive its IP settings from a DHCP server then select Enabled from the drop down list Enabling the DHCP client will disable the IP address subnet mask and default gateway fields If the DHCP option is Disable...

Page 22: ...ress of SNMP Trap Host 4 4 Wireless Click on the Wireless link on the navigation drop down menu You will then see four options basic settings advanced settings security and site survey Each option is described below 4 4 1 Basic Settings Infrastructure Adhoc Click on the Basic Settings link under the Wireless menu Using this option you may configure the 802 11b g settings as well as the frequency c...

Page 23: ...el is not required however when selecting Adhoc mode you must select the same channel on all points Enable MAC cloning Change the Bridge s MAC to the connected Client s MAC which is the first client connects with Bridge This function only allow one Client connect to network Clone MAC Address Bridge s MAC will be defined by the value in blank space Click on the Apply Changes button to confirm the c...

Page 24: ...ect Auto if you are not sure which authentication type is used Fragment Threshold Packets over the specified size will be fragmented in order to improve performance on noisy networks RTS Threshold Packets over the specified size will use the RTS CTS mechanism to maintain performance in noisy networks and preventing hidden nodes from degrading the performance Beacon Interval Beacons will be sent ou...

Page 25: ...ormance The Default is disabled Click on the Apply Changes button to confirm the changes This device will automatically restart once these changes have been applied 4 4 3 Security Click on the Security link under the Wireless menu On this page you can configure the authentication and encryption settings such as WEP WPA and 80 1x 4 4 3 1 Encryption Disabled Encryption Select None from the drop down...

Page 26: ...lect WEP from the drop down list if your wireless network uses WEP encryption WEP is an acronym for Wired Equivalent Privacy and is a security protocol that provides the same level of security for wireless networks as for a wired network Set WEP Key Click on this button to configure the WEP Key ...

Page 27: ...the drop down list if your wireless network uses this encryption WPA Wi Fi Protected Access was designed to improve upon the security features of WEP Wired Equivalent Privacy The technology is designed to work with existing Wi Fi products that have been enabled with WEP WPA provides improved data encryption through the Temporal Integrity Protocol TKIP which scrambles the keys using a hashing algor...

Page 28: ...ugh the Temporal Integrity Protocol TKIP which scrambles the keys using a hashing algorithm and by adding an integrity checking feature which makes sure that keys haven t been tampered with WPA Authentication Mode Select the Enterprise RADIUS radio button WPA WPA2 Select TKIP or AES as the cipher suite RADIUS Port Enter the port number of the RADIUS server The default is usually 1812 RADIUS IP Add...

Page 29: ...address of the Access Point o Channel This indicates the current channel that the Access Point is operating on along with the 802 11 network type B G or B G o Encrypt This indicates the encryption type o Signal This indicates the signal strength of the Access Point You may select the radio button of a specific Access Point and then click on the Conenct button If the credentials of this device matc...

Page 30: ...fter logging in you will graphical user interface GUI of the Access Point The navigation drop down menu on left is divided into three main sections 4 Management This includes operation mode status statistics logs upgrade firmware save reload settings and password 5 TCP IP Settings This includes the configuration of the LAN port and settings for the LAN IP subnet mask DHCP client spanning tree and ...

Page 31: ...ents Displays the number of clients currently associated to the Access Point TCP IP Configuration o Attain IP Protocol The IP address setting may be fixed or static o IP Address Displays the current IP address of the LAN port o Subnet Mask Displays the current subnet mask for the IP address o Default Gateway Displays the default gateway for the device o DHCP Displays the DHCP setting o MAC Address...

Page 32: ...specified IP address into the web browser Switch to other mode the configuration settings will continue using Switch to other mode the setting Refer to Chapter 4 to learn how to configure this device in Bridge Router mode 5 2 2 Status Click on the Status link under the Management menu The Status page is the first page that is displayed once you have logged in This includes details about the system...

Page 33: ...The channel used to communicate on the wireless network o Encryption The type of security used on this network It may be disabled WEP WPA etc o BSSID The MAC address of the SSID o Associated Clients Displays the number of clients currently associated to the Access Point TCP IP Configuration o Attain IP Protocol The IP address setting may be fixed or static o IP Address Displays the current IP addr...

Page 34: ...isplays a list of events that are triggered on the Ethernet and Wireless interface This log can be referred when an unknown error occurs on the system or when a report needs to be sent to the technical support department for debugging purposes In order for the log to record all the events you must first place a check in the Enable Log or Enable Remote Log Log Server required check box Select syste...

Page 35: ...omplete Do not power off the device during this process as it may crash the device and make it unusable The device will restart automatically once the upgrade is complete 5 2 6 Save Reload Settings Reset to Default Click on the Save Reload Setting link under the Management menu This option is used to save the current settings of the device in a file on your local disk or load settings on to the de...

Page 36: ...or security reasons it is highly recommended that you create a user name and password Enter a user name into the first field Enter a password into the New Password field and then re type the password into the Confirmed Password field Then click on the Apply Changes button By clicking on the Reset button the user name and password fields will become blank indicating that the username and password h...

Page 37: ...ll receive its IP settings from a DHCP server then select Enabled from the drop down list Enabling the DHCP client will disable the IP address subnet mask and default gateway fields If the DHCP option is Disabled then the IP address subnet mask and default gateway fields must be filled in 802 1d Spanning Tree Select Enabled from the drop down list if you if you would like to use the spanning tree ...

Page 38: ...ent will disable the IP address subnet mask and default gateway fields If the DHCP option is Disabled then the IP address subnet mask and default gateway fields must be filled in 802 1d Spanning Tree Select Enabled from the drop down list if you if you would like to use the spanning tree feature Click on the Apply Changes button to confirm the changes This device will automatically restart once th...

Page 39: ...to the clients associated DHCP Client Range Enter the first and last IP address of the range Make sure that the range is on the same subnet as the device You may click on the Show Client button to view a list of IP addresses that were distributed DNS Server Enter the IP address of the DNS server 802 1d Spanning Tree Select Enabled from the drop down list if you if you would like to use the spannin...

Page 40: ...the Read Write Community Strings Enable Send SNMP Trap to activate the SNMP Trap Agent and input the IP address of SNMP Trap Host 5 4 Wireless Click on the Wireless link on the navigation drop down menu You will then see five options basic settings advanced settings security access control and WDS Each option is described below ...

Page 41: ...ss network The SSID must be identical on all points of the wireless network and cannot exceed 32 characters Channel Select a channel from the drop down list The channels available are based on the country s regulation When selecting Infrastructure mode a channel is not required however when selecting Adhoc mode you must select the same channel on all points Show Active Clients Click on this button...

Page 42: ... recommended to select Auto if you are not sure which authentication type is used Fragment Threshold Packets over the specified size will be fragmented in order to improve performance on noisy networks RTS Threshold Packets over the specified size will use the RTS CTS mechanism to maintain performance in noisy networks and preventing hidden nodes from degrading the performance Beacon Interval Beac...

Page 43: ... a site survey IAPP It is recommended to Enable the Inter Access Point Protocol IAPP if you would like the clients on the wireless network to seamlessly roam between Access Points of the same SSID 802 11g Protection If your wireless network is using both 802 11b and 802 g devices then it is recommended to enable this feature so that the 802 11b devices will not degrade the performance of 802 11g d...

Page 44: ...1 Encryption Disabled Encryption Select None from the drop down list if your wireless network does not use any type of encryption Click on the Apply Changes button to confirm the changes This device will automatically restart once these changes have been applied ...

Page 45: ...lect WEP from the drop down list if your wireless network uses WEP encryption WEP is an acronym for Wired Equivalent Privacy and is a security protocol that provides the same level of security for wireless networks as for a wired network Set WEP Key Click on this button to configure the WEP Key ...

Page 46: ...Mixed from the drop down list if your wireless network uses this encryption WPA Wi Fi Protected Access was designed to improve upon the security features of WEP Wired Equivalent Privacy The technology is designed to work with existing Wi Fi products that have been enabled with WEP WPA provides improved data encryption through the Temporal Integrity Protocol TKIP which scrambles the keys using a ha...

Page 47: ...tion through the Temporal Integrity Protocol TKIP which scrambles the keys using a hashing algorithm and by adding an integrity checking feature which makes sure that keys haven t been tampered with WPA Authentication Mode Select the Enterprise RADIUS radio button WPA WPA2 Select TKIP AES or both as the cipher suite RADIUS Port Enter the port number of the RADIUS server The default is usually 1812...

Page 48: ...n the table will have access to the network all other clients will be blocked On the other hand selected Deny Listed only the listed MAC address will be blocked from access the network all other clients will have access to the network MAC Address Enter the MAC address Current Access Control list This table lists the blocked or allowed MAC addresses you may delete selected MAC address or delete all...

Page 49: ...ture Add WDS AP Enter the MAC address of the Access Point that will join the WDS network along with a comment about the AP Current WDS AP list This table lists MAC addresses you may delete selected MAC address or delete all the addresses from the table by clicking on the associated buttons Click on the Apply Changes button to confirm the changes This device will automatically restart once these ch...

Page 50: ...haracters where as 128 bit keys require 26 characters A hex key is defined as a number between 0 through 9 and letter between A through F Key Length Select a 64 bit or 128 bit from the drop down list Pre Shared Key Format Select Passphrase from the drop down list Pre Shared Key Enter the pass phrase this should be between 8 and 63 characters Click on the Apply Changes button to confirm the changes...

Page 51: ...36Mbps 21dBm 48Mbps 20dBm 54Mbps Antenna 9dBi Internal RF Connector SMA Fr Type Optional Networking Topology Ad Hoc Infrastructure Operation Mode Point to Point Point to Multipoint Bridge AP Client Bridge WDS Interface One 10 100Mbps RJ 45 LAN Port Security IEEE802 1x authenticator RADIUS client EAP MD5 TLS TTLS support in AP mode WPA2 WPA Pre Share KEY PSK AES TKIP MAC address filtering Hide SSID...

Page 52: ...wing measures z Reorient or relocate the receiving antenna z Increase the separation between the equipment and receiver z Connect the equipment into an outlet on a circuit different from that to which the receiver is connected z Consult the dealer or an experienced radio TV technician for help FCC Caution Any changes or modifications not expressly approved by the party responsible for compliance c...

Reviews: