background image


18/32

energysistem.com

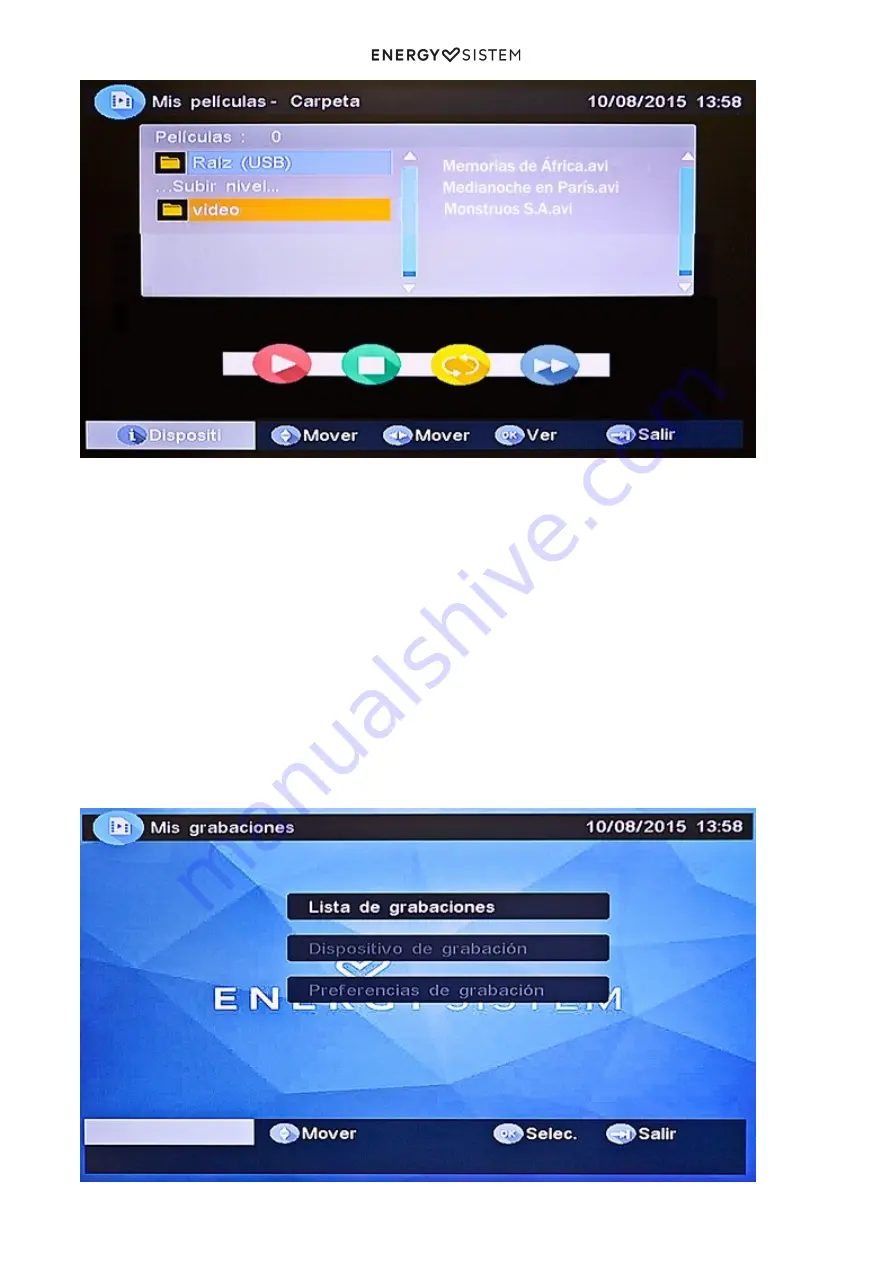
Press the "UP / DOWN" (11) and the "LEFT / RIGHT" arrow buttons (12) to move through folders and files and press "OK"
(22) to select folders or play the selected file.

Press "INFO" (18) to see all available control settings.

Press the "RED" button (16) to pause or resume the music.

Press the "GREEN" button (16) to move forward a frame.

Press the "YELLOW / BLUE" button (27) ) to move forward and backward at x2, x4, x8, x16, x32 or standard speed.

My Recordings

Through this menu, you will be able to watch the recorded DVB-T programmes using your USB stick and set the
recording and managing tools for storage units.

Please take into account that the USB unit must have a FAT or FAT32 format in order for your TDT SD3 to recognize it
correctly. It is probable that you will need to format your device through this menu to make it work properly. Use this
function carefully because formatting a device means deleting all saved data.

Summary of Contents for TDT SD3

Page 1: ... 15 Electronic Programme Guide EPG 15 Multimedia 15 My Album 15 Zoom 16 Rotation 16 Presentation 16 My Music 16 My films 17 My Recordings 18 Recording list 19 Recording unit 19 Recording preferences 20 Accesories 20 DVB T operation 20 Information 20 Changing channels 21 Adjust the volume 22 List of channels 22 Audio options of the channels 22 The track and audio channel settings are not always avai...

Page 2: ...2 32 energysistem com Trademarks 31 Declaration of conformity 32 ...

Page 3: ...3 32 energysistem com ...

Page 4: ... SD3 to impacts dust direct sunlight humidity or high temperatures Do not use corrosive nor abrasive cleaning products Keep the device clean and dust free using a soft dry cloth Always disconnect the device from the power supply before cleaning The slots and openings of your TDT SD3 are made for ventilation Do not cover or block them Do not disassemble the device Any repairs must be carried out by...

Page 5: ...nels mosaic display function MSM Multilingual OSD menu Teletext VBI Selectable subtitles between digital channel and teletext Channel management favourites move lock sort and parental control Parental control Automatic switch off ECO and timer SLEEP Games and applications included Calculator calendar connect 5 Software updated via USB port Automatic and manual TV and radio channel search with stora...

Page 6: ... Connect it to the external TV antenna 3 Antenna output connector Use it if you need to transfer the antenna signal from your SD3 to another device 4 IR receiver cable connector for the remote control This cable receives the signal from your SD3 5 AC DC power adapter cable connector 6 ...

Page 7: ...7 32 energysistem com USB Host cable connector Connect your external USB devices to play multimedia content or record from the 7 DVB T Remote control ...

Page 8: ...llows you to adjust the volume Left and right arrow 12 RECLIST It shows you the stored recordings list 13 NUMBER BUTTONS Use them to manually enter channels numbers or numbers in the menu 14 TV RADIO Switch between TV channel selection or radio stations AUDIO Select from the audio tracks 15 RED Sleep Programmed shut down Red selection button GREEN List Channel list Green selection button 16 ...

Page 9: ...is connected use REV and FWD to move around the DVB T broadcast For more information about Time Shift go to Multimedia My Recordings To use the remote control point it to the front part of the receiver cable The receiving cable has a sensor with an adhesive surface on the one end to place it on the front of the television Before adhering it and to ensure a secure installation make sure the surface...

Page 10: ...ote control for an extended period Dispose of used batteries according to your local environmental laws and guidelines Connection diagram Caution Check that the voltage in the power outlet is appropriate for the power adaptor of your TDT SD3 that is 110 to 240 V Disconnect the devices from the energy network before connecting it Check the information given by the manufacturer of your TV if necessa...

Page 11: ...rgysistem com Switch on and off To turn on the SD3 press the power button STANDBY 8 on the upper left part of your remote control You will see a green light in the IR receiver that indicates that it is turned on ...

Page 12: ...e disconnecting it from the energy network First use Start settings When first installing or restoring to factory settings your SD3 will automatically show the settings screen for the initial setup of the localization menu language audio subtitles etc and start the channel search Press UP DOWN 11 in your remote control to move around and LEFT RIGHT 12 for the settings Press the RED button 16 in the...

Page 13: ...the following submenus TV Radio Multimedia Applications Settings TV and Radio Receiving the DVB T broadcast you will find two types of channels TV and radio The operation of the Channel list and the Electronic guide remains identical for both radio and TV In this section we will explain the operation of the TV version that you will be able to apply to the radio version ...

Page 14: ...you want to edit Press OK 22 to show the channel s information press OK 22 again to enter the edit mode 2 Press UP DOWN 11 LEFT RIGHT 12 the number buttons 0 9 14 and RED GREEN 16 to enter the 3 characters Press OK 22 to complete editing and return to the channel information screen 4 Press RED 16 to save the changes and return to the channel list or EXIT 29 to exit to discard the changes 5 Move It...

Page 15: ...he guide window Press UP DOWN 11 to change channels 1 Press LEFT RIGHT 12 to change the programme or to choose another date 2 Press OK 22 to display the information of the selected programme 3 Press EXIT 20 to return to the previous menu or to exit 4 Press the RED button 16 to enter the list of scheduled events and OK 22 para incluir el programa 5 seleccionado to add the selected programme to the ...

Page 16: ...as been zoomed to more than 100 you can move around the screen using the arrow buttons 11 and 12 Rotation Press the LEFT RIGHT arrow buttons 12 to rotate the image clockwise other anticlockwise Press the YELLOW BLUE button 27 to mirror the image flipping it horizontally or vertically Presentation Press OK 22 to display the selected image Press it once again to start the presentation mode Press the ...

Page 17: ...OW button 27 to select the AutoRepeat mode Press the BLUE button 27 to adjust the speed x2 x3 x4 or standard of the fast forward function Press the LEFT RIGHT arrow buttons 12 while listening to music to adjust the volume My films Through My films menu you will be able to play the video files in MPEG2 Divx and Xvid formats with standard resolution SD saved on your USB stick Not all formats nor all vi...

Page 18: ...ton 27 to move forward and backward at x2 x4 x8 x16 x32 or standard speed My Recordings Through this menu you will be able to watch the recorded DVB T programmes using your USB stick and set the recording and managing tools for storage units Please take into account that the USB unit must have a FAT or FAT32 format in order for your TDT SD3 to recognize it correctly It is probable that you will ne...

Page 19: ...ecording Press the RED button 16 to delete the recorded programme Press INFO 18 to change the USB device in case that you have several storage units connected through a USB hub Recording unit In this menu you can select the device and the partition in which your TDT SD3 will save the DVB T recordings You will be also able to format partitions or whole USB units We recommend to choose this option i...

Page 20: ...he recording starts directly when pressing the RECORD button 17 on your remote control Off By pressing the RECORD button 17 on your remote control you will be able to select the recording time in 15 minutes intervals The recording time chosen by the user will be selected by default Recording time by default sets the recording time by default from 15 minutes to 8 hours in intervals of 15 minutes Acc...

Page 21: ...l as well as the intensity and quality of the signal will be shown by pressing a third time the INFO button 18 Changing channels You can change channels by choosing any of the following options By pressing the CH CH buttons 11 By entering the channel s number through the number buttons on your remote control 14 If the entered channel number does not exist no action will take place By pressing the ...

Page 22: ...ogramme you are watching Press the UP DOWN arrow buttons 11 to select the channel the audio track or the sound mode Press the LEFT RIGHT arrow buttons 12 to adjust values Pause You can pause the tv broadcast any time by pressing the PLAY PAUSE 19 button on your remote control You will need to have switched on the Timeshift option which has been explained in the point Multimedia under Recording pre...

Page 23: ...splayed Press OK 22 to enter the menu of the selected language Once the language has been selected press the number buttons to select a page or the UP DOWN 11 or LEFT RIGHT arrow buttons 12 to change from one page to the next one Additionally you can move through the sections marked in Red Green Yellow or Blue by pressing the buttons 16 and 27 of the same colour on your remote control Subtitles Pr...

Page 24: ...select the subtitles language Press OK 22 to turn on the subtitles Electronic Programme Guide Press EPG 21 on your remote control to access the weekly programme guide Open the Electronic programme guide through the TV and radio section to obtain more information List of channels Press the GREEN button 16 to access the list of channels Open the List of channels through the TV y Radio section to obt...

Page 25: ...ul to channel hop in a fast way by displaying different programmes on screen Press MSM 27 to show the dynamic channel mosaic display Press the UP DOWN 11 and LEFT RIGHT arrow buttons 12 to move through the channels Press OK 22 to display the selected channel or press EXIT 20 to return to the previous programme Settings Get into settings menu to configure your SD3 and adapt it to your installation ty...

Page 26: ...reception values for each localization OSD Language Selecciona el idioma para los textos de los menus en pantalla OSD On Screen Display Audio language Set the default language for the audio track You can later change this settings by pressing on the AUDIO button 15 of your remote control during the playback of the content in case more than one track is available Subtitle language Set the default l...

Page 27: ...s OK 22 in the notification screen to confirm erasing the channels previously memorised and start a new search The Auto Scan function might require several minutes to complete Manual Scan This function adds channels to the previously memorised channel list If you know the frequency and the bandwidth you might want to manually enter the channels Scanning a determined frequency will erase the previous...

Page 28: ...nding on the TV system of your localization The AUTO option is the more convenient in most of the situations OSD Transparency Adjust the transparency of the menus and system information that appears on the screen Level 1 is the most transparent while the maximum level is the most opaque Banner display time Adjust the time the banner appears on the screen when pressing the INFO button 18 This banne...

Page 29: ...d will depend on the localization or the channel The options are No lock Password is not needed no matter the rating of the programme Total lock Password always required no matter the rating of the programme 02 18 Password required when the parental rating of the programme exceeds the selected level Change password Press left right in your remote control to activate the password change Use the num...

Page 30: ...Cause Solution The front light of the device is off The system is not plugged in Check up if the power cable is plugged into the socket correctly Signal not found The antenna is off Check up if the cable of the antenna is plugged into the socket correctly The installation of the antenna has not been carried out correctly Consult your technician No DVB T signal range area Consult your technician No i...

Page 31: ...s This warranty covers any defects in workmanship or materials This warranty does not cover any failure of the product due to accidents misuse or alteration made by an unauthorized person The special 36 months warranty is valid for the European Union For other countries please refer to the specific legislation or your local distributor Warranty Procedure Visit http www energysistem com en support a...

Page 32: ... patents industrial secrets technologies products processes or other rights property of other companies or individuals Declaration of conformity Manufacturer name Energy Sistem Technology S A Address C Calpe 1 03509 Finestrat Alicante España Tel 902 388 388 Fax 902 119 034 NIF A53107488 We declare under our own exclusive responsibility that the product Brand Energy Sistem Model TDT SD3 Manufacturi...

Reviews: