5
INSTALLATION INSTRUCTIONS (CONT’D)
Press
Press back
together
Incorrect
Correct
Press
Lift up
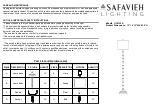
3. Each fixture will need to be connected to the power
supply/controller through the wire connector at the
end of each lead cord. Release the connector cover
by squeezing the latches on opposite sides of the
connector as shown in the figure, while lifting the
cover to separate into two halves.
Fig. 3
4. Lay the direct burial cable (D) so that the orientation is as shown in the figure, ensure that the
cable sits flush at the base of the connector. Snap back together the previously removed upper
half of the connector to complete the connection of the fixture to the direct burial cable (D) line.
Pay attention to the upper seams between the two halves of the connector, firmly press
together until the seam is closed without any gaps. Repeat this for each fixture connector to
complete the circuit.
NOTE:
Cut any excess cable slack so that the cable ends are within 6-inches of a connector.
Route the cable in close proximity to the fixtures, connectors, or next to a building structure,
such as a house or deck.
Bury the direct burial cable (D) not more than 6-inches from the surface.
Fig. 4
D
6
INSTALLATION INSTRUCTIONS (CONT’D)
OFF
ON
Dusk-to-Dawn
Timer 2 hours
after dusk
Timer 4 hours
after dusk
Timer 6 hours
after dusk
Timer 8 hours
after dusk
5.
Once all fixtures have been connected to the power
supply / controller, test the connection by plugging in
the power adapter to building power source and turning
the controller dial to “ON”. Ensure that all connected
lights turn on appropriately.
Bury all exposed lead wire at a depth of maximum
6-inches.
Turn the controller dial to the desired setting:
ON: Always on
Dusk-to-Dawn: photocell self-regulated on/off
2Hr Timer: Lights stay on for 2-hours after dusk
4Hr Timer: Lights stay on for 4-hours after dusk
6Hr Timer: Lights stay on for 6-hours after dusk
8Hr Timer: Lights stay on for 8-hours after dusk
Fig. 5
Clean with a mild, non-abrasive glass cleaner and soft cloth. Do NOT use solvents or cleaners
containing abrasive agents. When cleaning the fixture, make sure the power is turned off, and
any liquid spray should be applied to the cleaning cloth and not sprayed directly onto the fixture
itself.
CARE AND MAINTENANCE
TROUBLESHOOTING
Problem
Possible Solution
Corrective Action
Fixture does not light.
1. Power is off.
2. Incomplete wire
connection.
3. Light flicker
1. Check circuit breaker
or wall switch.
2. Check wire splices at each
connector.
3. Check if photocell sensor
is periodically blocked by
shade from a moving object.
D
Incorrect
Correct