Enerco Master Forge H140XL Operating Instructions And Owner'S Manual Download Page 22

22

Operating Instructions and Owner’s Manual

Master Forge Wood Pellet Fire Stove

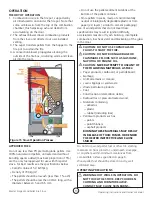
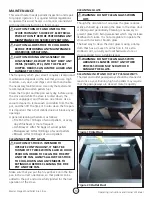
REMOVING BACK AND SIDE PANEL

Figure 24


H140XL 

Back & side disassembly

• 

To remove the H140XL side panels, remove the 
screws securing it on the rear of the heater. Then 
slide the panel along the side of the heater away 
from the front.

• 

To remove the H140XL rear plate, remove the 8 
screws securing it at the bottom and rear of the 
stove. 

• 

To remove the H80XL side panels, remove the 
screws securing it on the rear of the heater. Then 
pull the panel directly away from the heater.

• 

To open the side of the H3W80XL model, simply 
swing the side panel free of the magnetic lock. 

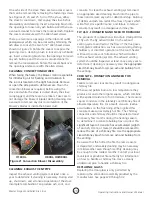
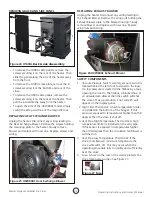
REPLACING: EXHAUST BLOWER

Unplug the heater. Disconnect any wiring leading to 
the Exhaust Blower. Remove the wing nuts holding the 
Exhaust Blower plate to the blower housing. Slowly 
remove blower and replace with new one. Replace 
wing nuts and wiring.

Figure 26 H3W80XL Exhaust Blower

SAFETY COMPONENTS

1.  Vacuum Pressure Switch: A safety vacuum switch is 

located behind the left door, fastened to the base. 
If a low pressure is created in the firebox by a leak, 
opening the door to the firebox, a blocked flue, or 
an unsealed ash drawer then the switch will shut 
the stove off as a precaution. Error code E5 will 
appear on the display panel.

2. High Limit Thermostat: A high temperature limiter 

is installed on the bottom of the hopper. If this 
sensor is exposed to temperatures higher than 158 
degrees then the stove is shut off.

3. Vent Pipe High Temperature Thermostat: A high 

temperature limiter is installed on the vent pipe. 
If this sensor is exposed to temperatures higher 
than 104 degrees then the circulation fan blower is 
switched on.

4.  Vent Pipe Low Temperature Thermostat: If the 

stove cools below a minimum temperature the 
stove will switch off. This may occur when the 
operating procedure fails to quickly and sufficiently 
heat the stove.

5.  Fuse: A fuse on the rear of the device protects the 

stove from power surges. See Figure 

27

Figure 27


Fuse

REPLACING: HEAT EXCHANGE BLOWER

Unplug the heater. Disconnect any wiring leading to 
the Heat Exchange Blower. Remove the screws holding 
the mounting plate to the heater. Slowly remove 
blower and replace with new one. Replace screws and 
wiring.

Figure 25


H3W80XL Heat Exchange Blower

Summary of Contents for Master Forge H140XL

Page 1: ...Y NEED TO OBTAIN A PERMIT OBSERVE ALL LOCAL BUILDING CODES OPERATING INSTRUCTIONS AND OWNER S MANUAL Model H80XL H140XL H3W80XL READ INSTRUCTIONS CAREFULLY Please read this entire manual before instal...

Page 2: ...MATERIALS PAPER OR CARDBOARD A SAFE DISTANCE AWAY FROM THE STOVE AS RECOMMENDED BY THE INSTRUCTIONS NEVER USE THE STOVE IN SPACES WHICH DO OR MAY CONTAIN VOLATILE OR AIRBORNE COMBUSTIBLES OR PRODUCTS...

Page 3: ...4 2 74 4 59 2 08 Stove Efficiency 81 4 78 7 80 8 Heat Output Rate Low BTU HR kW 9 739 2 85 16 149 4 73 10 151 2 97 Heat Output Rate Medium BTU HR kW 12 537 3 67 16 644 4 88 14 792 4 34 Heat Output Rat...

Page 4: ...Tape Floor Protection see FLOORING SPACE and FLOORING MATERIAL on page 6 Manufactured venting of 3 80mm in diameter of type L or PL which is listed to UL 641 ULC S609 Standard for 650 C Factory Built...

Page 5: ...E FLU WITH HEADACHE DIZZINESS AND OR NAUSEA IF YOU HAVE THESE SIGNS STOVE MAY NOT BE WORKING PROPERLY GET FRESH AIR AT ONCE HAVE STOVE SERVICED SOME PEOPLE PREGNANT WOMEN PERSONS WITH HEART OR LUNG DI...

Page 6: ...Vertical runs of vent pipe must be at least 3 76 mm from any wall Finally the area which the wood pellet fire stove is installed shall have a floor to ceiling distance of at least 84 2134 mm FLOORING...

Page 7: ...wer cord attaches to the stove at the exposed socket in the rear of the stove Once any necessary assembly of the display panel screen is complete you may briefly plug your stove in to make sure that i...

Page 8: ...ct with the stove s surface FRESH AIR AND VENTILATION REQUIREMENTS When deciding the location of the stove ensure that the space will always have a source of fresh air available Failure to do so may r...

Page 9: ...idential Type and Building Heating Appliance UL 103 A International Conference of Building Officials ICBO standards for solid fuel Stoves code approved masonry chimney VENT TERMINATION Install exhaust...

Page 10: ...annels separated from combustibles by a minimum of 6 inches 152 mm of glass fiber insulation Opening shall be covered and thimble supported with a sheet steel support minimum 24 gauge in thickness Fig...

Page 11: ...ured and can not be moved tipped or have ventilation seals compromised The stove must be provided a permanently ducted source of outside air to support combustion which meets the following requirement...

Page 12: ...sites of chimney manufacturers will be able to provide stove pipe that is rated to these standards This listing indicates that the Chimney is rated for high temperatures up to 2100 F 1 149 C Only use...

Page 13: ...ets in sacks made of environmentally neutral or biologically degradable plastic or from paper 2 3 layers similar to cement packaging Use of wood pellets that do not meet these specifications may resul...

Page 14: ...r This can take 5 to 15 minutes depending on the model of stove Lighting Cycle The electrically powered hot surface igniter will power on for 8 minutes and begin combustion of the pellets in the firep...

Page 15: ...art stove app by NHHATC which is available for iOS or android device through the app store Step 1 Download the Smart Stove app by NHHATC Step 2 Open the Smart Stove app The app opens by default to the...

Page 16: ...er devices via SMS or email Eco Mode There are two ECO settings which can be selected which will conserve wood pellets while maintaining the desired temperature Pressing the ECO button will allow you...

Page 17: ...display in the top right of the multi function display screen R Room temperature S Exhaust temperature P Protection Temperature Sensor Press to increase the temperature which the stove is intended to...

Page 18: ...hange the current selection 5 Press the Settings button to go back to home TO PROGRAM AUTOMATIC ON OFF 1 Press and hold the Settings button for 2 seconds 2 Cycle through the settings using the Confirm...

Page 19: ...ry day Whichever is more frequent Ash Drawer After 50 bags of wood pellets Passageways After 100 bags of wood pellets Blower After 100 bags of wood pellets CLEANING FIRE POT PAN CAUTION IF STOVE IS IN...

Page 20: ...sh or debris build up Build up of debris and ash can restrict the flow of gases which will affect stove performance and failure to remove creosote may result in a dangerous chimney fire FLY ASH FORMAT...

Page 21: ...o the most up and most left position of the prepared gasket gutter 5 Continue pressing the replacement gasket clockwise along the gasket gutter until it has wrapped back to where the gasket was presse...

Page 22: ...to the base If a low pressure is created in the firebox by a leak opening the door to the firebox a blocked flue or an unsealed ash drawer then the switch will shut the stove off as a precaution Error...

Page 23: ...in fire pot 2 Check that the firepot is sitting in the holder correctly and that the igniter is not obstructed 3 Check that the exhaust gas temperature sensor switch beside the combustion fan is not...

Page 24: ...is no problem the blower does not turn on until the stabilization cycle The blower does not turn on during Stabilization Cycle No power in stove or in control panel Check the power and wires Mother b...

Page 25: ...nit so that it will not start suddenly and then unblock the auger 2 Check that the auger is not blocked If it is blocked remove the cause of the jamming 3 Check that the auger screw fastening the auge...

Page 26: ...2 Replace the 30 o C temperature switch The fire extinguishes and the power shuts off continued Requested temperature has been reached This is normal ECO mode behavior The stove will automatically swi...

Page 27: ...n Fan Blower L FUSE N Igniter Auger motor Display panel Vaccum switch Exhaust sensor Protection sensor Room sensor NC NO C k NOTE IF ANY OF THE ORIGINAL WIRE AS SUPPLIED WITH THE APPLIANCE MUST BE REP...

Page 28: ...Plate Long 13 n a Flue Fixed Plate Short 14 n a Pedestal Fixed Plate 15 66736 Left Side panel 16 66737 Right Side panel 17 n a Thermal Insulation Plate 18 n a Insulation Support Plate 19 66607 Combus...

Page 29: ...23 n a Ground Screw 24 66610 Vacuum Switch 25 66611 Silicone Tube 26 66612 Circulation Blower 27 n a Chamber Insulation Cover NO P N DESCRIPTION 28 66613 Safety Sensor 29 n a Motherboard Fixed Plate 3...

Page 30: ...nel 9 66622 Silicone Rubber Sealing Ring 10 66615 Power Socket 11 66637 Motherboard 12 66638 Fire Pot 13 66639 Vacuum Switch 14 66640 Igniter 15 66641 Combustion Blower 16 66612 Circulation Blower NO...

Page 31: ...rating Instructions and Owner s Manual Master Forge Wood Pellet Fire Stove THIS PAGE INTENTIONALLY LEFT BLANK ESTA P GINA INTENCIONALMENTE SE DEJA EN BLANCO CETTE PAGE A T INTENTIONNELLEMENT LAISS E V...

Page 32: ...s of the dealer from whom you purchased our product The foregoing is the full extent of the responsibility of the Company There are no other warranties express or implied Specifically there is no warr...

Page 33: ...ES DE LA CONSTRUCTIONS LOCAUX GUIDE DU PROPRI TAIRE ET INSTRUCTIONS D UTILISATION No de mod le H80XL H140XL H3W80XL LIRE LES INSTRUCTIONS ATTENTIVEMENT Veuillez lire le pr sent manuel au complet avant...

Page 34: ...INSTRUCTION OU D TIQUETTES DE REMPLACEMENT VEUILLEZ COMMUNIQUER AVEC LE FABRICANT AVERTISSEMENT DANGER D INCENDIE DE BR LURE D MANATIONS ET DE D FLAGRATION GARDER LES MATI RES COMBUSTIBLES SOLIDES TE...

Page 35: ...r glage bas 0 09 Taux de consommation de grenailles sur r glage bas kg h lb h 0 65 1 43 1 09 2 4 0 67 1 48 Taux de consommation de grenailles sur r glage moyen kg h lb h 0 82 1 81 1 12 2 47 0 98 2 16...

Page 36: ...DE PLANCHER et MAT RIAUX DE REV TEMENT DE SOL la page 6 Tuyau d event de 80 mm 3 po de diametre de type L ou PL portant les sceaux d enregistrement UL 641 ULC S609 Norme Standard for 650 C Factory Bui...

Page 37: ...ES TOURDISSEMENTS ET OU NAUS ES SI VOUS SOUFFREZ DE CES SYMPT MES LE PO LE POURRAIT EN TRE LA CAUSE EN RAISON DE MAUVAIS FONCTIONNEMENT OBTENEZ DE L AIR FRAIS RESPIRER SUR LE CHAMP FAITES UN ENTRETIEN...

Page 38: ...tout mur Finalement l a pi ce dans laquelle le po le grenailles de bois est install devra avoir une hauteur de plafond d au moins 2 134 mm 84 po MAT RIAUX DE REV TEMENT DE SOL La protection de planche...

Page 39: ...entation lectrique Le cordon d alimentation se branche dans la prise l arri re du po le Apr s tout assemblage requis du panneau d affichage vous pouvez brancher votre po le temporairement pour vous as...

Page 40: ...rsque vous d cidez de la localisation du po le assurez vous que l aire sera toujours approvisionn e d air frais Un manque d air pourrait appauvrir tous les appareils combustion de vos quartiers et pos...

Page 41: ...de ma onnerie certifi e ICBO International Conference of Building Officials pour les po les combustible solide CAPUCHON D VENT Installer l vent d chappement en respectant les distances de d gagement s...

Page 42: ...e et la section de chemin e support e et fix e deux montants d acier de calibre minimum no 24 La quincaillerie de fixation de la section de chemin e ne doit pas perforer sa paroi interne TECHNIQUES DE...

Page 43: ...fa on compromettant une a ration ad quate Une canalisation permanente d admission d air frais pour entretenir la combustion devra tre install e en r pondant aux exigences suivantes La canalisation de...

Page 44: ...n domiciliaires les quincailleries et les magasins de fournitures CVCA ainsi que les sites Web de fabricants de chemin es pourront vous fournir des tuyaux de po le isol s r pondant ces normes Cet enre...

Page 45: ...sacs deux ou trois couches de papier comme ceux des sacs de ciment ou faits de produits synth tiques biologiquement d gradables et neutres au point de vue environnemental L utilisation de grenailles...

Page 46: ...des Le po le proc dera automatiquement effectuer ce qui suit Cycle de nettoyage Le pot de combustion est nettoy des cendres poussi res et r sidus accumul s Cycle d alimentation Les grenailles passeron...

Page 47: ...STOVE L tat de votre po le peut tre surveill contr l et programm en utilisant l application Smart Stove par NHHATC qui est disponible votre magasin d applications pour les plateformes iOS ou Android t...

Page 48: ...gerie SMS ou par courriel Eco Mode Il existe deux modes ECO pouvant tre s lectionn s qui conomiseront les grenailles de bois tout en maintenant la temp rature d sir e L actionnement du bouton ECO perm...

Page 49: ...in sup rieur droit de l afficheur multi fonction R Temp rature de la pi ce S Temp rature d chappement P R glage du capteur de protection Actionner pour augmenter la temp rature laquelle le po le devra...

Page 50: ...ur changer l heure actuelle 5 Appuyez sur le bouton Settings pour revenir l accueil POUR FAIRE LE R GLAGE MARCHE ARR T AUTOMATIQUE 1 Tenez enfonc le bouton Settings pendant 2 secondes 2 Parcourez les...

Page 51: ...elon la premi re ventualit Tiroir de cendre Apr s 50 sacs de grenailles de bois Canalisations internes Apr s 100 sacs de grenailles de bois Ventilateur Apr s 100 sacs de grenailles de bois NETTOYAGE P...

Page 52: ...ulation de d bris et les cendres peuvent restreindre le d bit de gaz qui affectera la performance du po le et ne pas retirer la cr osote pourrait r sulter en un dangereux feu de chemin e CENDRES VOLAN...

Page 53: ...tanch it r sistant aux temp ratures lev es l int rieur du sillon 4 Presser l extr mit du joint d tanch it de remplacement dans le sillon pr par partir du point gauche le plus lev 5 Continuer presser...

Page 54: ...r une fuite l ouverture de la porte du pot de combustion une chemin e obstru e ou un tiroir de cendre non scell le pressostat teindra le po le comme mesure de pr caution Le code d erreur E5 s afficher...

Page 55: ...bstruction devant l allumeur 3 S assurer que le capteur de temp rature de gaz d chappement adjacent au ventilateur de combustion est en bon tat et n a pas subi de dommage 4 S assurer que l allumeur n...

Page 56: ...e met en marche qu au cycle de stabilisation Le ventilateur ne se met pas en marche durant le cycle de stabilisation Le po le panneau de commande n est pas sous tension V rifier l alimentation et les...

Page 57: ...uise pas de d marrage inattendu et d gager le blocage de la tari re 2 V rifier que la tari re ne soit pas bloqu e Si c est le cas d gager le produit causant le coincement 3 S assurer que la vis de fix...

Page 58: ...nect s 2 Remplacer le thermostat de 30 C La combustion s arr te et le po le interrompt son fonctionnement suite La temp rature r gl e a t atteinte Ceci est le fonctionnement normal du mode ECO Le po l...

Page 59: ...stion Ventilateur L FUSIBLE N Allumeur Moteur de tari re Afficheur Pressostat Capteur T d chappement Capteur de protection Capteur T de la pi ce NC NO C FUSIBLE REMARQUE SI DES FILS QUELCONQUES DOIVEN...

Page 60: ...re d isolation de chambre 28 66613 Capteur de s curit 29 n a Plaque fixe de la carte m re 30 66631 Capot arri re 31 66615 Prise de courant 32 66616 Capteur de pi ce 33 66622 Joint d tanch it en caoutc...

Page 61: ...Plaque fixe de la carte m re 30 66614 Capot arri re 31 66615 Prise de courant 32 66616 Capteur de pi ce 33 n a tiquette de notation 34 66617 Commutateur de couvercle de tr mie 35 n a Outil de nettoyag...

Page 62: ...ouc silicone dix 66615 Prise de courant 11 66637 Carte m re 12 66638 Pot de feu 13 66639 Commutateur de vide 14 66640 Allumeur 15 66641 Souffleur combustion No No de pi ce DESCRIPTION 16 66612 Ventila...

Page 63: ...Forge Po le grenailles de bois Guide du propri taire et intructions d utlisation THIS PAGE INTENTIONALLY LEFT BLANK ESTA P GINA INTENCIONALMENTE SE DEJA EN BLANCO CETTE PAGE A T INTENTIONNELLEMENT LAI...

Page 64: ...e d achat ainsi que les nom et adresse du d positaire o vous avez achet votre produit Ce qui suit est la description compl te de la responsabilit de la Soci t Aucune autre garantie explicite ou implic...

Reviews: