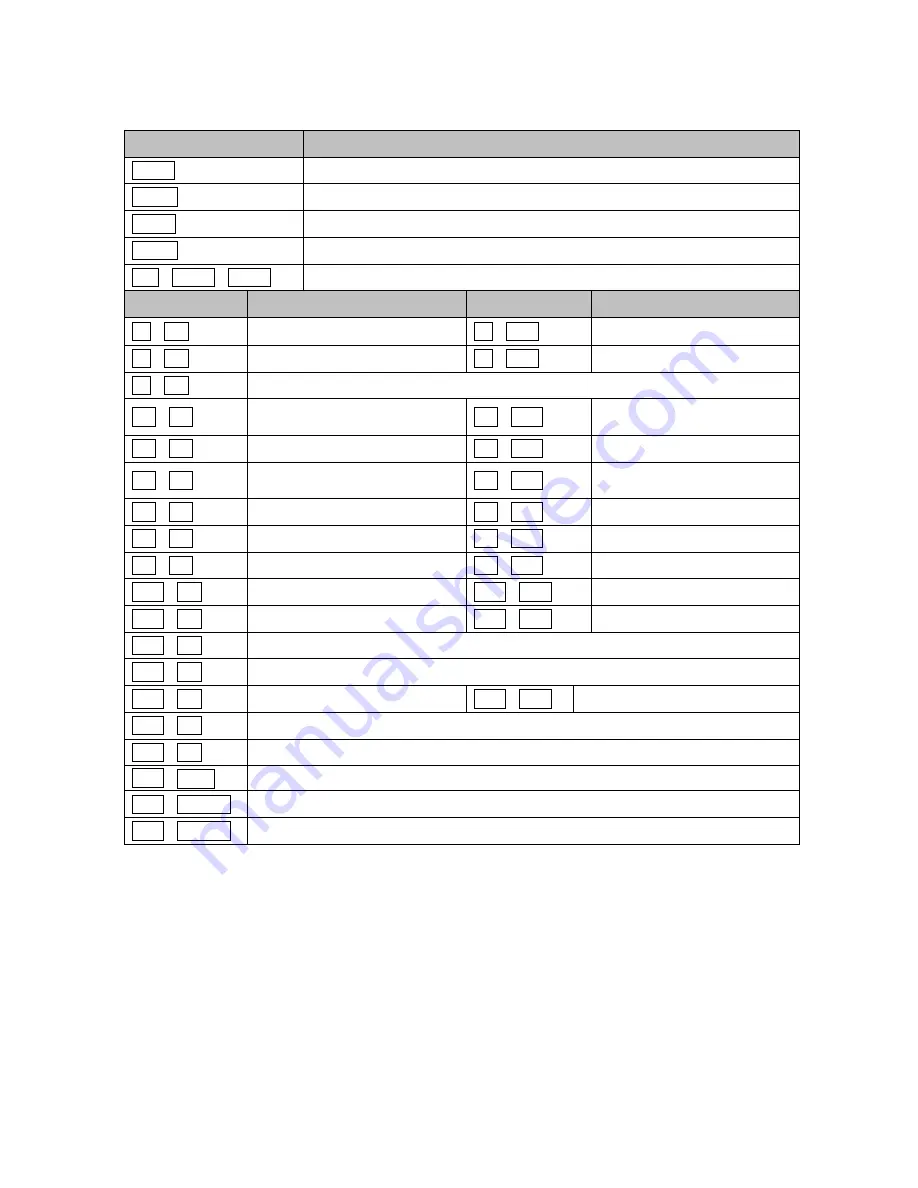
background image

75 

Appendix D 

— Short Cut Key  

Short Cut Key


Function


PRST


Pop up Preset setup menu. 

TOUR


Pop up Tour setup menu. 

PTRN


Pop up Pattern setup menu. 

SCAN


Pop up Auto Scan setup menu. 

No.+ CTRL+ PRST 

Store the current view at the selected number. 

Short Cut Key


Function


Short Cut Key


Function


 7 + ON 

Change FOCUS to AUTO 

 7 + OFF


Change FOCUS to manual 

 8 + ON 

Change AE to AE1 

 8 + OFF


Change AE to manual 

 9 + ON 

Change Night Shot to AUTO 

10 + ON 

Night Shot on 
(go to the manual mode) 

10 + OFF


Night Shot off 
(go to the manual mode) 

11 + ON 

BLC on (AE auto1 mode) 

11 + OFF


BLC off (AE auto1 mode) 

12 + ON 

Digital Zoom on (According 
to digital zoom setting) 

12 + OFF


Digital Zoom off 

13 + ON 

Dome OSD on 

13 + OFF


Dome OSD off 

14 + ON 

Dome Area Title Display on 

14 + OFF


Dome Area Title Display off 

15 + ON 

View Direction on 

15 + OFF


View Direction off 

104 + ON 

WDR ON 

104 + OFF


WDR off 

150 + ON 

Image Flip ON 

150 + OFF 

Image Flip off 

151 + ON 

Origin Check 

152 + ON 

Place the camera in the 0° area horizontally. 

153 + ON 

Go to the slow speed mode


153 + OFF 

Go to the normal speed mode


154 + ON 

Display System Information 

155 + ON 

Flip the camera in the 180° area horizontally. 

250 + PRST 

Factory setup menu (Tour dwell time, Answer delay) 

888 + ENTER 

Night Shot on (in the global mode only) 

999 + ENTER 

Night Shot off (in the global mode only) 


Summary of Contents for 22X

Page 1: ...User s Manual 22X PTZ III NETWORK DOME CAMERA www hitron co kr...

Page 2: ...ing flash with arrowhead symbol within an equilateral triangle is intended to alert the user to the presence of uninsulated dangerous voltage within the product s enclosure that may be of sufficient m...

Page 3: ...AY CAUSE HARMFUL INTERFERENCE TO RADIO COMMUNICATIONS OPERATION OF THIS EQUIPMENT IN A RESIDENTIAL AREA IS LIKELY TO CAUSE HARMFUL INTERFERENCE IN WHICH CASE THE USER WILL BE REQUIRED TO CORRECT THE I...

Page 4: ...or pinched particularly at plugs convenience receptacles and the point where they exit from the apparatus 11 Only use attachments accessories specified by the manufacturer 12 Use only with the cart s...

Page 5: ...ntrol the On Screen Menu Utility 9 3 4 Auto Scan Shortcut SCAN 10 3 5 Preset Shortcut PRST 12 3 6 Shortcut of Preset Program 13 3 7 Tour Shortcut TOUR 14 3 8 Pattern Shortcut PTRN 16 3 9 Area Title 17...

Page 6: ...5 System 53 1 Information 53 2 Security 53 3 Date Time 56 4 Network 57 5 Language 64 6 Maintenance 64 7 Support 65 4 5 6 About 66 4 6 PTZ Control 66 4 7 Help 67 4 8 Resetting to the factory default s...

Page 7: ...Interface Protocol TCP IP UDP IPv4 v6 HTTP HTTPS QoS FTP SNMP uPnP RTP RTSP RTCP DHCP ARP 120 Preset positions with the individual Camera AE setup 4 Tours consist of Presets Patterns Auto Scans and ot...

Page 8: ...d to be mounted both wall and ceiling type The housing meets the Protection Classification IP66 standards for dust and moisture resistance Dome Camera 1 Installation Guide CD 1 Template Sheet 1 Mounti...

Page 9: ...ome camera CAUTION A silicone rubber sealant must be applied to seal the housing to secure waterproofing 2 2 1 Locking Dome Camera A Make screw holes on the ceiling using the supplied mounting Templat...

Page 10: ...he tab of the mounting bracket into the locking slot Screws A should not be too tight or too loose when the dome is in the locked position After setting the proper positions of screws A remove the mou...

Page 11: ...larm Input Yellow GND Black White Alarm Output Green RS485 Blue RS485 Alarm Input Output RS485 6pin terminal 4 Black Ethernet RJ45 Modular Jack 5 Yellow Video Composite Output BNC Jack 6 Red Audio lin...

Page 12: ...t 1 Event In Alarm In for configuring alarm input G Ground NOTE All the connectors marked G or GND are common Connect the ground side of the alarm input and or alarm output to the G Ground connector A...

Page 13: ...er up 2 Start SmartManager utility All programs NautilusClient16 SmartManager the main window will be displayed after a short while any network devices connected to the network will be displayed in th...

Page 14: ...move the OSD position in the OSD position setup AREA TITLE AF AE FUNC TITLE CTRL KEY TO MOVE SAVE AND EXIT ESC TO CANCEL DOME ID ANGLE OSD Position Setup 001 AF AE EMPTY DATA DOMEID 0001 W 360 0 090...

Page 15: ...the keyboard controller the following On screen menu utility will appear DOME MENU AUTO SCAN PRESET TOUR PATTERN AREA TITLE PRIVACY ZONE CAMERA DOME SETUP DOME COMMUNICATION FUNCTION RUN EXIT ESC TO...

Page 16: ...int for the end point DWELL Set the dwell time at the both end 01 99 seconds 1 Press the SCAN key to enter the Auto Scan menu directly Or press the MENU key to display the main menu on the monitor Scr...

Page 17: ...zoom interval twist the Joystick at the zoom field 8 Set SCAN DIR to CCW or CW 9 Select SWAP Set to ON to exchange the start angle and the end angle 10 Set DWELL TIME 11 Select SAVE EXIT and push the...

Page 18: ...ion Follow steps below to store the Preset positions 1 Press the PRST key to enter the Preset menu directly Or press the MENU key to display the main menu on the monitor Scroll to Preset and push the...

Page 19: ...old down the CTRL key while selecting the desired scene using the Joystick Current position will be displayed Release the CTRL key to complete Or Press the IRIS Open key then the CTRL displays Move th...

Page 20: ...y pushing the Joystick up down right or left 4 To add a stored Preset twist the Joystick then the stored Preset number displays 5 To place functions other than Preset press the TOUR PTRN or SCAN keys...

Page 21: ...ST key the camera will move to the stored Preset view and the cursor moves to the dwell time field After changing the dwell time press the PRST key and the cursor moves to the Preset number To assign...

Page 22: ...tten 3 Press and hold down the CTRL key while controlling the camera direction and zoom with the Joystick The dome will be automatically recorded until you release the CTRL key Or press the IRIS Open...

Page 23: ...sition will be displayed Release the CTRL key to complete the selection of the start position Or press the IRIS Open key then the CTRL displays Move the desired position Press the IRIS Close key then...

Page 24: ...displays Move the desired position Press the IRIS Close key then the CTRL disappears and returns to the previous menu PRIVACY AREA MENU CTRL KEY CONTROL NUMBER 001 354 8 344 8 3 Place the cursor at t...

Page 25: ...l range 8X Zoom is extendable up to 8X of digital range MAX Zoom is extendable Max digital zoom range IMAGE FLIP This function turns the video output from the camera upside down and reverses it horizo...

Page 26: ...HT 003 SHUTTER 1 50 FLICKERLESS BACK LIGHT OFF WDR WDR LEVEL NIGHT SHOT AUTO SAVE AND EXIT ESC TO CANCEL MODE AE1 AE2 SHUTTER PRIO MANUAL AE1 Auto exposure mode1 Use to normal surroundings indoor AE2...

Page 27: ...the NIGHT SHOT mode is set to GLOBAL 999 ENTER will turn Off the NIGHT SHOT mode and 888 ENTER will turn On the NIGHT SHOT mode ON B W mode OFF Color mode NOTE AUTO in NIGHT SHOT function is not appli...

Page 28: ...e function can be set so that the camera automatically goes to Preset Tour Pattern Auto Scan after the keyboard controller has been idle for a amount of time For example if the controller is idle for...

Page 29: ...ed that you set North as a Preset Recall the North Preset before enabling the directional title DOME OSD ON OFF All display or title will disappear when DOME OSD DISPLAY sets OFF AREA TITLE ON OFF If...

Page 30: ...is can prevent from obstruction or bad focus problem caused by the horizontal line of the semi sphere in the bubble OFF When this option is disabled the range of the tilt angle will not be limited Whe...

Page 31: ...otherwise press the ESC key to exit without erasing The erased data includes all stored data Auto Scan Preset and Tour except origin offset The offset value is still valid after all data is erased The...

Page 32: ...OK This feature is used to re calibrate the orientation of a selected dome camera Origin offset value is not affected by this function Offset is still valid after origin set SYSTEM MENU SYSTEM MENU M...

Page 33: ...0 second TURBO MAXIMUM SPEED 380 second PASSWORD EDIT PASSWORD EDIT SETUP CTRL KEY INPUT PASSWORD PASSWORD A B C D E F G H I J K L M N O P Q R S T U V W X Y Z 0 1 2 3 4 5 6 7 8 9 SAVE AND EXIT ESC TO...

Page 34: ...munication DOME COMMUNICATION SETUP DOME ID 001 PROTOCOL AUTO BAUDRATE 9600 SAVE AND EXIT ESC TO EXIT To prevent damage each dome camera must have a unique address ID When installing multiple dome cam...

Page 35: ...he function PRESET PATTERN TOUR and SCAN first HOME Select HOME and press the CTRL key Then dome camera goes to the default position to which the dome camera returns after an assigned period of inacti...

Page 36: ...indows Note To view streaming video in Microsoft Internet Explorer set your browser to allow ActiveX controls 4 1 Access from a browser 1 Start a browser Internet Explorer 2 Enter the IP address or ho...

Page 37: ...The default administrator username and password is admin If the password is lost the network camera must be reset to the factory default settings Please see 4 8 Resetting to the factory default setti...

Page 38: ...re not set 2 Control toolbar The live viewer toolbar is available in the web browser page only It displays the following buttons The Stop button stops the video stream being played Pressing the key ag...

Page 39: ...for more information 5 Video and Audio Streams The network camera provides several images and video stream formats Your requirements and the properties of your network will determine the type you use...

Page 40: ...o allow anonymous viewer login which means that anybody may access the Live View page as described below The user list displays the authorized users and user groups levels User Group Authority Guest P...

Page 41: ...amically it is also possible to use it to set a static known IP address for a particular MAC address Use the following IP address To use a static IP address for the network camera check the radio butt...

Page 42: ...BP Base Profile Originally intended as the mainstream consumer profile for broadcast and storage applications the importance of this profile faded when the High profile was developed for those applica...

Page 43: ...en by enhancing the image quality users can do so by decreasing the compressibility In ease case please adjust this function according to the network status and monitoring purposes The default is 2000...

Page 44: ...e desired audio quality bitrate The settings affect the available bandwidth and the required audio quality Audio Input Audio from an external line source can be connected to the RCA Jack I O of the ne...

Page 45: ...k format in the overlay see below New Server Time Select your time zone from the drop down list If you want the server clock to automatically adjust for daylight savings time select the Automatically...

Page 46: ...The network camera can stream live video to a website Copy the HTML code generated on the screen and paste it in page code of the website you want to display live video Note To use webcasting service...

Page 47: ...Refer to 4 5 1 Basic Configuration 4 Audio for more details 4 5 4 Event 1 Event In On Boot This is used to trigger the event every time the Network Transmitter is started Select Enable to activate th...

Page 48: ...Dwell Time Set the dwell time an event lasts for the specified dwell time from the point of detection of an alarm input Manual Trigger This option makes use of the manual trigger button provided on t...

Page 49: ...part of a motion window needs to be masked this can be configured in a Mask window Pre Viewer Motion detection windows are configured by Motion or Mask windows Each window can be selected by clicking...

Page 50: ...tivity Sets up the sensitivity for the motion detection Dwell Time Set the hold time an event lasts for the specified hold time from the point of detection of a motion You can also modify or delete a...

Page 51: ...Represents the frequency of the email notification when an event occurs Aggregate events Shows the maximum number of emails sent within each interval If your mail server requires authentication check...

Page 52: ...ettings if using a host name Port Enter the port number used by the FTP server The default is 21 Use passive mode Under normal circumstances the network camera simply requests the target FTP server to...

Page 53: ...ile name This name will be used for all the image files saved If suffixes are also used the file name will take the form prefix suffix extension Additional suffix Add either a date time suffix or a se...

Page 54: ...output port Check the box to enable and then select either Enable When you select Enable alarm out the output will be activated for as long as the event is active Audio Alert When the network camera...

Page 55: ...sted by clicking the Test button To remove an audio file select index and click the Remove button Note For a proper operation of Audio Alert you must enable full duplex in Audio setting page Audio Rec...

Page 56: ...on and talk to the microphone to record the audio or voice You can record up to 30 seconds Click the Stop button to stop on capturing 3 Click the Save button and then set the file name to save a curre...

Page 57: ...n Check the box to enable the service and return to the Home position once the event has ended 3 Event Map The event map allows you to change the settings and establish a schedule for each event trigg...

Page 58: ...o record and saves images to an FTP server when an event has occurred HTTP Server It sends notification messages to an HTTP server that listens for these The destination server must first be configure...

Page 59: ...he system information This page is very useful when you refer device information after installation Device Name Configuration Enter the device name Location Configuration Enter the location informatio...

Page 60: ...ork camera without the user account When using the user account users have to try log in at every access User List Setting This section shows a registered user account Enter a user name and password t...

Page 61: ...ne help IP Filtering Checking the Enable IP address filtering box enables the IP address filtering function Up to 256 IP address entries may be specified a single entry can contain multiple IP address...

Page 62: ...Automatically adjustment for daylight saving time changes From the Time Mode section select the preferred method to use for setting the time Synchronize with computer time sets the time from the cloc...

Page 63: ...ed by default Although a DHCP server is mostly used to set an IP address dynamically it is also possible to use it to set a static known IP address for a particular MAC address Use the following IP ad...

Page 64: ...Name for example myserver is the host name in the Fully Qualified Domain Name myserver mycompany com where mycompany com is the Domain name DNS servers enter the IP addresses of the primary and secon...

Page 65: ...cctv network co kr Enable DDNS Check to get DDNS service to be available DDNS Server Select the DDNS server Registered host Enter an address of the DDNS server Username Enter an ID to access to the D...

Page 66: ...function is for sending Video and Audio to Multicast group Enable Multicast Check the box to enable multicast operation Multicast destination IP Enter an IP between 224 0 0 0 and 239 255 255 255 Altho...

Page 67: ...ting systems and clients that support this protocol Note UPnP must be installed on your workstation if running Windows XP To do this open the Control Panel from the Start Menu and select Add Remove Pr...

Page 68: ...int value This value is used to mark the traffic s IP header When the marked traffic reaches a network router or switch the DSCP value in the IP header tells the router or switch which type of treatme...

Page 69: ...om the public network Internet Use NAT Traversal when your network cameras are located on an intranet LAN and you wish to make it available from the other WAN side of a NAT router With NAT traversal p...

Page 70: ...rovided Notes If you attempt to manually enter a port that is already in use an alert message will be displayed When the port is selected automatically it is displayed in this field To change this ent...

Page 71: ...rk camera to a user PC Restore Import and apply a setting value saved to a user PC Note Backup and Restore can only be used on the same unit running the same firmware This feature is not intended for...

Page 72: ...rol You can control a PTZ in the live screen Press the button on the left top in the live screen to activate the PTZ control panel PTZ Control Panel PTZ Menu Panel Direction Buttons Iris Focus Zoom Bu...

Page 73: ...selected value or function in programming mode Ctrl Off Control function ex CTRL Up Down Right Left Button Operated turbo mode Preset Pressing the Preset will bring up the preset programming menu Auto...

Page 74: ...he Control Button SW1 on the board with your finger while reconnecting the power 4 Keep the Control button SW1 pressed during about 2 seconds 5 Release the Control Button SW1 6 The network camera rese...

Page 75: ...0 Digital Flip Image Flip YES Auto Calibration 0 1 6 Panning angle 360 continuous rotation Auto Scan 1 auto pan 4 auto scan capability Preset 120 presets with individual camera AE setup Pattern 4 patt...

Page 76: ...Supported Open Platform Compatible Milestone ONVIF Alarm Triggers Motion Detection External Input Manual Trigger Alarm Events File upload via FTP and HTTP Notification via E mail HTTP and TCP External...

Page 77: ...71 Figure Dimension...

Page 78: ...in the base Check the voltage level of the dome camera Camera number does not match the multiplexer number Check the camera ID and insert the BNC cable into the proper input of the multiplexer Frame...

Page 79: ...er side Home Position The default position to which the dome camera returns after an assigned period of inactivity passes The default position may be a Preset Tour Pattern or No Action Input Alarm A c...

Page 80: ...r the dome camera Privacy Zone Masked areas of the dome camera s viewing area These masks prevent operators of the surveillance system from viewing these designated zones The Privacy Zones move in rel...

Page 81: ...de 11 OFF BLC off AE auto1 mode 12 ON Digital Zoom on According to digital zoom setting 12 OFF Digital Zoom off 13 ON Dome OSD on 13 OFF Dome OSD off 14 ON Dome Area Title Display on 14 OFF Dome Area...

Page 82: ...distribution through specialised trade channels only Videor E Hartig GmbH Carl Zeiss Stra e 8 63322 R dermark Germany Tel 49 0 6074 888 0 Fax 49 0 6074 888 100 www videor com Technical changes reserve...

Reviews: