background image

Proline t-mass 65 PROFIBUS DP/PA

Installation

Hauser

13

3.2.3

Pipework requirements

Good engineering practice should be followed at all times:

• Correct preparation, welding and finishing techniques
• Correctly sized gaskets
• Correctly aligned flanges and gaskets
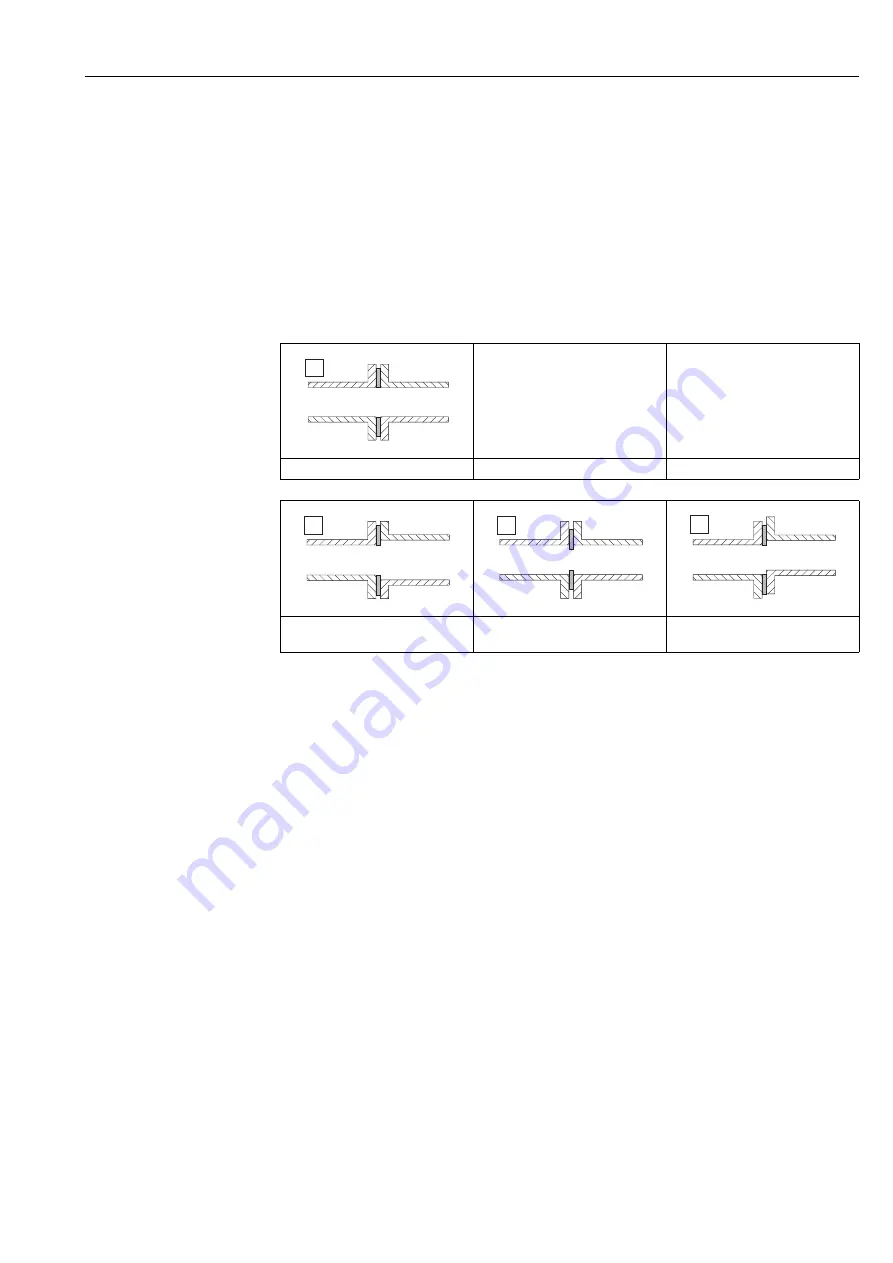
• Connecting pipe work should match the internal diameter of the flowmeter. 

Maximum pipe diameter mismatch should not exceed:
– 1 mm (0.04 inch) for diameters < DN 200 (8")
– 3 mm (0.12 inch) for diameters 

 DN 200 (8")

For further information please refer to ISO 14511.

"

Caution! 
New installations should be free of metallic and abrasive particles to prevent damage to the sensing 
elements on start-up.

a0005103

Correctly aligned flanges and gaskets

a0005104

a0005105

a0005106

Pipe diameter one is not equal pipe 

diameter two

Incorrectly sized gaskets

Incorrectly aligned flanges and gaskets

Ã

Summary of Contents for Proline t-mass 65

Page 1: ... 06 EN 13 10 71123860 Valid as of version PROFIBUS DP V 3 06 XX Device software PROFIBUS PA V 3 06 XX Device software Operating Instructions Proline t mass 65 PROFIBUS DP PA Thermal Mass Flow Measuring System 8 ...

Page 2: ......

Page 3: ...e of protection 34 4 5 Post connection check 35 5 Operation 36 5 1 Quick operation guide 36 5 2 Local display 37 5 2 1 Display and operating elements 37 5 2 2 Icons 37 5 3 Brief operating instructions to the function matrix 38 5 3 1 General notes 39 5 3 2 Enabling the programming mode 39 5 3 3 Disabling the programming mode 39 5 4 Error messages 40 5 4 1 Type of error 40 5 4 2 Error message type 4...

Page 4: ...or messages 90 9 2 1 Displaying the device status on PROFIBUS DP 90 9 2 2 List of system error messages 92 9 3 Process error messages 97 9 3 1 List of process error messages 97 9 4 Process errors without messages 97 9 5 Spare parts 99 9 5 1 Removing and installing printed circuit boards 100 9 5 2 Replacing the device fuse 105 9 6 Return 106 9 7 Disposal 106 9 8 Software history 106 10 Technical da...

Page 5: ...ork by the facility s owner operator The specialist must have read and understood these Operating Instructions and must follow the instructions they contain The device must be operated by persons authorised and trained by the facility s owner operator Strict compliance with the instructions in the Operating Instruction is mandatory Endress Hauser is willing to assist in clarifying the chemical res...

Page 6: ...pdates to these Operating Instructions 1 4 Return Do not return a measuring device if you are not absolutely certain that all traces of hazardous substances have been removed e g substances which have penetrated crevices or diffused through plastic Costs incurred for waste disposal and injury burns etc due to inadequate cleaning will be charged to the owner operator Please note the measures on ä 1...

Page 7: ... 1 Order code serial number See the specifications on the order confirmation for the meanings of the individual letters and digits 2 Power supply frequency power consumption 3 Available inputs outputs 4 Reserved for information on special products 5 Please refer to operating instructions documentation 6 Reserved for certificates approvals and for additional information on device version 7 Ambient ...

Page 8: ...of measuring tubes 6 Seal material 7 Reserved for information on special products 8 Please refer to operating instructions documentation 9 Ambient temperature range 10 Degree of protection 11 Reserved for additional information on device version approvals certificates 1 2 4 5 6 7 9 11 10 3 Proline t mass F ABCDEFGHIJKLMNOPQRST TAG No Ser No 12345678901 Order Code IP67 NEMA Type 4X 65F50 XXXXXXXXXX...

Page 9: ...7 6 Version of device software currently installed 7 Installed communication type e g HART PROFIBUS DP etc 8 Information on current communication software Device Revision and Device Description e g Dev 01 DD 01 for HART 9 Date of manufacture 10 Current updates to data specified in points 6 to 9 2 3 1 4 5 6 7 8 9 10 Device SW 01 Dec 2009 XXXXXXXXXXXXXXXXXX Drivers Communication Date SW version Ex w...

Page 10: ... the device by affixing to it the CE mark The measuring system meets the EMC requirements of the Australian Communications and Media Authority ACMA The flow measuring system has successfully passed all the test procedures carried out and is certified and registered by the PNO PROFIBUS User Organization The device thus meets all the requirements of the following specifications Certified to PROFIBUS...

Page 11: ...bing slings slung round the two process connections Do not use chains as they could damage the housing Warning Risk of injury if the measuring device slips The center of gravity of the assembled measuring device might be higher than the points around which the slings are slung At all times therefore make sure that the device does not unexpectedly turn around its axis or slip a0004294 Fig 4 Instruc...

Page 12: ...t heavy sensors 3 2 1 Dimensions The dimensions and installation lengths of the sensor and transmitter can be found in the Technical Information for the device in question This document can be downloaded as a PDF file from www endress com A list of the Technical Information documents available is provided in the Documentation section on ä 116 3 2 2 System pressure and pulsating flow Reciprocating ...

Page 13: ...eter of the flowmeter Maximum pipe diameter mismatch should not exceed 1 mm 0 04 inch for diameters DN 200 8 3 mm 0 12 inch for diameters DN 200 8 For further information please refer to ISO 14511 Caution New installations should be free of metallic and abrasive particles to prevent damage to the sensing elements on start up a0005103 Correctly aligned flanges and gaskets a0005104 a0005105 a0005106...

Page 14: ...rientation transmitter head down A0009897 compact remote à p Ãà Recommended orientation à Orientation recommended in certain situations m In the case of saturated or unclean gases upward flow in a vertical pipe section is preferred to minimize condensation contamination n Not recommended if the vibrations are too high or if the installation is unstable o Only suitable for clean dry gases Do not mo...

Page 15: ...ium and Hydrogen all upstream distances should be doubled The minimum recommendations for inlet and outlet runs without flow conditioner are Flanged sensor Insertion sensor Note A specially designed perforated plate flow conditioner can be installed if it is not possible to observe the inlet runs required ä 16 1 a0007523 2 a0007524 3 a0007525 4 a0007526 5 a0007527 6 a0007528 1 Reduction 2 Expansio...

Page 16: ...onditioner if the recommended inlet runs are not available See accessories ä 87 a0005115 Fig 6 The figure above illustrates the minimum recommended inlet and outlet runs expressed in multiples of the pipe diameter using a flow conditioner 1 Flow conditioner with the flanged sensor 2 Flow conditioner with the insertion sensor Flow conditioner for use with insertion sensors The well known Mitsubishi...

Page 17: ...e transmitter Incorrect installation of the flow conditioner will have a small effect on the measurement accuracy a0005116 Fig 7 Flow conditioner mounting arrangement example 1 perforated plate flow conditioner 2 aeal gasket 3 alignment notch 4 alignment in the same plane as the transmitter Note For optimum performance it is advised that the t mass F sensor and flow conditioner are ordered at the ...

Page 18: ...sion always remain free of insulating material 3 2 7 Thermal insulation When the gas is very damp or saturated with water e g bio gas the piping and flowmeter body should be insulated to prevent water droplets condensing on the measuring sensor a0005122 Fig 8 Maximum thermal insulation for t mass 65F and 65I a Maximum insulation height for the flanged sensor b Maximum insulation height for the ins...

Page 19: ...thin wall duct use a suitable support bracket for the sensor and weld the welding socket to a base plate to spread the load Otherwise the mounting may be unstable and the duct wall can be damaged Warning These instructions are only applicable to installation in an un pressurized line without gas present and at safe temperatures 1 Drill or cut hole of Ø 31 0 mm 0 5 mm 1 22 0 019 in the pipe 2 Debur...

Page 20: ...the sensor to the calculated insertion depth 5 Insert the sensor into the socket 1 and tighten the lower nut of compression fitting 2 first by hand and then tighten it 1 revolutions using a wrench 42 mm Caution NPT thread use a thread sealing tape or paste G 1 A thread the sealing ring supplied must be installed 6 Tighten the upper nut of compression fitting 3 such that the sensor can still be adj...

Page 21: ...suring transducers to the flowing gas stream the sensor must not be rotated more than 7 degrees from this alignment A0010114 Fig 13 Securing the position of the sensor 9 Tighten the compression fitting 1 by hand to secure the position of the sensor Then using an open ended wrench tighten another 1 revolutions in a clockwise direction 10 Fix the two securing screws 2 Allen key 3 mm 1 8 Warning Obse...

Page 22: ...esumed while removal work is in progress Allow the system and device to cool to a safe temperature i e 50 C 120 F A0011016 Fig 14 Removing the insertion sensor 1 Release the securing screws 1 2 Release the upper nut of compression fitting using a wrench turning in a counterclockwise direction 2 Caution In the case of vertical installation do not drop the measuring device into the pipe 3 Unscrew th...

Page 23: ...mitter housing as far as it will go 4 Turn the transmitter housing to the desired position max 2 90 in either direction 5 Lower the housing into position and re engage the bayonet catch 6 Retighten the two securing screws a0004302 Fig 16 Turning the transmitter housing aluminium field housing 3 3 5 Turning the local display 1 Unscrew cover of the electronics compartment from the transmitter housin...

Page 24: ...o 140 F Install the device in a shaded location Avoid direct sunlight on the display Always install the wall mount housing in such a way that the cable entries are pointing down Mounted directly on the wall 1 Drill the holes as illustrated in the diagram 2 Remove the cover of the connection compartment a 3 Push the two securing screws b through the appropriate bores c in the housing Securing screw...

Page 25: ...dly seated on the panel wall Afterwards tighten the locking nuts Additional support is not necessary a0001131 Fig 19 Panel installation wall mount housing Pipe mounting The assembly should be performed by following the instructions in the diagram Caution If a warm pipe is used for installation make sure that the housing temperature does not exceed the max permitted value of 60 C 140 F a0001132 Fig...

Page 26: ...nal diameter correctly sized gaskets ä 13 Is the position chosen for the sensor correct in other words suitable for sensor type fluid properties and fluid temperature ä 14 Is there sufficient upstream and downstream pipe sensor ä 15 Correct installation of flow conditioner if fitted ä 16 Does the arrow on the sensor match the direction of flow through the pipe ä 14 Correct sensor depth insertion s...

Page 27: ...g resistor The bus length or the number of users can be increased by introducing a repeater The first and last segment can comprise max 31 devices The segments between the repeaters can comprise max 30 stations The maximum distance between two bus users can be calculated as follows NO_REP 1 segment length Note NO_REP maximum number of repeaters that may be switched in series depending on the repea...

Page 28: ...Electromagnetic compatibility EMC Explosion protection Safety of the personnel To ensure the optimum electromagnetic compatibility of systems it is important that the system components and above all the cables which connect the components are shielded and that no portion of the system is unshielded Ideally the cable shields are connected to the normally metal housings of the connected field device...

Page 29: ...g Non hazardous area and zone 2 ATEX II3G FM CSA see separate Ex documentation B Field housing Zone 1 ATEX II2GD IECEx FM CSA see separate Ex documentation C Remote sensor insertion D Remote sensor flanged Wire colors when supplied by Endress Hauser Terminal no 41 white 42 brown 43 green 44 yellow 4 2 2 Cable specification connecting cable The specifications of the cable connecting the transmitter...

Page 30: ...e installation of electrical equipment also apply 1 Unscrew the connection compartment cover from the transmitter housing 2 Feed the power supply cable the fieldbus cable and the power supply cable for external termination optional cable through the appropriate cable entries 3 Perform wiring Wiring diagram ä 31 Terminal assignment see above Caution Risk of damage to the fieldbus cable Observe the ...

Page 31: ...rminal No 26 B RxD TxD P Terminal No 27 A RxD TxD N e Ground terminal for fieldbus cable shield Observe the following the shielding and grounding of the fieldbus cable ä 28 that the stripped and twisted lengths of cable shield to the ground terminal are as short as possible f Service socket for connecting service interface FXA 193 FieldCare or Fieldcheck g Power supply cable for external terminati...

Page 32: ...DC c Ground terminal for protective ground d Fieldbus cable Terminal No 26 PA with reverse polarity protection Terminal No 27 PA with reverse polarity protection e Fieldbus cable shield ground terminal Please note the following The shield and grounding of the fieldbus cable ä 28 Make sure that the stripped and twisted lengths of cable shield to the ground terminal are kept as short as possible f S...

Page 33: ...expanded instantly e g when constructing new star distributors using 4 channel or 8 channel distribution modules The measuring device can therefore be supplied with the option of a ready mounted fieldbus connector Fieldbus connectors for retrofitting can be ordered from Endress Hauser as a spare part ä 87 a0005999 Fig 24 Connectors for connecting to the PROFIBUS PA A Aluminum field housing B Stain...

Page 34: ...ned or replaced if necessary All threaded fasteners and screw covers must be firmly tightened The cables used for connection must be of the specified outside diameter Cable entry ä 109 Firmly tighten the cable entries a The cables must loop down before they enter the cable entries water trap b This arrangement prevents moisture penetrating the entry Always install the measuring device in such a wa...

Page 35: ...y remote version Is the flow sensor connected to the matching transmitter electronics Check serial number on nameplates of sensor and connected transmitter Only remote version is the connecting cable between sensor and transmitter connected correctly ä 29 Are all screw terminals firmly tightened Are all cable entries installed firmly tightened and correctly sealed Cables looped as water traps ä 34...

Page 36: ...rers for these purposes 3 Jumpers miniature switches for hardware settings PROFIBUS DP ä 43 PROFIBUS PA ä 46 You can make the following hardware settings using a jumper or miniature switches on the I O board Address mode configuration select software or hardware addressing Device bus address configuration for hardware addressing Hardware write protection enabling disabling a0001318 Fig 26 Methods ...

Page 37: ... line Shows primary measured values e g volume flow in ml min or in Lower display line Shows supplementary measured variables and status variables e g totalizer reading in m3 bar graph measuring point designation 2 Plus minus keys Enter numerical values select parameters Select different function groups within the function matrix Press the keys simultaneously to trigger the following functions Exi...

Page 38: ...unction group e g CURRENT OUTPUT 1 3 Select a function e g TIME CONSTANT Change parameter enter numerical values OS Select or enter enable code parameters numerical values F Save your entries 4 Exit the function matrix Press and hold down Esc key X for longer than 3 seconds HOME position Repeatedly press Esc key X Return step by step to HOME position a0001142 Fig 28 Selecting functions and configu...

Page 39: ...tion matrix itself in the Description of Device Functions manual which is a separate part of these Operating Instructions 5 3 2 Enabling the programming mode The function matrix can be disabled Disabling the function matrix rules out the possibility of inadvertent changes to device functions numerical values or factory settings A numerical code factory setting 65 has to be entered before settings ...

Page 40: ...or designation e g FLOW LIMIT maximum flow limit exceeded 4 Error number e g 422 5 Duration of most recent error occurrence in hours minutes and seconds 5 4 2 Error message type The measuring device always assigns system and process errors which occur to two types of error messages fault or notice messages resulting in different weightings ä 89 Serious system errors e g module defects are always i...

Page 41: ...e software package test results can be imported into a database printed out and used for official certification Contact your Endress Hauser representative for more information Valid for device software 3 06 XX Function DEVICE SOFTWARE PROFIBUS DP device data Profile Version t mass 65 ID No Profile ID No 3 0 1545hex 9740hex Function PROFILE VERSION Function DEVICE ID GSD file information t mass 65 ...

Page 42: ...formation t mass 65 GSD file Extended format recommended Standard format eh3x1550 gsd eh3_1550 gsd Note When planning and configuring the PROFIBUS network please observe the information on using GSD files ä 61 ff Profile GSD file PA039740 gsd Bitmaps EH_1550_d bmp dib EH_1550_n bmp dib EH_1550_s bmp dib Software release 10 2010 Operating program Sources for obtaining device descriptions t mass 65 ...

Page 43: ...figure the hardware write protection accordingly with the aid of the jumpers see Figure 4 Installation is the reverse of the removal procedure a0005407 Fig 30 Switching write protection on and off with the aid of a jumper on the I O board 1 Jumper for switching write protection on and off 1 1 Write protection switched on factory setting it is not possible to write to the device parameters via PROF...

Page 44: ...tched off before you remove the cover of the electronics compartment 1 Loosen Allen screw 3 mm of the securing clamp 2 Unscrew cover of the electronics compartment from the transmitter housing 3 Remove the local display if present by loosening the set screws of the display module 4 Set the position of the miniature switches on the I O board using a sharp pointed object 5 Installation is the revers...

Page 45: ...e bus ON ON ON ON The measuring device is operated with a baudrate 1 5 MBaud Due to the capacitive load of the device and the line reflection generated as a result make sure that external termination is used The miniature switch for termination is located on the I O board see Figure a0005408 Fig 32 Set terminating resistors for baud rates 1 5 MBaud A Factory setting B Setting at the last transmitt...

Page 46: ... O board 3 Configure the hardware write protection accordingly with the aid of the jumpers see Figure 4 Installation is the reverse of the removal procedure a0001359 Fig 33 Switching write protection on and off with the aid of a jumper on the I O board 1 Jumper for switching write protection on and off 1 1 Write protection switched on it is not possible to write to the device functions via PROFIBU...

Page 47: ...tched off before you remove the cover of the electronics compartment 1 Loosen the Allen screw 3 mm of the securing clamp 2 Unscrew cover of the electronics compartment from the transmitter housing 3 Remove the local display if present by loosening the set screws of the display module 4 Set the position of the miniature switches on the I O board using a sharp pointed object 5 Installation is the re...

Page 48: ...lay Normal measuring mode commences as soon as start up completes Various measured values and or status variables appear on the display HOME position Note If start up fails an error message indicating the cause is displayed 6 3 Quick Setup All important device parameters for standard operation can be configured quickly and easily by means of the Quick Setup menu especially for devices that have be...

Page 49: ...it Calorific Val Corr Vol Communication QUICK SETUP COMMISSION Use the O or S key at the prompt QS COMMISSION NO and the device access code entry appears Enter the device access code 65 and press F programming is enabled The prompt QS COMMISSION NO appears Use the O or S key to change NO to YES and press F LANGUAGE Use the O or S key to select the required language and continue with F PRE SETTING ...

Page 50: ...he automatic parameterization of the display option contains the following basic settings factory settings YES main line MASS FLOW additional line TOTALIZER 1 NO The existing selected settings remain Carry out another Quick Setup u Select additional Quick Setups to complete commissioning or select NO to exit ...

Page 51: ...HICKNESS and OUTER DIAMETER The function INTERNAL DIAMETER displays the calculated internal diameter and is read only RECTANGULAR Enter the INTERNAL HEIGHT INTERNAL WIDTH and WALL THICKNESS of the duct Select the MOUNTING orientation of the sensor HORIZONTAL or VERTICAL MOUNTING SET LENGTH n Enter the measured length of the mounting set including the compression fitting ä 19 INSERTION DEPTH o This...

Page 52: ...grammed as one single gas or one gas mixture of up to 8 components A single gas can be selected from a list of standard gases or setup for other suitable types of gases such as Ozone using manual correction factors and the option called SPECIAL GAS This requires application evaluation at the factory consult your Endress Hauser representative prior to using this function E Esc E XXX XXX XX HOME POS...

Page 53: ...or each GAS TYPE only if NUMBER OF GASES is 2 and more The error message CHECK VALUES appears if the total mixture does not equal 100 Go back and check the mixture settings 2 SAVE CHANGES Select YES to save changes to the GAS GROUP and activate them Press F to continue or Select CANCEL to save the entered settings in buffer memory but not activate them for measurement If this function is selected ...

Page 54: ...ressures to absolute pressure If a pressure compensating input is being used then the input signal value overrides the manually programmed value The pressure input value applies to both gas groups i e 2 independent pressure values are no longer possible This Quick Setup Gas function is not available if an in situ calibration function has been performed on the device as the in situ calibration curv...

Page 55: ...ROUP 2 Note If only one gas group is used then leave mode 2 as default settings The units of measure are selected in the system units section ä 49 Auto Gross The gross heating value or higher heating value is the total heat obtained by complete combustion at constant pressure of a volume of gas in air including the heat released by the water vapor in the combustion products gas air and combustion ...

Page 56: ...Carbon Monoxide CO 10 1 4 34 10 1 4 34 Hydrogen Sulphide H2S 15 2 6 54 19 49 8 38 Methane CH4 50 02 21 51 55 52 23 87 Ethane C2H6 47 5 20 43 51 93 22 33 Propane C3H8 46 32 19 92 50 32 21 64 Butane C4H10 45 71 19 66 49 51 21 29 Ethylene C2H4 47 16 20 28 50 31 21 63 According to ISO 6976 1995 E and GPA Standard 2172 96 Country reference combustion temperature Austria Belgium Denmark Germany Italy Lu...

Page 57: ...ontinue with F SELECTION GSD Use the O or S key to select the operating mode GSD file which should be used for cyclic communication with the PROFIBUS Master class 1 and continue with F MANUFACT SPEC factory setting The measuring device is operated with complete device functionality PROFILE GSD The measuring device is operated in the PROFIBUS Profile mode Note For PROFIBUS network configuration mak...

Page 58: ...asuring points Note For information on installing and removing the T DAT ä 99 a0001221 en Fig 37 Data backup transmission with T DAT SAVE LOAD function Information on the LOAD and SAVE options available LOAD Data are transferred from the T DAT to the EEPROM Note Any settings already saved on the EEPROM are deleted This option is only available if the T DAT contains valid data This option can only ...

Page 59: ...US DP ä 43 PROFIBUS PA ä 46 2 Enter the tag name optional COMMUNICATION TAG NAME 3 Configuring the fieldbus address Software addressing using the local display or operating program COMMUNICATION FIELDBUS ADDRESS Hardware addressing via miniature switches PROFIBUS DP ä 44 PROFIBUS PA ä 47 4 Select the system unit a Determine the units by means of the system units group SYSTEM UNITS UNIT MASS FLOW U...

Page 60: ... the totalizer TOTALIZER UNIT TOTALIZER Configure totalizer status e g totalize TOTALIZER SET TOTALIZER Option TOTALIZE Set the totalizer mode TOTALIZER MODE TOTALIZER Select one of the following options BALANCE factory setting calculates the positive and negative flow portions POSITIVE calculates the positive flow portions NEGATIVE calculates the positive flow portions HOLD VALUE The totalizer re...

Page 61: ...re configuration takes place a decision should be made as to which GSD file should be used to operate the measuring device in the PROFIBUS DP Master class 1 system The measuring device supports the following GSD files t mass GSD file manufacturer specific GSD file complete device functionality PROFIBUS Profile GSD file Below you will find a detailed description of the GSD files supported t mass GS...

Page 62: ... similar devices from different manufacturers can be interchanged with the profile GSD file without the need to reconfigure interchangeability The following modules are supported with the Profile GSD file AI Flow module Analog Input function block 1 output variable mass flow Totalizer module Totalizer function block 1 output variable totalized mass flow Name of the PROFIBUS Profile GSD file Source...

Page 63: ... EH3x1545 gsd Copy the file to the subdirectory siemens step7 s7data gsd The bitmap files also belong to the GSD files These bitmap files are used to display the measuring points in image form The bitmap files must be saved to the directory siemens step7 s7data nsbmp If you are using configuration software other than that referred to above ask your PROFIBUS master system manufacturer which directo...

Page 64: ...PROFIBUS DP Profile 3 0 Esc E XXX XXX XX Measured variable 1 Measured variable 2 Measured variable 3 Measured variable Measured variable 1 Measured variable 2 Measured variable 3 Measured variable Analog Input 1 Output value AI Output value AI Analog Input 2 Signal processing PROFIBUS PROFILE Parameter Manufacturer specific Parameter Control CONTROL_BLOCK Display value DISPLAY_VALUE Transducer blo...

Page 65: ...nd the totalizer function blocks 1 to 2 can be changed by means of the CHANNEL function A detailed description of the individual modules is contained in the following section The device has to be reset once a new configuration has been loaded to the automation system This can be effected as follows By means of the local display By means of an operating program e g FieldCare By switching the supply...

Page 66: ...n COMMUNICATION BLOCK SELECTION Selection of an Analog Input function block COMMUNICATION CHANNEL Selection of a measured variable Possible settings Factory setting TOTAL module The measuring device has three totalizer function blocks The totalizer values can be cyclically transmitted to the PROFIBUS Master class 1 via the TOTAL module slots 4 to 5 The totalizer value is represented in the first f...

Page 67: ...function the totalizer can be controlled via control variables The following control variables are supported 0 Totalize factory setting 1 Reset totalizer the totalizer value is reset to 0 2 Accept totalizer preset Note After the totalizer value has been reset to 0 or set to the preset value the totalizing continues automatically The control variable does not have to be changed to 0 again to restar...

Page 68: ...es the positive and negative flow portions 1 calculates the positive flow portions 2 calculates the negative flow portions 3 Totalizing is stopped Note The device can t calculate negative flow portions TOTAL function For a description of the TOTAL function refer to TOTAL module ä 66 Data structure of the SETTOT_MODETOT_TOTAL module combination Example of using the SETTOT_MODETOT_TOTAL module If th...

Page 69: ...itching on positive zero return Supported control variables of the CONTROL_BLOCK module The following device specific control variables can be activated by changing the output byte from 0 x Note The control e g switching on positive zero return is executed by cyclic data transmission if the output byte switches from 0 to the bit pattern in question The output byte must always switch from 0 A switc...

Page 70: ...a non volatile device parameter A constant overwriting of this non volatile device parameter via the PROFIBUS is to be avoided ä 63 Output data Note The status is not evaluated by the device EMPTY_MODULE module The measuring device is a so called modular PROFIBUS slave In contrast to a compact slave the structure of a modular slave is variable it consists of several individual modules In the GSD f...

Page 71: ...w factory setting 2 AI 5 Analog Input function block 1 Output variable corr volume flow factory setting 3 AI 5 Analog Input function block 1 Output variable temperature factory setting 4 SETTOT _MODETOT _TOTAL 5 2 Totalizer function block 1 TOTAL output variable totalized mass flow factory setting SETTOT totalizer control MODETOT totalizer configuration 5 SETTOT _MODETOT _TOTAL 5 2 Totalizer funct...

Page 72: ...means of Analog Input function block 1 The totalizer is configured without configuration In other words in this example it only returns the totalizer value for the mass flow factory setting by means of the TOTAL module and cannot be controlled by the PROFIBUS Master class 1 Slot sequence Module Byte length input data Byte length output data Description 1 AI 5 Analog Input function block 1 Output v...

Page 73: ...PROFIBUS PA Profile 3 0 Esc E XXX XXX XX Measured variable 1 Measured variable 2 Measured variable 3 Measured variable Measured variable 1 Measured variable 2 Measured variable 3 Measured variable Analog Input 1 Output value AI Output value AI Analog Input 2 Signal processing PROFIBUS PROFILE Parameter Manufacturer specific Parameter Control CONTROL_BLOCK Display value DISPLAY_VALUE Transducer blo...

Page 74: ...nd the totalizer function blocks 1 to 2 can be changed by means of the CHANNEL function A detailed description of the individual modules is contained in the following section The device has to be reset once a new configuration has been loaded to the automation system This can be effected as follows By means of the local display By means of an operating program e g FieldCare By switching the supply...

Page 75: ...n COMMUNICATION BLOCK SELECTION Selection of an Analog Input function block COMMUNICATION CHANNEL Selection of a measured variable Possible settings Factory setting TOTAL module The measuring device has three totalizer function blocks The totalizer values can be cyclically transmitted to the PROFIBUS Master class 1 via the TOTAL module slots 4 to 5 The totalizer value is represented in the first f...

Page 76: ...function the totalizer can be controlled via control variables The following control variables are supported 0 Totalize factory setting 1 Reset totalizer the totalizer value is reset to 0 2 Accept totalizer preset Note After the totalizer value has been reset to 0 or set to the preset value the totalizing continues automatically The control variable does not have to be changed to 0 again to restar...

Page 77: ...es the positive and negative flow portions 1 calculates the positive flow portions 2 calculates the negative flow portions 3 Totalizing is stopped Note The device can t calculate negative flow portions TOTAL function For a description of the TOTAL function refer to TOTAL module ä 66 Data structure of the SETTOT_MODETOT_TOTAL module combination Example of using the SETTOT_MODETOT_TOTAL module If th...

Page 78: ...itching on positive zero return Supported control variables of the CONTROL_BLOCK module The following device specific control variables can be activated by changing the output byte from 0 x Note The control e g switching on positive zero return is executed by cyclic data transmission if the output byte switches from 0 to the bit pattern in question The output byte must always switch from 0 A switc...

Page 79: ...a non volatile device parameter A constant overwriting of this non volatile device parameter via the PROFIBUS is to be avoided ä 63 Output data Note The status is not evaluated by the device EMPTY_MODULE module The measuring device is a so called modular PROFIBUS slave In contrast to a compact slave the structure of a modular slave is variable it consists of several individual modules In the GSD f...

Page 80: ...w factory setting 2 AI 5 Analog Input function block 1 Output variable corr volume flow factory setting 3 AI 5 Analog Input function block 1 Output variable temperature factory setting 4 SETTOT _MODETOT _TOTAL 5 2 Totalizer function block 1 TOTAL output variable totalized mass flow factory setting SETTOT totalizer control MODETOT totalizer configuration 5 SETTOT _MODETOT _TOTAL 5 2 Totalizer funct...

Page 81: ...means of Analog Input function block 1 The totalizer is configured without configuration In other words in this example it only returns the totalizer value for the mass flow factory setting by means of the TOTAL module and cannot be controlled by the PROFIBUS Master class 1 Slot sequence Module Byte length input data Byte length output data Description 1 AI 5 Analog Input function block 1 Output v...

Page 82: ...special SAP s Therefore the number of Master class 2 that can communicate with a device simultaneously is limited to the number of SAPs available for this data transmission The use of a Master class 2 increases the cycle time of the bus system This must be taken into account when programming the control system used 6 8 2 Master class 1 acyclic MS1AC In MS1AC a cyclic master that is already reading...

Page 83: ...le in the following special cases To achieve highest measuring accuracy with very small flow rates Under process or operating conditions where the gas properties heat capacity and thermal conductivity will change e g Hydrogen and Helium Preconditions for a zero point adjustment Note the following before you perform a zero point adjustment A zero point adjustment can be performed only with gases th...

Page 84: ...longer than three seconds or Repeatedly press and release the Esc key X Resetting a zero point adjustment The currently stored zero point can be reset to the original factory value by using the RESET option within ZERO POINT ADJUST Use O or S to select RESET and press F to confirm The zero point adjustment is now reset 6 10 Data storage device HistoROM At Endress Hauser the term HistoROM refers to...

Page 85: ...N function maybe activated to set the current output to zero flow during such cycles See Description of Device Functions manual for more information Caution Do not use a pipe cleaning pig 7 3 Transducer cleaning For gases that do carry impurities it is recommended that the sensor be routinely inspected and cleaned to minimise any potential measuring errors due to contamination or build ups The fre...

Page 86: ...able pressure and temperature without pressure compensation input 3 Mass flow reference a mass flow reference meter mounted in the measurement or bypass pipe providing a mA signal to t mass or b manual entry of known mass flow reference values For example the display value from the reference meter or a derived value from a pump curve 4 Ability to control the flow range over a minimum of 5 control ...

Page 87: ...ng Suitable for pipe mounting to 3 DK6WM Flow conditioner Perforated plate flow conditioner t mass F sensor DN25 to 100 1 to 4 t mass I sensor DN80 to 300 3 to 12 DK6ST DK7ST Hot tap Mounting set with ball valve and safety chain Insertion or extraction of sensor under process pressure max 4 bar 58 psi Please refer to the product page of the Endress Hauser Internet page www endress com Mounting set...

Page 88: ...tor On CD ROM for local PC installation DKA80 Fieldcheck Tester simulator for testing flowmeters in the field When used in conjunction with the FieldCare software package test results can be imported into a database printed and used for official certification Contact your Endress Hauser representative for more information 50098801 FieldCare FieldCare is Endress Hauser s FDT based Plant Asset Manag...

Page 89: ...isplay text will appear in English default and is displayed at maximum contrast Measured value indicated but no signal at the current or pulse output Measuring electronics defective order spare parts ä 99 Error messages on display Errors that occur during commissioning or measuring are displayed immediately Error messages consist of a variety of icons The meanings of these icons are as follows exa...

Page 90: ...ges ä 40 9 2 1 Displaying the device status on PROFIBUS DP Display in the operating program acyclic data transmission The device status can be queried using an operating program e g FieldCare Function block SUPERVISION ACTUAL SYSTEM CONDITION Faulty connection to PROFIBUS master continued Network structure Check permissible fieldbus length and number of spurs Fieldbus address Check fieldbus addres...

Page 91: ...tatus information is transmitted to the PROFIBUS master via the quality byte For the selection FAILSAFE_TYPE FSAFE VALUE For the selection FAILSAFE_TYPE LAST GOOD VALUE factory setting If a valid output value was available before the failure If no valid output value was available before the failure For FAILSAFE_TYPE WRONG VALUE For status information see the table in the following section Note The...

Page 92: ...OM Remedy Replace the amplifier board 014 S AMP SW ROM RAM 014 0x0F BAD Device Failure Constant Amp ROM RAM data inconsistent Cause Amplifier Defective ROM RAM Remedy Replace the amplifier board 031 S SENSOR HW DAT 031 0x10 0x11 0x12 BAD Sensor Failure O K Low High S DAT failure not inserted Cause Sensor DAT 1 HistoROM S DAT is defective 2 HistoROM S DAT is not plugged into the amplifier board or ...

Page 93: ...e parts set number Hardware revision code 3 Replace measuring electronics boards if necessary 051 AC COMPATIB 051 0x0F BAD Device Failure Constant Compatibility Amp I O module Cause The I O board and the amplifier board are not compatible Remedy Use only compatible modules and boards Check the compatibility of the modules used Check the Spare parts set number Hardware revision code 070 S SENSOR DE...

Page 94: ...lacement DAT is compatible with the measuring electronics Check the Spare parts set number Hardware revision code 3 Replace measuring electronics boards if necessary ä 99 206 S SAVE T DAT 206 0x0F BAD Device Failure Constant Restore from T DAT failed 211 S S DAT NO HW 211 0x0F BAD Device Failure Constant S DAT no hardware Cause HistoROM S DAT is not fitted to amplifier board Remedy Check whether t...

Page 95: ...the transducer may be damaged No 5xx Application error 501 S SW UPDATE ACT 501 0x48 0x49 0x4A UNCERTAIN Substitute Set O K Low High Software upload active Cause New amplifier or communication I O module software version is loaded Currently no other functions are possible Remedy Wait until process is finished The device will restart automatically 502 S UP DOWL ACT 502 0x48 0x49 0x4A UNCERTAIN Subst...

Page 96: ...on measured value active Cause Simulation of the measured value is active Remedy Switch off simulation Access SIMULAT SYSTEM SIM MEASURAND OFF 698 S DEV TEST ACT 698 0x60 0x61 0x62 UNCERTAIN Simulated Value O K Low High Device test via Fieldcheck active Cause The measuring device is being checked on site via the test and simulation device No Device status message local display PROFIBUS measured va...

Page 97: ...curate possibly due to unstable process or flow conditions Remedy Stabilize process conditions or relocate the instrument to a more stable measuring location Symptoms Rectification Note You may have to change or correct certain settings of the function matrix in order to rectify faults The functions outlined below such as DISPLAY DAMPING for example are described in detail in the Description of De...

Page 98: ... too high i e above sensor calibration range 1 Check the sensor measuring range using the Endress Hauser Applicator program 2 Check if the inverted plus sign is shown on the display If yes reduce the velocity if possible 4 The flow rate maybe too low 1 Check the sensor measuring range using the E H Applicator program 2 Increase the velocity if possible 5 Check the condition of the transducer 1 Are...

Page 99: ...spare parts directly from your Endress Hauser representative by providing the serial number printed on the transmitter s nameplate ä 7 Spare parts are shipped as sets comprising the following parts Spare part Additional parts small items threaded fasteners etc Mounting instructions Packaging a0005495 Fig 46 Spare parts for transmitter 65 field and wall mount housings 1 Power unit board 85 to 260 V...

Page 100: ...ut in accordance with the manufacturer s specifications When connecting Ex certified devices see the notes and diagrams in the Ex specific supplement to these Operating Instructions Caution Use only original Endress Hauser parts Installation and removal å 47 1 Unscrew cover of the electronics compartment from the transmitter housing 2 Remove the screws 1 1 and remove the cover 1 from the electroni...

Page 101: ...h local display 1 1 Screws of electronics compartment cover 1 2 Ribbon cable display module 2 Aperture for installing removing boards 3 Power unit board 4 Amplifier board 4 1 Signal cable sensor 4 2 HistoROM S DAT sensor data memory 4 3 HistoROM T DAT transmitter data memory 5 I O board 3 4 5 2 2 4 1 4 3 4 2 1 2 3 4 W E N O 1 2 3 4 W E N O 1 2 3 4 W E N O 1 2 3 4 W E N O 1 1 1 1 2 ...

Page 102: ...manufacturer s specifications When connecting Ex certified devices see the notes and diagrams in the Ex specific supplement to these Operating Instructions Caution Use only original Endress Hauser parts Installation and removal å 48 1 Remove the screws and open the hinged cover 1 of the housing 2 Loosen the screws securing the electronics module 2 Then push up electronics module and pull it as far...

Page 103: ...ver 5 Aperture for installing removing boards 6 Power unit board 7 Amplifier board 7 1 Signal cable sensor 7 2 HistoROM S DAT sensor data memory 7 3 HistoROM T DAT transmitter data memory 8 I O board flexible assignment 8 1 Pluggable submodules status input and current input current output frequency output and relay output 9 I O board permanent assignment 3 4 1 2 6 7 8 5 7 1 7 3 7 2 5 3 1 2 3 4 W ...

Page 104: ...ecifications When connecting Ex certified devices see the notes and diagrams in the Ex specific supplement to these Operating Instructions Caution Use only original Endress Hauser parts Removal and installation å 49 1 Remove the safety screw 1 and remove the cover 2 from the electronics compartment 2 Disconnect the sensor cable plug 3 3 Disconnect the remote cable from the terminal block 4 4 Remov...

Page 105: ...he fuse is as follows 1 Switch off power supply 2 Remove the power unit board ä 100 3 Remove the protection cap 1 and replace the device fuse 2 Only use the following fuse type Power supply 20 to 55 V AC 16 to 62 V DC 2 0 A slow blow 250 V 5 2 20 mm Power supply 85 to 260 V AC 0 8 A slow blow 250 V 5 2 20 mm Ex rated devices see the Ex documentation 4 Installation is the reverse of the removal pro...

Page 106: ...e is hazardous to health e g flammable toxic caustic carcinogenic etc Note You will find a preprinted Declaration of contamination form at the back of these Operating Instructions 9 7 Disposal Observe the regulations applicable in your country 9 8 Software history Note Up or downloading a software version normally requires a special service software Date Software version Changes to software Operat...

Page 107: ...ds in the liquid phase Resulting from incorrect use or from use other than that designated the operational safety of the measuring devices can be jeopardized The manufacturer accepts no liability for damages being produced from this 10 1 2 Function and system design Measuring principle Mass flow measurement by the thermal dispersion principle Measuring system The t mass 65 flow measuring system co...

Page 108: ...put combination ä 30 PROFIBUS PA interface PROFIBUS PA in accordance with EN 50170 Volume 2 IEC 61158 2 MBP galvanically isolated Data transmission rate 31 25 kBaud Current consumption 11 mA Permitted supply voltage 9 to 32 V Bus connection with integrated reverse polarity protection Error current FDE Fault Disconnection Electronic 0 mA Signal coding Manchester II Function blocks 3 Analog Input 2 ...

Page 109: ...ameter serial number flow conditioner zero point etc Totalizer stops at the last value determined Potential equalisation No measures necessary For devices in hazardous areas please refer to the additional Ex documentation 10 1 6 Performance characteristics Calibration reference conditions Accredited according to ISO IEC 17025 Traceable to National Standards Calibration gas air Temperature controll...

Page 110: ...e Install the device in a shady location Avoid direct sunlight particularly in warm climatic regions A protective sun cover is available on request At ambient temperatures below 20 C 4 F the readability of the display may be impaired Storage temperature 40 to 80 C 40 to 176 F recommended 20 C 68 F Degree of protection Standard IP 67 NEMA 4X for transmitter and sensor Shock resistance According to ...

Page 111: ... 7 25 to 290 psi gauge Limiting medium pressure range rated pressure The material load diagrams pressure temperature diagrams for the process connections are provided in the separate Technical Information document on the device in question This can be downloaded as a PDF file from www endress com A list of the Technical Information documents ä 116 Flow limit See Measuring range section ä 107 The v...

Page 112: ... lb For flanged versions all values weight refer to devices with Cl 150 flanges Material Transmitter housing Compact housing powder coated die cast aluminium Wall mount housing powder coated die cast aluminium Remote field housing powder coated die cast aluminium Connection housing sensor remote version Powder coated die cast aluminium t mass F DN 15 25 40 50 80 100 Compact version 7 5 8 0 12 5 12...

Page 113: ...626 Bushing PEEK GF30 PVDF O ring seals EPDM Kalrez 6375 Viton FKM t mass I sensor Insertion tube Sensor length 235 9 335 13 435 17 608 24 1 4404 to EN 10216 5 and 316 316L to A312 Transducer body 1 4404 to EN10272 and 316L to A479 Alloy C22 2 4602 and UNS N06022 to B574 Transducer elements 1 4404 to EN10217 7 and 316L to A249 or 1 4404 to EN 10216 5 and 316L to A213 Alloy C22 2 4602 and UNS N0602...

Page 114: ...representative on request All explosion protection data are given in a separate documentation which is available upon request a0005128 en Fig 51 Example of t mass devices in the hazardous area Example t mass 65F PROFIBUS DP PA certification The flowmeter has successfully passed all the test procedures carried out and is certified and registered by the PNO PROFIBUS User Organization The device thus...

Page 115: ...t the wetted parts of the flow sensor have been degreased in accordance with British Oxygen Company BOC specification 0000 N S 430 00 01 and BS IEC 60877 1999 After final degreasing there shall be less than 100 milligram m 0 01 milligram cm of oil grease contamination on the degreased surface of the component Other standards and guidelines BS IEC 60877 1999 Procedures for ensuring the cleanliness ...

Page 116: ...e order codes on request 10 1 14 Accessories Various accessories which can be ordered separately from Endress Hauser are available for the transmitter and the sensor ä 87 10 1 15 Documentation Technical Information t mass 65F 65I TI069D 06 Description of Device Functions t mass 65 BA00114D 06 Supplementary documentation on Ex ratings ATEX FM CSA IECEx NEPSI Flow measuring technology FA005D 06 ...

Page 117: ...MODETOT_TOTAL module 77 D Data back up of device data with T DAT 58 Data transmission Acyclic 82 Declaration of conformity CE mark 10 Degree of protection 34 110 Designated use 5 107 Device address PROFIBUS DP 44 Device address configuring PROFIBUS PA 47 Device description data PROFIBUS DP 41 42 Device description files 41 Device designation 7 107 Device errors 89 Device functions See Function des...

Page 118: ...OFIBUS DP 69 PROFIBUS PA 78 DISPLAY_VALUE PROFIBUS DP 69 PROFIBUS PA 78 EMPTY_MODULE PROFIBUS DP 70 PROFIBUS PA 79 PRESSURE_VALUE PROFIBUS DP 70 PROFIBUS PA 79 SETTOT_MODETOT_TOTAL PROFIBUS DP 68 PROFIBUS PA 77 SETTOT_TOTAL PROFIBUS DP 67 PROFIBUS PA 76 TOTAL PROFIBUS DP 66 PROFIBUS PA 75 Mounting Insertion sensor 19 See Installation conditions Mounting sets 87 N Nameplate Connections 9 Sensor 8 N...

Page 119: ...9 Data back up of device data with T DAT 58 Gas 52 Heat flow 55 Pressure 54 Sensor 51 R Recalibration 86 Registered trademarks 10 Remote transmitter wall mount housing 24 Removing the insertion sensor 22 Repair 6 106 Repeatability 109 Replacement Printed circuit boards installation removal 100 102 104 Replacing Seals 86 Returning devices 6 106 S Safety icons 6 Safety instructions 6 S DAT HistoROM ...

Page 120: ...the field housing aluminium 23 Transporting the sensor 11 Trouble shooting and remedy 89 V Vibration resistance 110 Vibrations 110 W Wall mount housing installing 24 Wechselarmatur Hot tap 111 Weight 112 Welding socket 19 Wiring See Electrical connection Write protection hardware PROFIBUS DP 43 PROFIBUS PA 46 Writes max 63 Z Zero point adjustment 83 84 ...

Page 121: ...____________________________________________ ______________________________________________________________________________________________________________ We hereby certify that this declaration is filled out truthfully and completely to the best of our knowledge We further certify that the returned parts have been carefully cleaned To the best of our knowledge they are free of any residues in da...

Page 122: ...www endress com worldwide BA00113D 06 EN 13 10 71123860 FM SGML6 0 ProMoDo ...

Reviews: