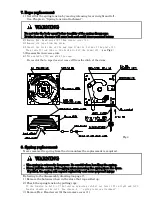
4) Remove the set of drum (15) and plate (15) from casing
assembly (24).
Fig.5
5) Remove rope (22) from drum.
6) Loosen Screws (21) and remove Plate (15) from Drum (13).
7) Check spring (14) fracture point and rivet condition.
If fracture caused in the inside, remove spring.
If fracture caused near outer periphery or rivet of
spring is broken. do not remove spring.
Reassemble the plate (15) to drum (13), then contact
to the store.
(
see Fig.5
)
8) Remove spring (14) from drum (13).
9) Reassemble in reverse order.
・
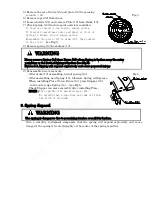
After drum (13) assembling, install spring (14).
Fig.6
・
After assembling new Spring (14), lubricate Spring with grease.
・
When installing Plate (15) on Drum (13), place Stopper (16)
in the outer edge Spring (14).
(see Fig.6
)
Check Stopper can move smoothly after installing Plate.
NOTE
:
Turn spindle (13) and wind rope (22).
Be careful that a rope does not come off from
the ditch of the drum.
9. Spring disposal
Give a warning to disposal companies that the spring will expand explosively and cause
danger if the spring is treated roughly or the center of the spring is pulled.
WARNING
Never remove Spring (14) from Drum (13) when Spring is broken near the outer
periphery or the rivet of Spring is broken (see Fig.5).
If removed, Spring will expand explosively and cause personal injury.
WARNING
The spring is dangerous due to remaining tension even if it is broken.
Copied
digital
data
from
http://www.endo-kogyo.co.jp/
Summary of Contents for BS3N
Page 14: ......


