EMS Imaging iVu9s-Pro User Manual Download Page 9


7


OPERATION APPROACH 

Software Operation 

System Requirements and Precautions 

1.


Whenever  power  off  iVu9s-Pro,  please  stay  unpowered  at  least  5  to  10  seconds  to  allow  power 
capacitors to discharge.   

2.


The iVu9s-Pro provides software control program which runs under Microsoft Windows 98, 2000, XP, 
7, 8 through the interface of RS-232 serial control. 

3.


Before you click on the icon of the software, make sure you have secured the connection between 
your computer COM port and the iVu9s-Pro. 


Start the Software Control Program 

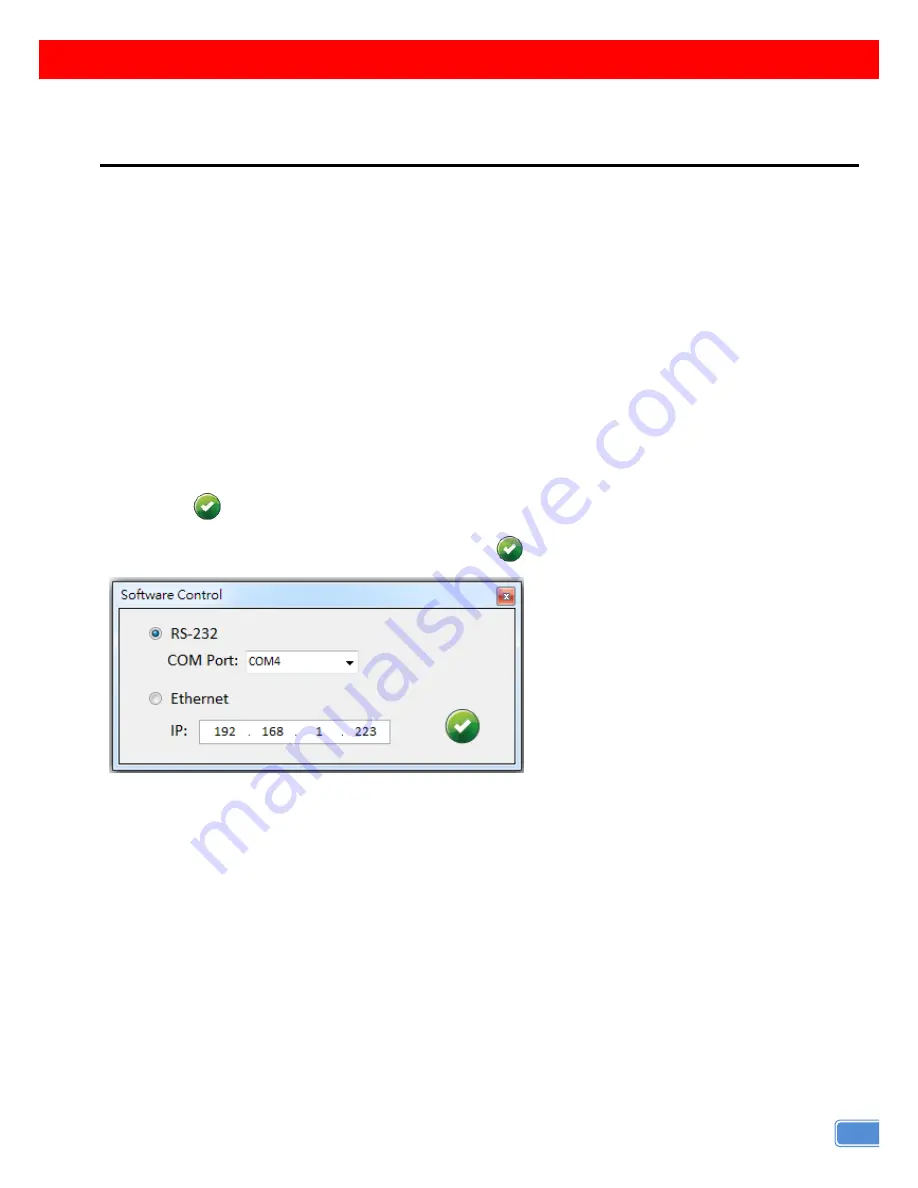
When clicking on the executable file, the following dialog will pop-up. There are two ways to control the 
iVu9s-Pro device (under Microsoft Windows 7, please run as administrator). 

RS-232 serial Mode: Use RS-232 to connect the port on device and computer.  Select correct COM port 

and click the 

  button.   

Ethernet Mode: Enter the device IP address and click the 

  button.   


After the software control setting is accomplished, it will enter the control interface directly. 

Summary of Contents for iVu9s-Pro

Page 1: ...12 Display 9 Display 4K2K Video Wall Processor User Manual rev 150409 Made in Taiwan iVu9s Pro ...

Page 2: ...t attempt to service this unit yourself except where explained in this manual Provide proper ventilation and air circulation and do not use near water Keep objects that might damage the device and assure that the placement of this unit is on a stable surface Use only the power adapter and power cords and connection cables designed for this unit Do not use liquid or aerosol cleaners to clean this u...

Page 3: ...ns and optimize visual effects Typical applications include digital signage and broadcasting education surveillance systems etc FEATURES Up to 12 DVI outputs from 640x480 to 1920x1200 with a local loop out for monitoring Support input rotation PIP side by side PAP full screen modes and adjustable size position through software Resize position flip zoom output video Each DVI output has an independe...

Page 4: ...ESD protection Human body model 15kV air gap discharge 8kV contact discharge Input 2x DVI HDMI 1x VGA 1x Component 1x RS 232 1x RJ 45 DVI connector DVI I 29 pin female digital only VGA connector HD 15 15 pin D sub female RS 232 connector DE 9 9 pin D sub female RJ45 connector WE SS 8P8C Mechanical Enclosure Metal enclosure Dimensions L x W x H Model 44 x 37 47 x 13 12 cm Carton 57 x 47 x 26 5 cm W...

Page 5: ... or Component Inputs on the iVu9s Pro 2 Connect all displays to DVI HDMI Outputs on the iVu9s Pro 3 Connect the AC Power cord 100 240V to the iVu9s Pro 4 Power up the iVu9s Pro 5 Switch on all devices connected and then control the display output through RS 232 Ethernet and software ...

Page 6: ...4 CONNECTION DIAGRAM ...

Page 7: ... Port DVI HDMI input supports input resolution up to 4K2K 30 4 Input Port VGA Component input 5 RS 232 control RS 232 control port 6 Power Switch Power ON OFF switch 7 Ethernet control Ethernet control port 8 Output Port 1 12 DVI HDMI outputs The output card module cage 4 output 10 12 is optionally available ...

Page 8: ... 1280x1024 60Hz 1280x720 1280x720 1360x768 60Hz 1280x768 1280x768 1400x1080 60Hz 1280x800 1280x800 1600x1200 60Hz 1280x960 1280x960 1920x1080 60Hz 1280x1024 1280x1024 1360x768 1360x768 1366x768 1366x768 1400x1050 1400x1050 1440x240 1440x240 1440x288 576i 1440x288 576i 1440x900 1440x900 1600x900 1600x900 1600x1200 1600x1200 1680x1050 1680x1050 1920x540 1080i 1920x540 1080i 1920x1080 1920x1080 1920x...

Page 9: ...tware make sure you have secured the connection between your computer COM port and the iVu9s Pro Start the Software Control Program When clicking on the executable file the following dialog will pop up There are two ways to control the iVu9s Pro device under Microsoft Windows 7 please run as administrator RS 232 serial Mode Use RS 232 to connect the port on device and computer Select correct COM p...

Page 10: ...se RS 232 serial control Mode to connect device the graph is In contrast the graph of Ethernet is 2 Input Control In this part you can set up the input source source display mode and screen rotation 1 Source setting Set the Input source You can select at most two input source 1 2 3 4 5 6 7 ...

Page 11: ...ifferent colors of frame represents the different input sources The information of coordinate shows the position of input source screen In different color frame it will show a white circle in the right corner User can slide the white circle to resize the input source screen or adjust the position by setting coordinate Besides user can also click the button to make the window precedence ...

Page 12: ...screen or 3 Output control In this part user can set up the output resolution display setting and the output s brightness and contrast 1 Output Resolution Set the output resolution User can choose the desired display icon to select the output port and setup resolution When setting the different resolution the coordinate of output will also be changed If you buy iVu9s Pro 9X the display output port...

Page 13: ...r enter the number to adjust the coordinate In addition if user wants to understand or estimate which part you may select it also can select the button to show grid on the graph After the setting please click the button Quick Select In Quick Select mode user can define how to cut in both directions and the part you desired to show on output TV ...

Page 14: ... adjust the brightness and contrast of output 4 Advanced setting 1 File Options User can click the button to save all the configuration for future use You can also click the button to load and read back the configuration from the existing file ...

Page 15: ...ontent Select the EDID input source HDMI 1 HDMI 2 Click button to read the EDID description and analysis 4 Input Card firmware update Make sure your RS 232 is connected and the connection status is Click the button to enter the interface Click button to select the firmware file which you want to update Click button and the firmware will start to update ...

Page 16: ...t 1 9 Make sure your RS 232 is connected and the connection status is Click the button to enter the interface Click button to select the firmware file which you want to update Click button and the firmware will start to update After firmware update it will display the status of each output card ...

Page 17: ...up a dialog indicates Finished please restart this machine 5 IP Configure You can also use the Ethernet to control software program First you should click the button to setup network set Next you can read the Ethernet setting from device or manually set to device After the step of IP configuration please restart the machine ...

Page 18: ...h This function can not only refresh the information of setting but also reconnect this device You can click button to update the control connection After you click this button pop up a Reconnect window shows you can select the approach to connect this device ...

Page 19: ...ng all HDMI displays In this case a 720p HDMI signal output would be probably the safest choice Nevertheless the user can force the matrix to learn the EDID of the lowest capable HDMI display among others to make sure all displays are capable to play the HDMI signals normally There is a method to do EDID Learning as below Software Control Please refer to the Operation Approach Software Operation P...

Page 20: ...sk of loss or damage in transit Under no circumstances will a unit be accepted without a return authorization number The warranty is in lieu of all other warranties expressed or implied including without limitations any other implied warranty or fitness or merchantability for any particular purpose all of which are expressly disclaimed Proof of sale may be required in order to claim warranty Custo...

Reviews: