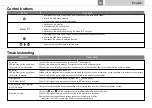
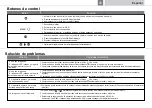
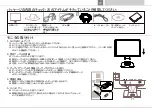
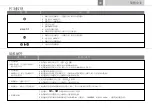
Emprex LM-1902 Quick Installation Manual Download Page 3

Control  buttons

Button                                                                                                

Func  tions

02

English

MENU

1.Activates  the  Volume  control  menu,  and  increases  volume  (with  audio  option).

2.Scrolls  the  OSD  menu  upward.

3.Increases  the  value  of  a  selected  function.

1.Switches  on  the  monitor.

2.Activates  the  OSD  control  menu.

3.Selects  the  specific  function.

4.Switches  off  the  monitor  by  pressing  the  button  for  3  seconds.

1.Activates  the  Volume  control  menu,  and  decreases  volume  (with  audio  option).

2.Scrolls  the  OSD  menu  downward.

3.Decreases  the  value  of  a  selected  function.

1.Automatically  optimizes  picture  performance.

Troubleshooting

Symptom

           Check items

*No  picture

*LED  indicator  (at the right side  of

the  monitor)  is  not  illuminated

*No  picture

*LED  indicator  (at the right side  of

  the monitor) is  orange

*Picture  shows

  "NO  SIGNAL INPUT"

*Picture  shows  "INPUT  SIGNAL

  OUT OF RANGE"

*Picture  is  not  clear

1.Check if the monitor is switched on (press the     

button again).

2.Check  if the  power  cord  is  properly  connected  to the  monitor  and  power  outlet.

3.Check  if there is  electricity  coming from  the  power  outlet.  (plug  in  another  device to  confirm  that the  outlet  is  working).

1.Check  if  your  computer  is  switched  on.

2.Make sure  the  computer  is  not in  power  saving  mode  (move the  mouse  or  press  a key  on  the  keyboard  to  re-activate the  computer).

3.Check  if  the analog  signal  cable  is  properly  connected  to  the  monitor  and  computer.

1.Check if your computer is switched on.(press the     

button again)

2.Check  if  the  signal  cable  is  properly  connected  to  the  monitor  and  computer.

1.Ensure  that  the  resolution  and/or  refresh  rate  is  set  correctly.  (See  item  2.4  of  Monitor  installation  section).

1.Press the     and      button simultaneously to activate the Auto Adjustment  function.

2.Check  if  the  signal  cable  is  properly  connected  to  the  monitor  and  computer.

3.Adjust  the  screen  resolution  and  refresh  rate  of  your  computer to  WXGA+

    (resolution:  1440*900,  refresh rate: 60Hz) for optimal performance.

Summary of Contents for LM-1902

Page 1: ......

Page 2: ...signal cable 2 1 Switch off your computer 2 2 Connect the signal cable to the D SUB or DVI port at the rear of the monitor and tighten the connector screws 2 3 Connect the other end of signal cable t...

Page 3: ...nitor is switched on press the button again 2 Check if the power cord is properly connected to the monitor and power outlet 3 Check if there is electricity coming from the power outlet plug in another...

Page 4: ...2 1 Mettez votre ordinateur hors tension 2 2 Connectez le c ble vid o sur le port SUB D ou DVI situ l arri re du moniteur et serrez les vis du connecteur 2 3 connectez l autre bout du c ble au port V...

Page 5: ...rifiez que le cordon d alimentation est bien correctement connect au moniteur et la prise lectrique 3 V rifiez que la prise lectrique fournit bien de l lectricit branchez un autre appareil pour voir...

Page 6: ...halten Sie den Computer aus 2 2 Schlie en Sie das Signalkabel an den D SUB oder DVI Anschluss an der R ckseite des Monitors an ziehen Sie dann die Schrauben am Stecker fest 2 3 Verbinden Sie das ander...

Page 7: ...ob das Netzkabel richtig in Monitor und Steckdose eingesteckt ist 3 berzeugen Sie sich davon dass die Steckdose Strom f hrt schlie en Sie zum Testen einfach ei anderes Ger t an die Steckdose an 1 Pr...

Page 8: ...l 2 1 Apague el equipo 2 2 Conecte el cable de se al al puerto D SUB o DVI situado en la parte posterior del monitor y apriete los tornillos del conector 2 3 Conecte el otro extremo del cable de se al...

Page 9: ...r est encendido Pulse el bot n de nuevo 2 Compruebe que el cable de alimentaci n est enchufado correctamente al monitor y a la toma de corriente 3 Compruebe si la electricidad proviene de la toma de c...

Page 10: ...segnale 2 1 Spegnere il computer 2 2 Collegare il cavo del segnale alla porta D SUB o DVI situata nella parte posteriore del monitor e stringere le viti del connettore 2 3 Collegare l altra estremit d...

Page 11: ...sia acceso Premere il tasto 2 Verificare che il cavo elettrico sia collegato correttamente al monitor e alla presa di corrente 3 Verificare che la presa di corrente eroghi energia attaccare un altro d...

Page 12: ...11 LCD CD ROM 1 1 1 1 2 1 3 2 2 1 2 2 D SUB DVI 2 3 VGA 2 4 1440 900 75Hz 3 3 1 3 2 4 4 1 AC 4 2 5 5 1 5 2 POWER AUDIO DVI D SUB...

Page 13: ...12 MENU 1 2 OSD 3 1 2 OSD 3 4 1 2 OSD 3 1 LED LED 1 2 3 1 2 3 1 2 1 2 4 1 2 3 WXGA 1440 900 60Hz...

Page 14: ...13 1 1 1 1 2 1 3 2 2 1 2 2 D SUB DVI 2 3 VGA 2 4 1440 900 75 3 3 1 AUDIO 3 2 4 4 1 POWER 4 2 5 5 1 5 2 POWER AUDIO DVI D SUB...

Page 15: ...14 MENU 1 2 OSD 3 1 2 3 4 3 1 2 OSD 3 1 1 2 3 1 2 3 1 2 1 2 4 1 2 3 WXGA 1440 900 60...

Page 16: ...15 LCD CD ROM 1 1 1 1 2 1 3 2 2 1 2 2 D SUB DVI 2 3 VGA 2 4 1440 900 75Hz 3 3 1 AUDIO 3 2 4 4 1 POWER 4 2 5 5 1 5 2 POWER AUDIO DVI D SUB...

Page 17: ...16 MENU 1 2 OSD 3 1 2 OSD 3 4 1 2 OSD 3 1 LED LED 1 2 3 1 2 3 1 2 1 2 4 1 2 3 WXGA 1440 900 60Hz...

Page 18: ...17 LCD l CD ROM 1 1 1 1 2 1 3 2 2 1 2 2 D SUB DVI 2 3 VGA 2 4 1440 900 75Hz 3 3 1 AUDIO 3 2 4 4 1 POWER 4 2 5 5 1 5 2 POWER AUDIO DVI D SUB...

Page 19: ...18 MENU 1 2 OSD 3 1 2 OSD 3 4 3 1 2 OSD 3 1 LED LED 1 2 3 1 2 3 1 2 1 2 4 1 2 3 WXGA 1440 900 60Hz...

Reviews: