- 11 -
THREADING UPPER THREAD
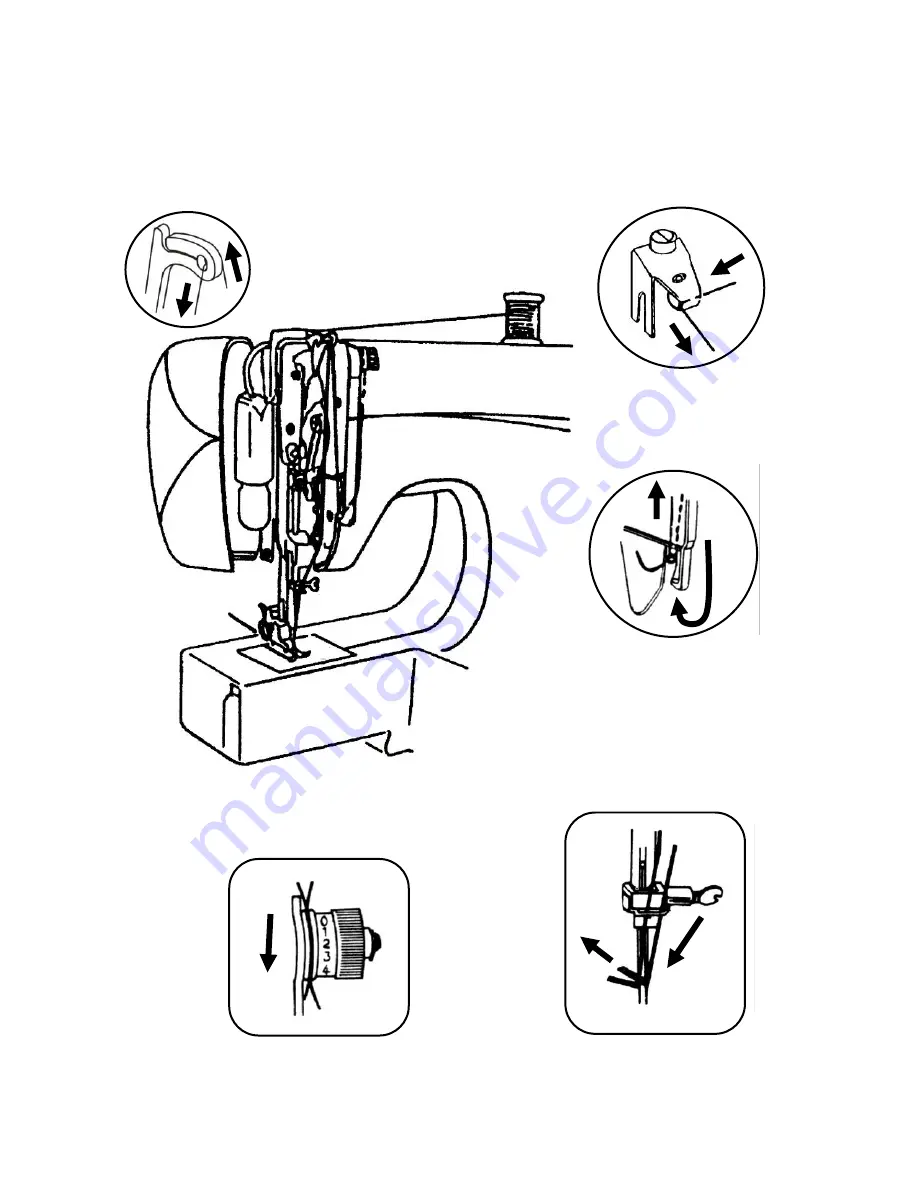
Pass the thread from A to H as shown.
A
B
C
D
F
G
E
H
Twin needle threading.
Page 1: ...INSTRUCTION MANUAL FREE ARM SEWING MACHINE your creative assistant...
Page 2: ...e blocked keep the air wends free form dust fusel and leftovers Never place anything on the foot controller This machine is not intended for use by persons including children with reduced physical sen...
Page 3: ...ions 12 Levelling machine 13 Adjusting thread tension 14 Changing needle 15 Insert darning plate 15 Fabric Thread Needle table 16 Sewing pattern selector and operation table 17 To start sewing 18 How...
Page 4: ...attern selector dial 3 Spool pins 4 Bobbin winder stopper 5 Hand wheel 6 Stitch length dial 7 Reverse button 8 Thread guide and needle clamp 9 Extension table 10 Shuttle cover 11 Presser foot 12 Face...
Page 5: ...4 REAR VIEW 1 Bobbin winder spindle 2 Upper thread guide 3 Presser foot lever 4 Thumb screw 5 Needle plate 1 3 4 5 2...
Page 6: ...5 ACCESSORIES Needle plate screw driver Screw driver Zipper foot Needle Buttonhole cutter Darning plate Bobbin Felt Zigzag foot on machine Buttonhole foot...
Page 7: ...maintenance work to the machine so that you prevent deadly peril and electric shock Bulb replacement 1 Open face cover in direction of arrow 2 Remove bulb by unscrewing it counter clockwise 3 Install...
Page 8: ...1 This sewing machine can be used as a flat bed machine but easily converts to a free arm machine by removing the extension table 2 Especially useful for sewing sleeves pant legs tubular fabrics etc...
Page 9: ...ge coupling knob Push bobbin winder spindle in direction of the arrow When bobbin winding is completed return spindle to its original position When bobbin winding is incorrect release the screw of the...
Page 10: ...ull 5 cm of thread from bobbin and insert it into bobbin case as shown 3 Pull the thread through the slot and under the tension spring and draw out about 10 cm of thread Making sure the bobbin turns i...
Page 11: ...E 1 Raise the needle to its highest position Pull the thread to the front open the latch of the bobbin case and hold it 2 Holding the latch open place bobbin case onto the center pin in the shuttle an...
Page 12: ...11 THREADING UPPER THREAD Pass the thread from A to H as shown A B C D F G F C G D B E E H H Twin needle threading...
Page 13: ...p the upper thread by which the lower thread will be brought up in a loop 2 Pull out both threads and place them together under presser foot to the rear of the machine 3 Place fabric under presser foo...
Page 14: ...13 LEVELLING MACHINE Down Up...
Page 15: ...usted by turning the thread tension dial Lower thread tension can be increased by turning the screw of the bobbin case slightly to the right clockwise Turning it to the left counter clockwise decrease...
Page 16: ...le clamp screw securely INSERT DARNING PLATE Sometimes you will want to control the feeding of fabric yourself Turn the needle bar to its highest position and raise the presser foot over the needle pl...
Page 17: ...ation of Upper Tension Straight stitch ZZ Stitch Length Dial Light Nylon 80 Cotton 70 10 1 3 1 4 Tricot 60 S Fiber silk Silk 50 Silk Wool silk 50 S Fiber silk 80 12 Medium Gingham 60 80 Cotton 80 90 1...
Page 18: ...ser foot Darning plate A Straight stitch B E Zigzag F Blind stitch G Blind hem H Three step zigzag stitch I Slant over edge J Single overlock stitch K Honeycomb stitch L Zigzag stitch M Straight stret...
Page 19: ...presser foot 4 Depress foot speed control and start to sew 5 Test the machine stitches on a scrap of fabric you plan to use adjusting the machine for the length of the stitch and tension suitable to...
Page 20: ...seam 2 Push the reverse button and sew in reverse for about 3 4 cms 3 Raise needle to its highest position 4 Lift the presser foot and pull the fabric out of the back of the machine 5 Cut threads as...
Page 21: ...ector position Satin stitching can be used for sewing initials patterns appliqu etc AUTOMATIC EMBROIDERY These stitches have a wide range of decorative and utility applications and are particularly su...
Page 22: ...G Use these stitches for oversewing rough edges STRAIGHT AND ZIGZAG STRETCH STITCHES Use this stitch with knitted tricot or other stretchy fabrics The stitch enables your seam to stretch without break...
Page 23: ...22 BLIND STITCH Optional 1 Fold fabric as shown 2 Finish the seam as shown...
Page 24: ...23 Adjust the width to obtain the correct seam Wrong Needle is not piercing edge to fold at all Correct seam Needle pierces the edge of fold too much...
Page 25: ...it firmly 3 Place the button between presser foot and fabric and lower the presser foot 4 Manually turn hand wheel towards you ensuring that the needle enters into both holes of button without obstruc...
Page 26: ...hus preventing sewing on zipper 2 Place zipper foot in position and attach firmly 3 Fold the fabric about 2 cm and place the fabric under foot 1 To sew the left side of the zipper set the zipper on th...
Page 27: ...to 1 position 2 Sew left side 3 Raise the needle 4 Set dial to 2 position 5 Sew 5 6 stitches 6 Raise the needle 7 Set dial to 3 position 8 Sew right side 9 Raise the needle 10 Set dial to 4 position...
Page 28: ...oot by pulling the threads 3 Lower the foot and sew the hem 4 While sewing fold the fabric to the left a little and guide it into the hemmer foot 5 Make sure that the fabric does not move under the ri...
Page 29: ...the third widest stitch width as this will break the needles ATTENTION When using the twin needle adjust the stitch width to maximally 3 Adjusting the stitch width to a higher number causes the needl...
Page 30: ...e quilter to the required stitch distance SEAM GUIDE Optional 1 Use the seam guide to sew long seams of an equal distance from the edge of the fabric 2 Screw the guide on the right side of the needle...
Page 31: ...leaning shuttle race A Latch knob B Shuttle race cover C Shuttle hook Open face cover and oil the parts indicated 1 Raise needle to its highest position 2 Take out the bobbin case 3 Turn the latch kno...
Page 32: ...upper thread tension Bent needle Scratches or nicks on bobbin case Re adjust zigzag width Re thread machine Reduce upper thread tension Replace needle Polish or replace bobbin case Breaking bobbin th...
Page 33: ...r for possible repair or replacement If the retailer fails to resolve the problem and you need to return the machine make sure that The unit is packed carefully back into its original packaging Proof...
Page 34: ...exchange the product in terms of this warranty subject to legislative requirements This warranty shall be valid only where the customer has not broken the product himself or used the product for somet...
Page 35: ...34 273456203 A 12 11 08...