background image

Empava Gas Rangetops

15

SURFACE BURNER IGNITION

To ligh he top burners, push and turn the appropriate control knob counter clockwise to the “HI”
posi on. You will hear a clicking noise the sound o he electric spark igni ng the burner. Once burner
igni on has been achieved, then turn the burner control knob to adjus he desired heat se ng.

NOTE:

When one burner is turned to the “HI” posi on, the burner igniters will park. Do not a emp o

disassemble or clean around any burner while another burner is on. Do no ouch any burner cap,
burner base, or igniter while the igniters are sparking.

FOR THE MODELS WITH GRIDDLE
Before Using the Griddle

1. Clean the griddle thoroughly with warm, soapy water to remove dust or any protec ve coa ng.
2. Rinse with clean water and wipe o

o dry with so , clean, lint-free cloth.

3. A stainless steel cover tha s sized to fit on top o he surface when the griddle is not being used is
provided. Please note tha he cover must be removed before turning the griddle on.
4. Make sure the grease tray is under the front edge o he griddle. Posi on the tray under the griddle
overhang to catch grease or food residue.

Use o he griddle

1. Push and turn the control knob counter-clockwise to the preferred cooking temperature.
2. Prehea he griddle for 10-12 minutes.
3. When the griddle is preheated to the desired temp., the indicator light will turn on.
4. Bu er or cooking oil can be added for more flavor, then plate the food to cook.

The surface o he griddle is hot a er use. Please allow sufficien

me for the griddle to cool prior to

cleaning.

Summary of Contents for EMPV-30GC30

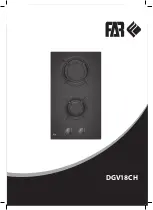
Page 1: ...Empava Gas Rangetops PROFESSIONAL GAS RANGETOPS USER MANUAL INSTALLATION GUIDE Models EMPV 30GC30 EMPV 36GC31 EMPV 48GC32 ...

Page 2: ...y Please read through this manual prior to installation it contains important information to help you properly use maintain your new gas rangetop IMPORTANT NOTE Inspect the product and packaging to verify no shipping damage to the product DO NOT return this product to the original seller Please give us a call and we will do our best to help you STOP Questions 1 888 682 8882 WWW empava com 15253 Do...

Page 3: ...y and amperage must be supplied to the appliance from a dedicated grounded circuit breaker or me delay fuse Empava gas rangetop are manufacture for use with natural gas or liquid propane gas LP Features and specifications are subject changeatany mewithout no ce Visit empava com for the most up to date informa on or call us at 1 888 862 8882 during regular office hour 9am 5pm M F PST To ensure the saf...

Page 4: ... performed by a qualified or licensed contractor plumber or gasfi er qualified or licensed by the state province or region where this appliance is being installed Only use gas shut off valves approved for use within the state province or region where this appliance is being installed A flexible gas connector when used must not exceed 3 9 m WHAT TO DO IF YOU SMELL GAS DO NOT try to light any appliance D...

Page 5: ...benzene soot and carbon monoxide This is caused primarily from the incomplete combus on of natural gas or LP gas Properly adjusted burners will minimize incomplete combus on By opening a window using a ven la ng hood or fan can minimized the exposure to these substances Proper installa on Empava gas rangetop must be properly installed and grounded by a qualified technician in accordance with the Na...

Page 6: ...uct WARNING DO NOT TOUCH SURFACE BURNERS OR AREAS NEAR THESE BURNERS Surface burners may be hot a er use even though the flame is not visible or contac he surface directly Areas near surface burners may become hot enough to cause burns during and a er use Do not let clothing or other flammable materials to contact with areas near surface burners un l they have had sufficien me to cool down WARNING NEV...

Page 7: ...r new range top install it or have them recommend a qualified installer Installa on must conform with local codes In the absence ofl ocal codes the installa on must conform with the Na onal Fuel Gas Code ANSI Z223 1 Latest Edi on in the U S A or the CAN CGA B149 1 or 2 Installa on Codes in Canada The range top should be connected to the supply line with 1 2 inch black iron pipe or a cer fied flexible ...

Page 8: ...ply Teflon tape or a thread compound approved for use with LP or Natural gases to all threaded connec ons Install a manual gas line shut off valve in the gas line in an easily accessed loca on outside the range in the gas piping external to the appliance for the purpose o urning on or shu ng off gas to the appliance Install male 1 2 30 or 36 inch rangetop or 3 4 48 inch range top flare union adapter t...

Page 9: ...mum of 6 15 2 cm side clearance from the Range top to such combus ble surfaces above the 36 91 4 cm counter height Within the 6 15 2 cm side clearance to combus ble ver cal surfaces above 36 91 4 cm the maximum wall cabinet depth must be 13 33 0 cm and wall cabinets within this 6 15 2 cm side clearance must be 18 45 7 cm above the 36 91 4 cm high counter top Wall cabinets above the range top must ...

Page 10: ...CSA Clearances to non combus ble materials must be approved by the authority having jurisdic on This range top may be installed directly adjacen o exis ng 36 91 4 cm high base cabinets The range top CANNOT be installed directly adjacen o sidewalls tall cabinets tall appliances or other side ver cal surfaces above 36 91 4 cm high There must be a minimum of 6 15 2 cm side clearance from the range to...

Page 11: ...nding plug The plug must be plugged into a mating outlet Make sure there is a power outlet within the reach of the range top s power supply cable within 36 30 cm from the right side of the range top The outlet should be accessible with the range top installed Empava Gas Rangetop must be properly grounded for safe operation DO NOT ground the rangetop to any of gas line gas pipe ...

Page 12: ...Empava Gas Rangetops 11 PRODUCT DIMENSION Make sure the counter top cut ou ollow the dimensions given in the illustra on below The cabinetry material below rangetop must be non combus ble material ...

Page 13: ...e rangetop from its package and set aside all burners burner caps and cooking grates ž Gently slide in the range top halfi nto the cut out make sure your gas connec on and electrical power plug are properly installed ž Once this is done you re now ready to slide the rangetop all the way back to the wall ž Install all burners and burner caps ž Install all grates ...

Page 14: ... on In Canada flexible connectors should be single wall metal connectors less than 6 feet 182 9 cm in length Shut off the main gas supply valve before removing the old cooking appliance if applicable and leave it off un l the new hook up has been completed Don t forget to relight the pilots on other gas appliances when you turn the gas back on Because hard piping restricts movement of the range top t...

Page 15: ...ot handle Keep handles out o he way Turn handles so tha hey don t extend over the edge o he range or another burner tha s on Take care when deep frying Oil or fat can overheat very quickly par cularly on a high se ng Make sure that all burner parts are properly in place Incorrectly or incompletely assembled burners may produce dangerous flames See Replacing the burner parts in Care and cleaning Kee...

Page 16: ...warm soapy water to remove dust or any protec ve coa ng 2 Rinse with clean water and wipe o o dry with so clean lint free cloth 3 A stainless steel cover tha s sized to fit on top o he surface when the griddle is not being used is provided Please note tha he cover must be removed before turning the griddle on 4 Make sure the grease tray is under the front edge o he griddle Posi on the tray under th...

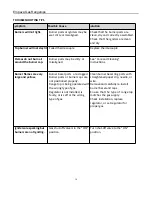
Page 17: ...instruc ons Burner flames are very large and yellow Burner bezel ports are clogged Burner ports or burner caps are not posi oned properly Range top is being operated with the wrong type of gas Regulator is not Installed is faulty or is se or the wrong type of gas Clean burner bezel ring ports with straightened paper clip needle or wire Remove and carefully re install burner bezel and caps Ensure th...

Page 18: ...s And sump area Once clean reignite top burners No igni on spark Dead ba eries or igni on module failed Replace ba eries and a empt igni on If There is s ll no spark igni on the range top burners can s ll be used To ligh hem 1 Holding a lit match to the flame spreader push in on the control knob and turn counter clockwise to LIGHT 2 When the flame is burning all the way around the burner you may adj...

Page 19: ...he above limita on may not apply to your implied warranty Empava will pay for 1 All repair labor and cost of replacement parts found to be defec ve due to material and workmanship Service must be provided by a Empava Authorized Service Agency during normal working hours 2 For any ques on regarding our product or need for service please contact us at 1 877 288 8099 during regular business hour Empa...

Page 20: ...e loca on or is not installed in accordance with published installa on instruc ons 8 This warranty is void i he factory applied serial number has been altered or removed from your range 9 Repairs to parts or systems resul ng from unauthorized modifica ons made to the appliance 10 Expenses for travel and transporta on for product service if your range is located in a remote area where service by an ...

Page 21: ...1 888 682 8882 technical informa on and parts sales in the United States or to request service for your appliance please have your complete model number and serial number ready The model and serial number can be found on the product data plate Please enter the informa on requested in the spaces provided Purchaser_____________________________ Purchase Date ____________________________ Model Number ...

Reviews: