background image

Page 23

Performing A Dirac Live Room Calibration

Filter Design

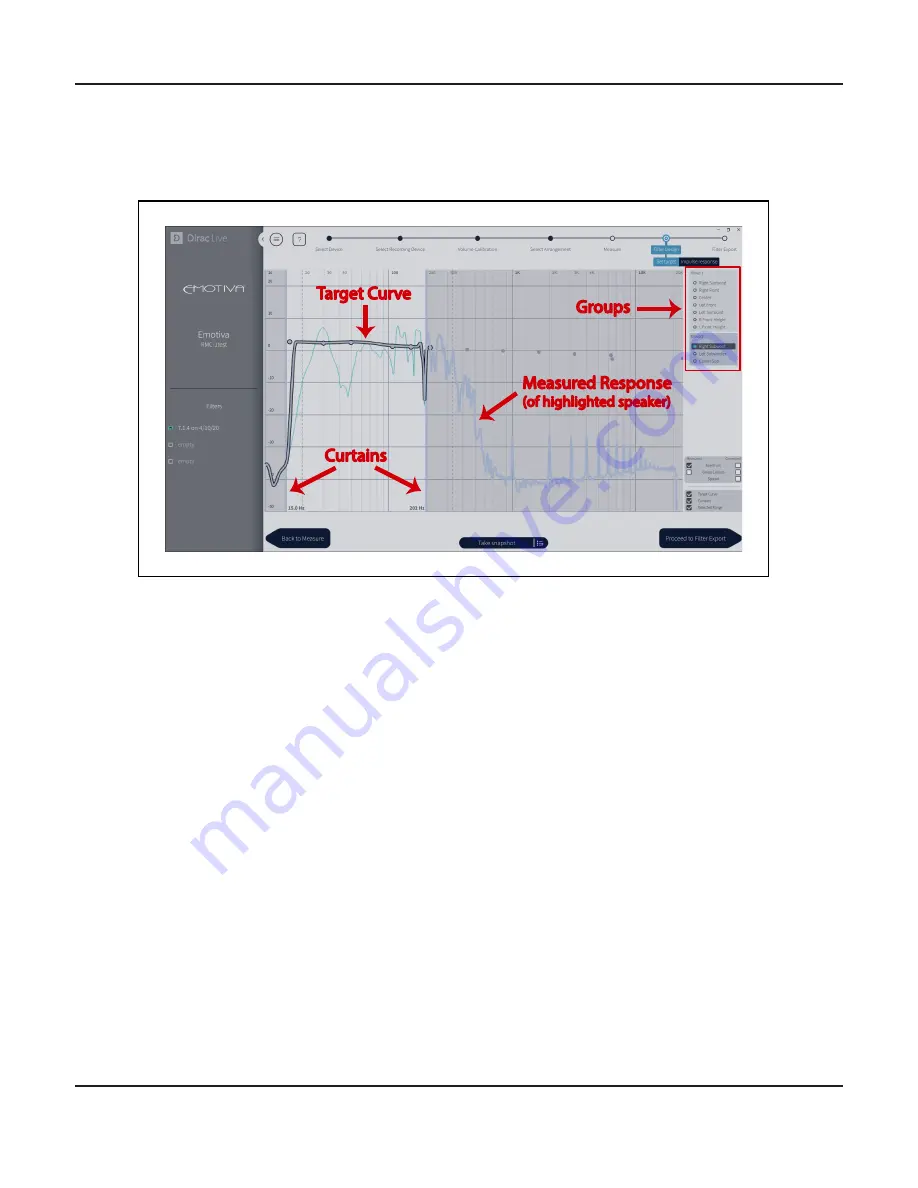
The following illustration shows the important parts of the Filter Design screen.

Dirac Live room correction works by using a series of test tones to measure the frequency 

response of your system and room, analyzing the results, comparing them to a desired frequency 

response Target Curve, and calculating a set of Correction Filters that will adjust the frequency 

response of your system and room so that it matches the Target Curve. (Dirac Live also performs 

calculations that enable it to correct phase anomalies as well as variations in frequency response.)
The 

Measured Response

 represents the combined frequency response of your system and room 

that Dirac Live has determined from its measurements. Depending on how you have the program 

configured you may see a single line representing the combined frequency response of all of your 

channels or a separate line for each channel.
The 

Target Curve

 represents the frequency response which Dirac Live will attempt to achieve. 

After analyzing your system Dirac Live will suggest a Target Curve. You may then adjust this Target 

Curve to suit your personal preference by dragging the small circles located along the curve up or 

down.

Note: Most people agree that, in a typical listening room, a measured flat frequency response 

actually sounds somewhat bright, and that a curve that slopes slightly downwards towards the 

high frequencies actually sounds more natural.

The 

Curtains

 represent the upper and lower limits of the range of frequencies which Dirac Live 

will attempt to correct. The range of frequencies that lies in the bright area “between the curtaibs” 

will be corrected. Frequencies outside that range will remain uncorrected.

Summary of Contents for RMC-1

Page 1: ......

Page 2: ......

Page 3: ...Emotiva Processors Dirac Live for Emotiva ProcessorsAutomatic Room on RMC 1 STANDBY Differential Reference HDMI 1 Reference Stereo Volume 35 0dB A HDMI 1 PCM 2 1 44kHz 20bits V HDMI 1 1080P 60 8bits...

Page 4: ...DIRAC LIVE SOFTWARE WHICH WORKS WITH OUR CURRENT PROCESSORS WILL NOT WORK WITH OUR LEGACY XMC 1 PROCESSOR If you have an XMC 1 you must download or purchase the correct version of Dirac Live LE for E...

Page 5: ...Together they give you far more accuracy and control than even the most experienced expert had at his or her disposal a few years ago However while performing frequency response corrections manually c...

Page 6: ...computer The current version of this software is standardized between all current processor models that offer Dirac Live automatic room correction Because of this as updates and new features are added...

Page 7: ...be located symmetrically and your center will actually be located in the center of the front wall While your particular listening room may limit your options the closer you can get to this goal the b...

Page 8: ...tioned accurately where your head is normally located while listening critically Note The calibrated microphone provided with your processor is intended to be used vertically with the point facing ver...

Page 9: ...activate your Dirac Live user account and download the latest version of the Dirac Live software Here are the steps required to use Dirac Live UPDATE THE FIRMWARE ON YOUR PROCESSOR TO THE CURRENT VER...

Page 10: ...ectly wired and the computer connected via WiFi will work for most users who have a fast stable WiFi connection If you have multiple routers or access points you must ensure that the computer and othe...

Page 11: ...tiva Dirac Network Interface Desktop or Laptop Computer RMC 1 RMC 1L XMC 2 Simplest Wireless Network Connections All wired connections shown are Ethernet except microphone USB Cable Modem or Wireless...

Page 12: ...g it for the first time you must visit the web page link included in your welcome letter and on the product page and follow the instructions to enter some basic information about your processor to act...

Page 13: ...n We assume you have already downloaded and installed the DIiac Live software Your microphone should be plugged into your computer via the included USB digitizer cable The Emotiva Dirac Network Interf...

Page 14: ...ee Dirac Filter presets for EACH of the main speaker presets Speakers Preset 1 Dirac 2 Dirac 1 Dirac 3 User Distance Levels Size Name Equalization Dirac Live Enable Shutdown Remote Set Distances Set L...

Page 15: ...Preset with a particular input or manually switch between the two Speaker Presets using the Menu or the remote control When you select one of the Speaker Presets in the Setup Menu and enable Dirac Liv...

Page 16: ...y and turned off anything else that makes a lot of noise Starting The Dirac Live Room Calibration Process On Your Processor On the RMC 1 RMC 1L or XMC 2 processor Select Menu Setup Speakers Preset 1 o...

Page 17: ...ve software program The first time you run the Dirac Live software you may see the following screen If so enter the User Name and Password you seleted when you activated your Dirac license and created...

Page 18: ...nient location Note Always be sure to use the specific calibration file that has been provided with the microphone you are using All of the current batch of calibrated measurement microphones provided...

Page 19: ...Gain as high as possible while being careful to avoid allowing the background noise in the room to interfere with the accuracy of our measurements So while being as quiet as possible raise the Mic Gai...

Page 20: ...or you hear no test tones stop the test and call Emotiva Technical Support Start by sliding the Master Output level tab all the way down Now click on the small triangle under the speaker you ve chosen...

Page 21: ...e level for all of the speakers you have configured If the channel sliders for some of your speakers scroll off the right edge of the screen you can access them by pressing the symbol at the right edg...

Page 22: ...are optimized for a somewhat wider range of listening positions A more focused choice will deliver the most accurate listening experience at the central seating position a wider focus offers a slightl...

Page 23: ...et In any case you MUST take the central measurement at your preferred listening location Note In order to make accurate measurements the calibrated microphone must have an unobstructed path between i...

Page 24: ...ke the one below while the test tones are playing After each set of test tones is completed you will see the screen below where you will be shown the results of the measurement that has just been comp...

Page 25: ...ing on how you have the program configured you may see a single line representing the combined frequency response of all of your channels or a separate line for each channel The Target Curve represent...

Page 26: ...a unique set of Curtains and Target Curves to each of these Groups The Groups assigned by Dirac Live will work well for most users but you may create new Groups move speakers between Groups or combine...

Page 27: ...annel configuration The Name that you use here will be visible in the Speaker Preset on your processor but the Description will NOT be visible on the processor Note You will ONLY see the list of Dirac...

Page 28: ...you should SHUT DOWN the Emotiva Dirac Network Interface device and unplug it You may shut down the Emotiva Dirac Network Interface by checking the Shutdown Remote check box in EITHER Speaker Preset N...

Page 29: ...Speaker Preset Remember WHEN YOU CHOOSE TO USE A DIRAC FILTER SET IN ONE OF THE SPEAKER PRESETS IT IS VERY IMPORTANT THAT THE SPEAKER CONFIGURATION YOU HAVE SET IN THE SPEAKER PRESET MATCH THE CONFIG...

Page 30: ...___________________ All information contained in this manual is accurate to the best of our knowledge at the time of publication In keeping with our policy of ongoing product improvement we reserve th...

Page 31: ......

Page 32: ...Emotiva Audio Corporation 135 Southeast Parkway Court Franklin TN 37064 emotiva com...

Reviews: