background image


4


|

 ENGLISH


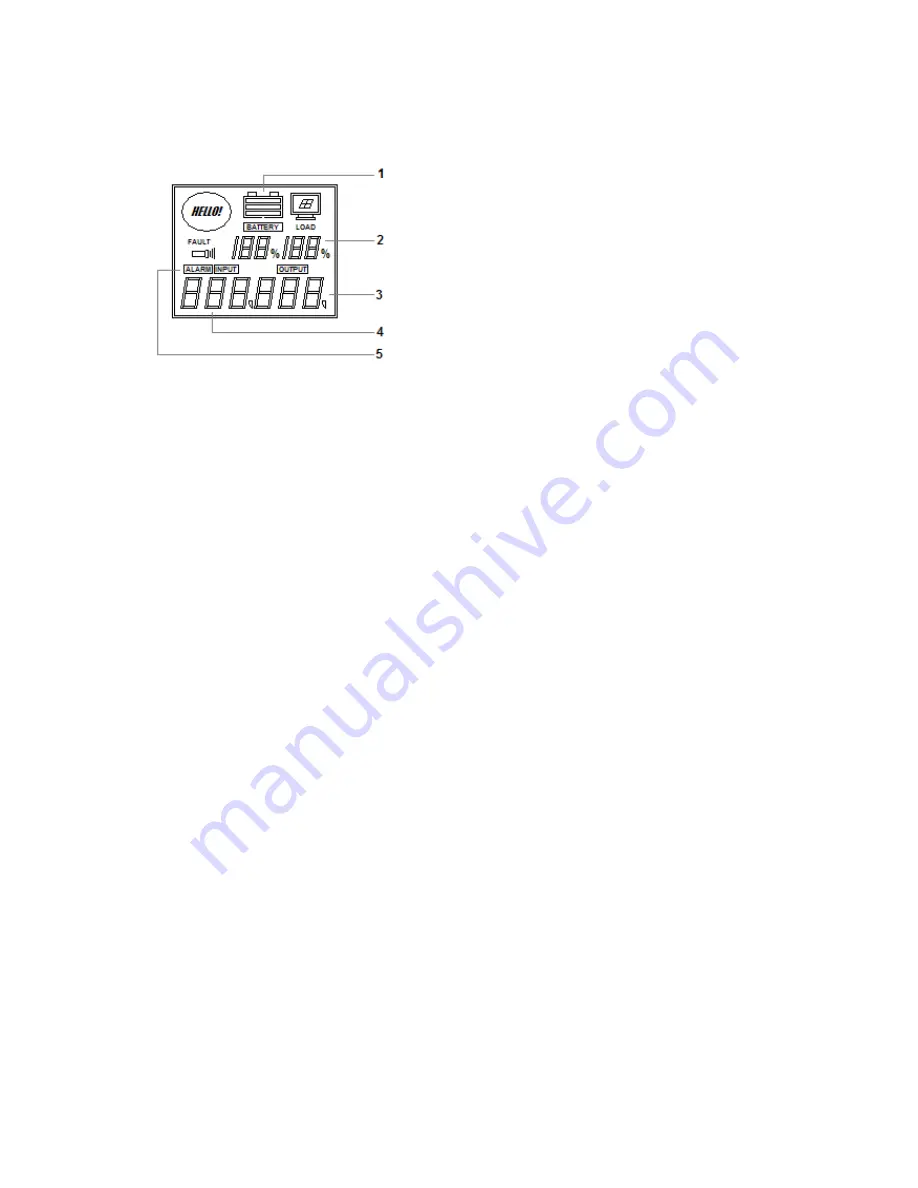
The EM3984 and the EM3988 are equipped with an LCD display instead of LEDs. The 
display shows the following information: 


(1)  The status of the battery 
(2)  Power usage in percent 
(3)  Output voltage 
(4)  Input voltage 
(5)  Alarm indication 

Follow the instructions below to connect the UPS: 
 
1. 

Connect the serial cable to the computer and to the UPS. 

2. 

Plug the UPS power cable into a wall outlet. 

3. 

Connect one end of the supplied power cable to the back of the UPS. Connect 
the other end to the power supply of your computer. 

4. 

If you wish, you can use an additional patch cable to connect the power supply of 
your monitor to the UPS. 

5. 

Optionally, to protect your telephone line from the effects of a lightning strike, you 
can connect the telephone cable from the wall outlet to one of the ‘TEL/FAX’ 
ports and your telephone, fax or modem to the other ‘TEL/FAX’ port. 

6. 

Press the on/off button on the front of the UPS to turn it on. You will hear a short 
beep. 

2.0 UPSmart 2000R software 

The EM3980/EM3982 is supplied with UPSmart 2000R software. This software 
package enables you to view the status of the UPS and change multiple settings. 
During a long lasting power failure the software will correctly shut down your computer 
before the battery of the UPS is drained 

2.1 Installing the software  

1. 

Insert the CD-ROM into the CD-ROM drive or DVD drive of your computer. 

2. 

The Setup menu of the software will automatically appear. 

3. 

Click ‘Next’. 

4. 

You will now be asked to enter a username, company name and serial number. 
Enter this information. The serial number can be found on the sleeve of the CD-
ROM. 

5. 

Click ‘Next’. 

6. 

Select the installation path and click ‘Next’. 

7. 

Enter an installation folder name and click ‘Next’. 

8. 

Click ‘Next’. 

Summary of Contents for EM3980

Page 1: ...EM398x R1 UPS 600 1000 1600VA...

Page 2: ...nnecting the UPS 7 4 2 Settings 8 5 0 Frequently Asked Questions and other related information 9 6 0 Service and support 9 7 0 Warning and points of attention 9 8 0 Warranty conditions 10 1 0 Introduc...

Page 3: ...EM3982 1000VA UPSmart 2000R EM3984 1600VA UPSmart 2000I EM3988 1600VA UPSmart 2000I 1 2 Packing contents The following parts need to be present in the packing The EM3980 82 84 or EM3988 UPS Serial ca...

Page 4: ...wall outlet to one of the TEL FAX ports and your telephone fax or modem to the other TEL FAX port 6 Press the on off button on the front of the UPS to turn it on You will hear a short beep 2 0 UPSmar...

Page 5: ...e a number of menu options We will summarize these options below Settings The menu option Settings allows you the change a large number of settings By clicking General Settings you can set the communi...

Page 6: ...xt 6 Enter an installation folder name and click Next 7 Click Next 8 Click Install 9 Click Finish to finish the installation of the software 10 Start the UPSmart 2000I software 11 A new screen with ni...

Page 7: ...d closed by UPSmart 2000I can be viewed here UPS Control This allows you to perform several self tests About Here you can find certain information about UPSmart 2000I such as the version and the seria...

Page 8: ...how many seconds this signal should repeat itself Critical alarm Under Critical Warning you can indicate if an there should be an alarm signal when the battery of the UPS is almost drained Check Minut...

Page 9: ...ons concerning its use in certain European member states In certain European member states the use of such devices could be prohibited Contact your local government for more information about this lim...

Page 10: ...overed by the Eminent warranty when exposed to incorrect improper use external influences or when opening the service parts of the product by parties other than Eminent Eminent may use refurbished mat...

Reviews: