background image

RXi HMI User Manual 

Section 3 

GFK-3231A 

Jan 2022 


RXi HMI Windows Activation 

Section 3:


RXi HMI Windows Activation 

The preloaded Windows 10 IOT Enterprise image on RXi HMI is 

activated by Default

The product 

key is embedded with the Windows. 

By default, the user must enable each device for activation. 


Each device is subject to one of three potential states : 


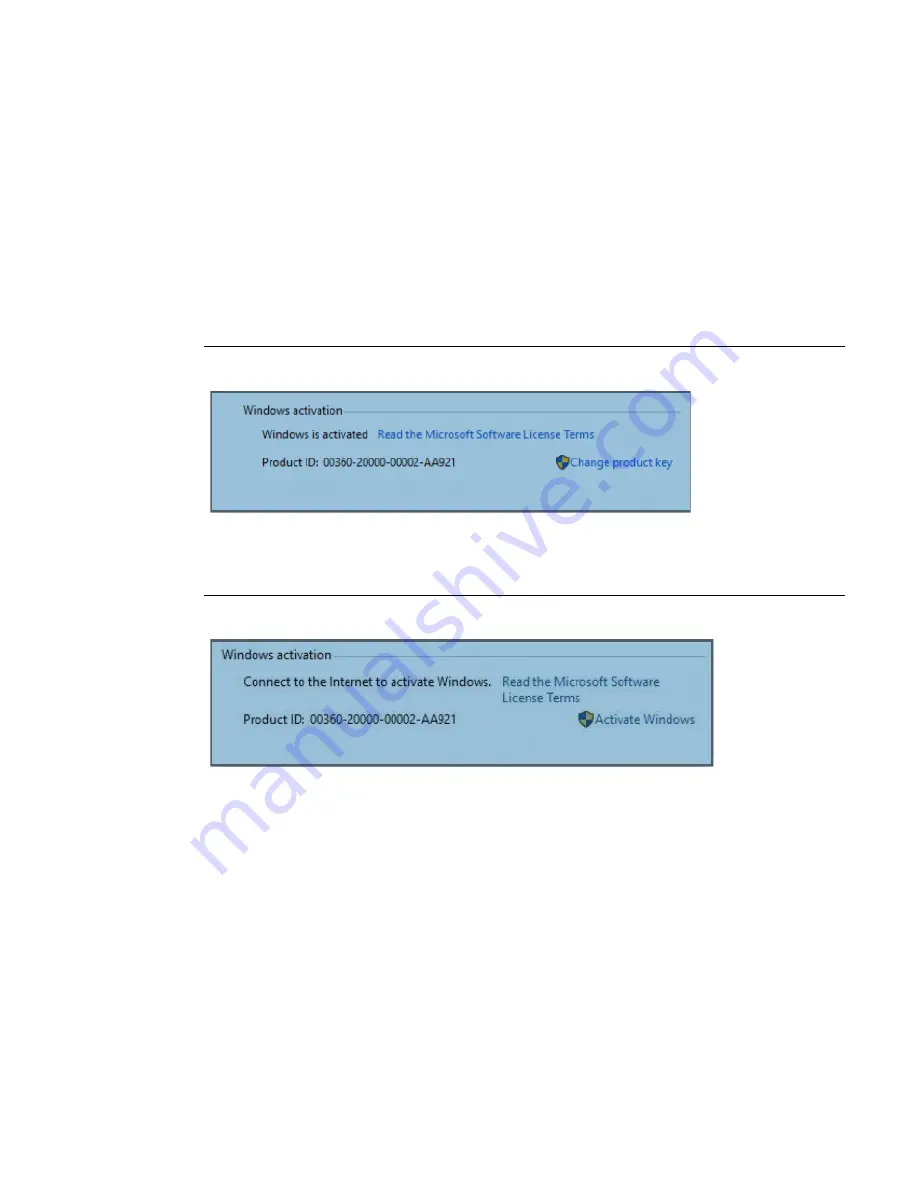
Activated State: If the device is connected to the Internet, the device will automatically activate 
over the Internet (Figure 1). 

Figure 1: Activated State 


Deferred Activation State: If the device is not connected to the Internet, it will remain in a deferred 
activation state (Figure 2). 

Figure 2: Deferred Activation state 


Note

: The Windows Activation dialog box will display Connect to the Internet to Activate Windows, 

but it may not display the Activate Windows icon nor reduce functionality.  


Summary of Contents for RXi HMI

Page 1: ...RXi HMI User Manual GFK 3231A Jan 2022 RXi HMI USER MANUAL ...

Page 2: ...ject Window 17 4 1 3 Profilo Info 18 4 1 4 Self Signed Certificate Generation Steps 21 4 1 5 Restore Last Open Screen and Zoom 27 4 1 6 Communication Error 27 4 1 7 Supported Drivers for Movicon WebHMI 28 4 2 Licensing 31 4 2 1 Movicon Editor Licensing 31 4 2 2 Checking Movicon WebHMI Runtime License 33 Section 5 RXi HMI OI Utilities 36 5 1 Launch Application 38 5 2 Settings 39 5 2 1 Import Regist...

Page 3: ...le 69 7 5 2 Scenario 2 Windows File System Corrupted 70 7 6 Obtaining License Files 70 Section 8 Accessing the BIOS 71 8 1 BIOS Settings 71 8 1 1 Accessing the BIOS RXi HMI 71 Section 9 Mounting Information 87 9 1 Panel Mount 87 9 1 1 Panel Cutout Dimensions 87 9 1 2 Installation Steps 88 9 2 Mounting to Modular Display 90 9 3 VESA Mount 93 9 3 1 VESA Mount Dimensions 93 Section 10 Physical Connec...

Page 4: ...31A Jan 2022 Contents iii 10 7 LVDS LCD Panel Connector 98 10 7 1BIOS Setting 98 10 8 Audio 98 10 8 1Rear Audio 98 10 9 Battery 99 Appendix A Open Source Software Used by RXi HMI 100 General Contact Information 101 Technical Support 101 ...

Page 5: ...ring installation operation and maintenance The information is supplied for informational purposes only and Emerson makes no warranty as to the accuracy of the information included herein Changes modifications and or improvements to equipment and specifications are made periodically and these changes may or may not be reflected herein It is understood that Emerson may make changes modifications or...

Page 6: ...ifications Web HMI project files can be configured and deployed to the RXi HMI using the Movicon NExT configuration tool which can be installed on a separate computer or laptop 1 1 Movicon Development Help This documents centers on configuration of the RXi HMI hardware For help with the Movicon WebHMI development environment please consult the Movicon User Manual listed in the following section 1 ...

Page 7: ...acklight LED Dimmable via Software Processor Chipset AMD Embedded G Series SOC Chipset Drivers AMD 2 16 12 341RL Processor GX 412GC of cores TDP 4 15W CPU frequency L2 Cache GX 412GC 1 2GHz 2MB GPU frequency GX 412GC 300MHz AMD Graphics Driver 20 50 23 01L Memory Capacity 4GB DDR3L Soldered with ECC 40 C 85 C Storage Internal 64 MLC SSD SATA Slim 40 C 85 C External Slot 1 x External Micro SD SDHC ...

Page 8: ...P20 Open Type product for mounting in an ultimate enclosure Pollution Degree 2 environment Operating System Installed Standard Windows 10 IOT Enterprise LTSC Software Tools Tool 1 Secure Trusted Boot Capability Tool 2 DHCP Client Web Browser IE or Google Chrome Java JRE Capability Secure Trusted Boot Item 1 On Board TPM2 0 Design Housing Aluminum Die Casting Front Construction Type Modular Detacha...

Page 9: ...mation Technology Equipment UL CSA 62368 1 UL and cUL Class 1 Division 2 Programmable Controllers for Use in Hazardous Locations UL CSA 61010 2 201 UL 121201 CSA C22 2 No 213 IECEx ATEX Zone 2 22 Hazardous Locations IEC EN 60079 0 IEC EN 60079 7 IEC EN 60079 31 IECEE CB Scheme IEC 61010 2 201 UL TYPE 4 4X IP66 ANSI IEC 60529 Marine DNV ABS BV LR ...

Page 10: ...1920x1200 60Hz BIOS AMI SPI 64Mbit Storage 1 x Micro SD 1 x SATA 3 0 7 15pin Ethernet 2 x Intel I210IT 40 to 105 C PCIe 10 100 1000Mbps Outside I O 2 x USB 3 0 1 x RS 232 1 x RS 485 1 x Line out 1 x Mic in 2 x GbE RJ 45 1 x DP 1 x Power Button Internal I O 1 x LVDS LCD Panel Connector 1 x AIO DIO 1x30pin Connector JAE TX24 30R 10ST H1E Battery CR2032 Coin Cell Audio Codec 92HD73C Expansion 1 x Min...

Page 11: ...ject to one of three potential states Activated State If the device is connected to the Internet the device will automatically activate over the Internet Figure 1 Figure 1 Activated State Deferred Activation State If the device is not connected to the Internet it will remain in a deferred activation state Figure 2 Figure 2 Deferred Activation state Note The Windows Activation dialog box will displ...

Page 12: ...attempt fails due to an invalid licensing key or one that has exceeded its activation allotment it will enter a Not Activated state Figure 3 Not Activated State After a device has been activated it will remain activated unless a significant change triggers a need to reactivate the device such as a motherboard replacement or completely reimaging the device ...

Page 13: ...tartup Page The user can open the already created project by clicking Open Existing Project Figure 4 WebHMI Project Wizard 3 Add required screens graphical objects tags and configure drivers Note Check the Movicon NExT 4 1 User Manual or online local help for more details about the configuration of Movicon WebHMI Project 4 The Project Type property is one of the project properties that is used to ...

Page 14: ...orted by WebHMI needing to verify the compatibility of a previously developed project with WebHMI visualization Any objects and symbols used in the project and not supported by WebHMI will be highlighted as shown in Figure 6 Figure 6 Datalogger 5 Select the command from the Options Create WebHMI SVG HTML5 menu from the project s toolbar that starts the project s export to SVG as shown below Figure...

Page 15: ...roject window allows you to deploy the project on the RXi HMI along with the I O Data Server and Web Server which are needed to run the WebHMI locally on the HMI Enter User and Password as shown in green color Provide the IP Address of the RXi HMI and port as 5002 IP Address of RXi HMI 5002 as shown in the blue color box Finally click on Connect Commands as shown in the red color box of Figure 9 C...

Page 16: ...ate a self signed certificate are in Section 4 1 4 Self Signed Certificate Generation Steps Figure 10 Error Validation 9 The user will be prompted to deploy the I O Data Server if not found on the RXi HMI as shown below Click Yes to start uploading the I O Data Server to RXi HMI Figure 11 IO Data Server Upload 10 The user will be prompted to deploy the WebHMI Server if not found on the RXi HMI as ...

Page 17: ... shown below Click Yes to start deploying the current project to RXi HMI Figure 14 Deploy Current Project on Target Machine Note If the project is already deployed and the user is trying to download a different project then the user will be prompted to replace the current project as shown in Figure 15 It is always recommended to select Yes Figure 15 Replace Current Project ...

Page 18: ...close the pop up dialog Figure 16 Deployment Completed 13 Start all the enabled servers Figure 17 Figure 17 Start Servers 14 The Movicon WebHMI project can be opened as below on the RXi HMI The project is deployed by the integrated Web Server on ports 5000 HTTP and 5001 HTTPS The default configuration requires that the request received on port 5000 be automatically redirected to port 5001 ...

Page 19: ...Figure 18 Start Browser Note The Start Browser command will schedule the Google chrome browser to start automatically on every reboot with a deployed project When the user restarts the RXi HMI after deploying the WebHMI a dialog will appear with the message Loading WebHMI this could take about 60 seconds as shown in Figure 19 The user can click on the OK button to close this dialog or it will be c...

Page 20: ...me browser with the addresses below then Google chrome browser will not automatically start on every reboot with deployed project The following addresses can also be used by the web browser Example https 192 168 29 73 5001 https localhost 5001 It is also possible to open a different page from the Main page defined in the project by using the following syntax HTTP WebServer_IP_Address 5000 page Scr...

Page 21: ...gned certificate The steps are available in Section 4 1 4 Self Signed Certificate Generation Steps 15 The Movicon WebHMI project can also be launched directly by Clicking on the MoviconWeb HMI icon on the desktop to open the webHMI Project In this scenario chrome browser opens the Movicon WebHMI project in full screen mode Figure 22 MoviconWeb HMI Icon ...

Page 22: ...T Web HMI Configuration 17 4 1 2 Deploy Project Window The Deploy Project window allows the user to deploy the project on the HMI along with the I O Data Server and Web Server which are needed to run the WebHMI locally on the HMI Figure 23 Deploy Project Window ...

Page 23: ... profiles User The username is used to connect to the RXi HMI s Deploy Server Password The password is used to connect to the RXi HMI s Deploy Server Host The RXi HMI s IP address or hostname including the Deploy Server port E g 192 168 0 74 5002 Overwrite Retentive Files The retentive data in the device will be overwritten with those in the project during the project deployment phase The retentiv...

Page 24: ...oject this cancels the project on the RXi HMI Server Startup Starts all the services on the RXi HMI Advanced Server Startup allows the execution of each Runtime component to be started up or stopped Remote License Info Check Remote License displays the RXi HMI s active license options and Site Code Remote License Info Install Remote License this allows the software license to be installed on the r...

Page 25: ...nfo This section shows the information on the remote device s processes and operating system Figure 27 Remote Device Info Scheduled Processes shows the process running on the remote HMI and CPU and RAM usage Process Output reports the actual Syslog file contents on the remote device OS Description shows the versions of the installed Runtime components and information on the HMI s operating system ...

Page 26: ...S development certificate TextExtension 2 5 29 19 critical text 2 5 29 37 critical text 1 3 6 1 5 5 7 3 1 2 5 29 17 critical text DNS DESKTOP HSCFREB Note Make sure to change the Subject and DNS from DESKTOP HSCFREB to your Machine Name as highlighted Be sure to point the web browser to https Machine name 5001 once the machine name has been changed It is advised to generate the certificate for loc...

Page 27: ...ht click on the DESKTOP HSCFREB certificate and choose Copy 4 Select the Trusted Root Certificate Authorities Certificates and right click paste as shown in Figure 1 You will be prompted with a security warning as shown in Figure 30 Figure 30 Security Warning Figure 31 Trusted Root Certificate ...

Page 28: ...31A Jan 2022 Movicon NExT Web HMI Configuration 23 5 Follow the screenshots below to export the certificate into a pfx using the export wizard Figure 32 Export Wizard 6 Follow the Export Wizard prompts Figure 33 Certificate Export Wizard ...

Page 29: ... HMI User Manual Section 4 GFK 3231A Jan 2022 Movicon NExT Web HMI Configuration 24 7 Export the Private Key Figure 34 Export Key 8 Select Personal Information Exchange Figure 35 Certificate Export Wizard ...

Page 30: ...31A Jan 2022 Movicon NExT Web HMI Configuration 25 9 Create and confirm the new password Figure 36 Credentials 10 Browse for the Personal Information Exchange File PFX The file path is Users Public Documentation Progea Figure 37 PFX File ...

Page 31: ...r NExT 4 1 WebHMIServer and also update appsettings json file with the same information as done in Step 16 Figure 39 Add the Kestrel Section Note In these parts you need to change the path and the password with the data that you have used for export the certificate 17 Restart the RXi HMI device Note In this case locally you can connect without any warnings about the certificate If you want to conn...

Page 32: ...e Zoom scenario will not work when the zoom functionality is applied with the touch screen on the RXi HMI device 2 To properly configure the zoom functionality apply the zoom feature with a mouse using the Ctrl button and mouse scroll wheel or use the Chrome settings zoom value 4 1 6 Communication Error When the user stops and starts the server while the WebHMI is already running the values displa...

Page 33: ...the communication protocol INA2000 Automation Fatek Fatek All Fatek Plc supporting FATEK Communication Protocol on TCP Automation GE Emerson GE Ethernet Support GE intelligent platform PLCs series 90 GE intelligent platform micro series Automation Hilscher Hilscher CIFX Fieldbus Multiprotocol Hilscher cifX card for fieldbus PCI interface Automation Mitsubishi Melsec FX PLC MELSEC FX and MELSEC FX2...

Page 34: ...tion SAIA Burgess Saia S BUS Serial All Saia PLCs PCD Series Automation Siemens S7 Ethernet TCP Simatic S7 200 300 400 Vipa System 200v 300v 300s Automation Siemens Siemens PC Adapter MPI Simatic PLCs S7 300 400 Vipa PLCs and compatible device Automation Siemens S7 TIA PORTAL Symbolic Simatic S7 1200 1500 Automation Siemens Siemens PPI Simatic S7 200 and compatible Automation Modbus Modbus Serial ...

Page 35: ...Net IP Any device supporting Bacnet IP Facilities Konnex KNX KNX EIBUS Falcon Ethernet Building automation device supporting or compliant KNX Facilities Endress Hauser Energy Manager RMS621 Endress Hauser Energy Manager RMS621 Facilities SNMP SNMP Manager Device supporting SNMP protocol acting as SNMP Agents Facilities IoT PubNub PubNub IoT Cloud PubNub Applications IOT IoT Progea Databoom IoT Pro...

Page 36: ...g image deployment at the Factory License Daemon checks and identifies HW and gets product SKU from the License file License Daemon reads HW MAC address and writes a MAC address in the license file The license file is a JSON template file with the name license json License is locked to a specific MAC address and uses the OpenSSL toolkit to create a signed digest from the license file The signed di...

Page 37: ...RXi HMI User Manual Section 4 GFK 3231A Jan 2022 Movicon NExT Web HMI Configuration 32 Figure 43 License Validated ...

Page 38: ...icon WebHMI Runtime License 1 Click the Options menu from the toolbar and select the Deploy WebHMI Project to check the Movicon WebHMI Runtime License Figure 44 Deploy WebHMI Project 2 Enter the username password and IP address as seen in Figure 45 Click the Connect command button Figure 45 Connect Command ...

Page 39: ...ser if they want to deploy the current project on the target machine Select No Figure 46 Confirm Running on Target Machine 4 Navigate to the Remote License Info section in Deploy Project Window and click the Check Remote License option to check the Movicon WebHMI Runtime License on RXi HMI Figure 47 Check Remote License ...

Page 40: ...lay window to the user as shown in Figure 48 Figure 48 License Found Note Browse to the Path C Users Public Documents Progea DeployServer NExT 4 1 Projects Project Name Log Open the System Log and check for the string You re running in demo mode This is another way the user can check the Movicon WebHMI Runtime License on the RXi HMI device ...

Page 41: ...ties can be launched from the desktop using the shortcut icon as shown in Figure 49 or from the Start menu as shown in Figure 50 Figure 49 Desktop Icon Figure 50 Start Menu Icon Note Once the user clicks the RXi HMI OI Utilities then the UAC dialog will be prompted as shown in Figure 51 S Click Yes to launch the application ...

Page 42: ...RXi HMI User Manual Section 5 GFK 3231A Jan 2022 RXi HMI IO Utilities 37 ...

Page 43: ...ion An application like Screen Sensitivity Task Manager Device Manager Remote Desktop VNC Server Reboot to reboot the RXi HMI device Control Panel Date Time Taskbar Admin Tools PacsAnalyzer Notepad File Options Volume Settings Network 1 Launch RXi HMI OI Utilities Select Yes on the UAC prompt dialog 2 Navigate to the Launch Application page under RXi HMI OI Utilities 3 Click the icons to launch th...

Page 44: ...at the user can select to save the setting s value to the file Note 1 The System tab of the settings page is not used for setting the values for any device parameters It is only used to make the selection of the parameter settings that the user wants wishes to a file 2 The feature supports saving and restoring static IP addresses 3 Saving and restoring Date Time will save or restore Time Zone info...

Page 45: ...ng the values click the Add button to save the data and the entered data may be viewed as a record in the Registry tab Figure 55 Add Registry Key on Registry Tab The entered data can be edited by selecting the record in the list box and It will update the data by clicking on the Update button We can delete the registry from the registry list as well by clicking on the Delete button All the entries...

Page 46: ...on where the registry value data is available in an XML file and then imported using the Import option in the dialog The schema of the XML data can be seen in the screenshot below Figure 57 XML Schema for Registry 1 Click the Import button and browse for the XML file to be imported Figure 58 Import XML Feature Note The feature does not support editing any registry keys inside HKEY_CLASSES_ROOT ...

Page 47: ... a file click on the Save button It displays the file save dialog allowing the user to select the folder location and provide the file name Click the OK button which is shown in Figure 59 to complete the creation and saving of data to the file Figure 59 Saving the Settings and Registry Values to a File Figure 60 Save Function Successful Notification ...

Page 48: ...HMI 2 Click on the Restore button select Ok when prompted for confirmation which is shown in Figure 61 3 In the Open File dialog browse and select the rbs file from which you would like to restore the data then click on the Open button which is shown in Figure 62 4 Once the rbs file is restored then It will ask to restart the RXi HMI to apply the settings on the device which is shown in Figure 63 ...

Page 49: ...Backlight It allows to configure the backlight brightness Display It allows to change the screen display rotation like 0 90 180 and 270 degrees of RXi HMI Services It allows to enable or disable the FTP and HTTP services SNTP It allows to fetch the network time settings from the configured SNTP server NOTICE To limit distraction the touchscreen will not generate a tone when pressed unless the devi...

Page 50: ...djustment 1 Select the Backlight tab to configure the backlight 2 The user can enable the Automatically Turn off Backlight in and specify an amount of time The time intervals can be configured for 0 seconds min to 5 hours max 3 The user can set the backlight using the slider Figure 64 Backlight Adjustment ...

Page 51: ...rightness 2 The user can adjust the brightness using the slider The leftmost slider movement is set to low brightness and the rightmost slider movement is set to higher brightness The value varies from 0 to 100 Note Additional Parameters can be configured through settings under the control panel Figure 65 Brightness Slider in Backlight Tab ...

Page 52: ...tion 270o degree Rotation Figure 66 Screen Rotation Note Display Screen Rotation cannot be changed when RXi HMI Device is connected through Remote Desktop CAUTION Although Emerson recommends the use of the protective sheet do not operate the touchscreen with any hard materials such as a screwdriver This could damage the touchscreen display 5 3 3 Services Tab Services tab will provide multiple oper...

Page 53: ... status is changed the RXi HMI must be restarted before changes take effect Enable HTTP Server The HyperText Transfer Protocol HTTP server is included with the RXi HMI supports standard RFC 2616 The HTTP server is configured with the RXi HMI Setup Tool By default the server is not enabled Once enabled a background program will run waiting for clients to connect An HTTP server can be accessed throu...

Page 54: ...ver included with the RXi HMI supports SNTP Version 4 for IPv4 IPv6 and OSI By default the server is not enabled The SNTP server supports non secure UDP port 123 operations 1 Check Enable SNTP 2 Select from the drop down or enter the server s name manually to configure the server 3 Click on Update Now 4 The RXi HMI will fetch the date and time from the configured server Note The user can enter mul...

Page 55: ...s to any other RXi HMI from the Removable Media The installed Movicon WebHMI is secured with user and password The user shall be able to proceed only when the credentials are successfully authenticated Note The default user and password are Admin 123 5 4 1 Copy Project CAUTION Before disconnecting power verify that the copy or update operation is complete no busy message or wait cursor To copy a p...

Page 56: ... only a single removable drive is available the system will request the user s profile credentials project deployment credentials Figure 69 Figure 69 Profile Credentials 6 After successful credentials it will launch the below dialog Figure 70 The user needs to click on the Yes button to proceed with copy the projects Figure 70 Copy Confirmation ...

Page 57: ...e user clicks on the Yes button the projects will be copied to removable media as shown in Figure 71 Figure 71 Copy Project Status 8 The status dialog box sill prompt a Copy Done message once projects are copied to the removable media Figure 72 Click OK Figure 72 Copy Project Status ...

Page 58: ...n the user will be prompted with the below message Figure 73 Figure 73 No Removable Media While the project files are copying if the user tries to close the dialog box it prompts the below message Figure 74 to the user If the user clicks Yes it will stop the copying operation If the user clicks on No the project files will continue to copy Figure 74 Copy Still in Progress ...

Page 59: ... projects to the removable media insert this removable media into the RXi HMI hardware and reboot the unit 2 After powerup the unit will prompt the user with the below dialog Figure 75 to proceed to restore copied projects from the removable media to the RXi HMI Figure 75 RestorePCCard 3 The user will now see the drive selection screen as shown in Figure 76 Note If there are only one removable med...

Page 60: ...rome browser in full screen mode Once the Chrome browser is launched it can take up to one minute for the WebHMI screen to load completely Note While the project files are copying if the user tries to close the dialog box it prompts the below message Figure 79 to the user If the user clicks Yes it will stop the copying operation If the user clicks on No the project files will continue to copy Figu...

Page 61: ...eps need to be performed for each user 4 Select the Enable Disable option as shown in Figure 80 Enter the username password and domain if available and click Apply If the entered credentials are valid then the Auto Logon feature will be enabled disabled for the specific user The user will be prompted to either Reboot Now or defer to later as shown in 5 Figure 81 If the entered credentials are not ...

Page 62: ...n The System Information tool is used to configure various system parameters Parameter Description Device Information Displays information about this device Drives Information Displays information about the mounted drives System Information Displays configured system parameters Display Information Displays information about the video display Network Information Displays the assigned network parame...

Page 63: ... Navigate to the Movicon WebHMI page under RXi HMI OI Utilities 3 Click on the Start WebHMI button as shown in Figure 83 4 WebHMI screen will run automatically in chrome browser with full screen mode 5 If the project is not deployed then the Chrome browser will run automatically and display the message that A Movicon WebHMI project couldn t be found on the device for the first time Please download...

Page 64: ...RXi HMI User Manual Section 5 GFK 3231A Jan 2022 RXi HMI IO Utilities 59 ...

Page 65: ...er and old Password 4 Enter the New Password and Confirm Password 5 Click on Apply to change the password in Figure 85 A confirmation dialog will be prompted as shown in Figure 86 Click OK to proceed further 6 If the user and old password are not valid then the error dialog message Incorrect User Or Current Password will be prompted as shown in Figure 87 7 If the WebHMI credential is valid the pas...

Page 66: ...RXi HMI User Manual Section 5 GFK 3231A Jan 2022 RXi HMI IO Utilities 61 Figure 87 Error Message Figure 88 Success Message ...

Page 67: ... Desktop Connection and then select Remote Desktop Connection 3 In Remote Desktop Connection type the IP Address of the RXi HMI you want to connect to and then select Connect 6 2 VNC Client The user can use any VNC client software to connect the RXi HMI To do so the user needs to start the VNC server on the RXi HMI device VNC Server can be launched with the following steps 1 Launch RXi HMI OI Util...

Page 68: ... cannot be done if the device is in sleep mode The user needs to awake the RXi HMI or set the Sleep to Never as shown below Figure 90 Sleep Configuration 2 It is required to launch VNC Server after the RXi HMI device reboots 3 The UAC User Account Control dialog prompts on RXi HMI will close the VNC Connection ...

Page 69: ...ash device and copy Windows PE for Windows image deployment to it Note Use FAT32 type USB Flash Drive that is between 8 and 32 GB 1 Stick Insertion Console Window Insert USB device and open a command window Use Run as administrator if you work on a system with UAC active Alternatively you can choose to open a non elevated console window This will cause the UAC dialog when you call the diskpart uti...

Page 70: ...he free space on your disk Figure 94 Verify Disk Free Space 7 Enter create a partition primary to create a primary partition Figure 95 Create Primary Partition 8 Check the volumes and be sure the partition you selected is already selected noted by the asterisk Otherwise issue the command select vol 4 in this case Figure 96 Select Partition ...

Page 71: ...s Figure 98 Check Volumes 11 Use the assign command to assign a drive letter This step is necessary only if a drive letter is not already assigned For example Step 8 did not display a proper drive letter for the newly created volume Note that the assigned command may interfere with current network drive mappings in case a spare drive letter cannot be found below the first drive letter correspondin...

Page 72: ...ectory structure below the Contents folder i e not the Contents folder itself to the USB stick You can issue a console command or do this in the GUI Explorer Total Commander The example command is in Figure 102 Note The number of files copied in this step may vary depending on how many files are actually in the Contents folder of the environment which you copy There may be a difference due to the ...

Page 73: ...nts bootmgr efi Contents sources boot wim xxx File s copied Figure 103 Contents Copied Successfully 2 Copy the Recovery Image s RXi_Win10_2019_ HMI_rxxx swm to the images folder These are typically swm files or a wim file 3 Eject and remove the WinPE USB stick just created ...

Page 74: ...re you want to proceed 8 It will back up the license files License json License sig from the hardware unit where the recovery image is getting installed to the bootable USB device 9 The image installation will execute by applying the image to the hardware unit 10 It will restore the license files License json License sig to the hardware unit from the bootable USB device After restored License file...

Page 75: ...rt for License files after Image Recovery The user should follow the instructions outlined in Section 7 6 Obtaining License Files 7 6 Obtaining License Files The customer needs to follow the below steps to collect the License Files from the technical support team 1 The customer needs to get the Hardware MAC address and sent it to the technical support team for generating the License 2 Launch CMD a...

Page 76: ...a configuration change has been made such as a hard drive replaced or a device has been added The CMOS battery can fail over time causing CMOS data loss If this happens you need to install a new CMOS battery and reconfigure the BIOS settings Keys Function Right and Left arrows Moves the highlight left or right to select a menu Up and Down arrows Moves the highlight up or down between submenu or fi...

Page 77: ...rings you to the BIOS Main Menu Main Menu The Main menu is the first screen that you will see when you enter the BIOS Setup Utility Figure 105 Main Menu BIOS Parameter Description System Language Choose the system default language System Date The date format is day month date year Day displays a day from Sunday to Saturday Month displays the month from 01 to 12 Date displays the date from 01 to 31...

Page 78: ...tem or allow the user to set some features according to their preference Figure 106 Advanced Menu ACPI Settings This section configures system ACPI parameters Figure 107 ACPI Settings BIOS Parameter Description ACPI Auto Configuration This field is used to enable or disable BIOS ACPI auto configuration Enable Hibernation This field is used to enable or disable the system s ability to hibernate OS ...

Page 79: ... Computing BIOS Parameter Description Security Device Support Enable or disable BIOS support for a security device The Operating System will not show a security device TCG EFI protocol and INT1A interface will not be available Pending Operation Schedule an operation for the security device Your computer will reboot during restart to change the state of the security device ...

Page 80: ...onfiguration This section is used to configure the Wakeup ACPI Power Management Figure 109 Wakeup Configuration BIOS Parameter Description Resume by PME Enable or disable to resume by PME PCI PCIe LAN etc Resume by USB This is enabled by default Enable or disable to resume by USB ...

Page 81: ...splay the detected CPU information Figure 110 CPU Configuration BIOS Parameter Description SVM Mode Enable or disable CPU Virtualization Core Leveling Mode Select the number of cores in the system Automatic mode Three cores per processor Two cores per processor or One core per processor Node 0 Information View Memory Information related to Node 0 ...

Page 82: ...ion USB Configuration This section is used to configure the parameters of the USB Device Figure 112 USB Configuration BIOS Parameter Description Legacy USB Support Enabled Enabled Legacy USB Disabled Keep USB devices available only for EFI applications Auto Disable support for legacy when no USB devices are connected USB Mass Storage Driver Support Enable or disable the support of the USB Mass Sto...

Page 83: ... is used to configure the parameters of the system super IO chip BIOS Parameter Description Serial Port Enable or disable the serial COM port RS485 Auto Flow Support Enable or disable the RS485 auto flow support NCT 6112D HW Monitor This section is used to monitor hardware status Figure 113 NCT6112D Hardware Monitor ...

Page 84: ... Description WatchDog Count Mode A WatchDog timer WDT is a hardware timer that automatically generates a system reset if the main program neglects to periodically service it It is often used to automatically reset an embedded device that hangs because of a software or hardware fault Use this menu to select the WatchDog Timer Unit second or minute WatchDog TimeoutValue Enter the value to set the Su...

Page 85: ...escription Network Stack Enable or disable the UEFI network stack When Network Stack is set to enabled the screen will be displayed as below Ipv4 PXE Support When enabled Ipv4 PXE boot supports When disabled the Ipv4 PXE boot option will not be available Ipv6 PXE Support When enabled Ipv6 PXE boot supports When disabled the Ipv6 PXE boot option will not be available PXE Boot Wait Time Enter the wa...

Page 86: ...ilure the system will remain off You must press the Power button to power on the system Last State When power returns after an AC power failure the system will return to the state where you left off before power failure occurs If the system s power is off when AC power failure occurs it will remain off when power returns If the system s power is on when AC power failure occurs the system will powe...

Page 87: ...tup activation key 65535 0xFFFF denotes indefinite waiting Bootup NumLock State This allows you to determine the default state of the numeric keypad By default the system boots up with NumLock on wherein the function of the numeric keypad is the number keys When set to Off the function of the numeric keypad is the arrow keys Quiet Boot Enable or disable the Quiet Boot option Boot Option 1 2 Select...

Page 88: ...n Launch CSM This field is used to enable or disable to launch of CSM Boot Option Filter This option controls what device s the system will boot to Launch PXE OpROM Policy This field controls the execution of UEFI and Legacy PXE OpROM Launch Storage OpROM Policy This field controls the execution of UEFI and Legacy Storage OpROM Launch Video OpROM Policy This field controls the execution of UEFI an...

Page 89: ...user password Secure Boot Menu This section is used to configure customizable secure boot settings Secure Boot Enable or disable secure boot Secure Boot can be enabled if 1 System running in user mode with enrolled platform key PK 2 CSM function is disabled Secure Boot Mode Select secure boot mode standard or custom Custom mode enables users to change image execution policy and manage secure boot ...

Page 90: ...e on external media Set new KEK Select Yes and press Enter to set a new KEK or select No and press Enter to load it from a file on external media Append KEK Select Yes and press Enter to set a new KEK or select No and press Enter to load it from a file on external media Set new DB Select Yes and press Enter to set a new DB or select No and press Enter to load it from a file on external media Appen...

Page 91: ...made Discard Changes To discard the changes select this field and then press Enter A dialog box will appear Select Yes to reset the system setup without saving any changes Restore Defaults Enter A dialog box will appear Select Yes to restore the default values of all the setup options Updating the BIOS To update the BIOS you will need the BIOS file and a flash utility Please contact technical supp...

Page 92: ...ckness 1 6 to 5mm All measurements within 0 5mm 9 1 1 Panel Cutout Dimensions Figure 122 Panel Cutout Dimensions Width Height Display Size in Width mm Height mm 12 317 214 5 15 398 245 5 19 482 297 24 581 360 All panel cutout measurements should be within 0 5 mm Values presented are width and height only 1 For IP66 installations of 12 inch displays IC760CSW12CDA use a 14 to 7 gauge 2 to 5 mm thick...

Page 93: ...Mounting Information 88 9 1 2 Installation Steps 1 Verify that the gasket is present and properly seated in the bezel channel located on the sides of the unit 2 Carefully insert the RXi HMI into the mounting panel cutout Figure 123 Panel Install View ...

Page 94: ...e following figure Figure 124 Mounting Bracket Insertion 4 Tighten all mounting brackets by hand until the gasket seal contacts the mounting surface uniformly 5 In a cross pattern around the monitor tighten all mounting clip screws to a torque of 13 to 13 9 in lbs 15 to 16kgf cm making sure not to overtighten the bracket Figure 125 Tighten Mounting Bracket ...

Page 95: ...RXi HMI User Manual Section 9 GFK 3231A Jan 2022 Mounting Information 90 9 2 Mounting to Modular Display Figure 126 12 Mount ...

Page 96: ...RXi HMI User Manual Section 9 GFK 3231A Jan 2022 Mounting Information 91 Figure 127 15 Mount ...

Page 97: ...RXi HMI User Manual Section 9 GFK 3231A Jan 2022 Mounting Information 92 Figure 128 19 24 Mount ...

Page 98: ...rmation 93 9 3 VESA Mount 9 3 1 VESA Mount Dimensions The RXi HMI can also be VESA mounted as shown in the figures below All 12 through 24 units include VESA Mount Dimensions of 100 mm x 100 mm All units are fastened with four M4x8 screws Figure 129 12 VESA Mount ...

Page 99: ...RXi HMI User Manual Section 9 GFK 3231A Jan 2022 Mounting Information 94 Figure 130 15 VESA Mount ...

Page 100: ...RXi HMI User Manual Section 9 GFK 3231A Jan 2022 Mounting Information 95 Figure 131 19 24 VESA Mount ...

Page 101: ...tarting up Solid green during normal operation Be sure to connect a DC power cord to this 3 pin power connector Using a voltage out of the range may fail to boot the system or cause damage to the system board 10 1 Graphics Interface The RXi HMI uses a DisplayPort to connect to a display device such as a computer monitor The DisplayPort connection will be used to transmit both audio and video If ad...

Page 102: ...Blinking Backlight failure Off Power not applied to the unit 10 3 USBs The RXi HMI features two USB 2 0 Type A ports for the mouse and keyboard There are also two USB 3 0 Type A ports for external storage devices If configure the device to wake on keyboard mouse function visit the Wakeup Configuration menu in the device BIOS on startup 10 4 Serial Connectors UART The RXi HMI features two serial po...

Page 103: ...D Socket The micro SD socket allows you to install a micro SD card for the expansion of available storage 10 7 LVDS LCD Panel Connector The system board allows you to connect an LCD Display Panel with the LVDS LCD panel connector This connector transmits video signals and power from the system board to the LCD Display Panel Refer to the right side for the pin functions of the LVDS connector 10 7 1...

Page 104: ... the computing module when separated from the screen as shown inFigure 132 Safety Measures Danger of explosion if battery incorrectly replaced Replace only with the same or equivalent type recommended by the manufacturer Dispose of used batteries according to local ordinances Figure 132 CR2032 Battery for 12 to 24 inch WARNING Use of Another Battery May Present a Risk of Fire or Explosion Replace ...

Page 105: ...R ANY CLAIM DAMAGES OR OTHER LIABILITY WHETHER IN AN ACTION OF CONTRACT TORT OR OTHERWISE ARISING FROM OUT OF OR IN CONNECTION WITH THE SOFTWARE OR THE USE OR OTHER DEALINGS IN THE SOFTWARE Component Name Microsoft Dism Version 2 2 2 License Information The MIT License MIT Copyright c 2016 Permission is hereby granted free of charge to any person obtaining a copy of this software and associated do...

Page 106: ...other Countries Customer Care Quotes Orders Returns customercare cn mas emerson com Technical Support support mas apac emerson com Any escalation request should be sent to mas sfdcescalation emerson com Note If the product is purchased through an Authorized Channel Partner please contact the seller directly for any support Emerson reserves the right to modify or improve the designs or specificatio...

Reviews: