background image

These Operations are accessible by Remote Control.

Some may also be accessible by the Main Unit's Control Panel.

Initial Setup

This section will guide you through the Unit’s Initial setting which includes
selecting a Language for your On-screen Menu and Autoprogram, which
Automatically scans and memorizes viewable channels.

Before you begin:

Make sure the Unit is connected to an Antenna or Cable.

1

After making All the Necessary Connections, press 

B

 to Turn On

the Unit.

It may take a few moments to Turn On the Unit for the first time.

Initial setup

 menu appears Automatically after the Unit is Turned

On.

2

Use 

H


I

 to select the On-screen language from the choices

(

English

 / 

Español

 / 

Français

) on the right side of the TV screen, then

press 

OK

.

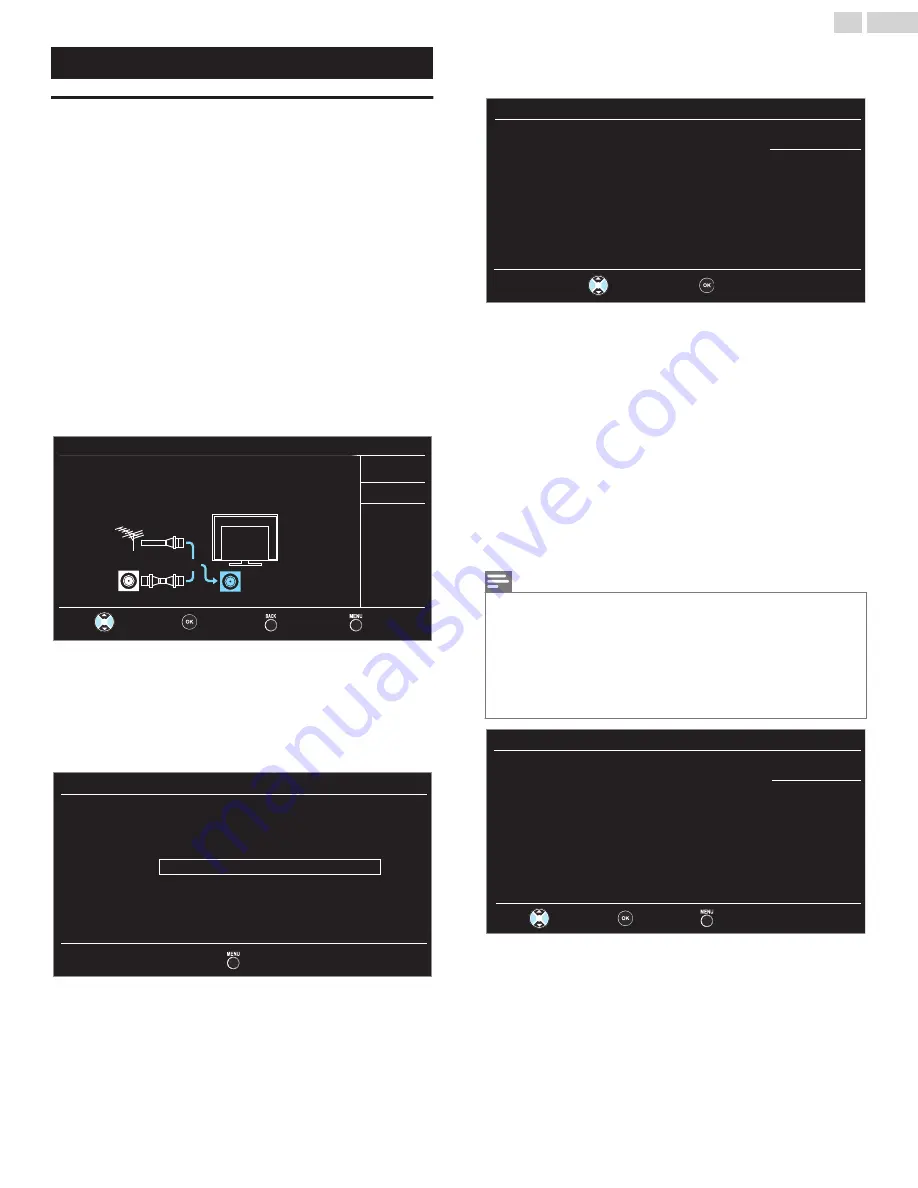
3

Use 

H


I

 to select 

Antenna

 for TV channels or 

Cable

 for CATV

channels, then press 

OK

.


Skip

Back

OK

Select

Skip

Cable

Antenna

ANTENNA IN

Or

Cable

Antenna

Select your signal source.

jack.

Make sure the antenna is connected to "ANTENNA IN"

Initial setup

When 

Antenna

 is selected, the TV detects Antenna signals. It

searches for DTV and Analog TV channels available in your area.

When 

Cable

 is selected, the TV detects signals supplied by

Cable. It searches for DTV, Analog TV and Cable channels
available in your area.

Autoprogram

 will begin.

Skip

0 ch

Analog channels

0 ch

Digital channels

0%

complete.

Auto programming may take more than 20 minutes to

Please wait while the system is scanning for channels.

Initial setup

4

Use 

H


I

 to select the desired Location setting, then press 

OK

.

Home

 is the ENERGY STAR

N

 qualified setting.


OK

Select

Home

Retail

Initial setup

In the Retail store mode, all settings are fixed.

and is ENERGY STAR qualified.

Location Home is recommended for normal home use

Select 

Home

, the Unit is set to maximize the energy efficiency for

home setting and it can be adjusted through a choice of Picture
and Sound quality according to your preference. Use this setting
to remove the E-sticker, if visible on the display. 


L

  p. 29

You must set 

Home

 in step 

4

. Otherwise, 

Picture

 and 

Sound

settings you adjusted will not be memorized after the Unit goes
into Standby mode.

When the Initial setup is completed, the Lowest Memorized
Channel with the confirmation message of the Location setting will
be displayed on the TV screen.

Select 

Retail

, the Unit will be set up with predefined settings for

retail displays. In this setting, the Power Consumption may possibly
exceed the limited requirement limit of the ENERGY STAR

N

qualification.

Note(s)

If you are not receiving a signal from your Cable service, contact the Cable provider.

If you press 

B

 or 

MENU

 during Autoprogram, this Setup of TV channels will be Cancelled.

The Initial Autoprogram function can be executed for either 

Antenna

 or 

Cable

 only Once.

When you change the Connection (Antenna / Cable), select 

Autoprogram

 again.


L

  p. 23

If there is no signal Input from the Antenna terminal and no operation for several seconds
after you Turn On the Unit, Helpful hints appears. Follow the instructions listed on the
TV screen.

Skip

OK

Select

Later

Retry

Initial setup

the appropriate source input.

press "SOURCE" key on the remote control to select

the input which you have connected to  the box and

If you are using a cable or satellite box, please confirm

installation process searches this connection.

ANTENNA IN jack on the back of the TV, the channel

Verify that you have a cable connected to the

Try Autoprogram again?

No channel is registered.

After an Initial Setup is completed...

If you want to scan the channels Automatically again.

Autoprogram 

L

  p. 23

You can add the desired Cable and Analog channels not memorized by
Autoprogram.

Add channels 

L

  p. 24

If you want to change to another Language.

Language 

L

  p. 30

If you want to change the Location setting.

Location 

L

  p. 29

16

.

English

Summary of Contents for LD320EM5

Page 1: ...e call toll free or visit our web site below ES Necesita ayuda Llame por favor sin costo ó visite nuestro sitio web en FR Besoin d aide Appelez notre numéro gratuit ou visitez notre site web à l adresse 1 866 309 8819 www emersonaudiovideo com EN Owner s Manual ES Manual del Propietario FR Manuel du Propriétaire LD320EM5 ...

Page 2: ...rnal Device 18 Changing Picture and Sound Settings 18 Sleep Timer 18 Switching Audio Mode 18 Changing Picture Format 19 TV Screen information 19 5 Making more use with your TV 20 Displaying the Main Menu 20 Picture 21 Sound 22 Setup 23 Autoprogram 23 Channel list 23 Add channels 24 Antenna Confirmation 24 Features 24 Caption settings 24 Child and Ratings Lock 26 PC settings 28 fun Link HDMI CEC 29...

Page 3: ...me entertainment safe and enjoyable As you enjoy your television please note that all televisions new and old must be supported on proper stands or installed according to the manufacturer s recommendations Televisions that are inappropriately situated on dressers bookcases shelves desks speakers chests carts etc may fall over resulting in injury TUNE IN TO SAFETY ALWAYS follow the manufacturer s r...

Page 4: ...in any way such as power supply cord or plug is damaged liquid has been spilled or objects plug is damaged liquid has been spilled or objects have fallen into the apparatus the apparatus has been have fallen into the apparatus the apparatus has been exposed to rain or moisture does not operate exposed to rain or moisture does not operate normally or has been dropped normally or has been dropped No...

Page 5: ...is equipment does cause harmful interference to radio or television reception which can be determined by turning the equipment off and on the user is encouraged to try to correct the interference by one or more of the following measures Reorient or relocate the receiving antenna Increase the separation between the equipment and the receiver Connect the equipment into an outlet on a circuit differe...

Page 6: ...ze energy efficiency while delivering the best possible picture using the factory installed home mode settings Changing or enabling other features in thisTV e g brightened backlighting will possibly increase energy consumption beyond the original ENERGY STAR qualified limits Portions of this software are copyright The FreeType Project www freetype org The American Academy of Pediatrics discourages...

Page 7: ...ded Make sure to leave a space of 4 inches 10cm or more around this apparatus Press to turn the Unit on and go into standby mode To completely turn off the Unit you must unplug the AC power cord Disconnect the AC plug to shut the Unit off when trouble is found or not in use The AC plug shall remain readily available AC plug Never use a gas duster on this TV The gas trapped inside of this Unit may ...

Page 8: ...dphone Audio Output Headphone 3 5mm Stereo jack for personal listening DVD Dolby Digital Sound Enjoy Dolby Digital multi channel surround sound when you connect the Unit to your Dolby Digital decoder Still Fast Slow Step Playback Various Playback modes are available including Still Pictures Fast Forward Reverse Slow Motion and Step Playback Frames DVD Menus in a Desired Language You can display DV...

Page 9: ...ation Cable NTSC Analog TV Operation If neither symbol appears the operation is applicable to both DVD FUNCTIONS DVD Playback of DVD video CD Playback of Audio CD If neither symbol appears under the function heading operation is applicable to both Attaching the Base You must attach the base to the Unit to have it as a table top Unit Be sure the front and rear of the base match the proper direction...

Page 10: ...nit make sure to unscrew the wood screw from your Wood Stand Furniture and other wood item Installing the Remote Control Batteries 1 Slide the battery cover off the back of the Remote Control 2 Insert 2 Supplied Batteries AAA 1 5V Be sure the and ends of the Batteries line up with the markings inside the case 3 Slide the cover back into position Note s Remove the Batteries if not using the Remote ...

Page 11: ...AVIGATION keys OK Moves the cursor Selects the On screen Menu items l TV MENU Opens the Main On screen Menu m A EJECT Ejects a Disc from the Disc Slot n SAP AUDIO Selects Audio mode MONO STEREO SAP Audio language o CLEAR Clears the numbers entered incorrectly Cancels the point A for A B repeat Removes a Track number in the CD Program input p H G Skips Backward or Forward Chapters Titles or Tracks ...

Page 12: ...posite Video Analog Audio L R jacks Signal PC Connection Analog Audio L R jacks Signal with Stereo Mini 3 5mm Plug Audio Cable on PC o HDMI Input jack s Digital Audio and Video Input from High Definition Digital Devices such as DVD Blu ray Disc players Cable Satellite Set top Boxes and PC s p 75 ohm Cable Antenna Satellite connection Signal Input from an Antenna or Cable Satellite Set top Boxes q ...

Page 13: ...VD Recorder Video cable Audio L R cables Video cable Audio L R cables Video cable Audio L R cables Note s If you have any question about the DTV s Antenna visit www antennaweb org for further information Depending on your Antenna system you may need different types of combiners mixers or separators splitters for HDTV Signal The minimum RF bandpass on these Devices is 2 000MHz or 2GHz For your safe...

Page 14: ... cable HD game console or Blu ray Disc DVD Player or Set top Box OUT HDMI cable IN HDMI DVI Connection This Unit can be connected to your Device that has a DVI Terminal Use an HDMI DVI Conversion Cable for this Connection and it requires Audio Cable for Analog Audio signal as well Cable Receiver or Satellite Set top Box with the DVI Output jack IN OUT Audio L R cables OUT HDMI DVI conversion cable...

Page 15: ...on cable IN OUT Stereo Mini 3 5 mm Plug Audio cable IN VGA Connection This unit is equipped with a PC Input jack If you connect this Unit to your PC you can use this Unit as a PC monitor Use a VGA cable for this Video Connection and it requires a Stereo mini 3 5mm Plug Audio Cable for Analog Audio signal as well VGA cable VGA cable VGA cable PC Stereo Mini 3 5 mm Plug Audio cable OUT IN IN IN IN I...

Page 16: ...cy for home setting and it can be adjusted through a choice of Picture and Sound quality according to your preference Use this setting to remove the E sticker if visible on the display L p 29 You must set Home in step 4 Otherwise Picture and Sound settings you adjusted will not be memorized after the Unit goes into Standby mode When the Initial setup is completed the Lowest Memorized Channel with ...

Page 17: ...n on the Remote Control or VOL to recover the original sound Switching Channels TV Remote Control Control Keys are on the Side of the Unit To select Channels by using CHI H or CH Press CH I Down H Up on the Side of the Unit or press CH on the Remote Control To select Channels by using the NUMBER keys DigitalTV Operation For Digital channels press a number followed by a dot and the corresponding su...

Page 18: ...e and powerful sound settings for a cinematic experience Game Optimized for PCs and game consoles Eco Eco TV settings for low Power Consumption Music Optimized for Music Playback News Controls Picture Tone and Sets the Anchor s Voice at a comfortable volume level Sleep Timer Sleep Timer can set the Unit to go into Standby mode after an incremental period of time Press SLEEP Repeatedly to change th...

Page 19: ... that has a DVI Terminal Use an HDMI DVI Conversion Cable for this Video Connection and it requires a Stereo Mini 3 5mm Plug Audio Cable for Analog Audio signal as well Refer to 16 9 Video Signal on this page if the PC has an HDMI Output Normal Proportionately stretched picture Sidebars appear on both edges of the screen Full Stretched out of proportion to fill the screen Unscaled Original size TV...

Page 20: ...red Menu and an item then press OK or use H I J K to determine the setting Adjusting the Picture Mode or customize the Picture quality as your preference Adjusting the Sound Mode Equalizer and some other Sound functions Scanning the Channels available in your area and see what the Antenna Signal levels are Adjusting the Closed Caption Parental Guide and some other useful functions You can choose E...

Page 21: ...Color alignment Noise reduction Black stretch Dynamic contrast and Gamma You can set a Particular Picture Quality using Advanced settings Gamma2 On On On Normal Gamma Dynamic contrast Black stretch Noise reduction Color alignment USB Language Features Setup Sound Picture Color alignment Color temperature mode to set the picture color temperature to Personal Cool Normal or Warm When you adjust the ...

Page 22: ... constant loudness level between the TV commercials and the Programs Auto volume leveling Off to Remove the Auto volume leveling On to Reduce Volume Differences between the TV Commercials and the Programs You can select the Audio Output from the Unit s speakers or not If your amplifier is HDMI link function compatible and connected by an HDMI cable to this Unit some sound operations such as volume...

Page 23: ... channels Please wait while the system is scanning for Autoprogram When the Scanning and Memorizing of Available Channels is Completed the Lowest Memorized Channel will be Displayed Note s After setting Autoprogram using CH skips unavailable channels Automatically If you are not receiving a signal from your Cable service contact the Cable provider If you press B or TV MENU during Autoprogram the S...

Page 24: ... USB Language Features Setup Sound Picture Note s If the channel is set to an Analog channel or External Input you cannot confirm the Antenna condition Features 1 Press TV MENU and use H I to select Features then press OK Home Software upgrade E sticker Location fun Link HDMI CEC Child lock PC settings Caption settings USB Language Features Setup Sound Picture 2 Adjust the following items Caption ...

Page 25: ...g is set to Off Closed Captions Service may not be controlled by this Unit s Menu options if you are watching television through an External Cable or Satellite Set top Box In which case you will need to use the Menu options on the External Set top Box to control Closed Captions The Captions do not always use correct Spelling and Grammar Not all TV Programs and product Commercials include Closed Ca...

Page 26: ...ting to E All ratings turn to E Automatically To Block any inappropriate programs set your limits in US movie ratings lock US TV ratings lock and Region ratings lock The Child Lock setting will be retained after a Power failure or after the Power is removed for longer than 10 seconds except the PIN code reverts to 0000 Child and Ratings Lock L p 26 Region ratings lock and Clear region ratings lock...

Page 27: ...opriate for All Children 7 and Older G TV G General Audience PG TV PG Parental Guidance Suggested PG 13 Unsuitable for children under 13 TV 14 Unsuitable for children under 14 R Restricted under 17 Requires Accompanying Parent or Adult Guardian NC 17 No One under 17 Admitted X TV MA Mature Audience Only To set the Sub ratings As for TV Y7 TV PG TV 14 or TV MA you can further set the Sub ratings to...

Page 28: ... PIN code Enter PIN code again in Confirm PIN entry field Back PIN Code Confirm PIN Enter PIN USB Language Features Setup Sound Picture Note s Make sure to enter a PIN code and the confirm PIN code must be exactly the same If they are different the space is cleared to reenter the New PIN code When a Power failure occurs the PIN code will be erased and Unit returns to the default PIN code 0000 If y...

Page 29: ...ct model number or name of Connected Devices Back Refresh Input Change Blu ray disc player HDMI2 DVD recorder HDMI1 Language Features Setup Sound Picture Setting your Location to Home You can set the Location of your TV to Home or Retail Choosing Home gives you full flexibility to change predefined settings for Picture and Sound 1 Use H I to Select Location then press OK Home Software upgrade E st...

Page 30: ...nú Select your menu language USB Language Features Setup Sound Picture 2 Use H I to select English Español or Français then press OK Note s If you need the English menu instead of the Spanish or French menu s press TV MENU Use H I to select Idioma or Langue then press OK Use H I to select English then press OK Press TV MENU to Exit the Main menu 30 English ...

Page 31: ... the Software Find information and Software related to your TV and Download the Latest Software Upgrade file to your PC 1 On your PC open a web browser and go to http emersonaudiovideo com support download 2 Enter the model number in the Type the Model Number field 3 Click the desired Software to be Downloaded Decompress the ZIP file 4 Copy the Upgrade file to the Empty root directory on the clean...

Page 32: ...the Disc can be selected 2 Language setting for Audio and Subtitle are Not available with some Discs Use MODE to select Subtitles available on the DVD Use SAP AUDIO to select Audio available on the DVD If the DVD s default settings for Audio and Subtitle are the same Language the Subtitles may not show unless you turn them On DVD Audio Setting Choose the appropriate Audio Settings for your equipme...

Page 33: ...in case you forget it If you forget the Password press 4 7 3 7 then enter your New Password Password will be cleared and Parental Levels will be set to ALL Go to step 3 to reset PARENTAL LEVEL A Power failure will Not Erase your Password Others You can change the Others functions 1 In STOP mode press DVD SETUP and use J K to select OTHERS 2 Use H I to select the desired item then press OK OK ON AU...

Page 34: ...nish FIN 5255 Sindhi 6550 French FRE 5264 Singhalese 6555 Frisian 5271 Siswat 6565 Galician 5358 Slovak 6557 Georgian 5747 Slovenian 6558 German GER 5051 Somali 6561 Greek GRE 5158 Spanish SPA 5165 Greenlandic 5758 Sundanese 6567 Guarani 5360 Swahili 6569 Gujarati 5367 Swedish SWE 6568 Hausa 5447 T Hebrew 5569 Tagalog 6658 Hindi 5455 Tajik 6653 Hungarian HUN 5467 Tamil 6647 I K Tatar 6666 Icelandi...

Page 35: ... Region Codes other than 1 or ALL DTS CD DVD ROM for personal computers CD ROM for personal computers The Discs with labels scratches stains blemishes etc HD DVD Blu ray Disc DVD or CD contains MP3 JPEG files KODAK Picture CD On the following Disc the sound recorded on the disc s high density layer WILL NOT be played back and displays a message Super Audio CD Any other Discs without compatibility ...

Page 36: ...he DVD Menu press DISC MENU and use H I J K to select an item then press OK or K PLAY To display the Top Menu press TITLE and use H I J K to select an item then press OK or K PLAY Note s Menu operations may vary depending on the Disc Refer to the manual accompanying the Disc for more details Resume Playback Press C during Playback Resume Message will appear on the TV screen Press K PLAY Playback w...

Page 37: ... To play a Double digit Chapter Title Track press the Chapter Title Track numbers For Double digit numbers you need to input both digits Track search is Not available for Programmed or Random Playback Using H G 1 During Playback press H G repeatedly until a desired Chapter Title or Track will be selected CH TR1 CH TR2 CH TR3 CH TR4 H G TT 1 TT 2 TT 3 TT 4 H G CH TR TT Current Title or Current Chap...

Page 38: ...al Tracks may be on other screens Use H I to go on to the Next Previous pages Repeat this Step until you have selected all the Tracks you wish to play back in the program Up to 99 Tracks can be ordered If 8 or more Tracks were in a Program use H G to see All the Tracks 3 Press K PLAY to start Programmed Playback Note s Press CLEAR to Erase the last Track in the program if you make an error To Eras...

Page 39: ... displayed number 3 Each time you press H I the Subtitle Language changes as follows OFF No Subtitles ENG English Audio SPA Spanish Audio FRE French Audio 4 Press BACK to EXIT Note s To Cancel the Subtitle select OFF at step 2 If your Language is not shown after pressing H I several times the Disc may not have that Language However some Discs allow you to change Subtitle Languages setting in the D...

Page 40: ...y Virtual Surround on your 2 channel Stereo System 1 During Playback press MODE repeatedly until appears 2 Press H I to select the Sound Level 1 Natural Effect 2 Emphasized Effect OFF No Effects original sound 3 Press BACK to EXIT Note s The Setting will be kept even if the Unit is Turned Off For Audio CD Virtual Surround will not be effective if the Sound Mode is set to something other than STERE...

Page 41: ...RF Coaxial Cable from your wall Cable Satellite Set top Box needs to be plugged into the Unit How come there is no image from the Connected External Devices Check if the correct Input mode is selected by pressing SOURCE or using CH Refer to Watching Channels from an External Device L p 18 Check the Antenna Cable or other Input Connection to the Unit When I enter a channel number why does it change...

Page 42: ...k whether All the cables to the Unit are connected to the correct Output jack of your device like Blu ray DVD Recorder View other TV channels The problem might be limited to the Broadcasting Station or Weak Signal Strength if DTV channel check signal strength Refer to Antenna confirmation L p 24 Unplug the AC Power Cord and wait for about 1 minute then Plug the AC Power Cord and turn On the Unit a...

Page 43: ...nd to some operating commands during Playback Operations may not be permitted by the Disc Refer to the instructions for the Disc Angle does not switch The Angle cannot be switched for DVD s which do not contain Multiple Angles In some cases Multiple Angles are only recorded for specific scenes Playback does not start when the Title is selected Check the PARENTAL setting Refer to L p 33 The passwor...

Page 44: ...ely from the Main Audio channel This Audio channel is used as an alternate in bilingual broadcasting SDTV Standard Definition TV Standard Digital format that is similar to the Analog TV picture quality Maintenance Cabinet Cleaning Wipe the front panel and other exterior surfaces of the Unit with a soft cloth Never use a solvent or alcohol Do Not spray insecticide liquid near the Unit Such chemical...

Page 45: ... W 1 W 94 Analog W 1 W 84 A 5 A 1 5A Tuning System Channel Frequency Synthesized Tuning System Channel Access Direct Access Number Keyboard Programmable Scan Channel up down and PREV CH Previous Channel Disc Playback compatibility DVD Video DVD RW R Audio CD CD RW R Frequency response DVD linear sound 20 Hz to 20 kHz sample rate 48 kHz 20 Hz to 44 kHz sample rate 96 kHz CD 20 Hz to 20 kHz Signal t...

Page 46: ...age caused by accident abuse misuse neglect misapplication or non supplied product b to damage caused by service performed by anyone other than company approved Authorized Service Location c to a product or a part that has been modified without written company permission or d if any serial number has been removed or defaced or e product accessories or consumables sold AS IS without warranty of any...

Page 47: ...EMERSON AND THE G CLEF LOGO ARE REGISTERED TRADEMARKS OF EMERSON RADIO CORP MOONACHIE NEW JERSEY U S A FUNAI CORPORATION Inc 19900 Van Ness Avenue Torrance CA 90501 A44F0UT ...

Reviews: