background image

18

EN

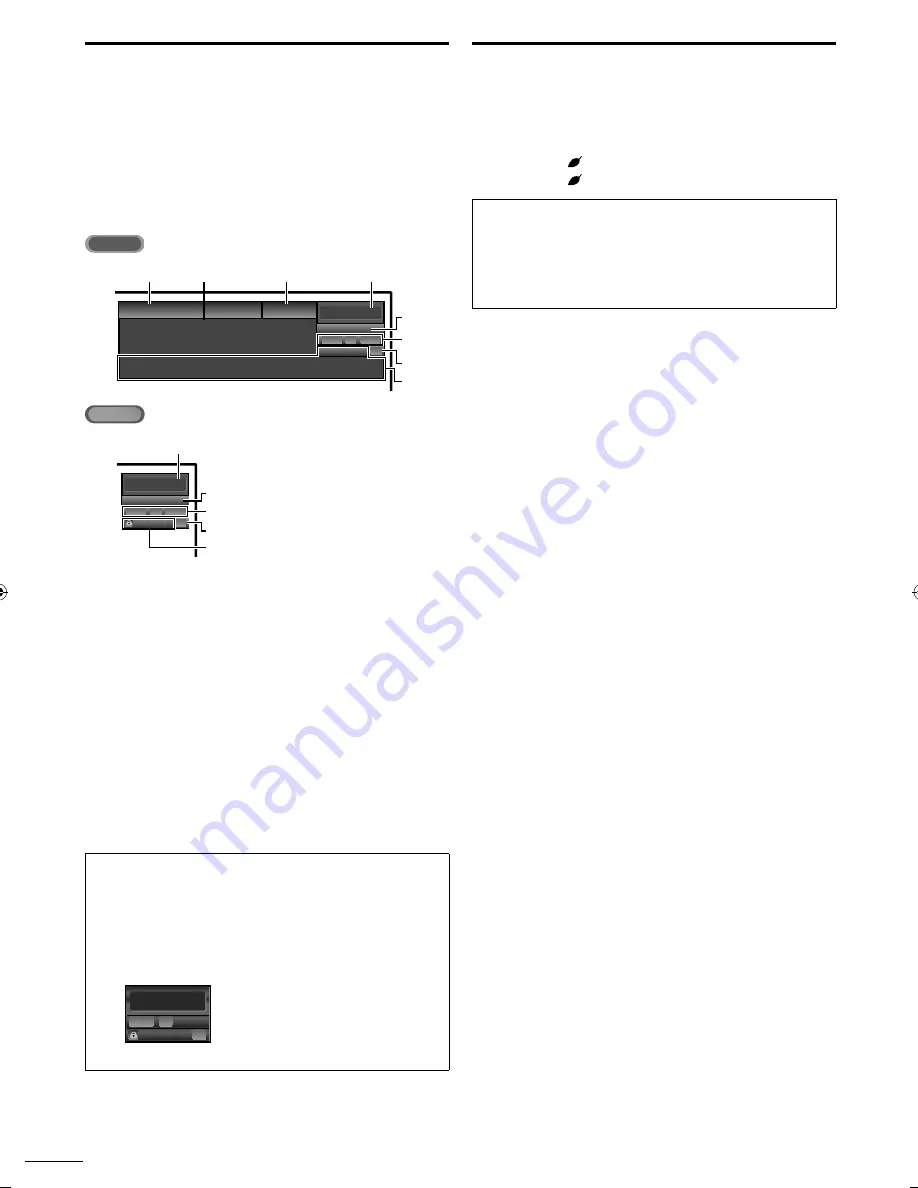
 TV Screen Information

You can display the currently selected channel or other 
information such as the audio mode on the TV screen.
In the digital mode, the detailed broadcasting information for 
the current channel such as program title, program guides are 
displayed.

Press

INFO

.

ATSC

11.1

TV: TV-14

1080i

1080i

16:9

16:9

HD

HD

CC

CC

KABC

KABC

1

2

3

4

5
6, 7, 8
9

10

A Day of Memories


A Day of Memories  


A quarter-century ago,which may now qualify as the
good old days of newspapering,run-of-paper sales
accounted for 80 percent of the industry's advertising
revenues.Department stores and supermarket were    

English 1/2  

Rating  

NTSC

11

TV-PG DLSV

480i

480i

4:3

4:3

SD

SD

CC

CC

4

5
6, 7, 8
9

10

SAP

 / STEREO  

1

program title

2

program guide
( The program guide added to broadcasting 

information is displayed to a maximum of 4 lines.)

 3

broadcast station

4

channel number

 5

 audio language (ATSC) / audio  mode  (NTSC)

[Switching Audio Mode]

p. 16

 6

effective scanning lines and scan mode

 7

TV format

 8

program aspect ratio

 9

CC (not available if closed caption is set to 

[Off]

)

10

 child lock rating

•  To clear the display, press 

INFO

again.

You can also press 

BACK

.

Note  

When the program guide consists of more than 4 lines, use 

/

to scroll.

[No description provided.]

is displayed when the program guide is not

provided.

While the program guide is displayed, the closed caption function is 
interrupted.

In external input mode, the following screen is displayed;

e.g.)

  When an external device is connected to Video  Input jack.

TV-PG DLSV

480i

480i

SD

SD

CC

CC

Video 

The information display will automatically disappear in 1 minute.

 Reducing the Brightness

Backlight brightness can be reduced which may save on power 
consumption more than you just set 

[On]

 in 

[Energy Saving 

Mode]

.

p. 31

Press

ECO 

once to reduce the brightness.

Press

ECO 

again to increase the brightness. 

Note  

Even if this function is in effect, the brightness will be increased when you 
change 

[Energy Saving Mode]

on or off due to the energy saving mode has 

priority.

You must set

[Home]

 in

[Location]

p. 31

Otherwise, the settings you adjusted will not be memorized after you turn 
off the unit.


LC8(LCD)̲master draft̲EN̲v1.indd   18

LC8(LCD)̲master draft̲EN̲v1.indd   18

2010/01/20   21:16:55

2010/01/20   21:16:55

Summary of Contents for LC190EM1

Page 1: ...resse Necesita ayuda Llame por favor sin costo ó visite nuestro sitio web en EN Owner s manual FR Manuel du propriétaire ES Manual del propietario 2010 Funai Electric Co Ltd MODEL NUMBER SERIAL NUMBER 1 866 www 309 8819 emersonaudiovideo com LC220EM1 LC190EM1 EMERSON ANDTHE G CLEF LOGO ARE REGISTEREDTRADEMARKS OF EMERSON RADIO CORP PARSIPPANY NEW JERSEY U S A ...

Page 2: ...all in accordance with the manufacturer s instructions 8 Do not install near any heat sources such as radiators heat registers stoves or other apparatus including amplifiers that produce heat 9 Do not defeat the safety purpose of the polarized or grounding type plug A polarized plug has two blades with one wider than the other A grounding type plug has two blades and a third grounding prong The wi...

Page 3: ...rely attached to the wall in accordance with the instructions LAMPINLCDCONTAINSMERCURY DISPOSEACCORDINGTOLOCAL STATEORFEDERALLAW Do not place the unit on the furniture that is capable of being tilted by a child and an adult leaning pulling standing or climbing on it A falling unit can cause serious injury or even death NOTE ABOUT RECYCLING This unit s packaging materials are recyclable and can be ...

Page 4: ...Off Function If there is no input signal and no operation for 15 minutes the unit will turn off automatically Sleep Timer This feature will automatically turn off the power of the unit at a specific time Choices for On screen Language Select your on screen language English Spanish or French Stereo Sound Function PLL Frequency Synthesized Tuning Provides free and easy channel selection and lets you...

Page 5: ...nit into base holes shown by arrow then move the base in the direction as shown by arrow until it stops and the 3 mounting holes are aligned Make sure not to put the AC power cord between the base and the unit 3 Drive Phillips pan screws into the 3 threaded holes at the bottom of the base until they are tight To remove the base from this unit Unscrew the Phillips pan screws on step 3 After the scr...

Page 6: ...ss to adjust the volume or move right left through the main menu items 5 Infrared sensor window Receives infrared rays transmitted from the remote control 6 POWER ON indicator Lights up green when power is on 7 STAND BY indicator Lights up red when power is off Control Panel MENU CHANNEL POWER STAND BY POWER ON VOLUME 4 2 1 3 7 5 6 ...

Page 7: ...ponent video and Audio L R Input jacks p 9 11 16 Digital audio Output jack p 12 17 Audio Input jack for PC connection p 13 Mini plug audio cable connection from your PC 18 Audio L R Input jacks for HDMI 1 p 10 Audio cable connection from your DVI device For HDMI 1 Input jack only Note for service terminal service terminal service use only Use this terminal only when a software update is necessary ...

Page 8: ...tteries like ni cad ni mh etc or old batteries with fresh ones If the device is not to be used for a long period of time remove the batteries to prevent damage or injury from possible battery leakage Do not try to recharge batteries they can overheat and rupture 1 SOURCE p 16 2 SLEEP p 16 3 BACK p 18 Press to return to the previous menu operation 4 cursor p 15 5 MENU p 19 6 OK p 15 7 VOL p 16 8 MU...

Page 9: ...be more effective than a set top or inside antenna To switch your reception source easily between antenna and cable install an antenna selector If you are not receiving a signal from your cable service contact the Cable provider Connection to Cable Receiver or Satellite Box Use an HDMI or component video cables to connect the HDMI or the ComponentVideo Input jacks of the unit to the HDMI or the co...

Page 10: ...devices equipped with DVI output jack STEREO PCM AUDIO OUT R L DVI OUT HDMI DV HDMI DVI conversion cable conversion cable cable receiver or satellite box with the DVI output jack audio cables rear of this unit e g Note For HDMI connection The unit accepts 480i 480p 720p 1080i of video signals and 32kHz 44 1kHz and 48kHz of audio signals This unit accepts only 2 channel audio signal LPCM You need t...

Page 11: ... g BD DVD recorder with the component video output jack rear of this unit audio cables bl component video component video cables b cables red blue green red blue green Note The unit accepts 480i 480p 720p and 1080i of video signals for this connection S Video Connection S Video connection offers good picture quality for video devices connected to the unit If you connect to the unit s S Video Input...

Page 12: ...put jack e g STEREO STAND BY AUDIO OUT R L VIDEO OUT HEAD PHONE audio cables video cable camcorder video game VCR side of this unit Note If you connect to the S Video Input jack and the CompositeVideo Input jack at the same time the S Video connection will have priority Digital Audio Output Connection for digital broadcasting only If you connect this unit to an external digital audio device you ca...

Page 13: ...a PC monitor e g rear of this unit stereo mini plug cables VGA cable VGA cable VGA cable should be with ferrite core personal computer The following video signals can be displayed Format Resolution Refresh rate VGA 640 x 480 60Hz SVGA 800 x 600 XGA 1 024 x 768 WXGA 1 280 x 768 1 360 x 768 Other formats or non standard signals will not be displayed correctly Note Please purchase theVGA cable that h...

Page 14: ...r cord AC outlet rear of this unit Caution Do not connect the AC power cord to a power supply outside the indicated voltage of this unit AC 120V Connecting the AC power cord to a power supply outside of this range may result in fire or electrical shocks Note Each time you plug in the AC power cord no operations will be performed for a few seconds This is not a malfunction ...

Page 15: ...f the ENERGY STAR R R qualification Select Home the unit is set to maximize the energy efficiency for home setting and it can be adjusted through a choice of picture and sound quality according to your preference When the initial setup is completed the lowest memorized channel with the confirmation message of the location setting will be displayed on theTV screen Note If you are not receiving a si...

Page 16: ...til P Sleep Off is displayed Sound Functions describe how to change the audio or the audio language as well as the volume Volume Adjustment Use VOL to adjust the volume will be displayed for a few seconds when adjusting the volume Silence Mode Press MUTE to turn off the sound temporarily will be is displayed for a few seconds Press MUTE again or VOL to recover the original volume Switching Audio M...

Page 17: ... the screen 16 9 displays a 4 3 picture at a 16 9 size the picture is stretched horizontally to fill the screen Movie Expand displays a 4 3 picture at a 16 9 size the picture is stretched more vertically at the top of the screen This crops out the top of the picture Zoom displays a 4 3 picture at a 16 9 size at its maximum size that is more vertically stretched to fill the screen This crops out th...

Page 18: ... and scan mode 7 TV format 8 program aspect ratio 9 CC not available if closed caption is set to Off 10 child lock rating To clear the display press INFO again You can also press BACK Note When the program guide consists of more than 4 lines use to scroll No description provided is displayed when the program guide is not provided While the program guide is displayed the closed caption function is ...

Page 19: ...after the initial setting or if you restore the DTV channels you deleted it is recommended to use Autoprogram to perform a new channel search Before you begin Make sure the unit is connected to antenna or cable 1 Press MENU to display the main menu 2 Use to select Setup then press OK 3 Use to select Autoprogram then press OK 4 Use to select an appropriate option then press OK Picture Sound Setup F...

Page 20: ...e removed as well 5 Press MENU to exit Note The channel with the DTV indicated on the display is ATSC Otherwise the channel is NTSC Add Channels This function lets you add the channels that were not added by the autoprogram due to reception conditions at the initial setting 1 Press MENU to display the main menu 2 Use to select Setup then press OK 3 Use to select Add Channels then press OK 4 Use th...

Page 21: ... confirm the antenna condition Video Picture Sound Setup Features Language Antenna Indicator is available for digital broadcasting only Back Ch Change 5 Press MENU to exit Language Selection You can choose English Spanish or French as your on screen language 1 Press MENU to display the main menu 2 Use to select Language then press OK 3 Use to select English Español or Français then press OK Pictur...

Page 22: ...ound Setup Features Language Picture Picture Mode Brightness Contrast Color Tint Sharpness Color Temperature Personal Standard Sports Movie Game Sharpness ColorTemperature You can only adjust the following options when you set to Personal in Picture Mode Use to select the desired setting then use to adjust Brightness OK Brightness 30 Adjust Move OK Press to decrease brightness Press to increase br...

Page 23: ...er is HDMI link function compatible and connected by an HDMI cable to this unit some sound operations such as volume up can be changed by using this unit s remote control Make sure Fun Link Control is set to On p 30 Use to select the desired option then press OK Picture Sound Setup Features Language TV Speakers On Sound will be output from the TV speakers Off Sound will not be output from the TV s...

Page 24: ... Service Digital Caption Service Caption Style Off CC 1 CC 2 CC 3 CC 4 T 1 T 2 T 3 T 4 CC 1 andT 1 The primary caption and text services The captioning or text is displayed in the same language as the program s dialogue up to 4 lines of script on theTV screen where it does not obstruct relevant parts of the picture CC 3 andT 3 Serve as the preferred data channels The captioning or text is often a ...

Page 25: ...ption Style C Caption Style ATSC You can change the caption style such as font color or size etc 4 Use to select Caption Style then press OK 5 Use to select User Setting then press OK Picture Sound Setup Features Language Closed Caption User Setting Font Style Font Size Font Color Font Opacity Background Color Background Opacity Edge Color Edge Type Off Font0 Middle White Solid Black Solid Black N...

Page 26: ...To show the closed caption on yourTV screen broadcast signal must contain the closed caption data Not allTV programs and commercials have the closed caption or all types of the closed caption Captions and texts may not exactly match theTV voice Changing channels may delay the closed caption for a few seconds Adjusting or muting the volume may delay the closed caption for a few seconds Abbreviation...

Page 27: ...ck any inappropriate programs set your limits in US Movie Ratings Lock US TV Ratings Lock and Region Ratings Lock The child lock setting will be retained after a power failure except the PIN code reverts to 0000 If the rating is blocked will appear Region Ratings Lock will be available when the unit receives a digital broadcast using the new rating system For the United States the unit may downloa...

Page 28: ...ng FV FantasyViolence TV Y7 V Violence TV MA TV 14 TV PG S Sexual Situation L Coarse Language D Suggestive Dialogue TV 14 TV PG Note Blocked sub rating will appear beside the main rating category in US TV Ratings Lock menu You cannot block a sub rating D L S orV if the main rating is set to View Changing the category to Block or View automatically changes all its sub ratings to the same Block or V...

Page 29: ...d clock on the TV and PC Cancel Adjust The horizontal vertical position clock and phase of the PC screen are automatically adjusted Horizontal Position Vertical Position Use to adjust Cursor r Cursor r Horizontal Position OK H Position 0 Adjust Move OK to move PC screen left to move PC screen right Vertical Position OK V Position 0 Adjust Move OK to move PC screen down to move PC screen up Clock P...

Page 30: ...y interlocking from this unit s power Use to select the desired setting then press OK Picture Sound Setup Features Language Auto Device Off When set to On and TV is turned off connected devices are turned off automatically On Off On Your connected Fun Link device turns off automatically when you turn off the unit Off Your connected Fun Link device stays on even if you turn off the unit AutoTV On T...

Page 31: ...en you select Retail store the power consumption may possibly exceed the limited requirement of the ENERGY STAR R R qualification 1 Press MENU to display the main menu 2 Use to select Features then press OK 3 Use to select Location then press OK 4 Use to select the desired location then press OK Picture Sound Setup Features Language Location Location Home is recommended for normal home use In the ...

Page 32: ...iver or satellite box is connected correctly Make sure that the selected input mode is connected to the working input jack Check if your computer is NOT in sleep mode when the input mode of this unit is in PC mode Tap any key on the keyboard to wake up your computer Make sure that the sound is not muted Press MUTE so that the volume bar and current volume level will appear on theTV screen Make sur...

Page 33: ...ire screen If you are using the unit as a PC monitor make sure that Horizontal Position and Vertical Position in PC Settings are set correctly If you are watchingTV or using the CompositeVideo S Video ComponentVideo or HDMI with 480i Input press FORMAT repeatedly to switch various screen modes Captions are displayed as a white box No caption is displayed in the Closed Caption supported program Int...

Page 34: ...terrupted and not completed some channels will not be received Make sure to complete p 19 The selected channel cannot be viewed by the Child Lock setting p 27 The unit requires some kind of antenna input An indoor antenna y g VHF UHF an external antenna VHF UHF or an RF coaxial cable from your wall cable satellite box needs to be plugged into the unit How come there is no image from the connected ...

Page 35: ... of the digital broadcasting standards Aspect Ratio The width of aTV screen relative to its height ConventionalTVs are 4 3 in other words theTV screen is almost square widescreen models are 16 9 theTV screen is almost twice as wide as its height ComponentVideo This is a video signal format that conveys each of 3 principal colors of light red blue and green through different signal lines This allow...

Page 36: ...put Mini DIN 4 pin jack x 1 Y 1V p p 75Ω C 286mV p p 75Ω Component video Input RCA jack x 3 Y 1V p p 75Ω Pb Cb 700mV p p 75Ω Pr Cr 700mV p p 75Ω r HDMI Input HDMI 19pin x 2 PC Input D Sub 15pin x 1 RGB Mini jack ø3 5mm x 1 Audio Coaxial Digital audio Output RCA jack x 1 500mV p p 75Ω Headphone 1 8 inches x 1 3 5mm Remote control Digital encoded infrared light system Operating temperature 41 F 5 C ...

Page 37: ...ontained within the product or other additional product or part not cov ered by this warranty Recovery or reinstallation of programs data or other information is not covered under this Limited Warranty This warranty does not apply a to damage caused by accident abuse misuse neglect misapplication or non supplied product b to damage caused by service performed by anyone other than company approved ...

Reviews: