background image

Getting started

18

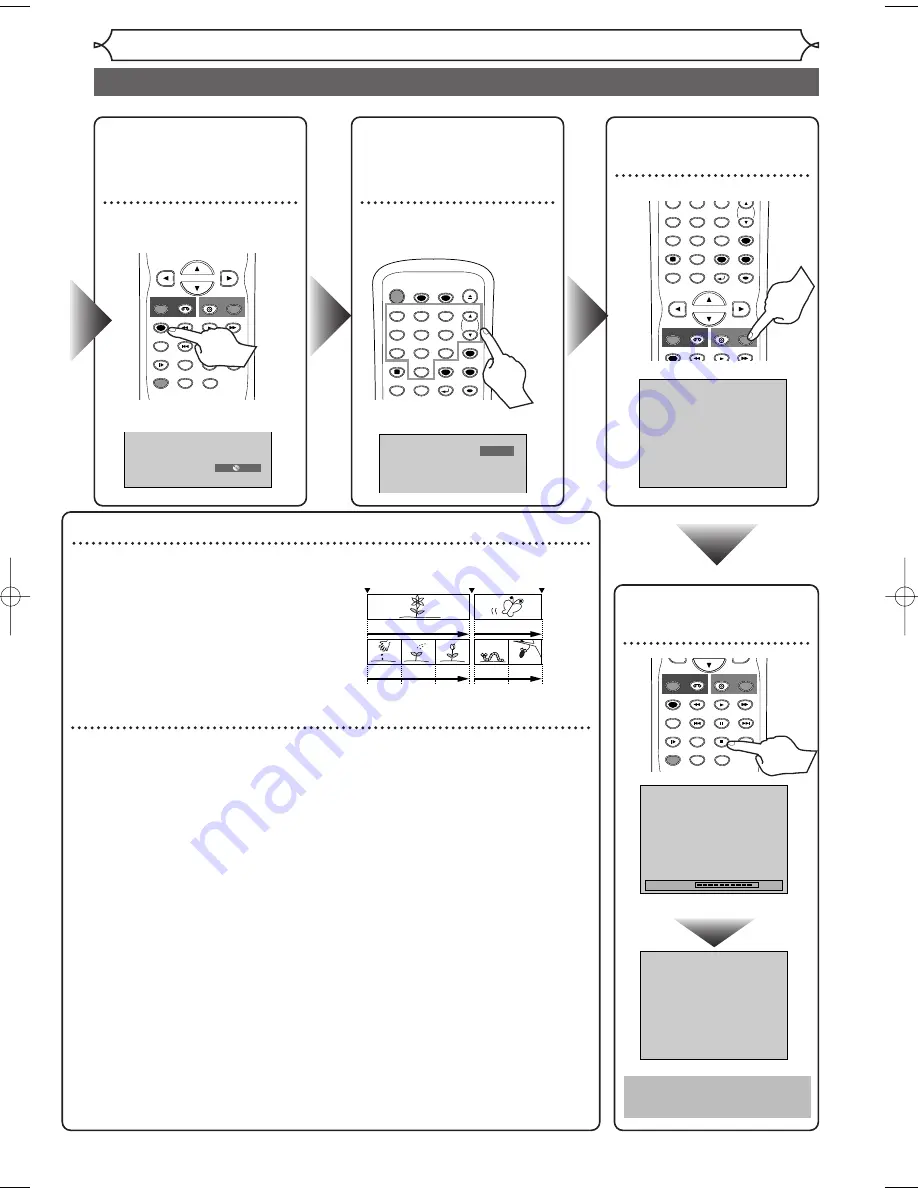
Easy DVD recording (Cont’d)

Step 3: Select the

Recording
speed

Step 5: Record to

DVD discs

Step 4: Select the

desired
channel

XP

0:58

Step 6: Stop the

Record

CH  12

   I

Hint 

1

: Play the recorded contents

You can select the title you want to play back from a displayed menu, and immedi-
ately start to play back. Recorded contents
are easily accessible, with simple procedure
of choosing a title on a chapter on the
menu screen.

What are titles and chapters?

The contents of a DVD disc are generally
divided into titles.Titles may be further
divided into chapters.

Hint 2: Edit the recorded disc

You will find editing discs is easy.This unit offers convenient editing functions
which are possible only with DVD-R/RW discs.

Title list offers the following editing functions.

• Putting names on titles
• Setting pictures for thumbnails 
• Setting/clearing chapter markers
• Deleting parts of titles or scenes

(Possible editing functions depend on the recording format and editing

method.)

Original and Playlist (VR mode)

You can edit the contents on a Playlist without changing the original record-
ings. A Playlist does not take up much disc space.

What “Original” or “Playlist” is for?

Throughout this manual, you will find 

Original

and 

Playlist

to refer to the origi-

nal content and the edited version.

Original

content refers to what’s originally recorded on the disc.

Playlist

content refers to the edited version of the original content.

Finalizing a Disc

• You need to record in video mode and finalize the disc to play it back on

other players.

• Once you finalize a disc recorded in video mode, you cannot record or edit

any information on the disc.

• Discs recorded in VR mode can still be edited after finalization.

Start Rec.

Stop/Start

Stop Rec.

Title 

1

Title 2

Chapter 

1

Chapter 

1

Chapter 2 Chapter 3

Chapter 2

This operation may take
a while to be completed.

Wait for a moment.

90%

C

STOP

SKIP

SKIP

SLOW

PAUSE

REC/OTR

DVD

REC/OTR

REC SPEED

ZOOM

SEARCH

VCR

CM SKIP

DUBBING

REC MONITOR

PLAY

AUDIO

POWER

T-SET

TIMER PROG.

OPEN/CLOSE

SPACE

1

2

3

4

5

6

7

8

0

9

CH

VIDEO/TV

.@/:

ABC

DEF

GHI

JKL

MNO

PQRS

DISPLAY

TUV

WXYZ

SETUP

RETURN

MENU/LIST

TOP MENU

CLEAR

ENTER

SPACE

1

2

3

4

5

6

7

8

0

9

CH

VIDEO/TV

GHI

JKL

MNO

PQRS

REC/OTR

DISPLAY

TUV

WXYZ

DVD

REC/OTR

REC SPEED

VCR

SETUP

RETURN

MENU/LIST

TOP MENU

CLEAR

ENTER

PLAY

STOP

SKIP

SKIP

SLOW

PAUSE

REC/OTR

DVD

REC/OTR

REC SPEED

ZOOM

SEARCH

VCR

CM SKIP

DUBBING

REC MONITOR

PLAY

AUDIO

(Appears only in the VR mode)

E9600UD_EN/SP.qx3  05.4.25 15:16  Page 18

Summary of Contents for EWR20V5

Page 1: ... region of the world This unit can play DVDs that are labeled for ALL regions or for Region 1 Q Q Q Qu u u ui i i ic c c ck k k k G G G Gu u u ui i i id d d de e e e EWR20V5 Example of aTV 1 Switch the input selector on yourTV to an appropriate external input channel usually near channel 0 2 Hit a button on the TV s original remote control see the table below to select an external input channel un...

Page 2: ...n 120 min 240 min 360 min 480 min 600 min 12 cm Disc poor poor good good Hit repeatedly to select desired recording time Display the Timer Programming Screen POWER T SET TIMER PROG OPEN CLOSE 1 2 3 4 5 6 CH ABC DEF GHI JKL MNO You can set up to 8 programs once daily or weekly Be sure to set the clock before starting a timer programming Timer Programming display appears Select any blank line and hi...

Page 3: ...E 1 800 605 8453 or visit our web site at http www EmersonAudioVideo com Before you use this unit you need to complete connections Refer to Connections on pages 14 16 To record a program easily refer to Easy DVD recording on pages 17 18 after connections are completed You CANNOT record on any copyright protected DVD disc with this unit EWR20V5 Owner s Manual DVD Recorder with Video Cassette Record...

Page 4: ...anada FCC WARNING This equipment may generate or use radio frequency energy Changes or modifications to this equipment may cause harmful interference unless the modifications are expressly approved in the instruc tion manual The user could lose the authority to operate this equipment if an unauthorized change or modi fication is made CAUTION TO PREVENT ELECTRIC SHOCK MATCH WIDE BLADE OF PLUG TO WI...

Page 5: ... to cords at plugs convenience receptacles and the point where they exit from the appliance 13 Outdoor Antenna Grounding If an outside antenna or cable system is connected to the product be sure the antenna or cable system is grounded so as to provide some protection against voltage surges and built up static charges Article 810 of the National Electrical Code ANSI NFPA No 70 provides infor mation...

Page 6: ... this unit at least for 2 hours until its inside gets dry Installation Location For safety and optimum performance of this unit Install the unit in a horizontal and stable position Do not place anything directly on top of the unit Do not place the unit directly on top of the TV Shield it from direct sunlight and keep it away from sources of intense heat Avoid dusty or humid places Avoid places wit...

Page 7: ... Authorized Service Center for inspection and cleaning of the laser optical pickup unit DISC HANDLING Handle the discs so that fingerprints and dust do not adhere to the surfaces of the discs Always store the disc in its protective case when it is not used AUTO HEAD CLEANING Automatically cleans video heads as you insert or remove a cassette so you can see a clear picture Playback picture may beco...

Page 8: ...ol 84 Before you start 2 Precautions 2 Table of contents 6 Features 7 Functional overview 8 Installing batteries in the remote control 10 Using a remote control 10 The VCR DVD recorder Switching 10 Setting DISC CD menus 11 DISPLAY menu 12 Connections 14 Connection to a TV 14 Connection to a cable box or satellite box 15 Connection to an Audio System 16 Getting started 17 Easy DVD recording 17 Chan...

Page 9: ... play back titles from either the Original list or the Playlist Quick search for what you want to watch You can easily find the part you want to watch using the Index search Time search An index mark will be assigned at the begin ning of each recordings you make For Time search you can go to a specific point on a videotape by entering the exact amount of time you wish to skip VCR mode DVD mode DVD...

Page 10: ...ton Hit to stop videotape playback or recording Hit to stop the proceeding Timer Recording inVCR 21 F FWD D button VCR Hit to rapidly advance the videotape or view the picture rapidly in forward during playback Forward Search 22 REW E button VCR Hit to rewind the videotape or to view the picture rapidly in reverse during the playback mode Rewind Search Rear Panel 1 AC Power Cord DVD VCR Connect to...

Page 11: ...lect channel numbers Hit to select a title chapter track on display Also hit to enter values for the settings in the Setting menu Also hit to start the index time search inVCR mode 3 DISPLAY button DVD VCR Hit to display the on screen menu 4 TOP MENU button DVD Hit to display the top menu 5 MENU LIST button DVD Hit to display the Disc menu Hit to change ORIGINAL and PLAYLIST on the TV screen VR mo...

Page 12: ...y with governmental regulations or public rules for envi ronmental protection that apply in your country or area Do not recharge short circuit heat burn or disas semble batteries 10 2 3 Because this product is a combination of a VCR and a DVD recorder you must select first which com ponent you wish to operate with SELECT Hit VCR on the remote control Verify that the VCR indicator is lit VCR MODE H...

Page 13: ...sc CD Playback Mode is available only when an Audio CD disc or a CD RW R disc with MP3 files is inserted into the unit 1 Title List Playlist Original Turns on a title list playlist or Original which shows the record ed titles on the disc 2 Format DVD RW only Allows you to erase all of the recorded content on the disc The disc will be completely blank Erased content cannot be retrieved A DVD RW dis...

Page 14: ...le Angle exceptVR mode Repeat Marker Noise Reduction Zoom DVD RW 1 1 0 00 00 XP 1 01 CH 8 Stereo Video mode 1 4 5 2 5 2 3 6 3 DVD DVD mode First Hit DISPLAY to display the onscreen display 1 Indicates current video status 2 Indicates the current time 3 Indicates a current channel number and an audio status of the program 4 Indicates a recording or play ing speed 5 Indicates a Tape Counter 6 Audio ...

Page 15: ...ppears when the Timer Recording is proceeding in DVD Appears when DVD is in the Timer Recording standby mode Appears when a DVD R disc is on the disc tray Appears when a DVD RW disc is on the disc tray Appears when the Timer Recording is proceeding in VCR Appears whenVCR is in the Timer Recording standby mode Appears duringVCR to DVD duplication process Appears during DVD toVCR duplication process...

Page 16: ...c Audio Method 2 Method 3 Better picture Best picture S VIDEO OUT COMPONENT VIDEO OUT Audio cable supplied Component video cables commercially available This unit Note Connect this unit directly to the TV If the A V cables are connected to a VCR pictures may be distort ed due to the copy protection system Method 2 and method 3 are only useful in DVD mode Method 1 Good picture VIDEO OUT Video cable...

Page 17: ...t by hitting POWER The POWER indicator on the front panel will appear Then hit CHANNEL L K to select channel 3 or 4 the same channel as the output channel of the cable box or satellite box If noise appears on the TV screen hit VIDEO TV on the remote control If you use the channel 4 you will need to change this unit s RF output to channel 4 Refer to RF converter output switch on page 81 2 At the TV...

Page 18: ... to a Multi channel Dolby Digital decoder you can enjoy high quality Dolby Digital 5 1 channel surround sound as heard in the movie theaters The audio source on a disc in a Dolby Digital 5 1 channel sur round format cannot be recorded as digital sound by an MD or DAT deck Playing back a DVD using incorrect settings may generate noise distortion and may also damage the speakers To complete these se...

Page 19: ...ecorded on you can delete those contents by formatting that disc Formatting is only neces sary to prepare disc pre viously recorded on for recording Details are on pages 27 28 When you format a disc the entire contents on that disc will be erased The unit automatically starts initializing when a brand new disc is inserted DVD disc types DVD RW VR DVD RW Video You want to Record TV programs Reuse b...

Page 20: ...ke up much disc space What Original or Playlist is for Throughout this manual you will find Original and Playlist to refer to the origi nal content and the edited version Original content refers to what s originally recorded on the disc Playlist content refers to the edited version of the original content Finalizing a Disc You need to record in video mode and finalize the disc to play it back on o...

Page 21: ...H 1 Note You cannot change the channel while one of the functions on the unit VCR or DVD is in the recording OTR or Timer Recording mode If the auto presetting is cancelled during preset ting some of the channels not yet preset may not be received The selection will depend on how you receive the TV chan nels To cancel the auto preset ting during scanning Press RETURN or SETUP to cancel To select a...

Page 22: ... will appear 3 Using K L select Manual Preset Hit ENTER Manual Preset menu will appear 4 Select the channel number to add or delete Press or CH L to move to a smaller channel number Press B or CH K to move to a larger channel number Use B to move through the channels one by one includ ing the ones not in the channel memory while use CH K L to move through the channels only in the channel memory Pr...

Page 23: ...formation 6 Hit SETUP to exit TV Audio Select SAP Stereo VCR DVD Notes on TV channel audio If you want to record a TV program available in second audio or stereo on a DVD RW R or videotape you have to select either Stereo or SAP in the Channel Preset screen beforehand Refer to the following table to check an appropriate setting You can only play back the disc in second audio if a TV program is ava...

Page 24: ...PBS channel number in your area Using K L select Manual Hit ENTER Using the Number buttons or K L enter the PBS channel number Hit ENTER The setting will be activated If you want to set the clock manually and cancel the auto clock setting Using K L select OFF Hit ENTER The auto clock setting will be canceled 6 Hit SETUP to exit 7 Hit POWER to turn off the unit This unit will search for the clock t...

Page 25: ...r sor Clock Setting JAN 01 2005 SAT 12 00 AM VCR DVD Clock Setting VCR DVD 5 Using K L enter the time hour minute Press B to move the cur sor 6 Press K L to select AM or PM Hit ENTER Clock menu will appear then the settings will be activated Although seconds are not dis played they will be counted from zero 7 Hit SETUP to exit Clock Setting JAN 01 2005 SAT 12 00 AM VCR DVD Note Your clock setting ...

Page 26: ...ct Daylight Saving Time Hit ENTER Option window will appear 5 Using K L select ON or OFF Hit ENTER Choose ON if you are currently observing the daylight saving time 6 Hit SETUP to exit Daylight Saving Time OFF ON VCR DVD Setting the daylight saving time When Daylight Saving Time is ON the clock will automatically move forward one hour on the first Sunday in April and move back one hour on the last...

Page 27: ...e REC SPEED is hit allowed recording time will be displayed Recording speed XP 1H SP 2H LP 4H EP 6H SLP 8H SEP 10H Recording time 18 min 36 min 72 min 108 min 144 min 180 min Video Sound Quality Disc Size 8cm Disc XP 1H SP 2H LP 4H EP 6H SLP 8H SEP 10H 60 min 120 min 240 min 360 min 480 min 600 min 12 cm Disc Disc type Disc format Video mode VR mode Video mode Functions Playback limited recording ...

Page 28: ... the disc When DVD RW R Video mode is finalized title menu will be created automatically Finalize discs recorded on this unit in order to play them back on other DVD players Disc type format Copy free Copy once Copy prohibited Recordable Not Recordable DVD RW DVD RW VR DVD RW DVD RW Video DVD R DVD R ver 1 1 1 2 ver 1 1 1 2 CPRM compatible ver 1 1 1 2 ver 1 1 1 2 CPRM compatible ver 2 0 What is CP...

Page 29: ...URN MENU LIST TOP MENU DUBBING REC MONITOR CLEAR ENTER PLAY AUDIO 1 2 3 4 5 7 When inserting a blank disc the unit starts to initialize it automati cally After that you can record on the disc with a recording format selected in the Setting menu You can set specific time interval for chapter marks 1 Hit SETUP Easy Setting Menu or Advanced Setting Menu will appear If Easy Setting Menu is displayed p...

Page 30: ...100 will be indicated This operation may take a while to be completed Formatting 100 Formatting 90 Format No Yes Are you sure Yes No Format No Yes DVD RW DVD RW VR DVD RW DVD RW Video Reformatting a disc Note When you reformat the disc all contents of the disc will be erased If you want to cancel format ting at step 3 or 4 select No A disc once formatted with this unit cannot be used on other DVD ...

Page 31: ...ns select a desired channel to record 5 Hit REC OTR to start recording I mark will be displayed for 5 seconds Hit PAUSE F to pause Hit REC OTR or PAUSE F to resume 6 Hit STOP C to stop recording This operation may take a while to be completed I CH 12 XP 0 58 This operation may take a while to be recognized DVD DVD R DVD R DVD RW DVD RW VR DVD RW DVD RW Video You can confirm the recording picture a...

Page 32: ...lect a recording speed Refer to Recording speed on page 25 3 Make sure that the recording format is set to the desired mode Refer to Formatting a disc on pages 27 28 When a DVD RW disc is loaded You can choose Video mode or VR mode from the Setting menu Video mode has been selected as the default Refer to page 27 Choosing the recording format of a blank disc When a DVD R disc is loaded DVD R discs...

Page 33: ...D Date Start End CH Speed DVD VCR VCR DVD Daily MON SAT JAN 01 JAN 31 MON FRI SAT FRI SUN Timer Programming 2 3 4 1 JAN 01 L1 DVD Date Start End CH Speed DVD VCR VCR DVD Timer Programming 2 3 4 1 Date Start End CH Speed DVD VCR VCR DVD Recording Auto Chapter 10 minutes Timer Programming DVD RW Recording Format Video mode Auto Finalize Dubbing Mode VCR DVD DVD VCR VCR DVD R DVD R DVD RW DVD RW VR D...

Page 34: ...TOP C to stop the disc recording or STOP C EJECT A to stop the videotape recording on the front panel of the main unit STOP C on the remote control is not effective To stop the Timer Recording in progress If the timer program did not complete correctly the error number appears on the timer programming list POWER T SET TIMER PROG OPEN CLOSE SPACE 1 2 3 4 5 6 7 8 0 9 CH VIDEO TV ABC DEF GHI JKL MNO ...

Page 35: ...free side of the unit is on the same channel with the one programmed for Timer Recording the unit pri oritizes Timer Recording and the current recording will be automatically stopped If the channels set for Timer recording and the current recording are same the current recording will continue without interruption If both DVD and VCR are timer programmed you cannot use any functions for either unit...

Page 36: ...t to use VIDEO IN Composite select Video In Select Video L2 Front Video In L1 Rear S Video In VCR DVD L1 Rear S Video In Video In VCR DVD or 34 Settings for an external source 1 Hit SETUP to display Easy Setting Menu or Advanced Setting Menu If Advanced Setting Menu is displayed proceed to step 3 2 Using K L select Advanced Setting Menu Hit ENTER 3 Using K L select Select Video Hit ENTER Select Vi...

Page 37: ...TOP C on the unit to stop recording For videotape Hit STOP C EJECT A on the unit to stop recording This operation may take a while to be completed VCR This operation may take a while to be recognized DVD Setting a disc to protect To prevent accidental recording edit ing or erasing of the titles you can protect them from the Setting menu 1 Hit SETUP Easy Setting Menu or Advanced Setting Menu will a...

Page 38: ...rd during finalization Details are on pages 25 26 1 Hit SETUP Easy Setting Menu or Advanced Setting Menu will appear 2 Using K L select Disc Hit ENTER Disc menu will appear 3 Using K L select Finalize Hit ENTER Confirmation window will appear 4 Using K L select Yes Hit ENTER Finalizing will start 5 Finalizing is complete This operation may take a while to be completed To cancel finalizing DVD RW o...

Page 39: ... window will appear 4 Using K L select Disc Full or End of Timer Rec Hit ENTER Option window will appear Example Disc Full Example End of Timer Rec 5 Using K L select ON Hit ENTER Your setting will be activated 6 Hit SETUP to exit Auto Finalize End of Timer Rec OFF ON DVD Auto Finalize Disc Full OFF ON DVD Auto Finalize End of Timer Rec OFF Disc Full OFF DVD DVD R DVD R DVD RW DVD RW Video Auto fi...

Page 40: ...rding Hit ENTER Recording menu will appear 4 Using K L select Dubbing Mode Hit ENTER Option window will appear Recording Auto Chapter 10 minutes Timer Programming DVD RW Recording Format Video mode Auto Finalize Dubbing Mode VCR DVD VCR DVD Recording Auto Chapter 10 minutes Timer Programming DVD RW Recording Format Video mode Auto Finalize Dubbing Mode VCR DVD DVD VCR VCR DVD R DVD R DVD RW DVD RW...

Page 41: ...ication will start 9 Hit STOP C to stop the recording DVD VCR Dubbing Mode DVD VCR VCR DVD VCR DVD DVD to VCR VCR DVD Dubbing Mode DVD VCR VCR DVD VCR DVD VCR to DVD Note When you turn off the unit after setting the Dubbing Mode to DVD VCR the setting will be set to VCR DVD automatically Dubbing Mode is available only if the videotape or disc is not copy protected You cannot change the output mode...

Page 42: ...lor systems Region codes This unit has been designed to play back DVD discs with Region One 1 DVDs must be labeled for ALL regions or for Region 1 You cannot play back DVDs labeled for other regions Look for the symbols below on your DVDs If these region symbols are not on your DVD you cannot play back the DVD on this unit The number inside the globe refers to region of the world A DVD labeled for...

Page 43: ...e disc tray guide 4 Hit OPEN CLOSE A to close the disc tray 5 Hit TOP MENU to display the title menu You can change Original or Playlist of VR mode using MENU LIST Video mode VR mode MENU LIST To exit the title menu hit TOP MENU again 6 Using K L B select a desired title Hit ENTER Playback will start 7 Hit STOP C to stop play back To eject the disc hit OPEN CLOSE A to open the disc tray then remov...

Page 44: ... NAME 1 2 FILE NAME 2 1 2 MP3 MP3 Basic playback cont d 1 Hit POWER Hit DVD When you are playing back a DVD or an audio CD turn on the TV and be sure to select the input to which the unit is connected 2 Hit OPEN CLOSE A to open the disc tray The disc tray will open 3 Insert your disc with its label facing up Align the disc to the disc tray guide 4 Hit PLAY B to start play back Playback will start ...

Page 45: ...c menu DVD DVD V DVD V Note TOP MENU will not always be active with all DVDs Menus vary among discs Refer to the information accompany ing the disc for details Playing back discs using the title menu Some DVDs have a title menu which lists the titles available on them It helps you to start play back at a specific title First 1 Hit TOP MENU The title menu will appear If the feature is not available...

Page 46: ... B x20 Normal speed playback x1 5 x20 x5 x40 x40 g g g g g g g g g g g g MP3 MP3 CD CD DVD R DVD R DVD RW DVD RW VR DVD RW DVD RW Video DVD V DVD V Skipping TV commercials during playback You can skip TV commercials by hitting CM SKIP in order to enjoy the recorded programs without interruption 1 During playback hit CM SKIP Normal playback will start at 30 seconds advanced from where you hit CM SK...

Page 47: ...Hit PLAY B to resume play F DVD R DVD R DVD RW DVD RW VR DVD RW DVD RW Video DVD V DVD V Slow forward Slow reverse playback 1 During playback hit PAUSE k Press D or E Every time you press D or E approximate speed will change as follows The sound will remain muted To return to the normal playback hit PLAY B x1 8 Pause x1 16 x1 8 x1 16 x1 2 x1 4 g g g g g g g g g g g g DVD R DVD R DVD RW DVD RW VR D...

Page 48: ...lect a desired marker number When it reaches the desired point hit ENTER The title track number and the time will be displayed 4 To return to the marker later Using K L select the desired marker number Hit ENTER Audio CD 1 0 00 00 1 2 3 4 5 6 1 2 3 4 5 6 DVD Video 1 1 0 00 00 DVD Video 1 1 0 00 00 CD CD DVD R DVD R DVD RW DVD RW VR DVD RW DVD RW Video DVD V DVD V Note To clear a marker select the ...

Page 49: ...tons enter a desired chapter number to search Hit ENTER Chapter search will start DVD Video 1 1 0 00 00 DVD R DVD R DVD RW DVD RW VR DVD RW DVD RW Video DVD V DVD V STOP POWER T SET TIMER PROG SKIP SKIP OPEN CLOSE SPACE 1 2 3 4 5 6 7 8 0 9 CH VIDEO TV SLOW PAUSE ABC DEF GHI JKL MNO PQRS REC OTR DISPLAY TUV WXYZ DVD REC OTR REC SPEED ZOOM SEARCH VCR SETUP CM SKIP RETURN MENU LIST TOP MENU DUBBING R...

Page 50: ... CD is displayed instead of time count 3 Using K L or the Number buttons enter a desired time to search Hit ENTER Time search will start Audio CD 1 0 00 00 DVD Video 1 1 0 00 00 CD CD DVD R DVD R DVD RW DVD RW VR DVD RW DVD RW Video DVD V DVD V Note Time search is available only within the same track or title STOP SKIP SKIP SLOW PAUSE REC OTR DVD REC OTR REC SPEED ZOOM SEARCH VCR CM SKIP DUBBING R...

Page 51: ... starting point A Hit ENTER after setting point A to select the ending point B Track The current track will be played back repeatedly CD MP3 only Group The current group will be played back repeatedly MP3 only Track All Group OFF MP3 1 0 00 00 Track All A B OFF Audio CD 1 0 00 00 Title Chapter A B OFF DVD Video 1 1 0 00 00 DVD Video 1 1 0 00 00 MP3 MP3 CD CD DVD R DVD R DVD RW DVD RW VR DVD RW DVD...

Page 52: ...appears in the subtitle menu at step 2 refer to the Language code on page 82 Switching subtitles Many DVD Video discs have subti tles in one or more languages they usually tell you which subtitle languages are available You can switch subtitle languages anytime during playback 1 During playback hit DISPLAY Display menu will appear 2 Using B select icon Hit ENTER Subtitle menu will appear 3 Using K...

Page 53: ...playing back Audio CDs or MP3 files you can switch among stereo the left channel only and the right channel only 1 During playback hit AUDIO Audio menu will appear DVD Video DVD RW VR mode Audio CD MP3 files 2 Using K L select a desired audio soundtrack or audio channel Hit ENTER DVD Video Audio soundtrack will change DVD RW VR mode Audio channel menu will appear Follow step 3 Audio CD MP3 files A...

Page 54: ...on reduces visual noise When playing back discs recorded in long time mode such as SLP or SEP mode select Type 1 or Type 2 Type 2 is more effective When playing back discs with a few noises such as DVD Video discs select OFF Type 1 Type 2 OFF DVD Video 1 1 0 00 00 DVD Video 1 1 0 00 00 DVD R DVD R DVD RW DVD RW VR DVD RW DVD RW Video DVD V DVD V STOP POWER T SET TIMER PROG SKIP SKIP OPEN CLOSE SPA...

Page 55: ...fer to page 56 Editing discs in VR mode For discs in VR mode you can use either Original menu or Playlist menu which is created from the original for editing Editing original titles The following items are available for editing of the original titles Deleting titles Refer to page 57 Setting titles to protect Refer to page 58 Releasing titles from protecting Refer to page 59 Editing playlists You c...

Page 56: ...n a DVD R disc is inserted into the unit 4 Using K L select Title Delete Hit ENTER Confirmation window will appear 5 Using K L select Yes Hit ENTER Title will be deleted 6 After this operation is com pleted hit SETUP to exit Writing the data on the disc will start momentarily This operation may take a while to be completed Title List JAN 1 1 00AM CH12 XP 4 5 1 2 3 Title List Title Delete No Yes JA...

Page 57: ...dit Title Name a b c A B C 1 2 3 JAN 1 1 00AM CH12 XP 0 00 59 6 DVD DVD R DVD R DVD RW DVD RW Video Putting names on titles Press ABC DEF GHI JKL MNO PQRS TUV WXYZ space abc def ghi jkl mno pqrs tuv wxyz space space _ 2 3 4 5 6 7 8 9 0 1 ABC abc Select 123 1 2 3 4 5 6 7 8 9 0 Step1 Step2 Follow the list below press the Number buttons repeatedly until the desired letter appears Select a desired cha...

Page 58: ...a desired time Hit ENTER Confirmation window will appear 3 Using K L select Yes Hit ENTER Chapter markers will be added If you select OFF at step 2 all the chapter markers will be erased 4 After this operation is com pleted hit SETUP to exit Writing the data on the disc will start momentarily This operation may take a while to be completed Title List Chapter Mark 5 minutes No Yes JAN 1 1 00AM CH12...

Page 59: ... After this operation is com pleted hit SETUP to exit Writing the data on the disc will start momentarily This operation may take a while to be completed Original Title Delete No Yes JAN 1 1 00AM CH12 XP Wait for a moment 3 Original Title Delete No Yes JAN 1 1 00AM CH12 XP 0 00 59 3 Original Protect Title Delete JAN 1 1 00AM CH12 XP 0 00 59 3 Original JAN 1 1 00AM CH12 XP 4 5 6 1 2 3 Disc Original...

Page 60: ...ect a whole disc DVD RW VR mode Only Select Disc Protect from Disc menu then select Yes Refer to Setting a disc to pro tect on page 35 This operation may take a while to be completed Original Protect OFF ON JAN 1 1 00AM CH12 XP 3 Wait for a moment Original Protect OFF ON JAN 1 1 00AM CH12 XP 0 00 59 3 DVD DVD RW DVD RW VR Setting titles to protect Note The protected title will be marked with a key...

Page 61: ...n will disappear from the title in the original list 3 After this operation is com pleted hit SETUP to exit Writing the data on the disc will start momentarily This operation may take a while to be completed Original Protect ON OFF JAN 1 1 00AM CH12 XP 3 Wait for a moment Original Protect ON OFF JAN 1 1 00AM CH12 XP 0 00 59 3 DVD DVD RW DVD RW VR Releasing titles from protecting STOP POWER T SET T...

Page 62: ...ing the data on the disc will start momentarily This operation may take a while to be completed Playlist Title Delete No Yes JAN 1 1 00AM CH12 XP Wait for a moment 3 Playlist Title Delete No Yes JAN 1 1 00AM CH12 XP 0 00 59 3 Playlist Scene Delete Title Delete Edit Title Name Chapter Mark Index Picture Title Dividing Title Combining JAN 1 1 00AM CH12 XP 0 00 59 6 Playlist JAN 1 1 00AM CH12 XP 4 5 ...

Page 63: ...indicat ed in red during the preview Hit ENTER again to start the preview You can check the result of the delation by preview 3 Using K L select Delete Hit ENTER Confirmation window will appear 4 Using K L select Yes Hit ENTER Part of a title will be deleted 5 After this operation is com pleted hit SETUP to exit Data will be written onto the disc momentarily This operation may take a while to be c...

Page 64: ... 3 JAN 1 1 00AM CH12 XP 0 00 59 3 DVD DVD RW DVD RW VR Putting names on titles Press ABC DEF GHI JKL MNO PQRS TUV WXYZ space abc def ghi jkl mno pqrs tuv wxyz space space _ 2 3 4 5 6 7 8 9 0 1 ABC abc Select 123 1 2 3 4 5 6 7 8 9 0 Step1 Step2 Follow the list below press the Number buttons repeatedly until the desired letter appears Select a desired character set using K L then hit ENTER Guide to ...

Page 65: ... new chapter marker will be added at the point you have decided Add When you select Delete at step 2 the chapter marker you have selected will be deleted Delete 4 After this operation is com pleted hit SETUP to exit Writing the data on the disc will start momentarily This operation may take a while to be completed Chapter 2 2 Playlist Chapter Mark Delete No Yes JAN 1 1 00AM CH12 XP Wait for a mome...

Page 66: ... decide the picture you want to select as thumbnail Then hit ENTER Confirmation window will appear 2 Using K L select Yes Hit ENTER A picture for thumbnail will be set 3 After this operation is com pleted hit SETUP to exit Writing the data on the disc will start momentarily This operation may take a while to be completed Playlist Index Picture No Yes JAN 1 1 00AM CH12 XP Wait for a moment 3 Playli...

Page 67: ...e reset to the first scene of each title 3 After this operation is com pleted hit SETUP to exit Writing the data on the disc will start momentarily This operation may take a while to be completed Playlist Title Dividing No Yes JAN 1 1 00AM CH12 XP Wait for a moment 3 Playlist Title Dividing No Yes JAN 1 1 00AM CH12 XP 0 00 59 3 F DVD DVD RW DVD RW VR Note If a disc contains the maxi mum number of ...

Page 68: ...peration may take a while to be completed Yes No Playlist Title Combining 1 3 Wait for a moment 2 1 2 Yes No Playlist Title Combining 2 3 1 2 1 Playlist Title Combining JAN 1 1 00AM CH12 XP 2 3 1 1 DVD DVD RW DVD RW VR Note If the number of chapter markers in the combined title exceeds 999 the combination will be rejected If one of two titles in the original is deleted the com bined new title will...

Page 69: ...0 to display the Playlist Add New Title Delete Playlist menu will appear next to the last title Using K L B select Delete Playlist Hit ENTER Confirmation window will appear 2 Using B select Yes Hit ENTER A Playlist will be deleted 3 After this operation is com pleted hit SETUP to exit Writing the data on the disc will start momentarily This operation may take a while to be completed Playlist Delet...

Page 70: ... range of sound volume Set whether or not to output sound during fast forward playback Set the parental level for DVD disc playback Set and change the password Audio Language Subtitle Language OSD Language Screen Saver Digital Out Dynamic Range Control Fast Forward with Audio Parental Lock Change password English French Spanish Original English French OFF English French OFF 5 minutes 10minutes Set...

Page 71: ...al Lock All TV Aspect 4 3 Letter Box Subtitle Language OFF Digital Out Fast Forward with Audio OFF Dynamic Range Control ON Disc Menu Language English Audio Language Original DVD Disc Menu Language French Spanish Other English DVD Audio Language English French Spanish Other Original DVD Disc Menu Language Default English Set the language for Disc Menu Using K L select a lan guage Hit ENTER Your se...

Page 72: ... Setting Menu will appear 3 Using K L select Display Hit ENTER Option window will appear 4 Using K L select a desired item Hit ENTER Hit STOP C if you are playing back a disc Playback Parental Lock All TV Aspect 4 3 Letter Box Digital Out Fast Forward with Audio OFF Dynamic Range Control ON Disc Menu Language English Audio Language Original Subtitle Language OFF DVD Subtitle Language OFF French Sp...

Page 73: ...ETUP Easy Setting Menu or Advanced Setting Menu will appear If Advanced Setting Menu is displayed proceed to step 3 Hit STOP C if you are playing back a disc Choose the appropriate Audio settings for your equipment Audio setting Instructions continue on the next page Display FL Dimmer Bright Screen Saver 10 minutes OSD Language English VCR DVD FL Dimmer Bright Dark Auto VCR DVD Using K L select a ...

Page 74: ...d at 48kHz Using K L select a setting Hit ENTER Your setting will be activated PCM Convert the Dolby Digital into PCM 2 channel When your amplifier decoder is NOT com patible with Dolby Digital set to PCM Stream Outputs Dolby Digital signals When your amplifier decoder is compati ble with Dolby Digital set to Stream B A Audio setting cont d Note When playing back a DVD RW disc recorded in VR mode ...

Page 75: ...sy Setting Menu or Advanced Setting Menu will appear If Advanced Setting Menu is displayed proceed to step 3 2 Using K L select Advanced Setting Menu Hit ENTER Advanced Setting Menu will appear 3 Using K L select Playback Hit ENTER Option window will appear 4 Using K L select Parental Lock Hit ENTER Hit STOP C if you are playing a disc Some DVD Video discs feature a Parental Lock level Playback wi...

Page 76: ...t password B Settings for Parental lock level cont d Playback Parental Lock All Disc Menu Language English TV Aspect 4 3 Letter Box Subtitle Language OFF Digital Out Audio Language Original Fast Forward with Audio OFF Dynamic Range Control ON DVD Parental Lock 8 7 6 5 4 3 2 1 All DVD Parental Lock Default All Set the Parental Lock level Using K L change the parental level Hit ENTER Option window w...

Page 77: ...emote control or CHANNEL K L on the front panel of the unit There is a videotape with a record tab in the unit The desired recording speed is selected in SP standard play or SLP super long play mode by hitting REC SPEED on the remote control Recording speed Stereo or SAP is selected Refer to page 21 Refer to page 31 for instructions on Timer Recording 1 Hit REC OTR VCR to begin the recording To te...

Page 78: ...the VCR will play the videotape automatically Pro 1 Pro 2 Pro 3 Pro 4 Pro 5 02 01 01 02 03 Beginning of tape End of tape CURRENT PROGRAM INDEX MARK INDEX SEARCH 03 VCR VCR VCR Index search Note Every time a videotape is recorded an index mark is written on the videotape Note The remaining recording time will appear on the display panel during an one touch Timer Recording Hit DISPLAY to see it on t...

Page 79: ...NO VCR VCR VCR Note Still Slow Pause mode will be automatically cancelled after 5 minutes to prevent damage to the videotape and the video head To return to playback from the Picture Search Still Slow mode hit PLAY B Search cont d HIFI Your Selection Type of recorded tape non Hi Fi tapes Hi Fi tapes recorded in Hi Fi stereo Hi Fi tapes recorded second audio program Hi Fi tapes recorded main audio ...

Page 80: ...sound Re connect all connections securely The connecting cord is damaged Check the connections to the amplifier input The input source setting on the amplifier is incorrect The unit is in pause mode or in Slow motion Play mode The unit is in fast forward or fast reverse mode TV channels cannot be changed Switch the input to TV Connect the antenna cable correctly page 14 The channel cannot be chang...

Page 81: ...nother recorder the unit cannot play back the disc unless it is finalized page 36 Sound is noisy The disc is dirty or flawed No DTS sound is output This unit is not compatible with DTS sound There is no picture The Setup Display appears Hit RETURN or SETUP to turn off the display Picture noise appears The disc is dirty or flawed If the picture output signal from the unit passes through yourVCR bef...

Page 82: ...ng Error This program is not recordable inVideo mode This program is not allowed to be recorded on this disc Unplayable disc is inserted in the unit The disc is upside down Insert the standardized disc which bears the marks on page 40 Insert the disc with the labeled side facing up Recording Error This disc is protected and not recordable Can not record on this disc Cause Error message Solution Th...

Page 83: ...te unnecessary titles pages 54 57 This unit cannot delete the original chapter Delete unnecessary chapter marker using other DVD recorders Delete unnecessary titles from the Original list page 57 Delete unnecessary titles pages 54 57 Insert a new disc Undo finalizing of the disc page 36 The maximum is 99 The maximum is 999 If you are still having trouble with this unit after checking Troubleshooti...

Page 84: ...ng at the rear panel Some discs are compati ble with more than one region or all regions Sampling frequency The rate which sound is measured by a specified interval to turn it into digi tal audio data The numbers of sam pling in one second defines as sam pling frequency The higher the rate the better the sound quality is SAP Secondary Audio Program Sub audio channel which is delivered separately f...

Page 85: ...Audio output During audio output Jacks Output 1 2 L R 2V rms 47kΩ RCA jacks Digital audio output Output level Jacks 500 mVp p 75Ω RCA jack 1Vp p 75Ω 286 mVp p 75Ω 4 pin mini DIN VHF UHF antenna input output terminal VHF UHF set 75Ω System VCR video heads Power requirements Power consumption Weight DVD Video DVD RW R CD DA CD RW R Video Cassette Tape Four heads AC120V 60 Hz 30 W standby 3 0 W 9 5 l...

Page 86: ...rabable Sí Sí Puede crear capítulos a intervalos fijos auto Sí Sí Puede crear capítulos donde desee manual Sí No Puede grabar imágenes de tamaño 16 9 Sí Sí Puede grabar un programa de Copia una vez Sí No Edición Puede hacer funciones de edición básica Sí Sí Puede hacer funciones de edición avanzadas edición de lista a reproducir Sí No No Sí No Sí No Sí No 1 El DVD RW modoVR sólo puede reproducirse...

Page 87: ...sco Qué significa Original o Playlist A lo largo de este manual encontrará Original y Playlist que se refieren a las grabaciones reales y la versión editada La grabación Original se refiere a la grabación real en el disco El Playlist se refiere a la versión editada del disco cómo se va a reproducir la versión Original Finalización de un disco Para reproducir el disco en un reproductor DVD diferent...

Page 88: ...a reproducción 6 Presione STOP C EJECT A en el panel frontal de la unidad para expulsar la cinta VCR VCR VCR Nota Cuando se coloca una cinta sin la lengüeta de grabación la unidad empezará a reproducir automáticamente El seguimiento se ajustará automáticamente para la reproducción Para ajustar manualmente el seguimiento presione CHANNEL K L en el panel frontal de la unidad o los botones CH K L en ...

Page 89: ...cione el canal deseado pre sionando los botones numéri cos en el mando a distancia o CHANNEL K L en el panel frontal de la unidad Hay una cinta con la lengüeta para grabación intacta en la unidad Seleccione la velocidad de grabación deseada en SP repro ducción estándar o SLP repro ducción de super larga duración presionando REC SPEED en el mando a distancia Velocidad de grabación Seleccione Estére...

Page 90: ...er maintenance commercial use such as hotel rental or office use of this product or damage which results from fire flood lightning or other acts of God THIS WARRANTY DOES NOT COVER PACKING MATERIALS ANY ACCESSORIES EXCEPT REMOTE CONTROL ANY COSMETIC PARTS COMPLETE ASSEMBLY PARTS DEMO OR FLOOR MODELS FUNAI CORP AND ITS REPRESENTATIVES OR AGENTS SHALL IN NO EVENT BE LIABLE FOR ANY GENERAL INDIRECT O...

Reviews: