background image

or

or

D

VD Functions

– 20 –

EN

3

3

2

2

SETUP

CUSTOM

LANGUAGE
DISPLAY
AUDIO
PARENTAL

Select CUSTOM

SETUP

QUICK
CUSTOM
INITIALIZE

To select the desired item

1

1

ENTER

ENTER

CUST

CUST

OM Men

OM Men

u

u

ENTER

ENTER

SETUP

STOP

ENTER

ENTER

Hint

Hint

1

• Language options are not available with

some discs.

• If OTHER is selected on the AUDIO, SUBTI-

TLE or DISC MENU screen, press four-digit
number to enter the code for the desired lan-
guage. (Refer to the language code list on
page 24.)

• Only the languages supported by the disc

can be selected.

2

• Language Setting for Audio and Subtitle is

not  available with some discs. Then use the
AUDIO and the SUBTITLE/T-SET button.
Details are on page 19.

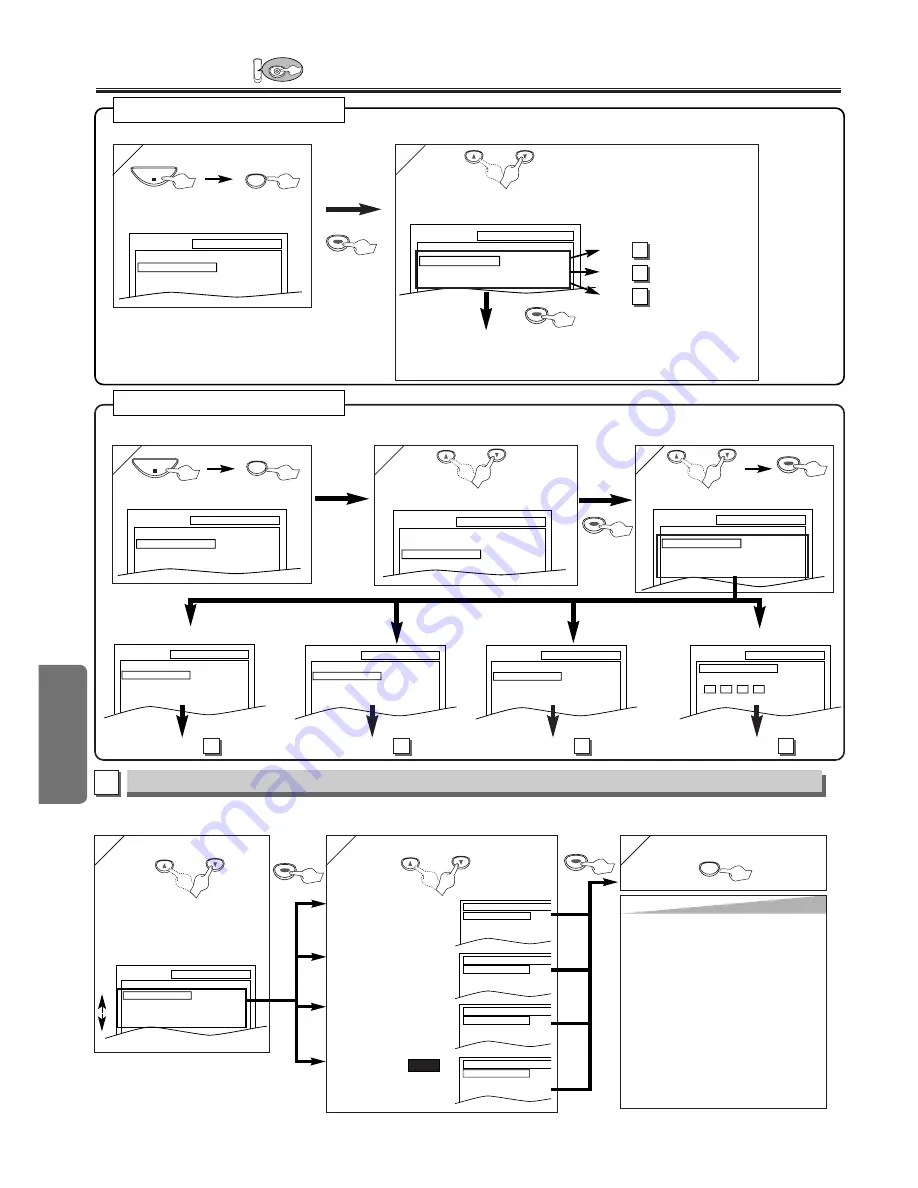
LANGUAGE Setting

Follow the step 1) to 3) in the “CUSTOM Menu” section on page 20.

4

4

or

Select the desired item 

6   

6   

To exit the menu

5

5

AUDIO 

∗∗

∗∗

2

(Default: ORIGINAL)

Sets the audio language.

SUBTITLE:

∗∗

∗∗

2

(Default: OFF)

Sets the subtitle language.

DISC MENU:

∗∗

1

(Default: ENGLISH)

Sets the language for DVD
menu.

PLAYER MENU:
(Default: ENGLISH)

Sets the language for the
On-screen display.

QUICK

ENTER

ENTER

SETUP

SETUP

PARENTAL

PASSWORD

Please enter a 4-digit password.

SETUP

AUDIO

DRC
DOWN SAMPLING
DOLBY DIGITAL

ON
ON
ON

SETUP

DISPLAY

TV ASPECT
STILL MODE
ANGLE ICON
AUTO POWER OFF

4:3 LETTER BOX
AUTO
ON
ON

SETUP

LANGUAGE

AUDIO
SUBTITLE
DISC MENU
PLAYER MENU

ORIGINAL
OFF
ENGLISH
ENGLISH

2

2

Select the desired item

1

1

SETUP

QUICK
CUSTOM
INITIALIZE

SETUP

STOP

SETUP

QUICK

PLAYER MENU
TV ASPECT
DOLBY DIGITAL

ENGLISH
4:3 LETTER BOX
ON

Q

Q

UICK SETUP Men

UICK SETUP Men

u

u

or

•Refer to the sections “PLAYER

MENU”, “TV ASPECT”, or “DOLBY
DIGITAL” section on page 20 or 21.

You can change the DVD player’s settings.

<SETUP MENU>

<SETUP MENU>

Confirm that QUICK is selected

You can select the “PLAYER MENU”, “TV ASPECT”, or “DOLBY DIGITAL” from the QUICK SETUP menu quickly.

ENTER

ENTER

LANGUAGE menu

AUDIO menu

DISPLAY menu

PARENTAL menu

or

Select the desired language

AUDIO

ORIGINAL
ENGLISH
FRENCH

SUBTITLE

OFF
ENGLISH
FRENCH

DISC MENU

ENGLISH
FRENCH
SPANISH

PLAYER MENU

ENGLISH
FRANÇAIS
ESPAÑOL

A

LANGUAGE menu

DVD Set Up 

DVD

P20      (Step 5)

P21      (Step 5)

P21      (Step 5)

A

B

C

page 20

A

page 21

B

page 21

C

page 22

D

to decide

SETUP

QUICK
CUSTOM
INITIALIZE

SETUP

LANGUAGE

AUDIO
SUBTITLE
DISC MENU
PLAYER MENU

ORIGINAL
OFF
ENGLISH
ENGLISH

ENTER

ENTER

Summary of Contents for EWD2204

Page 1: ...le Discs 5 Connections 5 RF Output Channel 5 Hint for Cable Box or Satellite Box 6 Connection to an Audio System 6 Connection to a TV 7 Front Rear Terminals 7 About the Remote Control and Front Panel 8 VCR DVD Switching 9 Preset for Use 10 Turn on the unit for the first time 10 Clock Set Up 10 VCR Functions Playback 11 Recording OTR One Touch Recording 11 Other Operations 11 On Screen Operations 1...

Page 2: ...quipment does cause harmful interference to radio or television reception which can be determined by turning the equipment off and on the user is encouraged to try to correct the interference by one or more of the following measures 1 Reorient or relocate the receiving antenna 2 Increase the separation between the equipment and receiver 3 Connect the equipment into an outlet on a circuit different...

Page 3: ...na Grounding If an outside antenna or cable system is connected to the video product be sure the antenna or cable system is grounded so as to provide some protection against voltage surges and built up static charges Article 810 of the National Electrical Code ANSI NFPA No 70 provides information with regard to proper grounding of the mast and supporting structure grounding of the lead in wire to ...

Page 4: ...ug and please call our help line mentioned on the front page to locate an Authorized Service Center CLEANING THE CABINET Use a soft cloth slightly moistened with a mild deter gent solution Do not use a solution containing alco hol spirits ammonia or abrasive CLEANING DISCS When a disc becomes dirty clean it with a cleaning cloth Wipe the disc from the center out Do not wipe in a circular motion Do...

Page 5: ...rmal CD layer can be delivered The sound recorded on the high density Super Audio CD layer cannot be delivered Any other discs without compatibility indications If channel 3 is already occupied for broadcasting 1 Set your TV to channel 4 2 Insert a pre recorded tape into this unit 3 Press the OUTPUT button on the DVD VCR so that the VCR OUTPUT light is lit If noise appears on the TV screen press t...

Page 6: ... to 2 above Then play back a tape Refer to Playback on page 11 To view one channel while recording another 1 While you are recording on the DVD VCR press the VCR TV but ton 2 At the cable box or satellite box select the channel you want to view ANT OUT ANT IN RF Cable supplied Back of DVD VCR IN OUT E Back of TV Cable Signal Connection A Cable box or Satellite box ANT OUT ANT IN RF Cable supplied ...

Page 7: ...r etc here S VIDEO OUT jack Connect an optional S Video cable here through the S video in jack of a televi sion DVD only COMPONENT VIDEO OUT jacks Connect optional component video cables here through the component video in jacks of a television DVD only Front Rear Terminals DIGITAL AUDIO OUT COAXIAL ANT OUT ANT IN AUDIO OUT DVD VCR DVD VCR S VIDEO OUT COMPONENT VIDEO OUT AUDIO IN VIDEO IN AUDIO OU...

Page 8: ...ame at a time To advance playback one frame at a time To pause disc playback To pause disc playback To pause tape playback or recording To stop playback To stop playback To stop playback or recording To skip chapters To skip tracks To return to the top file of the highest hierarchy in the program and MP3 menu MP3 To change channels To adjust the tracking manually during playback To begin disc play...

Page 9: ...s the VCR button on the remote control Verify that the VCR OUTPUT light is lit VCR MODE Note Pressing only the OUTPUT button on the front panel DOES NOT switch the mode of the remote control You MUST select the correct mode on the remote control Press the DVD button on the remote control Verify that the DVD OUTPUT light is lit DVD MODE OPEN CLOSE STOP EJECT PLAY REC OTR TIMERREC F FWD REW POWER CH...

Page 10: ... memo rized in this unit by using the CHANNEL buttons If AUTO SET UP appears on the TV screen again check the cable connections Then press the B button once again Y Yes es Press the MENU button to exit Refer to Hint for Cable Box or Satellite Box section on page 6 Do you connect the cable from the cable box or the satellite box to the DVD VCR s ANT IN jack YES NO Turn on the unit for the first tim...

Page 11: ...While you are recording on the DVD VCR press the VCR TV button 2 At the cable box or satellite box select the channel you want to view If you have connect ed the DVD VCR to a cable box or satel lite box refer to Hint for Cable Box or Satellite Box section on page 6 STOP EJECT A You can select a fixed recording time by press ing the REC OTR button repeatedly To cue or review picture during playback...

Page 12: ...EC SPEED AM B PM Select AM or PM 7 7 Repeat the procedure in steps 5 and 6 to set the end time Select the desired channel Timer Recording If you have connected the DVD VCR to a cable box or satellite box as the Connection A on page 6 select the VCR to channel 3 or 4 the RF output channel of the VCR Then select the desired channel at the cable box or satellite box Leave the cable box or satellite b...

Page 13: ...ity shielded cables with RCA type connectors Standard audio cables are not recommended You can use a video disc player satellite receiver or other audio video component with A V outputs L1 or L2 is found before the lowest memorized channel Example CH02 L2 input jacks are on the front of this DVD VCR Copying a Video Tape 13 If there is a power failure or the DVD VCR has been unplugged for more than...

Page 14: ... SELECT Hint Hint To cancel Auto Repeat follow steps 1 2 above Then press the B button so that OFF appears beside AUTO REPEAT Press the CLEAR C RESET button to exit If menu remains on the TV screen at step 3 press the CLEAR C RESET button to exit You can repeat playback of a whole tape automatically Insert a tape into this unit VCR VCR VCR Pro 1 Pro 2 Pro 3 Pro 4 Pro 5 02 01 01 02 03 Beginning of ...

Page 15: ...on Resume message will appear on the TV screen Press the PLAY button play back will resume from the point at which playback was stopped To cancel resume press the STOP button one more time during the Stop mode For MP3 playback will resume from the beginning of the track at which playback was stopped Paused and Step by Step Playback Press the PAUSE button during playback T To contin o continue pla ...

Page 16: ... Current track number Total tracks Elapsed time of the current chapter Remaining time of the current chapter Elapsed time of the current title Remaining time of the current title Layer numbers appears only when playing a two layered Disc L0 Layer 0 is playing L1 Layer 1 is playing DVD MP3 MP3 TRACK 01 1 36 0 01 15 T The name of the file currently in play will be displayed Current Repeat setting if...

Page 17: ...atedly until this screen appears For single digit tracks 1 9 press a single number eg track 3 press 3 To play track 26 press 10 2 6 of the Number buttons Using the SEARCH Using the SEARCH MODE MODE b button utton 1 1 Track Search Using the n Using the number b umber buttons uttons DVD MP3 MP3 CD CD 1 1 2 2 Within 30 seconds 2 2 2 Title Chapter Search Using the SEARCH Using the SEARCH MODE MODE b b...

Page 18: ...s Your programs are still stored until either the disc tray is open or power is turned off To repeat the current track in the program press the REPEAT but ton repeatedly until TRACK appears during playback To repeat the entire program press the REPEAT button repeatedly until ALL appears during playback You may determine the order in which tracks will play DVD MP3 MP3 CD CD 1 1 REPEAT PLAY TRACK AL...

Page 19: ...e during CD playback DVD CD CD 1 1 STEREO AUDIO PLAY Each time you press the AUDIO button Stereo Sound mode Camera Angle This unit allows you to select a subtitle language if available during DVD play back DVD DVD V DVD V 1 1 1 ENG 6 SUBTITLE T SET PLAY ENG FRE OFF English subtitles French subtitles no subtitles Each time you press the SUBTITLE T SET button subtitle languages change For example Su...

Page 20: ...isplay QUICK ENTER ENTER SETUP SETUP PARENTAL PASSWORD Please enter a 4 digit password SETUP AUDIO DRC DOWN SAMPLING DOLBY DIGITAL ON ON ON SETUP DISPLAY TV ASPECT STILL MODE ANGLE ICON AUTO POWER OFF 4 3 LETTER BOX AUTO ON ON SETUP LANGUAGE AUDIO SUBTITLE DISC MENU PLAYER MENU ORIGINAL OFF ENGLISH ENGLISH 2 2 Select the desired item 1 1 SETUP QUICK CUSTOM INITIALIZE SETUP STOP SETUP QUICK PLAYER ...

Page 21: ...WER OFF ON TV ASPECT 4 3 LETTERBOX STILL MODE AUTO ANGLE ICON ON AUTO POWER OFF ON 4 3 LETTERBOX AUTO ON OFF TV ASPECT 4 3 LETTERBOX STILL MODE AUTO ANGLE ICON ON AUTO POWER OFF ON 4 3 LETTERBOX AUTO OFF ON Select the desired setting or ENTER ENTER STILL MODE Default AUTO See Hint to the right TV ASPECT 4 3 LETTERBOX STILL MODE AUTO ANGLE ICON ON AUTO POWER OFF ON STILL MODE AUTO FIELD FRAME Selec...

Page 22: ...eral children can be played back Levels 7 to 2 Only DVD softwares intended for general use and chil dren can be played back Level 1 Only DVD softwares intended for children can be played back with those intended for adult and general use pro hibited 4 4 or Select PARENTAL LEVEL Enter your desired four digit password except for 4737 D PARENTAL menu 1 2 3 4 5 6 7 8 9 0 CHANGE PARENTAL LEVEL ALL 7 7 ...

Page 23: ...on the remote control to activate it in the VCR mode Check if the green VCR OUTPUT light is lit Then set it to the TV position by pressing the VCR TV button Video or color fades in and out when You cannot copy a copyrighted video tape You are experiencing copy guard protection making a copy of a video tape Cannot remove the tape Check if this unit is in the VCR mode If not press the VCR button on ...

Page 24: ...ollows DURATION PARTS FUNAI CORP will provide parts to replace defective parts without charge for one 1 year from the date of original retail purchase Two 2 years for Picture Tube Certain parts are excluded from this warranty LABOR FUNAI CORP will provide the labor without charge for a peri od of ninety 90 days from the date of original retail pur chase LIMITS AND EXCLUSIONS THIS WARRANTY IS EXTEN...

Page 25: ...e en la toma ANT IN de DVD VCR Pantalladeltelevisor Mando a distancia VCR VCR o VCR 1 1 MENU PROGRAMAR AUTOREPETIR OFF AJUSTE CANAL B AJUSTE DE RELOJ SELEC IDIOMA MENU AJUSTE DE RELOJ MES DIA AÑO 0 3 HORA MINUTO AM PM AJUSTE DE RELOJ MES DIA AÑO 0 3 1 5 HORA MINUTO AM PM Seleccione el mes actual Seleccione el día actual Si no se ha ajustado el reloj aparece la pantalla AJUSTE DE RELOJ cuando pulse...

Page 26: ...cto en el modo de grabadora de vídeo Para borrar los marcadores Para borrar los marcadores Disco compacto Para retirar el Nº de estado en la entrada de programa Para borrar los números entrados incorrectamente Para borrar los números entrados incorrectamente Para salir del menú de la grabadora de vídeo Para reponer el contador de cinta Para buscar en avance retroceso en un disco Para empezar la re...

Page 27: ...e OUTPUT button on the front panel DOES NOT switch the mode of the remote control You MUST select the correct mode on the remote control Press the DVD button on the remote control Verify that the DVD OUTPUT light is lit DVD MODE 2 2 LANGUAGE SELECT B ENGLISH ON FRANCAIS ESPAÑOL 1 1 Turn on the TV and set it to channel 3 If channel 3 is already occupied for broadcasting see RF Output Channel sectio...

Page 28: ...s To search track To search time CD To rapidly return to a location of disc Search the markers CD To select the recording speed To select channel The 10 button has no effect in VCR mode To clear the markers To clear the markers CD To remove status No in program input To clear the numbers entered incorrectly To clear the numbers entered incorrectly To exit the VCR Menu To reset the tape counter To ...

Reviews: