background image

– 27 –

EN

1L25

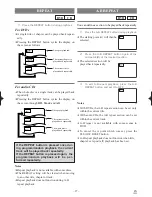
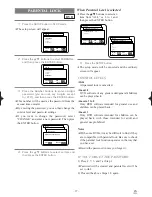
REPEAT

1   

Press the REPEAT button during playback.

For DVDs

¡

A single title or chapter can be played back repeat-
edly.

¡

Pressing the REPEAT button cycles the display on
the screen as follows.

For audio CDs

¡

The whole disc or a single track can be played back
repeatedly.

¡

Pressing the REPEAT button cycles the display on
the screen through Off, Track and All.

CD

DVD

The current title is 
played back repeatedly.

REPEAT
[OFF]

REPEAT

[CHAPTER]

REPEAT

   [TITLE]   

The current chapter is 
played back repeatedly.

No repeat playback.

The whole disc is 
played back repeatedly.

REPEAT
[ALL]   

REPEAT
[TRACK]

The current track is 
played back repeatedly.

No repeat playback.

REPEAT 
[OFF]

If the REPEAT button is pressed once dur-
ing program/random playback, the current
track will be played back repeatedly.
If the REPEAT button is pressed again, the
program/random playback will be per-
formed repeatedly.

Notes

¡

Repeat playback is not available with some discs.

¡

The REPEAT setting will be cleared when moving
to an other title, chapter or track.

¡

Repeat playback does not function during A-B
repeat playback.

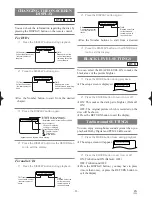
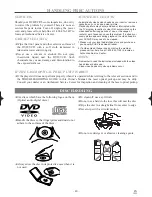
You can define a section to be played back repeatedly.

1   

Press the A-B REPEAT button during playback.

¡

The starting point (A) will then be
selected.

2   

Press the A-B REPEAT button again at the
end point (B) of the desired section.

¡

The selected section will be
played back repeatedly.

3   

To exit A-B repeat playback, press the A-B
REPEAT button and set it to OFF.

Notes

¡

With DVDs, the A-B repeat section can be set only
within the current title.

¡

With audio CDs, the A-B repeat section can be set
within the current track.

¡

A-B repeat is not available with some scenes in
DVD.

¡

To cancel the A point which was set, press the
CLEAR/C.RESET button.

¡

A-B repeat playback does not function when title,
chapter, or repeat (all) playback has been set.

CD

DVD

A-B REPEAT

REPEAT
[ A -     ]

REPEAT
[ A - B ]

REPEAT

[ OFF ]

Summary of Contents for EWD2202

Page 1: ...ding owner s manual please call TOLL FREE 1 800 256 2487 Please read before using this equipment INSTRUCCIONES EN ESPAÑOL INCLUIDAS DVD PLAYER with VIDEO CASSETTE RECORDER EWD2202 EMERSON AND THE G CLEF LOGO ARE REGISTERED TRADEMARKS OF EMERSON RADIO CORP PARSIPPANY NEW JERSEY U S A ...

Page 2: ...f electric shock to persons The exclamation point within an equilateral triangle is intended to alert the user to the pres ence of important operating and maintenance servicing instructions in the literature accom panying the appliance CAUTION TO REDUCE THE RISK OF ELECTRIC SHOCK DO NOT REMOVE COVER OR BACK NO USER SER VICEABLE PARTS INSIDE REFER SERVICING TO QUALIFIED SERVICE PERSONNEL CAUTION RI...

Page 3: ...13 Outdoor Antenna Grounding If an outside antenna or cable system is connected to the video product be sure the antenna or cable system is grounded so as to provide some protection against voltage surges and built up static charges Article 810 of the National Electrical Code ANSI NFPA No 70 provides information with regard to proper grounding of the mast and supporting structure grounding of the ...

Page 4: ...opying broadcasting public performance and lending of discs are prohibited This product incorporates copyright protection technology that is protected by claims of certain U S patents and other intellectual property rights owned by Macrovision Corporation and other rights owners Use of this copy right protection technology must be authorized by Macrovision Corporation and is intended for home and ...

Page 5: ...NTRADA DE S VÍDEO o TOMAS DE ENTRADA DE VÍDEO COMPONENTE 46 CONECTANDO A UN AMPLIFICADOR EQUIPADO CON TOMAS DE ENTRADA DIGITAL TALES COMO PLATINA MD O PLATINA DAT 46 CONECTANDO A UN DESCODIFICADOR DIGITAL DOLBY O DESCODIFICADOR DTS 46 CONECTANDO A UN AUDIO ANALÓGICO 46 PREPARACIÓN 46 PREPARACIÓN DE CANAL AUTOMÁTICA 46 PREPARACIÓN DE RELOJ 47 REPRODUCCIÓN DE UN DISCO 47 REPRODUCIENDO UN DVD VIDEO O...

Page 6: ...top mode DVD On screen display Information about the current operation can be displayed on the TV screen allowing you to confirm the currently active functions such as program playback on the TV screen using the remote control DTS Digital Theater System You can enjoy 5 1 channel surround system developed by the Digital Theater System co which reproduces the orig inal sound as truthfully as possibl...

Page 7: ...o not block the ventilation holes on the sides of the DVD VCR Avoid locations subject to strong vibration or strong magnetic fields Playback S VHS Quasi Playback SQPB Allows you to view a tape recorded in S VHS format Auto Repeat 2 Step Picture Search Operation Index Search Time Search Recording 1Year 7 events including Daily and Weekly Timer Recording OTR One Touch Recording PRECAUTIONS AVOID THE...

Page 8: ... Any other discs without compatibility indications PLAYABLE DISCS DVD Video 12 cm Approx 4 h single sided Approx 80 min single sided 8 cm Logo Maximum Playback Time Contents Disc Type Sound and Pictures Disc Size 74 min Approx 8 h double sided Approx 160 min double sided 12 cm 20 min 8 cm singles Audio CD Sound DVD Data on a DVD is divided into sections called titles and then into subsections call...

Page 9: ...to turn the power on and off 8 POWER Light Lights up when the power is on 9 VIDEO In Jack Connect a video cable coming from the video out jack of a camcorder another VCR or a video source laser disc player video disc player etc here 10 AUDIO In Jacks Connect audio cables coming from the audio out jacks of a camcorder another VCR or an audio source here 11 TIMER SET Button page 21 Press to put the ...

Page 10: ...DVD mode for the remote control You can switch the OUTPUT mode either by pressing the OUTPUT Button on the front panel or by pressing the DVD or the VCR Button on the remote control However if you press the OUTPUT Button on the front panel first you need to re select the corresponding mode by pressing the DVD or the VCR button on the remote control 32 h Button DVD mode Press to view the DVD pictur...

Page 11: ...g tape playback to freeze the picture Press to advance the picture by one frame at a time during still mode 53 SLOW Button page 19 During tape playback press to view the video tape in slow motion Press again to resume normal playback This button does not affect DVD playback 54 VCR TV Button page 21 Use to select VCR or TV position If the VCR TV light appears on the front of the DVD VCR it is in VC...

Page 12: ...tteries and to the component Video In jacks of a televi sion 61 COAXIAL Jack Connect an optional coaxial digital audio cable here and to the Coaxial Digital Audio In jack of a decoder or audio receiver 62 S VIDEO OUT Jack Connect an optional S Video cable here and to the S Video In jack of a television 63 DVD VCR VIDEO OUT Jack Connect the yellow video cable supplied here and to the TV s Video In ...

Page 13: ...E DVD VCR DVD button VCR button OUTPUT button DVD OUTPUT Light VCR OUTPUT Light Press the VCR button on the remote control Verify that the VCR OUTPUT Light is lit OR Press the OUTPUT button on the front panel and then press the VCR Button on the remote control Verify that the VCR OUTPUT Light is lit SWITCHING TO VCR MODE Notes Pressing only the OUTPUT Button on the front panel does not switch the ...

Page 14: ...nect the DVD VCR directly to a TV If the A V cables are connected to a VCR pictures may be distorted due to the copy protection system DVD VCR TO TV CONNECTION 1 Disconnect the AC power cord of the TV from the AC outlet 2 Disconnect the antenna or cable from the TV 3 Connect the antenna or cable to the ANT IN jack of the DVD VCR 4 Connect the DVD VCR to the TV using the coaxial cable 5 Plug the AC...

Page 15: ...VCR TO TV CONNEC TION on page 14 CONNECTING TO AN AMPLIFIER EQUIPPED WITH DIGITAL INPUT JACKS SUCH AS MD DECK OR DAT DECK Use an audio coaxial digital cables not included for the audio connections Connecting to an amplifier equipped with digital input jacks such as MD Deck or DAT Deck Amplifier equipped with digital input jacks MD deck DAT deck etc ANT IN IN DVD VCR OUT DVD VCR AUDIO OUT COMPONENT...

Page 16: ...Dolby Laboratories Notes Be sure to turn off the power to all components in the system before connecting another component Refer to the Owner s Manuals for the components to be connected to the DVD VCR If the output is Dolby Digital audio connect to a Dolby Digital decoder and set Dolby Digital to on for audio output in the setup mode If the output is DTS audio connect to a DTS decoder and set DTS...

Page 17: ...t follow the steps below before attempting to play or record a video tape 1 You need to connect the antenna or cable to the DVD VCR first Then connect the DVD VCR power plug to a standard AC outlet 2 Turn on the TV and set the TV to channel 3 or 4 Now set the CH3 CH4 switch on the back of the DVD VCR to match the channel selected on the TV 3 Turn on the DVD VCR by pressing the POWER button Both th...

Page 18: ...edly Then press the F FWD button 6 Set AM or PM Press the PLAY button or the STOP button repeatedly TO CHANGE THE ON SCREEN LANGUAGE 1 Press the MENU button twice to call up the main menu If you have already set the clock you only have to press it once 2 Select LANGUAGE SELECT by pressing the PLAY or the STOP button Then press the F FWD button 3 Select ENGLISH FRANCAIS or ESPAÑOL by pressing the P...

Page 19: ...annel selected on the TV 3 Begin playback by pressing the PLAY button Tracking adjustment will be done automatically Digital Tracking function when you start playback To adjust the tracking manually press the CHAN NEL o p buttons on the DVD VCR When a tape has reached the end the DVD VCR will automatically rewind the tape to the beginning and eject the tape S VHS Quasi Playback SQPB This unit allo...

Page 20: ......

Page 21: ......

Page 22: ...you play a VHS tape or receive a broadcast on the DVD VCR tuner channel you are watching the current status will appear when you press the DISPLAY button on the remote control When you record a MTS broadcast signal you need to set it to MTS mode 1 When a program is broadcast in stereo STEREO appears When a program is broadcast in second audio SAP appears Although a program may be broadcast in both...

Page 23: ...es may appear distorted and the playback operation may stop In such cases clean the disc and unplug the power cord and then plug it again before resuming playback With DVDs that use titles for playback program signals playback may start from the second title or it may skip these titles During the playback of a two layered disc pictures may stop for a moment This happens when the 1st layer switches...

Page 24: ...USING PLAYBACK OR DISPLAYING A STILL PICTURE 1 Press the PAUSE button during playback Playback will pause with sound muted 2 Press the PLAY button to resume playback CD DVD F B STEPPING THROUGH FRAMES 1 Press the PAUSE button while playback is paused The next picture frame is dis played with sound muted each time the button is pressed 2 Press the PLAY button to resume playback DVD F B RESUMING PLA...

Page 25: ...D TRACK 1 Press the Number buttons to enter the desired track number The selected track will be located and playback will start CD TR 5 PLAYING FROM A DESIRED TITLE OR A CHAPTER TRICKS WITH THE SKIP BUTTONS H G If the SKIP button G is pressed during playback or while playback is paused the current track will be skipped and the next track will start If the SKIP button H is pressed once the beginnin...

Page 26: ...MODE button in stop mode The program setting menu screen will appear 2 Press the MODE button again CD You can define the part to be called back 1 Press the SEARCH MODE button three times during playback Set the marker Using the cursor s B buttons position the cursor on to the marker number shown as NOT SET Press the ENTER button when the screen to be reviewed appears The marked time will be displa...

Page 27: ... program random playback will be per formed repeatedly Notes Repeat playback is not available with some discs The REPEAT setting will be cleared when moving to an other title chapter or track Repeat playback does not function during A B repeat playback You can define a section to be played back repeatedly 1 Press the A B REPEAT button during playback The starting point A will then be selected 2 Pr...

Page 28: ...ck and random playback are not available during program playback Program settings will be cleared when the power is turned off or the disc loading tray is opened Press the MODE button to check the programmed setting The programs will be cleared when you turn the power off 02 05 07 04 10 14 06 15 21 08 20 28 10 25 35 12 30 42 11 34 49 16 40 58 18 45 63 01 03 _ PROGRAM TIME 2 07 43 1 1 RANDOM MODE E...

Page 29: ... albums and tracks will be played from the beginning of the disc Press the TITLE button and the top hierarchy will be called back Albums can be played up to the 8th hierarchy 3 Press the PLAY button Playback will start 4 To stop playing press the STOP button FIRST PLAY ALBUM01 ALBUM02 ALBUM03 ALBUM04 1 15 VOLUME LABEL START PLAY SELECT ENTER RETURN ALBUM11 ALBUM12 ALBUM13 ALBUM14 ALBUM15 ALBUM01 S...

Page 30: ...P3 DISC IN A PROGRAM 2 Use the ARROW buttons L K to select a track Then press the ENTER button to save it in a program When an album name is highlighted press the L button and the next hierarchy is displayed Press the K button to go back to the previous hier archy If the entire program cannot be displayed at once on the screen L appears to go to the next page 3 When the program has been selected p...

Page 31: ...ayed when you first press the AUDIO button If the desired language is not shown after pressing the Audio button several times the disc does not have an audio source in that language The audio language resets to the one which was selected in the setup mode every time the power is turned on or discs are replaced If that language is not available on a disc a language defined by the disc will be selec...

Page 32: ...n the DVD being played The subtitle language cannot be changed if the subtitles are recorded in a single language on the DVD being played Pressing the SUBTITLE button cycles the subtitle language from SUBTITLE 1 SUBTITLE 2 and all the languages recorded The current subtitle mode will be displayed when you first press the SUBTITLE button Press the SUBTITLE button and then press the cur sor s B butt...

Page 33: ...0 03 21 0 02 15 B TR Track Current track number the total number of tracks TIME Elapsed time of the current track and remaining time of the current track 2 Press the DISPLAY button again ALL 4 12 0 13 45 0 45 40 B ALL Current track number the total number of tracks TIME Elapsed time of the current disk and remaining time of the current disc 3 Press the DISPLAY button or the RETURN but ton to exit ...

Page 34: ...udio and the Subtitle button Details are on pages 31 and 32 You can also select an item by entering the number besides it using the Number buttons When you change the setup items press the STOP button if you are in playback mode CHANGING THE SETUP ITEMS LANGUAGE SETTINGS 1 LANGUAGE 2 DISPLAY 3 AUDIO 4 PARENTAL SET UP EXIT SETUP CANCEL RETURN SELECT SET ENTER Please enter a 4 digit Language code SE...

Page 35: ...D DISPLAY SETTINGS 1 LANGUAGE 2 DISPLAY 3 AUDIO 4 PARENTAL SET UP EXIT SETUP CANCEL RETURN SELECT SET ENTER 1 LANGUAGE 2 DISPLAY 3 AUDIO 4 PARENTAL SET UP EXIT SETUP CANCEL RETURN SELECT SET ENTER 1 TV ASPECT 4 3 LETTER BOX 2 PANEL DISPLAY BRIGHT 3 ANGLE ICON ON 4 AUTO POWER OFF ON 5 BACKGROUND BLUE SET UP EXIT SETUP CANCEL RETURN SELECT SET ENTER DISPLAY CONTROLS 1 TV ASPECT 4 3 LETTER BOX 2 PANE...

Page 36: ...m and then press the ENTER button When playing a disc with copyright protection If you select 96 kHz copyright protection will be activated and no sound will come out If you select AUTO sound will be down sampled at 48 kHz 4 Press the SETUP button The setup mode will be canceled and the ordinary screen will appear AUDIO SETTINGS 1 LANGUAGE 2 DISPLAY 3 AUDIO 4 PARENTAL SET UP EXIT SETUP CANCEL RETU...

Page 37: ...d the above Steps 3 5 again 1 Press the SETUP button in STOP mode The setup screen will appear 2 Press the K L buttons to select PARENTAL and then press the ENTER button 3 Press the Number buttons to enter a 4 digit password you can use any 4 digits except for 4737 and then press the ENTER button This number will be used as the password from the second time onward By entering the password you can ...

Page 38: ... 79 80 81 82 83 84 85 86 87 88 89 90 91 92 93 94 95 96 97 98 99 100 101 102 103 104 105 106 107 108 109 110 111 112 113 114 115 116 117 118 119 120 121 122 123 124 125 126 127 128 129 130 131 132 133 134 135 136 No Language Country code Latvian Lettish Malagasy Maori Macedonian Malayalam Mongolian Moldavian Marathi Malay Maltese Burmese Nauru Nepali Dutch DUT Norwegian NOR Occitan Afan Oromo Oriya...

Page 39: ... mode Check if the green VCR OUTPUT light is lit Then set it to the TV position by pressing the VCR TV button The VCR TV light goes off Video or color fades in and out You cannot copy a copyrighted video tape You are experiencing copy guard protection when making a copy of a video tape Cannot remove the tape Check if the player is in the VCR mode If not press the VCR button on the remote control t...

Page 40: ...y need to be cleaned 1 Please visit your local Audio Video store and purchase a good quality VHS Video Head Cleaner 2 If a Video Head Cleaner does not solve the problem please call our help line at 1 800 242 7158 to locate an Authorized Service Center NOTES Remember to read the instructions included with the video head cleaner before use Clean video heads only when problems occur IF THE LASER OPTI...

Page 41: ... VHF Channel 3 or 4 Power source 120 V AC 10 60 Hz 0 5 Power consumption 25 W standby 7 2 W Operating temperature 5 C to 40 C Dimensions W 17 1 8 435 mm H 4 99 mm D 10 1 2 266 mm Weight 8 8 lbs 4 kg Designs and specifications are subject to change without notice If there is a discrepancy between languages the default language will be English ...

Page 42: ...order otro VCR o una fuente de videó reproductor de discos láser reproductor de cintas de videó etc 10 Tomas AUDIO IN Conecte aquí cables de audio procedentes de las tomas de sali da de audio de un camcorder otro VCR o una fuente de audio 11 Botón TIMER SET Presione para poner el DVD VCR en modo de espera para una grabación con temporizador 12 Luz CASSETTE IN Se enciende cuando un cassette está en...

Page 43: ...n de un DC de Audio Modo VCR Presione para rebobinar la cinta o para ver la ima gen rápidamente en inversión durante el modo de reproducción Búsqueda en Rebobinado Presione para cancelar un ajuste de programa con tempo rizador Presione para corregir dígitos cuando ajuste programa Por ejemplo ajuste de reloj o programa con temporizador Presione para añadir o cancelar números de canal durante preaju...

Page 44: ...s Modo VCR ANT IN DVD VCR OUT DVD VCR AUDIO OUT COMPONENT VIDEO OUT L L Y Cr COAXIAL S VIDEO OUT DIGITAL AUDIO OUT PCM BITSTREAM Cb R R AUDO VIDEO CH3 CH4 ANT OUT IN 6766 65 64 63 62 61 58 57 59 60 Presione para cambiar canales de TV en la DVD VCR 56 Botón AUDIO Presione para seleccionar un idioma de audio deseado o modo de sonido 57 Cordón de Alimentación AC Conecte a una toma de corriente AC est...

Page 45: ... DVD Botón VCR Botón OUTPUT Luz DVD OUTPUT Luz VCR OUTPUT Presione el Botón VCR en el control remote Verifique que la Luz VCR OUTPUT está enendida O Presione el Botón OUTPUT en el panel delantero y luego presione el Botón VCR en el control remote Verifique que la Luz VCR OUTPUT está encendida CAMBIO AL MODO VCR Notas Presionando sólo el Botón OUTPUT en el panel delantero no cambia el modo del cont...

Page 46: ...ste su TV al mismo canal AJUSTANDO EL CONMUTADOR CH3 CH4 CONEXIONES CONECTANDO A UN AMPLIFICADOR EQUIPADO CON TOMAS DE ENTRADA DIGITAL TALES COMO PLATINA MD O PLATINA DAT Por favor vea la Fig 4 en la página 15 para detalles Por favor vea la Fig 1 en la página 14 para detalles Por favor vea la Fig 2 en la página 14 para detalles CONECTANDO A UN DESCODIFICADOR DIGITAL DOLBY O DESCODIFICADOR DTS Por ...

Page 47: ... Presione PLAY o STOP repetidamente Luego presione F FWD 5 Ajuste el minuto Presione PLAY o STOP repetidamente Luego presione F FWD 6 Ajuste el AM o PM Presione PLAY o STOP repetidamente REPRODUCIENDO UN DVD VIDEO O UN CD AUDIO Para empezar Conecte la alimentación del TV amplificador y cualquier otro componente que se encuentre conectado al DVD VCR Cambie el sistema de entrada para que se adapte D...

Page 48: ... faulty installation improper maintenance commercial use such as hotel rental or office use of this product or damage which results from fire flood lightning or other acts of God THIS WARRANTY DOES NOT COVER PACKING MATERIALS ANY ACCESSORIES EXCEPT REMOTE CONTROL ANY COSMETIC PARTS COMPLETE ASSEMBLY PARTS DEMO OR FLOOR MODELS FUNAI CORP AND ITS REPRESENTATIVES OR AGENTS SHALL IN NO EVENT BE LIABLE...

Reviews: