background image

 15

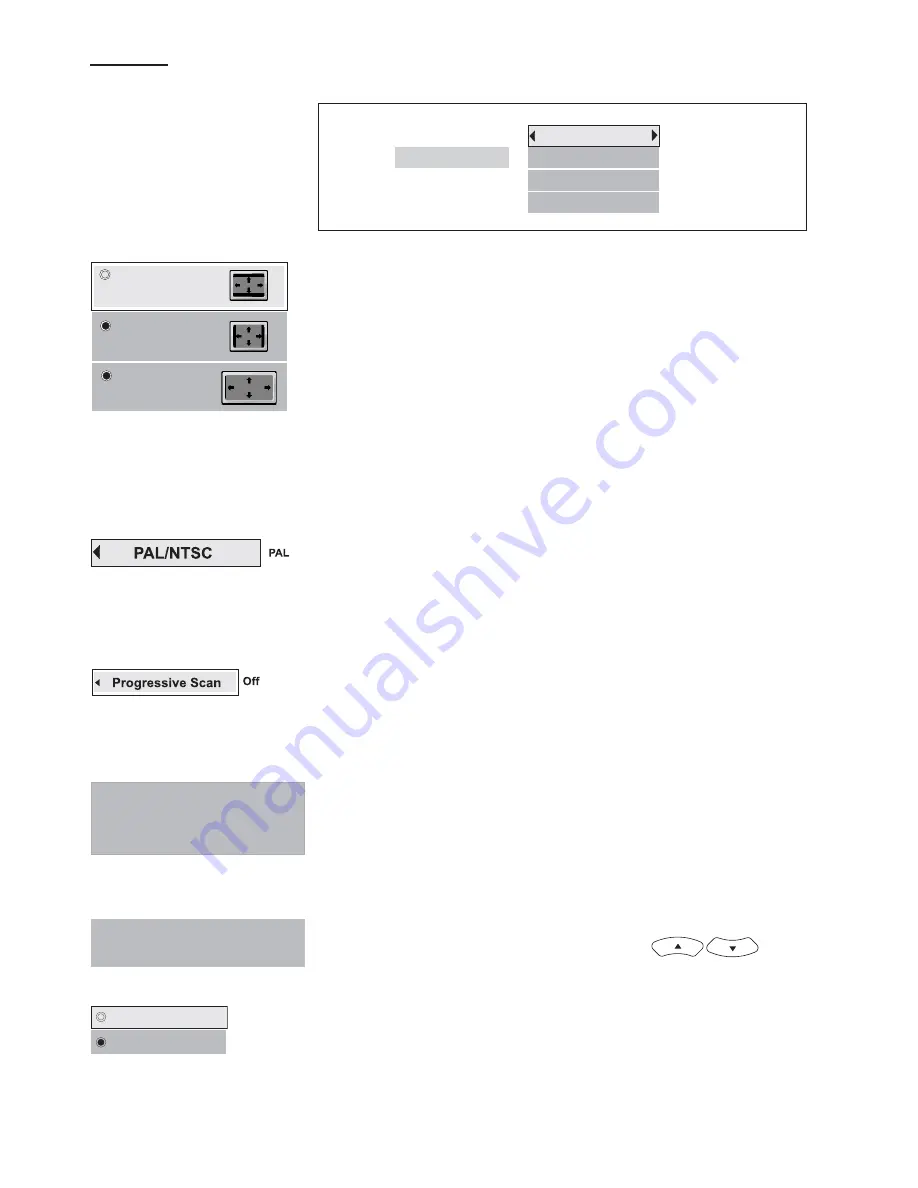
PAL/NTSC

Press OK to select between PAL or NTSC output to match your TV or other

equipment.

DISPLAY

TV Image

Three options available: 1) 4x3 Letter Box, 2) 4x3 Standard & 3) 16x9 Wide

Screen. Press OK to select a suitable one.

Select TV Image according to your TV type.

If you have a wide-screen (16:9) TV, select “16x9 Widescreen”

- for 16:9 movie, you will have full screen viewing.

- for 4:3 movie, black bars show on left and right sides of screen.

For conventional 4:3 TV,

- if you select 4x3 Letter Box for 16:9 movie, black bars show on top and

bottom of screen.

- if you select 4x3 Standard for 16:9 movie, left and right edges of the

screen are hidden.

- if you select either 4x3 Letter Box or 4x3 Standard for 4:3 movie, you will

have full screen viewing.

4 x 3 Letterbox

4 x 3 Standard

16 x 9 Widescreen

Display

TV Image

PAL/NTSC

Progressive Scan

Progressive Scan

4x3 Letterbox

NTSC

Off

Video

Component

The setting will change to Progressive Scan ON.
Incorrect setting of this item can distort the picture or no video
can be observed after proceeding this step. To retrieve correct
video output, you can press V.SELECT key several times.

Do you want to continue?
No, switch to Component output.
Yes, switch to Progressive Scan output.

Does your TV support Progressive Scan mode? and
Have you connected the Component Video Output cable to your TV
and your TV has set up accordingly?

Yes

No

Progressive Scan

By displaying all the lines of a picture simultaneously (instead of displaying odd

and even lines alternatively such as a conventional TV), Progressive Scan greatly

enhances picture resolution while minimizing distortion and flickering. 

To use

this feature, your TV must be Progressive Scan compatible with

Component Video input jacks connected to the DVD unit.

1. Set your unit to PAL output mode.

2. Select the Progressive Scan option and press OK (or V.Select on the

remote control) to activate.

3. A caution message will display.  Press OK to continue.

Caution:

 If you see distorted or no picture after pressed OK, then check the following:

i)

Your TV may not be Progressive Scan compatible. Wait a few seconds and

the unit will have return to the previous setting automatically.

ii)

Make sure your TV is connected with Component Video output from the DVD

unit and is now switched to view such input through which Progressive Scan

signals are transmitted . There will be no video signal from AV output, in case
you have both Component Video and AV connections.

4. A message requesting for confirmation will appear on screen. Select Yes

(confirm) or No (return to previous setting) by 

 and press

OK to confirm.

Video Output

Press OK to select between Component Output, and S-Video output to
match the video output of your DVD unit.

Component

S-Video

Summary of Contents for AV400

Page 1: ...OWNER S MANUAL AV400 Visit our web site at www emersonradio com Home Theater System with DVD Audio CD R RW Player and AM FM Digital Tuning Receiver AV400 IB Rev pages p65 3 5 2005 16 54 28 ...

Page 2: ...1 SAFETY To ensure proper use of this product please read this owner manual carefully and retain for future reference Should the unit require maintenance contact an authorized service location ...

Page 3: ...tus has been exposed to rain or moisture does not operate normally or has been dropped Apparatus shall not be exposed to dripping or splashing and that no objects filled with liquids such as vases shall be placed on the apparatus Disc Tray Keep your fingers well clear of the disc tray as it is closing It may cause serious personal injury Burden Do not place a heavy object on or step on the product...

Page 4: ...thattheuserswitchtheconnectiontothe standard definition output IftherearequestionsregardingourTVsetcompatibilitywiththismodel525pand 625pDVDplayer pleasecontactourcustomerservicecenter ThisproductincorporatescopyrightprotectiontechnologythatisprotectedbyU S patents andotherintellectualpropertyrights Useofthiscopyrightprotectiontechnologymustbe authorizedbyMacrovision andisintendedforhomeandotherli...

Page 5: ...oth sides They play for approximately 8 HOURS DVD discs have Titles and Chapters There can be several Titles on one disc and each Title can contain several Chapters Titles and Chapters are numbered e g Title 1 Title 2 etc Chapter 1 2 3 etc Usually Title one will show the disc publisher and studio logos The next Title will be the film Other Titles contain trailers for other films production notes o...

Page 6: ...s external AV inputs press repeatedly 16 SURROUND selects Surround modes or Soundfield modes 17 SLEEP sets the Sleep auto off timer function 18 TONE selects EQ modes 19 EXIT exits menus and Active Navigation mode 20 MENU 1 enters Disc Contents Menu in DVD mode 2 enters System Setup for SPEAKER settings in all other modes 21 TUNER selects Tuner mode switches between AM and FM bands 22 OK 1 enters o...

Page 7: ...cy in Tuner mode 5 SKIP 1 skips to next chapter track in DVD CD mode 2 tunes to a higher frequency in Tuner mode 6 1 Starts playing in DVD CD mode 2 Saves preset channel mode in Tuner mode 7 FUNC Switches between AV mode Tuner mode AUX mode and DVD mode 8 VFD Display 9 Infra Red Receiver Window 10 VOLUME Adjusts the master volume Turn clockwise to increase the volume and counter clockwise to decre...

Page 8: ...rce 2 Audio Inputs For connecting audio Left Right input signals from auxiliary sources such as VCR TV or Satellite Receiver and playing them through this Home Theater System These connections are labelled AUX1 and AUX2 and are selected by the FUNC button on the front panel 3 Video Inputs For connecting video signals from the corresponding video out jacks on the axillary items such as a TV VCR or ...

Page 9: ... connecting the left surround speaker to SL terminals and right surround speaker to SR terminals Connect the colored wire to and black wire to 10 Subwoofer Speaker For connecting the passive subwoofer with colored wire to terminal and black wire to terminal 11 Center Speaker For connecting the center speaker with colored wire to terminal and black wire to terminal 12 Front Speaker For connecting t...

Page 10: ...nd all optional equipment have been connected 1 Video Connections For good picture quality use the RCA VIDEO CABLE Included NOTE When in AV1 or AV2 mode only composite video sources will have video output signal therefore connect only RCA video output or TV Out to your TV sets NOTE Not all TVs have S Video or Component Video Input jacks For better picture quality use S VIDEO CABLE not included For...

Page 11: ...colored wire for positive and black wire for negative To prevent damage to circuits never short circuit the positive and negative speaker output terminals 2 Audio Connections VCR AUDIO IN VCR AUDIO IN VCR AUDIO OUT VCR AUDIO OUT TV AUDIO OUT TV AUDIO OUT Example EXTERNAL DECODER OPTIONAL Example EXTERNAL DECODER OPTIONAL COAXIAL IN COAXIAL IN 1 FRONT LEFT SPEAKER 2 FRONT RIGHT SPEAKER 4 SURROUND L...

Page 12: ... too far into the speaker connectors Insert the wire to the jack behind of the Speaker The above connections can be expressed by the below table FRONT LEFT FRONT RIGHT CENTER SURROUND RIGHT REAR SURROUND LEFT REAR SPEAKERS Use Wires Note always connect colored wire to colored speaker terminal always connect black wire to black speaker terminal Unit Terminals L White L Black R Red R Black C Green C...

Page 13: ...e This will set up all the functions on your theater You only need to do this when you first install your Home Theater If you choose to watch the movie you can find out about DVD options and navigation of the DVD disc in the section Playing a DVD disc and onward Placement of speakers play an important role in the reproduction of surround sound Particular attention should be taken when designing th...

Page 14: ...browse and make selections in the menus Example shows how to select French as Disc menus language in the Languages menu Select Disc Menus Open Languages Select Languages x5 Select French Open Disc Menus Confirm French Audio Player Menus Subtitles Disc Menus Spanish German Portuguese English Italian Swedish French Audio Player Menus Subtitles Disc Menus Spanish German Portuguese English Italian Swe...

Page 15: ...t memorize this password in order to change it in future Change Password Change your existing password to a new one using the numeric keys to replace the existing one Rated Titles DVD discs have parental levels assigned to them The range of parental controls are from 1 to 8 The player can be set in a similar way by pressing If the unit s rating limit is set to 8 it will play all discs If the playe...

Page 16: ...de and Have you connected the Component Video Output cable to your TV and your TV has set up accordingly Yes No Progressive Scan By displaying all the lines of a picture simultaneously instead of displaying odd and even lines alternatively such as a conventional TV Progressive Scan greatly enhances picture resolution while minimizing distortion and flickering To use this feature your TV must be Pr...

Page 17: ...y pressing and press OK to confirm setting and exit the menu Center Surround Front Front Speaker Distance 3 meter Distance Volume dB 0 Center Speaker SOUND Dynamic Range Compression DRC Press OK to turn on off This controls the Dynamic Range Compression DRC for night time listening DRC reduces the difference between normal voices and sounds such as like explosion to avoid waking your neighbours Th...

Page 18: ...nnel input signals It allows the user to gradually adjust the soundfield either towards the front or towards the rear If a recording is too spacious or strong from the surrounds it can be adjusted forward to get a better balance Likewise if a stereo recording is somewhat too mono or narrow sounding it can be adjusted toward the rear to get a more enveloping immersing result Center Width Dimension ...

Page 19: ...fault language for disc menus Press OK to confirm selection Audio Select amongst the 7 languages if available on disc as the default audio language Press OK to confirm selection Subtitle Select among the 7 languages if available on disc as the default subtitle language Press OK to confirm selection French Spanish German English French Spanish German English French Spanish German English ...

Page 20: ...peaker Indicator will disappear on the display and the MUTE icon appears Press MUTE or the volume button on the remote or volume knob on the front panel to restore the speakers output Hz M General Operation Selecting Surround Output Modes The number of output modes varies according to the system setup and the input sources Press SURROUND repeatedly on the remote control to select the different sur...

Page 21: ...s analog signal It is not a surround format so it does not require surround speakers Soundfield Effects The digital Soundfield Effects recreates the effects of sounds reflected from walls or ceilings to obtain the sound presence of real environments Stadium recreates a large stadium using very long reverberation times Stage recreates a stage environment emphasizing sound from the front speakers Ha...

Page 22: ...Mono mode This will normally improve the reception but the sound will no longer be in stereo Preset Stations When a preset station is selected the preset number will appear next to the frequency on the display Selecting Preset Stations 1 In tuner mode press TUNER to switch between AM and FM band if necessary 2 Press OK then use the remote s numeric keys or to select desired preset station Storing ...

Page 23: ...Sleep Timer press SLEEP repeatedly until SLEEP OFF is displayed Playing DVD CDs 1 To play DVD CD disc press to open the disc tray 2 Load disc onto the tray with the label side facing upward 3 Press to close the tray The disc will start playing automatically There may be a short delay before playing while the player reads the menu from the disc When DVD CD Disc is playing Pause Slow Motion and Fram...

Page 24: ...time you want to play from by using the numeric key Associated scene will be played on screen Press to select the title track you want to play 00 33 10 T 01 T 01 C 12 Press to select the chapter of DVD you want to play Press to select the screen fit option Normal Enhanced or Maximum according to the availability on disc Press to select subtitle language according to the availability on disc Press ...

Page 25: ...elected and proceeds to display all the JPEG files in the same folder It then goes onto the JPEG files in the subfolders contained in the same folder MP3 files along with JPEG files The player begins the slideshow with the JPEG files in the currently selected folder At the same time it plays the selected MP3 file following the music only playback The slideshow stops when the picture playback has f...

Page 26: ...o make menu selections without interrupting the playing MP3 WMA files only Press to select a play mode Standard Program Random Track Repeat Folder Repeat and Disc Repeat MP3 My favorite song JPEG Play Mode Standard SSS PLAY 00 15 20 MP3 PLAY MP3 My favorite song JPEG My best picture IMAGE Slideshow Speed Normal 00 15 20 SS Timer Display the discs current playback time Play Mode Selection Press rep...

Page 27: ... files in MP3 format As for CD R MP3 discs please follow all the recommendations for CD R above along with the comments below Your MP3 files should be ISO 9660 or JOLIET format ISO 9660 format and Joliet MP3 files are compatible with Microsoft s DOS and Windows as well as with Apple Mac These two formats are the most widely used MP3 filenames should not exceed 12 characters and should end with the...

Page 28: ...sampling rate that is conversion to WMA format of at least 32kB sec and up to 160kB sec Choosing higher rates such as 192 kB sec or more only rarely produces even better sound quality Conversely files with sampling rates below 32kB sec will not play properly Supported Formats WMA 7 0 WMA 8 0 WMA 9 0 WMA Files MPEG4 Files For MPEG 4 Video file format only stereo output will be available As for CD R...

Page 29: ...y 7 Number Key 6 Number Key 4 Number Key 1 and Number 8 on Remote Control in order FUNCTION DISTURBED The normal function of the product may be disturbed by external interference Just reset the product disconnecting and reconnecting the power cord might be required to resume normal operation NO POWER Check if the on off button on the front of the player is set to on Check if plug of the AC cord is...

Page 30: ...calling for product service Model Number AV400 Serial Number TO FIND THE LOCATION AND PHONE NUMBER OF YOUR NEAREST SERVICE CENTER PERMITTED TO PERFORM WARRANTY CALL TOLL FREE 1 800 695 0098 SERVICE R FOR ADDITIONAL SET UP OR OPERATING ASSISTANCE PLEASE CALL 1 800 898 9020 FOR CUSTOMER SERVICE PLEASE WRITE TO Emerson Radio Corp Consumer Affairs Dept 5101 Statesman Drive Irving TX 75063 AV400 IB pag...

Page 31: ...he serial number has been defaced modified or removed Damage to equipment not properly connected to the product Cost incurred in shipping your unit to and from an authorized Depot Repair Facility Ordinary adjustments which you can perform as outlined in the owner s manual Signal reception problems caused by external antenna or cable systems Products purchased used serviced or damaged outside of th...

Page 32: ...EMERSON Part No 16 2991 507 04 Printed in China R AV400 IB pages p65 29 4 2005 15 45 31 ...

Reviews: