

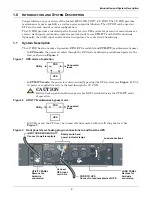


Rack Mount Installation
4
2.0
R
ACK
M
OUNT
I
NSTALLATION
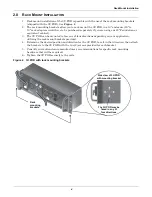
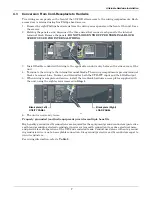
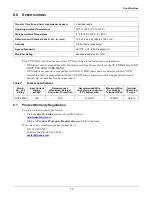
1. Rack mount installation of the 3U POD is possible with the use of the rack mounting brackets
(shipped with the 3U POD). See
Figure 4
.
2. The rack mounting brackets allow you to rack mount the 3U POD in a 19" enclosure (23" to
19" rack adapters would have to be purchased separately if you are using our 23" Foundation or
equivalent cabinet).
3. The 3U POD can be mounted to face one of four directions depending on your application,
utilizing the rack mount brackets provided.
4. Determine the desired position and direction for the 3U POD, face it in that direction, then attach
the brackets to the 3U POD with the two (2) screws provided for each bracket.
5. Consult your rack/enclosure manufacturer’s recommendations for specific rack mounting
hardware that will be required.
6. Tighten the 3U POD securely to the rails.
Figure 4
3U POD with rack mounting brackets
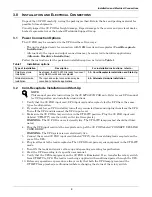
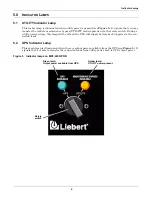
UPS
AVA
ILABLE
MAINTENANCE
BYP
ASS
AVAILABLE
UTILITY
UPS
OUTPUT
16A/208V~
OUTPUT
16A/208V~
OUTPUT
12A/208V~
ON
OFF
CONNECT TO
UPS OUTPUT
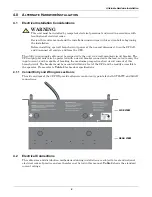
IF U
TILITY
LAM
P IS ILLU
MIN
ATED
MAIN
TEN
ANCE B
YP
ASS
POSITION
MAY
BE SELECTED
SW
ITC
H TO
UPS PO
SITIO
N O
NLY
WH
EN U
PS
LA
MP IS
ILLU
MIN
ATED
16A
/208V~
CO
NNEC
T UP
S
LIN
E CO
RD
HER
E
CA
UTIO
N
LOAD
UTILITY
Rack
mounting
brackets
The 3U POD may be
faced in any of
four directions
Side view of 3U POD
with mounting bracket
Summary of Contents for 3U MP2-220N POD
Page 1: ...POWER AVAILABILITY 3U MP2 220N POD USER MANUAL Power Output Distribution 208 Volt 16 Amp ...
Page 2: ......
Page 4: ...ii ...
Page 16: ...Specifications 12 ...
Page 17: ......


